background image

35 

ATENCIÓN!

 Inmediatamente después de recibir un dispositivo, desempaque cuidadosamente la caja de cartón, compruebe el 

contenido para asegurarse de que todas las partes están presentes, y se han recibido en buenas condiciones. Notifique 
inmediatamente al transportista y conserve el material de embalaje para la inspección por si aparecen daños causados por el 
transporte o el propio envase muestra signos de mal manejo. Guarde el paquete y todos los materiales de embalaje. En el 
caso de que deba ser devuelto a la fábrica, es importante que el aparato sea devuelto en la caja de la fábrica y embalaje 
originales. Si el aparato ha estado expuesto a grandes cambios de temperatura (tras el transporte), no lo enchufe 
inmediatamente. La condensación de agua producida podría dañar su aparato. Deje el dispositivo apagado hasta que se haya 
alcanzado la temperatura ambiente. 
 

En la etiqueta de la parte trasera del controlador se indica el tipo de fuente de alimentación que debe ser conectado. 
Compruebe que la tensión de red corresponda a esto, todos los otros voltajes a la especificada, puede causar efectos 
irreparable. El producto también debe estar conectado directamente a la red para ser utilizado. No en ninguna fuente de 
alimentación o dimmer ajustable. 

 
Conecte siempre el producto a un circuito protegido (disyuntor o fusible). Asegúrese de 

qu’el

 producto tiene una 

toma de tierra adecuada para evitar el riesgo de electrocución o incendio. 


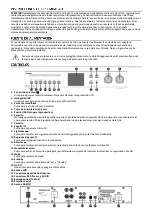
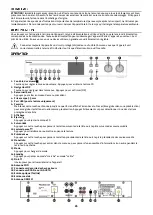
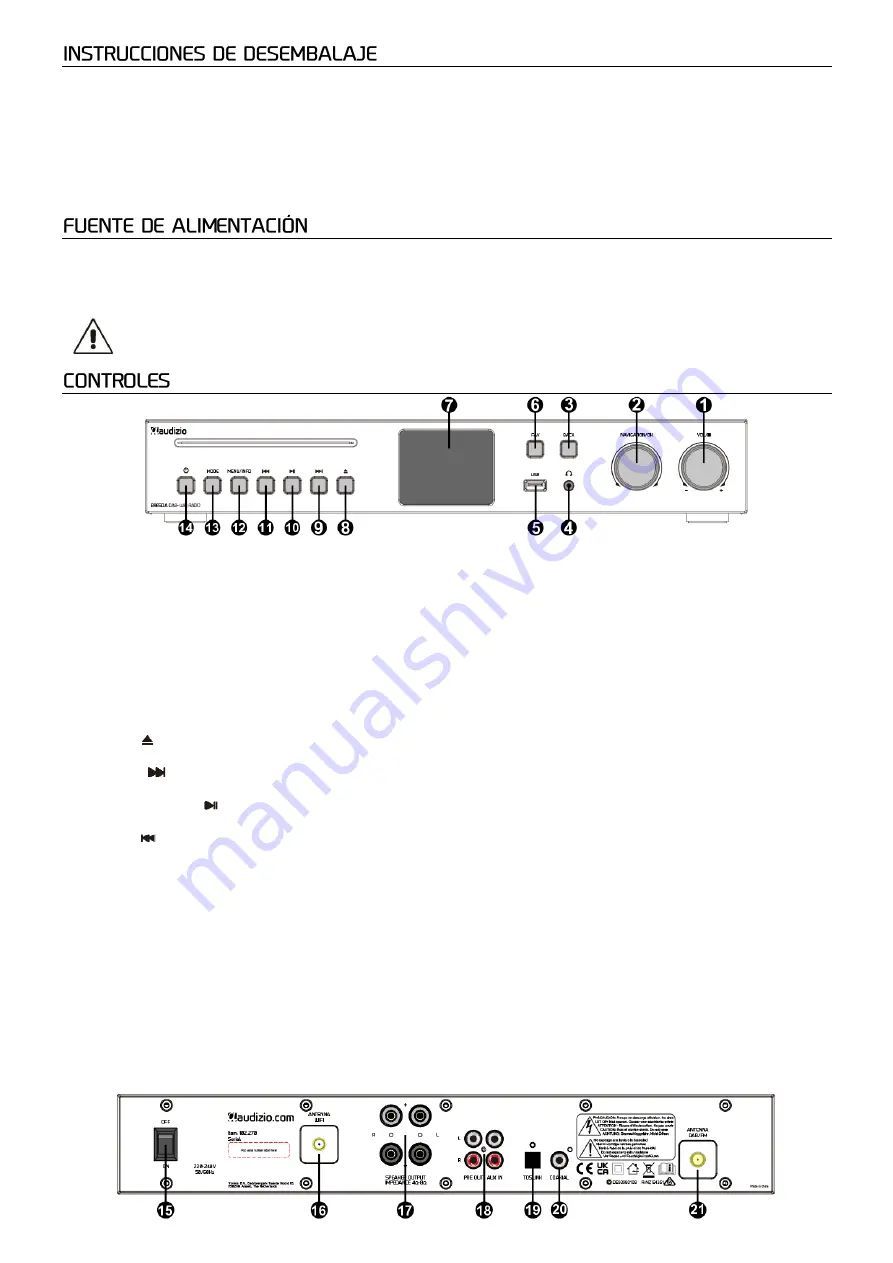
1.


Control de volumen /


Gire para ajustar el nivel de volumen. Pulse para detener la reproducción CD 

2.


Navegación/OK 

Gire para navegar por los menús. Pulse para confirmar (OK) 

3.


Volver/retorno/back 

Pulse para ir al nivel de menú anterior 

4.


Toma de auriculares de 3,5 mm 

5.


Puerto USB (sólo para reproducción) 

6.


Favorito 

Mantenga pulsado hasta que la pantalla muestre la pantalla Guardar en preselección para almacenar la emisora actual 
como preselección. Pulse brevemente para seleccionar una de las emisoras preseleccionadas de la lista 

7.


Pantalla 

8.


Expulsar   

Pulse para expulsar el disco CD 

9.


Siguiente 


Pulse para cambiar a la siguiente emisora de la lista/siguiente pista en las fuentes multimedia


10.


Reproducir/pausar


Pulse para reproducir/pausar la reproducción


11.


Anterior   

Pulse para cambiar a la emisora anterior de la lista/pista anterior en las fuentes multimedia


12.


Menú/información 

Pulse para entrar en el menú o para pasar por diferentes conjuntos de información mientras se reproduce un canal 

13.


Modo 

Pulse para cambiar de modo 

14.


Standby 

Pulse para cambiar entre el modo "on" y "standby" 

15.


On/off 

Interruptor para encender y apagar el dispositivo 

16.


Antena WIFI 

17.


Conectores de salida de altavoces 

18.


Conectores RCA Pre out y AUX IN 

19.


Entrada óptica (Toslink) 

20.


Entrada coaxial 

21.


Antena DAB/FM 

Содержание Brescia 102.270

Страница 1: ...Ref nr 102 270 102 272 INSTRUCTION MANUAL GEBRUIKSAANWIJZING BEDIENUNGSANLEITUNG MANUAL DE INSTRUCCIONES MANUEL D INSTRUCTIONS V1 2 ...

Страница 2: ...2 ...

Страница 3: ...ANNING 15 BEDIENING 15 AFSTANDSBEDIENING 16 VOORDAT JE BEGINT 16 AAN DE SLAG 16 MODUS SELECTIE 16 AUDIO AFSPELEN 16 MENUNAVIGATIE 16 PRESETS 17 INSTELLINGEN 17 INTERNET RADIO 19 PODCASTS 19 DAB RADIO 20 FM RADIO 20 CD 21 USB 21 AUXILIARY 22 BT STREAMING AUDIO 22 OPTICAL TOSLINK 22 COAXIAL 22 ALARM SLAAPTIMER 22 SPOTIFY CONNECT 23 DEUTSCH 24 AUSPACKEN 25 NETZANSCHLUSS 25 BEDIENUNG 25 FERNBEDIENUNG ...

Страница 4: ...SB 41 AUXILIARY 42 BT STREAMING AUDIO 42 OPTICAL TOSLINK 42 COAXIAL 42 ALARM SLEEP TIMER 42 SPOTIFY CONNECT 43 FRANÇAIS 44 DEBALLAGE 45 ALIMENTATION 45 OPÉRATION 45 TÉLÉCOMMANDE 46 AVANT DE COMMENCER 46 COMMENCER 46 SÉLECTION DU MODE 46 LECTURE AUDIO 46 NAVIGATION DE MENU 46 PRESETS 47 PARAMÈTRES 47 RADIO INTERNET 49 PODCASTS 49 DAB RADIO 50 FM RADIO 50 CD 51 USB 51 AUXILIARY 52 BT STREAMING AUDIO...

Страница 5: ...om a specialist Do not force the controls This unit is with speaker inside which can cause magnetic field Keep this unit at least 60cm away from computer or TV If this product has a built in lead acid rechargeable battery Please recharge the battery every 3 months if you are not going to use the product for a long period of time Otherwise the battery may be permanently damaged If the battery is da...

Страница 6: ...e used No dimmer or adjustable power supply Always connect the device to a protected circuit circuit breaker or fuse Make sure the device has an appropriate electrical ground to avoid the risk of electrocution or fire 1 Volume control Rotate to adjust the volume level Press to stop CD playback 2 Navigation OK Rotate to navigate the menus Press to confirm OK 3 Back Press to go to previous menu leve...

Страница 7: ...zard is launched automatically From the Main Menu select a mode and press OK Alternatively use the navigation knob to switch to different modes After just a moment the radio switches to that mode The last used station or track previously used in that mode is selected If this is not possible radio scans for relevant stations networks or prompts the user for input The common controls for audio playb...

Страница 8: ...selected network If connecting fails the device returns to a previous screen to try again To exit the process use the BACK MENU button If the network connection is lost the device reconnects automatically PBC Wlan setup Wi Fi Protected Setup The device prompts you to press the connect button on the router and then press the select control For more information on setting up a PBC Wlan encrypted net...

Страница 9: ...ion Disconnecting power during software update may permanently damage the unit Setup wizard This allows you to run the Setup wizard at any time Info Shows details of the current system including software version number Radio ID and the name by which the radio is identified on a network Privacy Policy Displays a privacy notice guiding you to our website for full details of the Frontier Smart Techno...

Страница 10: ... lists and submenus can change from time to time LOCAL Presents a sub menu to search for podcasts using a variety of categories for example comedy of the week authors popular etc Choose the required category and either a further list of sub categories is shown or if there is no further sub category the available podcasts for the chosen category are listed SEARCH You can also search for podcasts wi...

Страница 11: ...st Station order You can choose the order of the DAB station list to be either Alphanumeric or Ensemble Ensemble lists groups of stations that are broadcasted together on the same ensemble Valid lists valid stations first alphanumerically then off air stations To change station order select Menu Station order then Alphanumeric or Ensemble To enter FM Radio mode either press MODE and rotate the nav...

Страница 12: ...D playing USB mode plays audio from an external source such as an MP3 player To enter USB mode either press MODE and rotate the navigation knob until USB is displayed or select Menu Main menu USB USB functions To skip between tracks use the PREVIOUS or NEXT buttons on the radio or the remote Press PAUSE PLAY using the button on the device or remote control to play or pause To rewind fast forward w...

Страница 13: ...d On the now playing screen the remaining sleep time is displayed at the bottom of the display Alternatively select Menu Main menu Sleep and choose the desired sleep time option Once you have selected a sleep time period the system returns to the main menu Press and hold MENU to return to the now playing screen To cancel a selected sleep timer select Sleep OFF from the sleep options using either o...

Страница 14: ...orden gevolgd Het apparaat buiten bereik van kinderen houden Bovendien mag het apparaat nooit onbeheerd gelaten worden Gebruik geen schoonmaakspray om de schakelaars te reinigen Restanten van deze spray zorgen ervoor dat smeer en stof ophopen Raadpleeg bij storing te allen tijde een deskundige Gebruik geen overmatige kracht bij het bedienen van het apparaat Dit apparaat kan magnetisch veld veroorz...

Страница 15: ...kschakelaar of zekering Zorg ervoor dat het apparaat voldoende elektrisch is geaard om het risico op elektrocutie of brand te vermijden 1 Volumeregelaar Draai aan deze knop om het volume te regelen Indrukken om de CD weergave te stoppen 2 Navigation OK Draaien om door de menu s te navigeren Indrukken om te bevestigen OK 3 Back Indrukken om naar het vorige menuniveau te gaan 4 Hoofdtelefoonaansluit...

Страница 16: ... uitsluitend de meegeleverde VDE stekker om het apparaat op een huishoudelijk stopcontact aan te sluiten Als het apparaat voor de eerste keer wordt opgestart wordt automatisch de setup wizard gestart Selecteer een modus in het hoofdmenu en druk op OK U kunt ook de navigatieknop gebruiken om naar een andere modus over te schakelen Na slechts een ogenblik schakelt de radio over naar die modus De laa...

Страница 17: ...adloze netwerken en presenteert een lijst met SSID s Service Set Identifier voor de netwerken Het toestel onthoudt inloggegevens voor de laatste vier draadloze netwerken waarmee het verbinding heeft gemaakt en zal automatisch verbinding maken met deze netwerken wanneer ze beschikbaar zijn Als de verbinding met een netwerk tijdelijk wordt verbroken maakt het toestel automatisch opnieuw verbinding O...

Страница 18: ...e Taal De standaardtaal is Engels Om te wijzigen ga naar Menu System settings Languages om uw voorkeurstaal te selecteren Fabrieksreset Reset alle gebruikersinstellingen naar de standaardwaarden Tijd datum netwerkconfiguratie en voorinstellingen gaan verloren De huidige softwareversie van de radio blijft echter behouden Om een fabrieksreset uit te voeren selecteert u Menu System settings Factory r...

Страница 19: ...an stations gedefinieerd door hun oorsprong land genre of taal Navigeer door de categorie opties Zodra u uw keuze hebt gemaakt bevestigt een scherm de door u gekozen categorie en het aantal zenders binnen die categorie Om de lijst te zien selecteert u de optie die het aantal beschikbare stations weergeeft INFORMATIE Terwijl de stream speelt toont het scherm zijn naam en beschrijving Als er informa...

Страница 20: ...ar de volgende zender in de zenderlijst te gaan INFORMATIE Terwijl de stream speelt toont het scherm de naam en DLS Dynamic Label Segment informatie die real time informatie geeft zoals programmanaam titel van het nummer en andere details Stereo uitzendingen worden aangegeven met een pictogram boven aan het scherm Om meer informatie te bekijken drukt u op INFO Telkens wanneer u op drukt wordt een ...

Страница 21: ...n muzieknummers te wisselen gebruikt u de VORIGE of VOLGENDE knoppen op de radio of de afstandsbediening Druk op AFSPELEN PAUZEREN op het apparaat of de afstandsbediening om af te spelen of te pauzeren Om binnen het huidige muzieknummer terug verder te spoelen houdt u de VORIGE of VOLGENDE knoppen op de afstandsbediening ingedrukt en laat u deze los wanneer u het afspelen wilt hervatten Om de CD u...

Страница 22: ...schikbare BT apparaten Bediening via radio In de BT modus kunt u pauzeren afspelen en naar volgende vorige nummers springen met de daarvoor bestemde knoppen op de radio Optische modus speelt audio af van een externe bron zoals MP3 spelers Zet het volume zachter op zowel dit toestel als indien instelbaar op het bronapparaat om te voorkomen dat het volume plotseling te hard wordt Sluit de externe au...

Страница 23: ... een icoon linksonder in het display Op de ingestelde tijd zal het alarm afgaan Om het tijdelijk uit te zetten drukt u op OK Door herhaaldelijk op OK te drukken doorloopt u de beschikbare sluimerperiodes 5 min 10 min 15 min en 30 min De radio keert terug naar standby voor de ingestelde periode met knipperend het gedempte alarmicoon en een aftelling van de resterende snooze periode Na de ingestelde...

Страница 24: ...rät niemals unbeaufsichtigt lassen Die Regler nicht mit Reinigungssprays reinigen Diese hinterlassen Rückstände die zu Staub und Fettansammlungen führen Bei Störungen immer einen Fachmann um Rat fragen Das Gerät nur mit sauberen Händen bedienen Das Gerät nicht mit Gewalt bedienen Dieses Gerät kann dazu führen Magnetfeld Halten Sie das Gerät mindestens 60 cm vom Computer oder Fernseher Wenn dieses ...

Страница 25: ...stärkeregler Drehen Sie um die Lautstärke einzustellen Drücken um die CD Wiedergabe zu stoppen 2 Navigation OK Drehen Sie um durch die Menüs zu navigieren Drücken Sie zur Bestätigung OK 3 Zurück Drücken Sie um zur vorherigen Menüebene zu gelangen 4 Kopfhöreranschluss 3 5 mm 5 USB Eingang nur zur Anzeige 6 Favorit Halten Sie die Taste gedrückt bis auf dem Display Save to Preset angezeigt wird um de...

Страница 26: ...bene Spannung mit der in Ihrer Region verwendeten Spannung übereinstimmt Verwenden Sie für den Anschluss des Geräts an eine Haushaltssteckdose nur den mitgelieferten VDE Stecker Wenn das Gerät zum ersten Mal gestartet wird startet der Einrichtungsassistent automatisch Wählen Sie einen Modus aus dem Hauptmenü und drücken Sie OK Sie können auch die Navigationstaste verwenden um in einen anderen Modu...

Страница 27: ...n und präsentiert eine Liste von Service Set Identifiers SSIDs für die Netzwerke Ihr Gerät speichert die Anmeldeinformationen für die letzten vier Drahtlosnetzwerke mit denen Sie sich verbunden haben und stellt automatisch eine Verbindung zu diesen Netzwerken her sobald sie verfügbar sind Wenn die Verbindung zu einem Netzwerk vorübergehend unterbrochen wird stellt Ihr Gerät die Verbindung automati...

Страница 28: ...he Die Standardsprache ist Englisch Zum Ändern gehen Sie zu Menu System settings Languages und wählen Sie Ihre bevorzugte Sprache aus Zurücksetzen auf Werkseinstellungen Setzt alle Benutzereinstellungen auf ihre Standardwerte zurück Uhrzeit Datum Netzwerkkonfiguration und Voreinstellungen gehen dabei verloren Die aktuelle Softwareversion des Funkgeräts wird jedoch beibehalten Um eine Rückstellung ...

Страница 29: ...r wird angezeigt Wählen Sie ein Land aus und die verfügbaren Internet Radiosender werden angezeigt Wählen Sie einen Radiosender aus der Liste aus um diesen Sender einzustellen POPULÄR Präsentiert eine Liste der beliebtesten Internet Sender aus aller Welt ENTDECKEN Ermöglicht Ihnen die Auswahl aus einer Liste von Sendern die nach Herkunft Land Genre oder Sprache definiert sind Navigieren Sie durch ...

Страница 30: ...Sie Menu Station List und drücken Sie OK Wählen Sie den Sender den Sie hören möchten durch Blättern mit der Navigationssteuerung aus Stationen die mit einem gekennzeichnet sind sind nicht verfügbar Nach der Auswahl beginnt die Wiedergabe des Senders und auf dem Display werden Informationen über den Sender das Lied oder die Sendung die vom Sender ausgestrahlt wird angezeigt Sie können auch die link...

Страница 31: ...len Sie Menu Main menu CD Auf dem Display erscheint Loading gefolgt von Reading No Disc Legen Sie Ihre CD ein das Laufwerk zieht die CD automatisch ein Der erste Titel auf der CD wird abgespielt und die Spielzeit wird angezeigt Wenn der Titel das ID3 Format hat drücken Sie wiederholt die Taste INFO auf der Fernbedienung oder die Taste OK auf dem Gerät Es werden zusätzliche Informationen Datum Date...

Страница 32: ...h am Quellgerät herunter falls dies möglich ist um zu verhindern dass die Lautstärke plötzlich zu hoch wird Schließen Sie die externe Audioquelle an die Anschlüsse AUX IN L und R an Um den AUX IN Modus zu aktivieren drücken Sie MODE und drehen Sie den Bedienknopf bis Aux in angezeigt wird oder wählen Sie Menu Main menu Aux in Stellen Sie die Lautstärke dieses Geräts und ggf des Audioquellengeräts ...

Страница 33: ...der an Wochentagen Uhrzeit 12 00AM nach Bedarf anpassen Datum Nach Bedarf anpassen diese Option ist nur sichtbar wenn Einmalig im Feld Aktivieren ausgewählt wurde Modus Summer Internetradio DAB oder FM Voreinstellung Zuletzt angehört oder 1 40 Lautstärke 0 32 Um diese Einstellungen zu speichern und den Alarm einzustellen blättern Sie nach unten und wählen Sie Speichern Hinweis Wenn Sie ZURÜCK oder...

Страница 34: ...iños No deje el aparato sin vigilancia No utilice sprays limpiadores para limpiar los interruptores Los residuos de estos sprays producen depósitos de polvo y grasa En caso de mal funcionamiento siempre consulte a un profesional No fuerce los controles Si el aparato se ha caído siempre haga que lo verifique un técnico cualificado antes de encenderlo otra vez NO utilice productos químicos para limp...

Страница 35: ...l producto a un circuito protegido disyuntor o fusible Asegúrese de qu el producto tiene una toma de tierra adecuada para evitar el riesgo de electrocución o incendio 1 Control de volumen Gire para ajustar el nivel de volumen Pulse para detener la reproducción CD 2 Navegación OK Gire para navegar por los menús Pulse para confirmar OK 3 Volver retorno back Pulse para ir al nivel de menú anterior 4 ...

Страница 36: ... el enchufe VDE suministrado para conectar el aparato a una toma de corriente doméstica Al arrancar el aparato por primera vez se inicia automáticamente el asistente de configuración En el menú principal seleccione un modo y pulse OK También puede utilizar el mando de navegación para cambiar de modo Después de un momento la radio cambia a ese modo Se selecciona la última emisora o pista utilizada ...

Страница 37: ...áticamente Red abierta Si la red está abierta no encriptada el dispositivo se conecta y no se requiere ninguna otra entrada Red encriptada estándar Si la red inalámbrica está protegida la siguiente pantalla presenta opciones para introducir la clave de red o la contraseña frase Al finalizar El dispositivo se conecta a la red seleccionada Si la conexión falla el dispositivo vuelve a una pantalla an...

Страница 38: ...periódicamente de forma automática esta es la configuración por defecto Si el dispositivo detecta que hay un software más nuevo disponible le pregunta si quiere proceder a la actualización En caso afirmativo el nuevo software se descarga e instala Tras una actualización de software se mantienen todos los ajustes del usuario PRECAUCIÓN Antes de iniciar la actualización del software asegúrese de que...

Страница 39: ...e muestra otra serie de información pasando por los siguientes detalles Slogan default where available Language Location Codec and sampling rate Playback buffer Date info Este dispositivo puede reproducir miles de podcasts de todo el mundo a través de una conexión a Internet de banda ancha Una vez seleccionado un podcast el dispositivo se conecta directamente a esa emisora Para entrar en el modo P...

Страница 40: ...lla Para pasar por las diferentes opciones de visualización miniatura diapositiva con texto DLS y diapositiva a pantalla completa pulse el mando de control SETTINGS Dynamic Range Compression DRC Algunas emisiones DAB ofrecen la función de compresión de rango dinámico DRC Esta función permite a las radios comprimir el rango dinámico del flujo de audio de salida de modo que se aumenta el volumen de ...

Страница 41: ... determinado Cuando reproduzca un CD pulse STOP A continuación pulse PROGRAM en el mando a distancia para iniciar el modo de programación Aparece el icono de la Estrella Una vez en la configuración del programa la pantalla mostrará T001 para mostrar la primera pista del CD como P01 Ahora puede elegir qué pista desea como número de programa P01 utilizando los botones y para desplazarse hasta la pis...

Страница 42: ...e ajustar del dispositivo fuente Conecte la fuente de audio externa al conector óptico Para entrar en el modo óptico pulse MODE y gire el mando de navegación hasta que aparezca Optical o seleccione Menu Main menu Optical Ajuste el volumen de este dispositivo y si es necesario del dispositivo fuente de audio según sea necesario El modo coaxial reproduce el audio de una fuente externa como los repro...

Страница 43: ...da de la pantalla A la hora fijada la alarma sonará Para silenciarla temporalmente pulse OK Al pulsar OK repetidamente se pasa por los periodos de repetición disponibles 5 min 10 min 15 min y 30 min La radio vuelve al modo de espera durante el periodo establecido con el icono de la alarma silenciada parpadeando y una cuenta atrás del periodo de snooze restante Una vez transcurrido el tiempo de sno...

Страница 44: ... contient un haut parleur pouvant engendrer des champs magnétiques Tenez cet appareil à 60 cm au moins d un téléviseur ou ordinateur Si le produit comprend un accumulateur intégré plomb acide rechargez l accumulateur tous les 3 mois en cas de non utilisation prolongée de l appareil Sinon l accumulateur pourrait être endommagé de manière permanente Si l accumulateur est endommagé remplacez le par u...

Страница 45: ...ppuyez pour arrêter la lecture CD 2 Navigation OK Tournez pour naviguer dans les menus Appuyez pour confirmer OK 3 Retourner Back Appuyez pour aller au niveau de menu précédent 4 Prise casque 3 5 mm 5 Port USB pour la lecture uniquement 6 Favorite Maintenez cette touche enfoncée jusqu à ce que l écran affiche l écran Save to Preset Enregistrer dans une présélection pour enregistrer la station actu...

Страница 46: ...a tension utilisée dans votre région Utilisez uniquement la fiche VDE fournie pour connecter l appareil à une prise de courant domestique Lors du premier démarrage de l appareil l assistant de configuration est lancé automatiquement Dans le menu principal sélectionnez un mode et appuyez sur OK Vous pouvez également utiliser le bouton de navigation pour passer d un mode à l autre Après quelques ins...

Страница 47: ...our les réseaux L appareil mémorise les détails de connexion des quatre derniers réseaux sans fil auxquels il s est connecté et s y connectera automatiquement lorsqu ils seront disponibles Si la connexion à un réseau est temporairement perdue l appareil se reconnecte automatiquement Réseau ouvert Si le réseau est ouvert non crypté l appareil se connecte et aucune autre entrée n est requise Réseau ...

Страница 48: ...réseau et les préréglages sont perdus Cependant la version actuelle du logiciel de la radio est conservée Pour effectuer une réinitialisation d usine sélectionnez Menu System settings Factory reset Confirmez en sélectionnant Proceed Yes Mise à jour du logiciel De temps à autre des mises à jour logicielles contenant des corrections de bogues et ou des fonctionnalités supplémentaires sont disponible...

Страница 49: ...s définies par leur origine pays leur genre ou leur langue Naviguez dans les options de la catégorie Une fois que vous avez fait votre choix un écran confirme la catégorie sélectionnée et le nombre de stations dans cette catégorie Pour voir la liste sélectionnez l option indiquant le nombre de stations disponibles NOW PLAYING INFORMATION Pendant la lecture du flux l écran affiche son nom et sa des...

Страница 50: ...formations en temps réel telles que le nom du programme le titre de la piste et d autres détails Les émissions en stéréo sont indiquées par une icône en haut de l écran Pour afficher des informations supplémentaires appuyez sur INFO Chaque fois que vous appuyez sur cette touche une autre série d informations s affiche SLIDESHOW Lorsque le diaporama est disponible en fonction du signal diffusé les ...

Страница 51: ...ou mettre en pause appuyez sur la touche PAUSE PLAY de l appareil ou de la télécommande Pour revenir en arrière avancer rapidement dans la piste en cours maintenez enfoncées les touches PREVIOUS ou NEXT de la télécommande et relâchez les lorsque vous souhaitez reprendre la lecture Pour éjecter le CD appuyez sur la touche EJECT de l appareil ou de la télécommande Arrange a CD song program Il est po...

Страница 52: ...i permet de découvrir cet appareil Sur votre appareil intelligent compatible BT assurez vous que la fonction BT est activée et recherchez des appareils Sélectionnez Audizio Brescia dans la liste des appareils BT disponibles Control from radio En mode BT vous pouvez mettre en pause lire et passer aux pistes suivantes précédentes à l aide des boutons disponibles sur la radio Le mode optique lit l au...

Страница 53: ...nregistrer un écran de dialogue s affiche pour vous demander si vous souhaitez enregistrer les modifications L écran en cours de lecture affiche les alarmes actives avec une icône en bas à gauche de l écran À l heure programmée l alarme retentit Pour l arrêter temporairement appuyez sur OK Appuyez plusieurs fois sur OK pour faire défiler les périodes de répétition disponibles 5 min 10 min 15 min e...

Страница 54: ...30 x 75mm Weight 3 30kg The specifications are typical The actual values can slightly change from one unit to the other Specifications can be changed without prior notice The products referred to in this manual conform to the European Community Directives to which they are subject European Union United Kingdom Tronios B V Bedrijvenpark Twente Noord 18 7602KR Almelo The Netherlands Tronios Ltd 130 ...

Страница 55: ......

Страница 56: ...Specifications and design are subject to change without prior notice www tronios com Copyright 2022 by Tronios The Netherlands ...

Отзывы: