www.auberins.com
Copyright 2007-2017, Auber Instruments All Rights Reserved.
No part of this manual shall be copied, reproduced, or transmitted in any way without the prior, written consent of Auber Instruments. Auber
Instruments retains the exclusive rights to all information included in this document.
Quick Guide for Charcoal Smoker Controller SYL-1615
Version 1.2
(May, 2017)
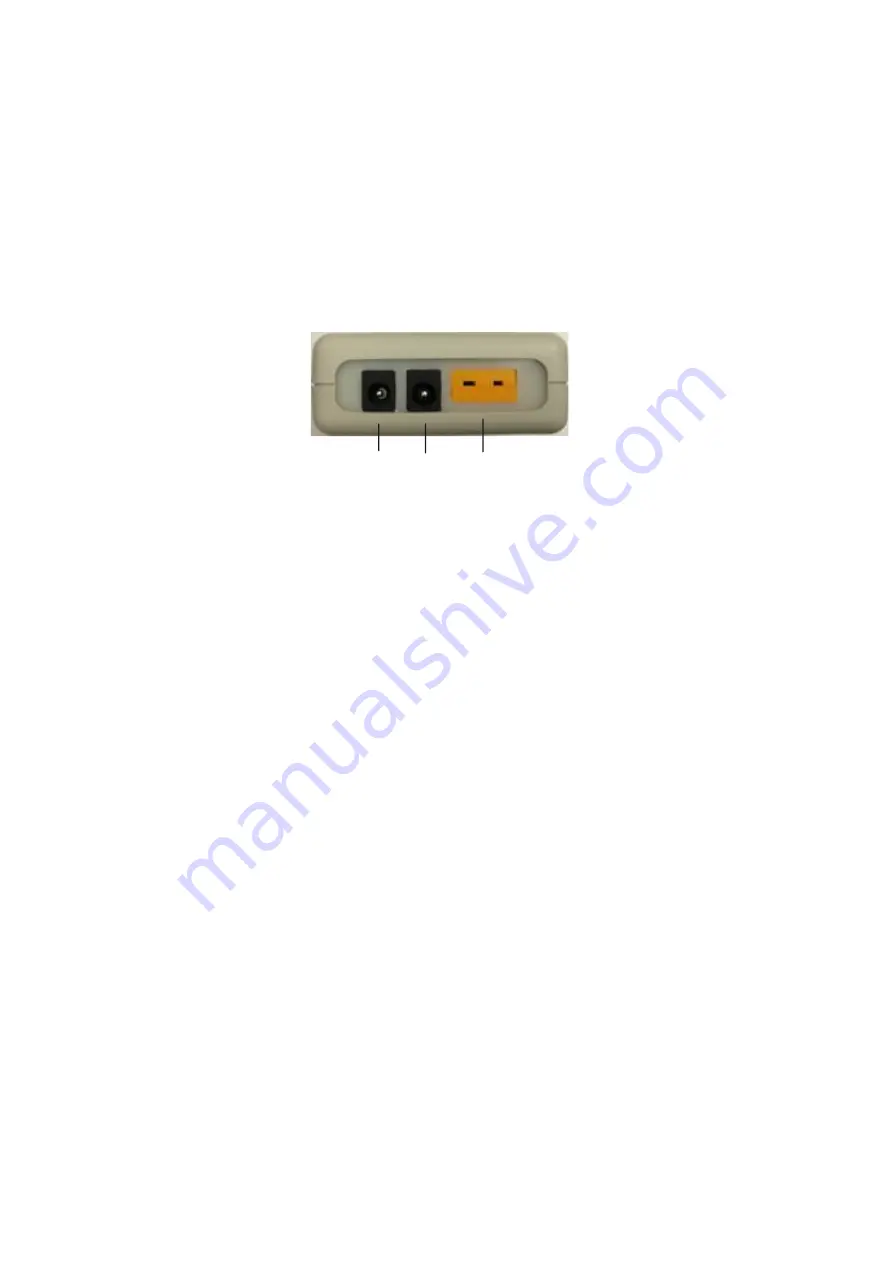
This SYL-1615 temperature controller is for charcoal smokers. To operate it, connect the 12 VDC power adapter to the POWER
INPUT connector (
①
) and wall outlet. Connect the fan connector to the OUTPUT connector (
②
). The polarity for this socket is
center pin positive (+), outer collar negative (−).
Connect the type K thermocouple to the INPUT socket (
③
).
Please note that
thermocouple connector also has polarity. The wide blade should go to wide slot.
①
POWER-12V Power supply input
②
OUT- Fan control output
③
INPUT-Temperature probe input
①
②
③
Figure 1. Controller connector identification.
Application Tips
1)
Lower Vents. The temperature in a Smoker/BBQ pit is mainly affected by two factors: the fuel and the air flow. When you
use a PID controller and a blower on a BBQ or smoker, the goal is to let the controller to take over the control of the air
flow. So, if there were multiple lower vents on the smoker, use one of them to mount the blower, and fully close all other
lower vents. If there is a big gap between the blower and the vent, please seal the gap with a piece of aluminum tape or a
silicone gasket.
2)
The top vents should be closed down a little bit than you normally would when cooking without a controller and blower. For
WSM, we recommend setting the top vent to 1/4” wide. For Kamado style smokers such as the
Big Green Eggs, the top
vent opening needs to be set very small. To maintain the cooking temperature at the lower range (around 225° F), please
close the bottom vent completed and only open the top vent to about 1/16'' (1.6 mm).
3)
The default PID parameters (Change P = 1.2, I = 300, D = 70) are optimized for charcoal smokers. Normally u
sers don’
t
need to change them. But if you are experiencing big temperature oscillation, you can try another set of PID parameters
which makes the controller approach the target temperature more gently. Please set P = 1.8, I = 1200,
D = 70. You’ll also
need to adjust another parameter SF (under access code 0037) and set it to SF = 30. Please DO NOT change other
parameters under this code. If you need further information about how to fine tune the controller or access the parameters,
please refer to the instruction manual.
4)
The thermocouple cable is food grade, which is insulated by TEFLON (PFA) with stainless steel over braid. The maximum
working temperature for the cable is 500° F. Please do not drop the cable on top of the flame or drape it over the fire box.
5)
Set the target temperature. There are two ways to set the target temperature:
a
. During the normal operation mode, p
ress Λ
or V once to switch the display from process value (PV) to set value (SV, or
target temperature). The display will start to blink. Press
Λ or V aga
in to increase or decrease the SV. When finished, wait
8 seconds and the setting will take effect automatically (the display will stop blinking).
b
. Press SET key once. Use >, Λ and V
keys to enter code 0001. Press SET key to confirm, then the display would be SV
(Su). Press SET key again to display the SV setting.
Use >, Λ and V keys to
enter the new SV and press SET to confirm.


