

QSG-t68WE8S-EN-15062619
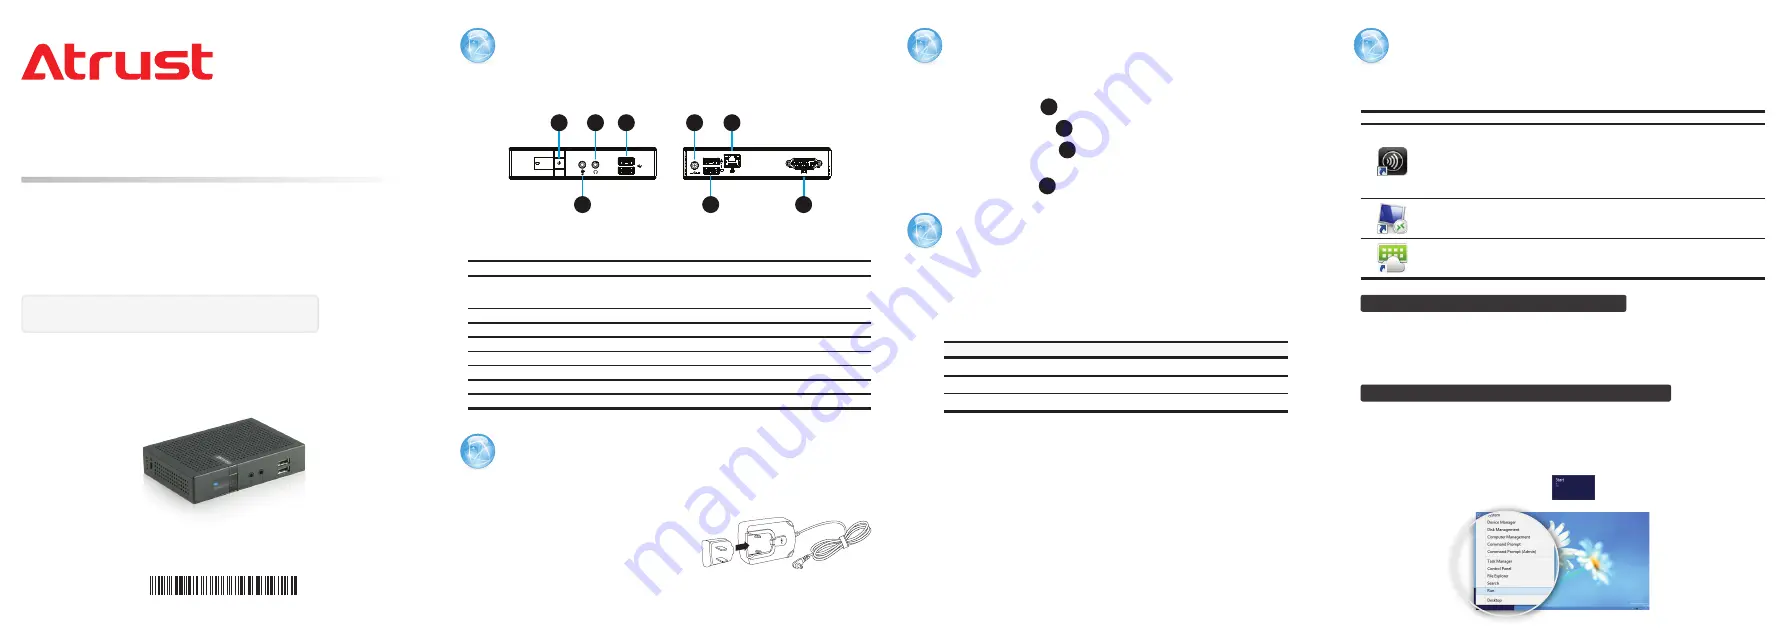
Power Button and I/O Ports
No.
Component
Description
1
Power button
Press to
power on
the thin client.
Press to
shut down
the thin client (OS default behavior).
Press to
resume
from the Sleep mode (orange-lighted LED).
2
Microphone port
Connects to a microphone.
3
Headphone port
Connects to a set of headphones or a speaker system.
4
USB port
Connects to a USB device.
5
DC IN
Connects to an AC adapter.
6
USB port
Connects to a mouse or keyboard.
7
LAN port
Connects to your local area network.
8
DVI-I port
Connects to a monitor.
Assembling the AC Adapter
To assemble the AC adapter for your t68W, please do the following:
1. Unpack your thin client package and
take out the AC adapter and
its detached plug.
2. Slide the plug into the AC adapter until
it clicks into place.
NOTE:
The supplied plug may vary with your area.
Getting Connected
To make connections for your t68W, please do the following:
1. Connect USB ports
6
to a keyboard and mouse separately.
2. Connect the LAN port
7
to your local network with an Ethernet cable.
3. Connect the DVI-I port
8
to a monitor, and then turn the monitor on.
If only the VGA monitor is available, use the supplied
DVI-I to VGA adapter
.
4. Connect the DC IN
5
to a power outlet using the AC adapter supplied.
Getting Started
To start using your t68W, please do the following:
1. Press the Power button on the front panel of your t68W to turn it on.
2. Your t68W will log in to Windows Embedded 8 Standard automatically with
the default standard user account (see table below for details).
Two Prebuilt User Accounts
Account Name
Account Type
Password
Administrator
Administrator
Atrustadmin
User
Standard user
Atrustuser
NOTE:
Your t68W is UWF-enabled. With
Unified Write Filter
, all system changes
will be discarded after restart. To change the default, click
Atrust Client
Setup
on Start screen, and then click
System
>
UWF
to make changes. A
restart is required to apply the changes.
NOTE:
To
activate
your Windows, disable UWF
first
. Next, move your mouse to
the bottom-right corner on the
desktop
or
Start screen
, select
Settings
>
Change PC settings
>
Activate Windows
, and then follow the on-screen
instructions to complete the task
online
or
offline
(by telephone; contact
information will be shown on the screen in the process). For information
about
volume activation
, visit
http://technet.microsoft.com/en-us/library/
for details.
Service Access
You can access remote / virtual desktop or application services simply through
the default standard shortcuts available on the desktop:
Shortcut
Name
Description
Citrix
Receiver
Double click to access Citrix services.
NOTE:
If the secure network connection is not implemented in your
Citrix environment, you might not be able to access Citrix services
through Citrix Receiver of this new version. Alternatively, Citrix allows
service access simply through a Web browser. Try to use the built-in
Internet Explorer (see instructions below) if you have problems with
Citrix Receiver.
Remote
Desktop
Connection
Double click to access Microsoft Remote Desktop services.
VMware
Horizon View
Client
Double click to access VMware View or Horizon View services.
Accessing Citrix Services with Internet Explorer
To quickly access Citrix services with the Internet Explorer, just open the browser,
enter the IP address / URL / FQDN of the server where the Citrix Web Interface is
hosted to open the service page (
NOTE:
For XenDesktop 7.0 or the later, consult
your IT administrator for the appropriate IP address / URL / FQDN).
Accessing Citrix Services through the Receiver Shortcut
To access Citrix services through the Receiver shortcut, please do the following:
1. With an administrator account, import the required safety certificate for
Citrix services.
Consult your IT administrator for necessary assistance
.
a. On the desktop, move the mouse to the bottom-left corner, and then
right click on the appeared
. A popup menu appears.
Thank you for purchasing Atrust thin client solution.
Read this Quick Start Guide to set up your t68W and access Microsoft,
Citrix, and VMware desktop virtualization services quickly.
For more information, please refer to the User’s Manual for t68W.
NOTE:
Your warranty will be
voided
if the warranty seal
on the product is broken or removed.
Quick Start Guide
Atrust t68W Thin Client
1
2
3
4
Sample Barcode
Thin Client Solution
5
1
2
3
4
5
6
7
8