background image


                  Storage: -20 

  ~ +55 


Relative humidity 20% ~ 93% (40 

4, Preparing for use 

1) Place the machine on a flat surface and ensure that the cabling is 

neat  and  sufficient.  Insert  the  power  connector  in  the  appropriate 

socket. 

2) Power on the machine (note: stable power source and ground is 

important). 

3) Install Operating System (Note: The POS is not pre-loaded with 

OS. Customer to use a legal copy of the Windows OS to install onto 

the POS). 

4)  After  successful  OS  installation,  ensure  that  all  relevant  drivers 

are installed: 

Chipset,  LAN,  Display,  Touch,  and  Sound  where  needed.  Also, 

ensure that the drivers for relevant peripherals are also installed and 

working. 


Содержание Smart Plus E915

Страница 1: ...E915 Smart Plus User Manual...

Страница 2: ...List 1 Safety Precautions 2 Initial Installation 3 Touch POS Appearance 4 Product Description 1 15 inch LED screen Touch Screen Parameter 2 I O port description...

Страница 3: ...re electronic stability 6 The product comes standard with a power connector with earth leakage Please do not change the connector unless certain of the power requirements 7 Make sure that the ground w...

Страница 4: ...n fail on the machine remove the machine from live power Refrain from opening or repairing the machine Contact an authorized repair center or person to assist with repairs WARNING For the non complian...

Страница 5: ...ete 2 Preparing for Installation Examine the case for cleanliness Logos marks and insure labeling is correct Check the working environment Because the POS is a precision instrument the working environ...

Страница 6: ...the machine note stable power source and ground is important 3 Install Operating System Note The POS is not pre loaded with OS Customer to use a legal copy of the Windows OS to install onto the POS 4...

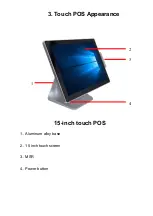
Страница 7: ...3 Touch POS Appearance 15 inch touch POS 1 Aluminum alloy base 2 15 inch touch screen 3 MSR 4 Power button 1 2 3 4...

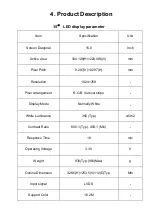
Страница 8: ...el Pitch 0 297 V 0 297 H mm Resolution 1024 768 Pixel Arrangement R G B Vertical stripe Display Mode Normally White White Luminance 350 Typ cd m2 Contrast Ratio 800 1 Typ 450 1 Min Response Time 16 m...

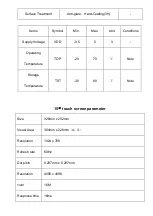
Страница 9: ...m Visual Area 304mm x 228mm 4 3 Resolution 1024 x 768 Refresh rate 60Hz Dot pitch 0 297mm x 0 297mm Resolution 4096 x 4096 color 16M Response time 16ms Items Symbol Min Max Unit Conditions Supply Volt...

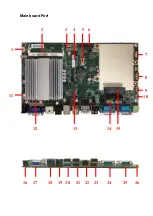
Страница 10: ...Main board Port 1 2 3 4 5 6 7 8 9 10 0 11 12 13 14 15 16 17 18 19 20 21 22 23 24 25 26...

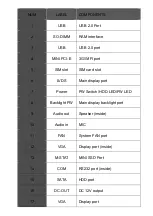
Страница 11: ...SIM card slot 6 LVDS Main display port 7 Power PW Switch HDD LED PW LED 8 Backlight PW Main display backlight port 9 Audio out Speaker inside 10 Audio in MIC 11 FAN System FAN port 12 VGA Display por...

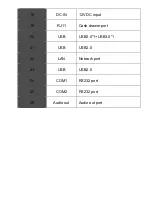
Страница 12: ...18 DC IN 12V DC input 19 RJ11 Cash drawer port 20 USB USB2 0 1 USB3 0 1 21 USB USB2 0 22 LAN Network port 23 USB USB2 0 24 COM1 RS232 port 25 COM2 RS232 port 26 Audio out Audio out port...

Отзывы: