ATN Aries 6800C Defender Скачать руководство пользователя страница 4

3

MOUNTING

PREPARATION FOR OPERATION

Before getting started make sure to follow these 

steps:
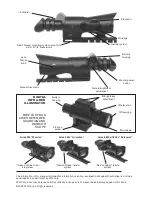
•  Install  the  battery  into  its  housing  with  the 

polarity order shown on the main body of the 

unit.

• Switch on the Aries scope with the protective 

lens cover still attached to the lens.

•  Make  sure  that  the  green  luminance  of  the 

light intensifier tube is present.

•  Observe  the  scene,  and  adjust  the  diopter 

and/or lens for optimal image clarity.

•  You  may  now  enter  a  dark  environment  or 

simply shut the lights off in order to darken 

the room.

• Next, remove the lens cap/daylight filter.
• Observe the scene, and adjust the front lens 

for ideal focus.

• Finally, you may want to turn the infra red (IR) 

illuminator on. Notice the ability of the Aries 

scope to see in total darkness with the aid of 

the IR illuminator.

OPERATING

RETICLE BRIGHTNESS ADJUSTMENT

By rotating the knob you may adjust the ret-

icle’s  brightness.  Adjustment  could  be  easily 

seen if you look through the scope while adjust-

ment.

1.  Slightly  loosen  the  horizontal  and  vertical 

fixing screws on the 7/8” weaver rail built into 

the scope.

2. Place the scope on the dovetail mount of the 

fire arm making certain that the mount aligns 

with the receptor attachment screw groove. 

Adjust as necessary.

3. Tighten the horizontal fixing screws.

NOTE:

 Receptor attachment screws may need to 

be tightened after continuous shooting.

FOCUSING

To focus your riflescope you will need to adjust 

the diopter first thing. Simply turn the diopter 

clockwise  until  it  stops.  Then,  while  looking 

through the diopter at a subject, slowly turn the 

diopter back counter clockwise until the grain 

in the image is sharp.

NOTE:

  We  suggest  that  you  focus  the  diopter 

during daylight with the filter on.

Before  focusing  turn  the  lens  fixation  handle  

clockwise, to unlock the lenses.
Next, focus the front lens until the image and the 

grain are both sharp. When you are in the low-

light conditions and the daylight filter is off you 

may focus the front lens to receive a sharp image, 

the diopter should not be adjusted.

NOTE:

 The front lens should be readjusted as 

you view objects at different distances.

When you are finished to adjust the front lens 

focus, you should lock the front lens in place by 

turning the lens fixation knob clockwise. Fail-

ure to do this may cause shift in aimpoint when 

shooting.

Locking knob

Battery

installation

Содержание Aries 6800C Defender

Страница 1: ...AMERICAN TECHNOLOGIES NETWORK CORP u s e r s g u i d e Aries 330 Warrior Aries 350c Guardian Aries 6800c 7800c Defender ...

Страница 2: ...indage Reticle system Battery housing New Titanium mounting system mounts to std U S 7 8 weaver rail Lens fixation knob Manual focus lens Reticle brightness adjustment Master power button Green on Green reti cle system Red on Green reticle system Red on Green reticle system Aries 330 Warrior Aries 350c Guardian Aries 6800c 7800c Defender IR brightness adjustment DIGITAL INFRA RED ILLUMINATOR FREE ...

Страница 3: ...djustment The Warrior also comes with our new detacha ble most powerful in the industry 450mw Infra red Illuminator with dedicated windage and ele vation adjustments This new IR lets you see even in total darkness up to 150 yards away The Aries 350 Guardian is the most com pact 1st gen weapon sight on the market Meas uring only 8 inches long and weighing less then 2 lbs the Guardian is one of the ...

Страница 4: ...into the scope 2 Place the scope on the dovetail mount of the fire arm making certain that the mount aligns with the receptor attachment screw groove Adjust as necessary 3 Tighten the horizontal fixing screws NOTE Receptor attachment screws may need to be tightened after continuous shooting FOCUSING To focus your riflescope you will need to adjust the diopter first thing Simply turn the diopter cl...

Страница 5: ...cated on the IR Rotate the IR placing at in the most convenient position Tighten the screw with the screw tool to fix the new posi tion IR Brightness Adjustment Battery Housing Fixation Screw IR Elevation IR Windage IR Focusing The range finder reticle in your Night Vision Rif lescopes was designed to assist you in deter mining the range of your target These distances are based on a 6 target ARIES...

Страница 6: ...ess This is normal and will not affect the life or per formance of the unit Q Image not clear S Adjust focus ring If problem persists increase viewing distance Q Fixed pattern noise in a honeycomb shape S Usually a cosmetic blemish characterized by a faint honeycomb type pattern This usually occurs when viewing very bright lights Adjust the potentiometer to reduce brightness Q A pattern of dark th...

Страница 7: ...cular purpose shall apply to the product All such implied warranties are hereby and expressly disclaimed LIMITATION OF LIABILITY ATN will not be liable for any claims actions suits proceedings costs expenses damages or liabili ties arising out of the use of this product Opera tion and use of the product are the sole respon sibility of the Customer ATN s sole undertaking is limited to providing the...

Страница 8: ...nden Ave Suite 1B South San Francisco CA 94080 phone 800 910 2862 650 875 0130 fax 650 875 0129 European Office phone 44 0 870 0111286 fax 44 0 845 3349142 The following countries can use our toll free number 00 800 9102 8620 Austria France Germany Holland Italy Spain Sweden Switzerland www atncorp com 2002 ATN Corporation ...

Отзывы: