background image

AT-OME-MS42

78

Appendix

Updating the Firmware

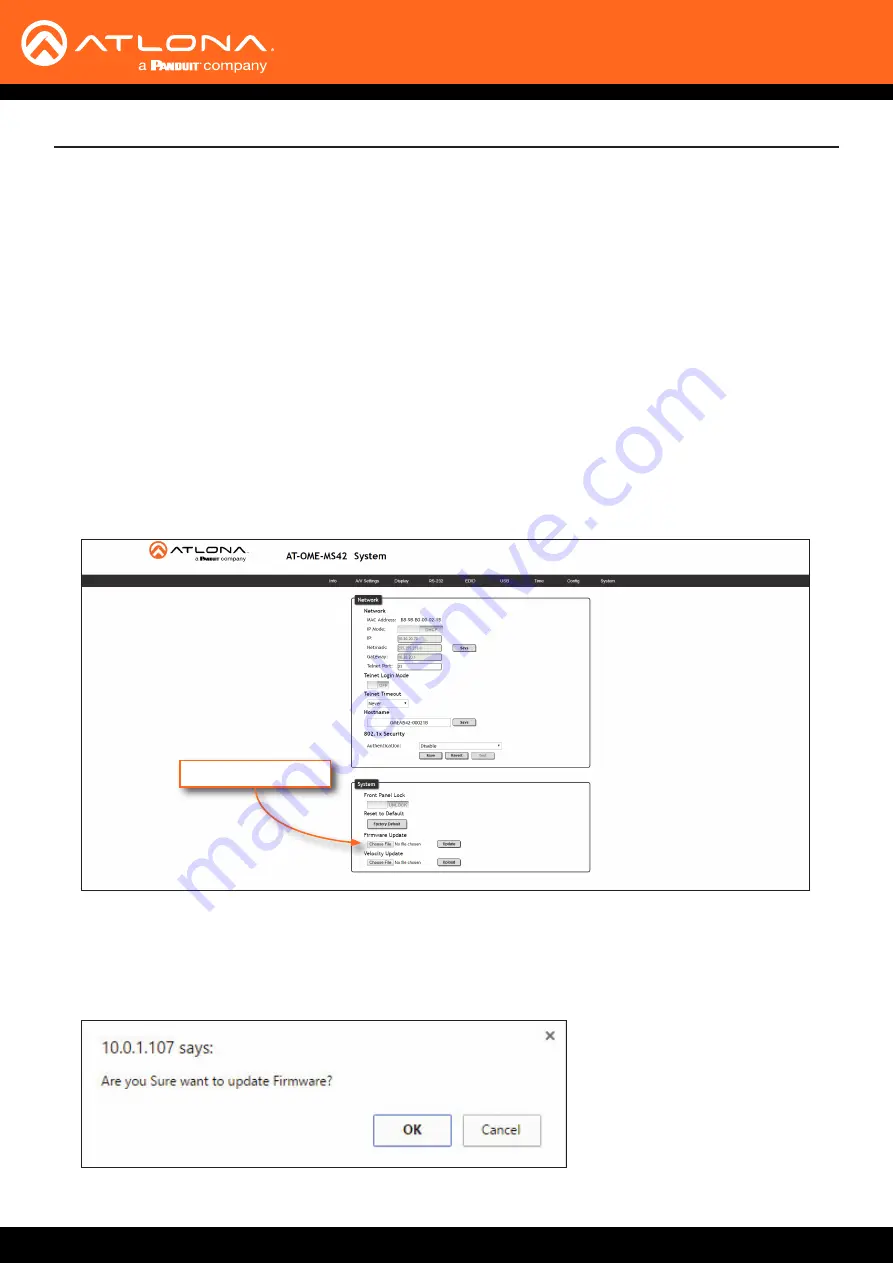
Updating the firmware is performed using the built-in web server.

1. 

Download the firmware file from atlona.com and extract the contents of the .zip file to a folder on the computer 

desktop.

2. 

Connect an Ethernet cable from the computer, containing the firmware, to the same network where the AT-OME-

MS42 is connected.

3. 

Login to the web server.  Refer to 

Introduction to the Web Server (page 51)

.

4.  Click 

System

 in the menu bar.

Requirements:

• 

AT-OME-MS42

• 

Firmware file

• 

Computer on the same network as the AT-OME-MS42

Choose File button

5.  Click the 

Choose File

 button, under the 

Firmware Update

 section.

6.  Browse to the location of the firmware file, select it, and click the 

Open

 button.

7.  Click the 

Update

 button, under the 

Firmware Update

 section.  The following message box will be displayed.

Содержание Omega AT-OME-MS42

Страница 1: ...AtlonaManuals Switchers AT OME MS42 Three Input Switcher for HDMI and USB C with HDBaseT and HDMI Outputs 4K UHD...

Страница 2: ...AT OME MS42 2 Version Release Date Notes 1 Sep 2019 Initial release Version Information...

Страница 3: ...ct go to http atlona com registration Sales Marketing and Customer Support Welcome to Atlona Operating Notes Main Office Atlona Incorporated 70 Daggett Drive San Jose CA 95134 United States Office 1 8...

Страница 4: ...cts 10 years from proof of purchase date for hardware electronics products purchased on or after June 1 2013 3 years from proof of purchase date for hardware electronics products purchased before June...

Страница 5: ...cts or states do not allow the exclusion or limitation of relief special incidental consequential or indirect damages or the limitation of liability to specified amounts so the above limitations or ex...

Страница 6: ...Do not use this product near water 6 Clean only with a dry cloth 7 Do not block any ventilation openings Install in accordance with the manufacturer s instructions 8 Do not install or place this prod...

Страница 7: ...Input 23 Scaler Pass Through 24 Notes on Scaling 25 Audio Management 26 Audio Output Muting 26 De embedding External Analog Audio 26 HDCP Content 27 EDID Management 28 Using the Downstream EDID 28 ED...

Страница 8: ...58 EDID Page 59 USB Page 60 Time Page 61 Config Page 62 System Page 63 Solution Setup and Configuration Guide 65 Display Control 65 CEC Control 65 Using RS 232 68 Using IP 71 Pass through mode 75 Cont...

Страница 9: ...r three host PCs plus two peripheral devices such as a camera microphone speakerphone or keyboard and mouse It is ideal for video conferencing and many other 4K presentation applications with the OME...

Страница 10: ...when an HDBaseT link is established between the AT OME MS42 and a receiver 3 HDMI OUT Input LED Indicators These LED indicators display which input is routed to the HDMI OUT port A solid blue indicat...

Страница 11: ...8 HDMI OUT Connect an HDMI cable from this port to a display or other sink device 9 HDBaseT OUT Connect a category cable from this port to a compatible receiver unit Recommended receivers are the AT...

Страница 12: ...or balanced audio using XLR connectors Use the included 5 pin captive screw terminal block Balanced audio connections use two signal wires and a ground to minimize interference in audio signals Unbala...

Страница 13: ...4V RESET AUDIO OUT USB HOST RS 232 L R RX TX USB USB USB HUB Cable Max Distance 4K Max Distance 1080p CAT5e 295 feet 90 meters 330 feet 100 meters CAT6a CAT6a CAT7 330 feet 100 meters 330 feet 100 met...

Страница 14: ...B U S B DP HDM I 3 HDM I 4 PWR LINK USB C HDB aseT OUT AT OM E M S42 OM EGA TM MU LTI FOM AT SW ITC HER DP HDM I 3 HDM I 4 USB C HDM I OUT HDMI Laptop USB C USB Host DisplayPort Laptop USB Host Laptop...

Страница 15: ...is 192 168 1 254 1 Make sure the AT OME MS42 is powered by connecting the included power supply 2 Press and hold the IP MODE button on the rear of the unit 3 Release the button once the LED indicator...

Страница 16: ...sed Check the HDBaseT connections and or try a different cable USB C DP HDMI 3 HDMI 4 Solid green The input is the currently selected active input Off The input is not active IP MODE Flash green 4x Fl...

Страница 17: ...HDMI OUT and HDBaseT OUT ports The active input will be identified on the front panel HDMI LED input indicators An active input will be displayed as a solid green LED Auto Switching page 22 can also b...

Страница 18: ...elect Matrix Mode IMPORTANT When the AT OME MS42 is set to Matrix Mode both auto switching and display control will be disabled Device Operation This mode allows the AT OME MS42 to independently switc...

Страница 19: ...T port 6 Click the Matrix Mode HDBaseT Source drop down list and select the input to be routed to the HDBaseT OUT port 7 Matrix Mode configuration is complete NOTE If the input source for the HDBaseT...

Страница 20: ...tching pool For example if the HDMI IN 3 port is specified as a static input then auto switching will skip this port when auto switching Matrix Mode w Static Route 1 Login to the web server Refer to I...

Страница 21: ...source connected to the DisplayPort input DP IN will be output to the HDMI OUT port The DP IN port is the static source and the HDMI OUT port is the static output This particular configuration will a...

Страница 22: ...er available that it will fallback to any available input IMPORTANT The auto switching feature is only available when the Switching Mode is set to Mirrored or Matrix mode with static route Refer to Sw...

Страница 23: ...lected then the switcher will return to the last connected input If no input is found then it will attempt to switch to any available input The default fallback port is set to Previous This means if m...

Страница 24: ...efer to Introduction to the Web Server page 51 2 Click A V Settings in the menu bar 3 Click the Scaler toggle switch 4 The following message box will be displayed Click OK to dismiss the message box 5...

Страница 25: ...scaled to 1080p The internal scaler will be bypassed if the connected display supports the resolution and timing information from the source device The HDBaseT OUTPUT port supports up to 4K 60 Hz Howe...

Страница 26: ...he Web Server page 51 2 Click A V Settings in the menu bar 3 Locate the Audio section 4 Click the toggle switch for the desired output For example to mute the audio output on the HDBaseT Output click...

Страница 27: ...k A V Settings in the menu bar 3 Locate the HDCP section 4 Click the toggle switch next to the desired input In this example clicking the USBC toggle switch and setting it to the OFF position will ins...

Страница 28: ...EDID EDID Presets Storing EDID Data By default the AT OME MS42 will read the EDID from the display device The term downstream is used to describe any device that receives a signal from another device...

Страница 29: ...lick the DisplayPort drop down list 5 EDID preset selection is complete EDID Preset Connected Display The default setting Refer to the previous page details 3840x2160 2CH NO HDR Support 3840 x 2160 60...

Страница 30: ...with EDID data to be captured EIA CEA 861 Inform ation Revision number 3 IT underscan Supported Basic audio Supported YCbCr 4 4 4 Supported YCbCr 4 2 2 Supported Native form ats 1 Detailed timing 1 1...

Страница 31: ...ed to the HDMI OUT port on the AT OME MS42 the HDMI Output option is selected Here the EDID will be stored in Memory 1 6 Click the Save button next to the drop down list for the memory location 7 The...

Страница 32: ...appears as an available EDID preset for each available input on the AT OME MS42 9 The EDID storing procedure is completed NOTE Once an EDID is written to a memory location it can be overwritten with...

Страница 33: ...et the last connected USB host device as the active USB host Use the procedure below to enable Follow USB mode 1 Connect the host computers to the USB host ports as desired Note that it is not require...

Страница 34: ...t If both USB 1 and USB 2 host ports are connected and one USB host port is disconnected then the AT OME MS42 will automatically switch to the opposite USB host port 5 Follow USB configuration is comp...

Страница 35: ...server Refer to Introduction to the Web Server page 51 3 Click USB in the menu bar 4 Click the Follow Video radio button The factory default USB Host assignments for Input 1 through Input 4 are shown...

Страница 36: ...HUB Input indicator AT OME MS42 DP HD MI 3 HD MI 4 PW R LIN K US B C HD Ba seT OU T AT OME MS42 OMEG A TM MULTI FOMAT SW ITCH ER DP HD MI 3 HD MI 4 US B C HD MI OU T USB HOST 1 HDMI IN 3 Laptop 1 USB...

Страница 37: ...C HD MI OU T USB HOST 1 HDMI IN 3 Laptop 1 USB HOST 2 HDMI IN 4 Laptop 2 Laptop1 Laptop2 USB USB Speaker Microphone AT HDVS CAM 1 0 X Z o o m F 1 6 F3 0 f4 7m m f 4 7 m m 1 0 X Z o o m F 1 6 F 3 0 f 4...

Страница 38: ...an be set using either local time or by assigning a Network Time Protocol NTP server 1 Login to the web server Refer to Introduction to the Web Server page 51 2 Click Time in the menu bar 3 Click the...

Страница 39: ...sired NTP server 5 Click the Sync button to synchronize the AT OME MS42 clock with the NTP server time 6 Click the Save button to commit changes 1 Login to the web server Refer to Introduction to the...

Страница 40: ...clicking the drop down lists for month week day hour and minute 5 Repeat the same procedure for the End Time row 6 In the Adjust Time row set the offset time This time is the number of hours which Da...

Страница 41: ...to the Web Server page 51 2 Click Config in the menu bar 3 Click the Old Password field and enter the current password 4 Enter the new password in the New Password field 5 Retype the new password in...

Страница 42: ...OME MS42 will be assigned an IP address on the network and no further network configuration is required However if the AT OME MS42 is unable to detect a DHCP server within 15 seconds then the unit wi...

Страница 43: ...espectively 7 Click the Save button to commit changes Changes will take effect immediately Changing the Telnet Port Typically the Telnet service is assigned to TCP port 23 This is the default setting...

Страница 44: ...tials Set this toggle switch to OFF to bypass user credentials request 4 Click Save to commit changes Telnet Login Mode When a Telnet session is request the AT OME MS42 provides the option to prompt f...

Страница 45: ...seconds 166 minutes 2 76 hours can be selected Adjusting Telnet Timeout When a Telnet session is active the AT OME MS42 can be set to monitor Telnet activity If there is no activity within the specifi...

Страница 46: ...ng the Host Name By default the AT OME MS42 is assgned a hostname which is constructed as follows OMEMS42 last six digits of MAC address For example a default hostname might look like this OMEMS42 000...

Страница 47: ...h allowing the client to access the LAN A full explanation of the 802 1X protocol is beyond the scope of this manual However the illustration below shows the basic architecture E t h e r n e t E A P O...

Страница 48: ...server which will process the credentials For example if foo authserv com is entered then this identifies AUTHSERV as the RADIUS authentication server CA certificate Click the Browse button to select...

Страница 49: ...n a rack environment By default the front panel buttons are unlocked 1 Login to the web server Refer to Introduction to the Web Server page 51 2 Click System in the menu bar 3 Click the Front Panel Lo...

Страница 50: ...b server Refer to Introduction to the Web Server page 51 2 Click System in the menu bar 3 Click the Factory Default button 4 The following message will be displayed at the top of the screen Click OK t...

Страница 51: ...e network 2 Launch a web browser and enter the IP address of the unit If the default static IP address is being used enter 192 168 1 254 3 The AT OME MS42 Login page will be displayed Introduction to...

Страница 52: ...n of firmware On Time d h m s Displays how long the system has been powered since the last reboot reset Rx Type If a receiver is connected to the AT OME MS42 then it will be displayed in this field Ot...

Страница 53: ...to manually select the switching mode Refer to Switching Modes page 17 for more information Input Description USBC Sets USBC as the active input DisplayPort Sets DP IN as the active input HDMI3 Sets...

Страница 54: ...drop down list to select the fallback input If the source is disconnected from the active input then the switcher can be configured to automatically switch to the desired port Scaler Click this toggle...

Страница 55: ...tion will instruct the source to send non HDCP content to the display Note that not all sources have this capability NOTE Setting this feature to OFF for any source does not provide decryption of HDCP...

Страница 56: ...ME MS42 to send the power on command to the display when an A V signal is detected When the AV signal is no longer present the AT OME MS42 will send the power off command to the display If this featur...

Страница 57: ...lable values are 10 seconds to 300 seconds The default value is 10 seconds Control Type Sets the control protocol for the connected display Click this drop down to select the control type Available se...

Страница 58: ...he following options are available 1 or 2 RS 232 Parameter Setting RS 232 settings for local or HDBaseT RS 232 control RS232 over HDBaseT If the AT OME MS42 is connected to a device such as the AT OME...

Страница 59: ...ble settings for most displays In addition three memory locations are available for storing captured EDID data If an EDID is stored in a memory location it will also be added to the list available EDI...

Страница 60: ...ect which USB ports are connected to a host device If both USB host ports are connected to host devices then the AT OME MS42 will set the last connected USB host device as the active USB host Manual T...

Страница 61: ...e button Click this button to commit changes to the NTP Server field If a save is not performed then the NTP server address will not be saved Server Time This field will display the current time Dayli...

Страница 62: ...for more information Old Username This field cannot be changed admin is the administrator user Old Password Enter the current password for the admin username in this field The default password is Atl...

Страница 63: ...CP mode Refer to Changing the Network IP Mode page 42 for more information IP Enter the IP address of the AT OME MS42 in this field This field will only be available when IP Mode is set to STATIC IP T...

Страница 64: ...er to Setting the Host Name page 46 for more information Authentication Click this drop down list to select the authentication method when using the 802 1x security protocol Refer to 802 1X Security p...

Страница 65: ...HDBaseT OUT AT OME MS42 OMEGATM MULTI FOMAT SWITCHER IP MODE DP HDMI 3 HDMI 4 USB C HDMI OUT HDMI IN 1 2 1 2 3 4 DP IN USB C IN HDMI OUT HDBaseT OUT LAN DC 24V RESET AUDIO OUT USB HOST RS 232 L R RX T...

Страница 66: ...he Web Server page 51 4 Click A V Settings in the menu bar 5 Verify that the Switching Mode is set to Mirrored Display control is not supported under Matrix Mode 6 Click Display in the menu bar 7 Unde...

Страница 67: ...pectively The display should power on and power off when clicking these buttons If the display does not respond check the following Verify that CEC is enabled on the display device Verify the integrit...

Страница 68: ...Display control is not supported under Matrix Mode DP HDMI 3 HDMI 4 USB C HDBaseT OUT AT OME MS42 DP HDMI 3 HDMI 4 USB C HDMI OUT HDMI IN 4 HDMI OUT HDBaseT OUT LAN DC 24V AUDIO OUT RS 232 L R RX TX...

Страница 69: ...st and select RS 232 9 Click the RS232 Mode drop down list and select Local RS232 Terminal 10 Scroll down to the bottom of the page and locate the RS 232 IP commands section 11 Click the Manufacturer...

Страница 70: ...returned The available values are 2 3 and 4 14 If Generic was selected as the manufacturer in step 11 then manually enter the required strings for each operation Refer to the following for informatio...

Страница 71: ...he display DP HDMI 3 HDMI 4 USB C HDBaseT OUT AT OME MS42 DP HDMI 3 HDMI 4 USB C HDMI OUT HDMI IN 4 HDMI OUT HDBaseT OUT LAN DC 24V AUDIO OUT RS 232 L R RX TX USB USB USB HUB to display 2 Login to the...

Страница 72: ...credentials will be required for the Telnet session 8 Locate the TCP IP Settings of Controlled Device section and enter the following information a IP Address Enter the IP address of the device to be...

Страница 73: ...the command fields with the proper values based on the selected device 12 Some devices may require that the command be sent multiple times before an acknowledge message is sent back to the AT OME MS4...

Страница 74: ...riage return should be specified In the example above x0D is the hexadecimal value for a carriage return HEX Command Strings ASCII Command Strings a Enter the ASCII command string is the correct field...

Страница 75: ...ERN ET 2 3 4 VID EO OUT 48V DC FAC TOR Y RES ET AT OME MS42 AT OME EX RX Display Control System DP HDM I 3 HDM I 4 PW R LINK USB C HDB aseT OUT AT OM E M S42 OM EG A TM MU LTI FO MA T SW ITC HE R DP H...

Страница 76: ...ay Refer to the User Manual of the display device for more information 8 Click the Save button to commit changes 9 RS 232 pass through configuration is complete The control system can now be used to s...

Страница 77: ...8V DC FAC TO RY RES ET Control System AT OME MS42 DP HD MI 3 HD MI 4 PW R LIN K USB C HD Bas eT OU T AT OME M S42 OM EG A TM MU LTI FOM AT SW ITC HE R DP HD MI 3 HD MI 4 USB C HD MI OU T 1 Connect the...

Страница 78: ...same network where the AT OME MS42 is connected 3 Login to the web server Refer to Introduction to the Web Server page 51 4 Click System in the menu bar Requirements AT OME MS42 Firmware file Computer...

Страница 79: ...MS42 79 Appendix 8 Click the OK button to begin the firmware update process Click the Cancel button to cancel the process 9 After the firmware update process is complete the Login screen will be disp...

Страница 80: ...of the unit to attach the mounting brackets 1 Attach the included small rack ear to one side of the AT OME MS42 using the included screws 2 Attach the included longer rack ear to the opposite side of...

Страница 81: ...U S B C H D B a se T O U T A T O M E M S 4 2 O M E G A TM M U L T I F O M A T S W IT C H E R D P H D M I 3 H D M I 4 U S B C H D M I O U T U S B C D P H D M I 3 H D M I 4 B Y O D D I S P L A Y I N P...

Страница 82: ...a 6 drywall screw is recommended Mounting screws are not included NOTE The unit can also be mounted under a flat surface such as a table by turning the unit upside down Appendix PWR VOL LEVEL AUDIO A...

Страница 83: ...unweighted Sample Rate 32 kHz 44 1 kHz 48 kHz 88 2 kHz 96 kHz 176 4 kHz 192 kHz 2560 1600 60 Hz 2048 1536 60 Hz 1920 1200 60 Hz 1680 1050 60 Hz 1600 1200 60 Hz 1440 900 60 Hz 1400 1050 60 Hz 1280 1024...

Страница 84: ...only 8 6 W Full load 104 W while powering USB C device up to 60 W HDBaseT PoE devices up to 30 W each and USB type A devices up to 2 5 W each External Power Supply 100 240 V AC 50 60 Hz Output 24 V 5...

Страница 85: ...names and trademarks or registered trademarks are the property of their respective owners Pricing specifications and availability subject to change without notice Actual products product images and o...

Отзывы: