background image

WS7011MAM

WS9011MAM

WS9011AAM

WS9011NAM

WS9011MAX

WS9011UAM

WS9011TAM

WS9092MAM

WS9092AAM

WS9092NAM

WS1011LAM

WS1211MAX

WS1211MAM

WS1292MAM

WS1511MAM

gebruiksaanwijzing


afzuigkap

instructions for use


cooker hood

notice d’utilisation


hotte cheminée

anleitung


dunstabzugshaube

Содержание WS1011LAM

Страница 1: ...NAM WS9011MAX WS9011UAM WS9011TAM WS9092MAM WS9092AAM WS9092NAM WS1011LAM WS1211MAX WS1211MAM WS1292MAM WS1511MAM gebruiksaanwijzing afzuigkap instructions for use cooker hood notice d utilisation hotte cheminée anleitung dunstabzugshaube ...

Страница 2: ......

Страница 3: ...OUD Uw afzuigkap Inleiding 4 Veiligheid Let op 5 Gebruik Bediening 7 Onderhoud Reinigen 13 Metalen vetfilters 13 Koolstoffilters 15 Installatie Algemeen 16 Aansluiting 17 Inbouwafmetingen 18 Bijlage Afvoeren 26 ...

Страница 4: ...ingen zult u snel vertrouwd raken met alle mogelijkheden van dit apparaat Lees de veiligheidsvoorschriften en hoe u het apparaat moet onderhouden Bewaar de instructies voor installatie en gebruik Dit kan nuttig zijn voor latere raadplegingen UW AFZUIGKAP ...

Страница 5: ...r voldoende ventilatie wanneer u de afzuigkap gebruikt samen met een gaskookplaat De afvoer mag niet worden aangesloten op een rookkanaal dat voor andere toestellen in gebruik is Flambeer nooit onder de afzuigkap en maak de filters op tijd schoon Het frituren moet geschieden onder voortdurend toezicht om te voorkomen dat verhit vet in brand raakt De afzuigkap moet regelmatig minstens 1 x per maand...

Страница 6: ...hakeld worden Neem de stekker uit het stopcontact of draai de schakelaar in de meterkast op nul Vet en olie zijn bij oververhitting brandbaar Blijf in de buurt tijdens het bereiden van gerechten Iedere aansprakelijkheid voor eventuele schade aan het apparaat of brand veroorzaakt door het niet in acht nemen van de aanwijzingen uit deze handleiding wordt afgewezen veiligheid ...

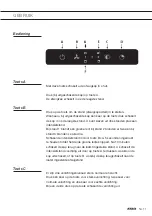
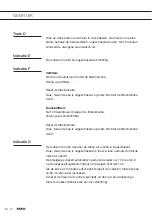
Страница 7: ...ft moet u de koolstoffilter signalering activeren zoals aangegeven in de paragraaf Alarmmeldingen Toets A Verlichting Soft light Inschakelen Druk kort op de toets voor de verlichting De lamp brandt op maximale sterkte Afregelen Druk gedurende enige tijd op de toets voor de verlichting De sterkte van de verlichting verandert tussen maximaal en minimaal en omgekeerd Uitschakelen Druk kort op de toet...

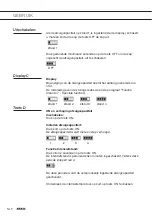
Страница 8: ...e storingscodes weer zie paragraaf Functie Clean Air Speciale functies stand 1 stand 2 stand 3 stand 4 Toets D ON en verhoging afzuigcapaciteit Inschakelen Druk op de toets ON Instellen afzuigcapaciteit Druk kort op de toets ON De afzuigcapaciteit wordt met een stap verhoogd 1 2 3 4 Functie Intensiefstand Druk circa 2 seconden op de toets ON De intensiefstand is gedurende tien minuten ingeschakeld...

Страница 9: ...Clean Air functie ververst u de lucht in de keuken gedurende maximaal 12 uur Zorg ervoor dat de afzuigkap is uitgeschakeld Druk ongeveer 4 seconden op de Timer toets De afzuigkap schakelt automatisch gedurende ieder uur 10 minuten in op de laagste afzuigstand Tijdens het afzuigen knippert led 4 1 seconde aan en 2 seconden uit Als de kap na 10 minuten uitschakelt blijft led 4 continu branden totdat...

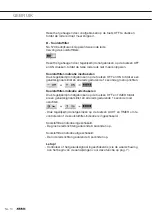
Страница 10: ... leds gedurende 1 seconde groen oplichten Koolstoffilter indicatie uitschakelen Druk tegelijkertijd onafgebroken op de toetsen OFF en TIMER totdat er een geluidssignaal klinkt en alle leds gedurende 1 seconde rood oplichten Druk tegelijkertijd onafgebroken op de toetsen LICHT en TIMER om te controleren of de koolstoffilter indicatie is ingeschakeld Koolstoffilter indicatie ingeschakeld De groene l...

Страница 11: ... stand 3 branden ze alle drie Schakel de intensiefstand in door toets B ca 5 seconden ingedrukt te houden totdat het derde groene ledje knippert Na 10 minuten schakelt de kap terug naar de laatst ingestelde stand U schakelt de intensiefstand voortijdig uit door op toets A te drukken waardoor de kap uitschakelt of op toets B waarbij de kap terugschakelt naar de laatst ingestelde afzuigstand Toets C...

Страница 12: ...knippert de filterindicatie Vervang de koolstoffilters Reset de filterindicatie Druk terwijl de kap is uitgeschakeld op toets B totdat de filterindicatie dooft Indicatie G De indicator brandt wanneer de Clean Air functie is ingeschakeld Druk terwijl de kap is uitgeschakeld op toets A aan uittoets totdat de indicator oplicht De afzuigkap schakelt automatisch gedurende ieder uur 10 minuten in op de ...

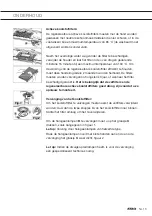
Страница 13: ...n Afzuigkap Maak de afzuigkap schoon met een sopje en een zachte doek Daarna met schoon water nabehandelen Gebruik geen agressieve schoonmaakmiddelen zoals bijvoorbeeld soda Het lakwerk van de afzuigkap blijft mooi als u zo nu en dan de lak met was inwrijft Roestvrijstalen schouwkappen Behandel roestvrijstalen schouwkappen niet met schuursponsjes of andere schuurmiddelen Behandel na met een niet s...

Страница 14: ... moet met het sluitmechanisme aan de zijkant geplaatst worden Open het sluitmechanisme De nokjes aan de zijkant van het filter vallen hierdoor naar binnen Houd bij het plaatsen van de filters het sluitmechanisme in deze positie 1 Plaats de nokjes aan de achterzijde van het filter in de daarvoor bestemde openingen aan de zijkant van de afzuigkap 2 Kantel het filter naar boven 3 Laat het sluitmechan...

Страница 15: ...rden vervangen na hoogstens 3 jaar of wanneer het filter beschadigd geraakt is Het is belangrijk dat de vetfilters en de regenereerbare actieve koolstoffilters goed droog zijn voordat u ze opnieuw te monteert Vervanging van het koolstoffilter Om het koolstoffilter te vervangen moeten eerst de vetfilters verwijderd worden duw dan de twee knopjes B van het koolstoffilter naar binnen Kantel het filte...

Страница 16: ...5 cm bedragen Bij een elektrische keramische of inductiekookplaat moet deze afstand minimaal 55 cm zijn Neem de plaatselijk geldende voorschriften in acht met betrekking tot de beluchting van gasapparaten Hoe korter de afvoerpijp en hoe minder bochten des te beter de werking van de afzuigkap Controleer voordat u met boren begint of er geen installatieleiding en aanwezig is zijn De aansluitbuis voo...

Страница 17: ...voor model WS9011TAM WS9011MAX WS1211MAX Dit apparaat is gebouwd in klasse I en moet dus geaard worden De aansluiting op het elektriciteitsnet moet als volgt plaatsvinden BRUIN L lijn BLAUW N neutraal GEEL GROEN aarde De neutrale kabel moet aangesloten worden op de klem met symbool N terwijl de GEEL GROENE kabel aangesloten moet worden op de klem vlakbij het symbool van de aarde Bij de elektrische...

Страница 18: ...092MAM WS9092AAM WS9092NAM WS1011LAM WS1211MAX WS1211MAM WS1292MAM WS1511MAM Hanghoogte De minimale afstand tussen de pandragers van het gasfornuis en de onderrand van de kap is 65 cm Voor gebruik met een elektrisch keramisch of inductiefornuis bedraagt deze afstand minimaal 55 cm Inbouwafmetingen ...

Страница 19: ... die eerder afgetekend is op de muur Teken de positie van de gaten af en boor ze Fig 2 Plaats de beugel tegen de muur en zet die vast met de twee schroeven meegeleverd Voor de montage worden schroeven en expansiepluggen gebruikt die geschikt zijn voor de muur zelf bijv gewapend beton gipsplaat enz Indien de schroeven en pluggen geleverd worden met de kap zorg er dan vooraf voor dat die geschikt zi...

Страница 20: ...NL 20 INSTALLATIE Plaats voor de installatie van de afzuigkap de elektrische unit rechtop Fig 4 Bevestig de beugel met de vier schroeven G zoals weergegeven in Fig 5 Fig 4 Fig 5 ...

Страница 21: ...fzuigkap en maak hem vast aan de beugel door de moer aan te brengen op de schroef figuur 6 stap 2 Houd een passende moersleutel vast in een hand en gebruik de andere hand om de moer tegen te houden met een tweede sleutel figuur 6 stap 3 De afstand tussen de moer en de beugel bedraagt minstens 3 mm Fig 6 INSTALLATIE ...

Страница 22: ...NL 22 INSTALLATIE Lijn de afzuigkap horizontaal uit door middel van de twee nivelleerschroeven figuur 7 stap 1 Fig 7 ...

Страница 23: ...rticaal uit door middel van de twee stelschroeven in het motorhuis Fig 8 stap 3 Na het stellen van de kap moet u de schroeven volledig vastdraaien zoals weergegeven in figuur 8 stap 4 en doe hetzelfde met de veiligheidsschroeven Fig 8 stap 5 Fig 8 ...

Страница 24: ...NL 24 INSTALLATIE Bevestig de afzuigkap definitief met de twee meegeleverde schroeven en twee ringen figuur 9 stap 2 Fig 9 ...

Страница 25: ...op zijn plaats met de meegeleverde schroeven en pluggen Fig 10 Sluit de flens aan op de luchtafvoer met behulp van een buis Fig 11 Plaats de bovenste schacht in de onderste schacht en plaats die op de behuizing van de kap Schuif de bovenste schacht tot tegen de beugel en zet deze vast met de twee schroeven Fig 12 ...

Страница 26: ...king van elektrische huishoudelijke apparatuur te wijzen is op het product het symbool van een doorgekruiste vuilnisbak aangebracht Dit betekent dat het apparaat aan het einde van zijn levensduur niet bij het gewone huisvuil mag worden gevoegd Het toestel moet naar een speciaal centrum voor gescheiden afvalinzameling van de gemeente worden gebracht of naar een verkooppunt dat deze service verschaf...

Страница 27: ...NL 27 ...

Страница 28: ...FR 28 ...

Страница 29: ...troduction 4 Sécurité Attention 5 Utilisation Commande 7 Entretien Nettoyage 14 Filtres métalliques 14 Filtres au charbon actif 16 Installation Généralités 17 Connexion électrique 18 Dimensions pour encastrement 19 Annexe Mise au rebut 27 ...

Страница 30: ...ement compte de toutes les fonctions que cet appareil vous offre Vous pouvez lire les consignes relatives à la sécurité et à la maintenance de l appareil Conserver les consignes pour l emploi et les consignes pour le montage Elles pourraient vous servir dans le cas d emploi successif de cet appareil ...

Страница 31: ... chose sauf si cela est expressément indiqué Veillez à ce que l aspiration soit suffisante lorsque la hotte aspirante est utilisée en même temps que la plaque de cuisson L évacuation ne peut pas être raccordée à un conduit de fumée également utilisé pour d autres appareils de chauffage Ne flambez jamais de plats sous la hotte aspirante et nettoyez les filtres à temps La préparation d aliments frit...

Страница 32: ...n nettoyage Débrancher la fiche de la prise de courant ou mettez le disjoncteur en position d interruption de courant La graisse et l huile s enflamment en cas de surchauffe Restez vigilant lorsque vous cuisinez La société décline toute responsabilité pour d éventuels inconvénients dégâts ou incendies provoqués par l appareil et dérivés de la non observation des instructions reprises dans ce manue...

Страница 33: ...ous devez activer la fonction de détection des filtres à charbon actif conformément aux consignes du paragraphe concerné Touche A Lumière éclairage d ambiance Allumage appuyez délicatement sur la touche éclairage pour allumer la lampe à la puissance maximale et activer la fonction rapide de l éclairage d ambiance Réglage maintenez la touche éclairage enfoncée pour régler l intensité de maximum à m...

Страница 34: ...rme voir fonctions spéciales vitesse 1 vitesse 2 vitesse 3 vitesse 4 Touche D ON et augmentation de la vitesse Allumage Pour allumer la hotte il suffit d appuyer sur la touche ON Réglage Appuyez brièvement sur la Touche ON pour augmenter la vitesse du moteur par incréments de 1 1 2 3 4 Fonction vitesse INTENSE Maintenez la touche ON enfoncée pendant 2 secondes environ pour activer la fonction vite...

Страница 35: ...nuterie ne peut pas être activée Fonction Clean Air Fonctions spéciales touche E Cette fonction garantit le renouvellement continu de l air de la cuisine pendant 12 heures maximum Si la touche Minuterie reste enfoncée pendant 4 secondes lorsque l appareil est éteint la fonction CLEAN AIR est activée Cela permet d allumer le moteur pendant 10 minutes toutes les heures à la vitesse 1 Le témoin 4 cli...

Страница 36: ...des jusqu à ce que le témoin 2 cesse de clignoter Activation de la fonction de détection des filtres à charbon actif Appuyez simultanément sur les touches OFF et ON pendant 5 secondes pour activer la fonction de détection des filtres au charbon grâce à l émission d un signal sonore par l avertisseur et l allumage pendant 1 seconde de tous les témoins verts Désactivation de la fonction de détection...

Страница 37: ...ndant 3 secondes tous les témoins verts si la fonction est inactive l écran affiche pendant 3 secondes tous les témoins rouges Attention Vérifier si la fonction Avertisseur n a pas été désactivée voir le message au début des instructions relatives à cette commande ...

Страница 38: ...e pendant 10 minutes Suite à cela la hotte revient à la dernière vitesse paramétrée Pour annuler la vitesse intense appuyez sur la touche Allumage La hotte s éteindra alors Appuyez sur la touche Vitesse turbine pour revenir à la vitesse préalablement définie Vitesse cyclique de la hotte Bouton C Lumière Trois niveaux de lumière sont prévus haut moyen bas Depuis la position Éteint appuyez une fois ...

Страница 39: ...manence Cela signifie qu il est temps de remplacer les filtres au charbon le cas échéant La fonction peut être réinitialisée lorsque la hotte est éteinte en appuyant sur le touche Vitesse turbine pendant 5 secondes Une fois cette opération effectuée le témoin s éteint et le réglage est réinitialisé Indicateur G Lorsque la hotte est à l arrêt si vous appuyez pendant 5 secondes sur la touche Allumag...

Страница 40: ...écédemment mentionnées Hotte Vous pouvez nettoyer la hotte à l eau savonneuse et une serviette douce puis rincer à l eau claire Ne pas utiliser de produits d entretien abrasifs Frotter la peinture laquée de votre hotte avec de la cire pour qu elle conserve sa beauté Hottes à cheminée en acier inoxydable Ne pas nettoyer la cheminée avec une éponge à récurer ou avec des produits abrasifs Frotter la ...

Страница 41: ...Remise en place de la cassette à filtre Le filtre avec le mécanisme de fermeture doit être orienté vers le côté Ouvrez le mécanisme de fermeture Les cames situées sur le côté du filtre tombent ainsi vers l intérieur En plaçant les filtres maintenez le mécanisme de fermeture dans cette position 1 Poussez les cames latérales du filtre dans les ouvertures prévues à cet effet situées sur le côté de la...

Страница 42: ...r les filtres anti graisses et les filtres à carbone actif régénérables il est important que ceux ci soient bien secs Pour transformer la hotte de la version aspirante à la version filtrante demander à votre revendeur les filtres au charbon actif et suivre les consignes de montage Remplacement des filtres au charbon actif Pour remplacer les filtres au charbon actif il faut enlever auparavant les f...

Страница 43: ... céramique ou à induction cette distance doit être d au moins 55 cm Ne pas oublier les règlements locaux en vigueur concernant l aération des appareils à gaz Un conduit d évacuation court et un nombre limité de coudes assurent un meilleur fonctionnement de la hotte Avant de commencer à percer assurez vous qu il ne passe pas de conduites à l endroit choisi Le tuyau de connexion de la hotte possède ...

Страница 44: ...ent il doit être raccordé à la prise de terre Le branchement au réseau électrique doit être exécuté de la façon suivante MARRON L ligne BLEU N neutre JAUNE VERT terre Le câble neutre doit être raccordé à la borne portant le symbole N tandis que le câble JAUNE VERT doit être raccordé au borne près du symbole de terre Dans l opération de raccordement électrique s assurer que la prise de courant est ...

Страница 45: ...1211MAX WS1211MAM WS1292MAM WS1511MAM Distance demandée La distance minimale entre la surface d appui des casseroles sur le fourneau et la partie plus basse de la hotte ne doit pas être inférieure à 65 cm Pour des fourneaux électriques en céramique ou à induction la distance devra être au minimum de 55 cm Dimensions pour l encastrement ...

Страница 46: ... avec celle qui a été marquée préalablement Marquer la position des trous et faire un trou Fig 2 Positionner la bride de support sur le mur et la fixer avec les deux vis en dotation Pour l opération de montage utiliser les vis et les chevilles à expansion indiquées au type de mur par ex béton armé placoplâtre etc Si les vis et les chevilles sont fournies avec la hotte s assurer qu elles sont appro...

Страница 47: ...r la hotte fixer la boîte électrique D Soulever la boîte électrique Fig 4 Placer la bride de soutien sur la même ligne que les quatre vis G qui se trouvent déjà dans la bague et les visser de la façon indiquée sur la Figure 5 Fig 4 Fig 5 ...

Страница 48: ...cer la hotte et la fixer sur la bride en insérant l écrou dans la vis figure 6 phase 2 Tenir à la main la clé anglaise appropriée et avec l autre tirer l écrou en utilisant une seconde clé anglaise figure 6 phase 3 La distance entre l écrou et la bride de soutien devrait être au minimum de 3 mm Fig 6 INSTALLATION ...

Страница 49: ...FR 23 INSTALLATION Aligner l appareil dans le sens horizontal en réglant les deux vis de nivellement figure 7 phase 1 Fig 7 ...

Страница 50: ...sens horizontal en réglant les deux vis de nivellement près des trous de sécurité Fig 8 phase 3 Après avoir nivelé la hotte serrer complètement les vis de la manière indiquée sur la figure 8 phase 4 ainsi que les vis de sécurité Fig 8 phase 5 Fig 8 ...

Страница 51: ...FR 25 INSTALLATION Fixer la hotte définitivement avec les deux vis et les deux rondelles en dotation figure 9 phase 2 Fig 9 ...

Страница 52: ...de des vis et des chevilles en dotation Fig 10 Connecter la bride au trou d évacuation à l aide d un tuyau Fig 11 Insérer la cheminée décorative supérieure dans la cheminée inférieure et les positionner sur le corps de la hotte Faire glisser la cheminée décorative supérieure jusqu à la bride et la fixer à l aide de deux vis Fig 12 ...

Страница 53: ...entales Pour rappeler l obligation de traiter séparément les appareils électroménagers a été apposé sur le produit un symbole représentant un conteneur à ordures barré d une croix Cela signifie qu à l issue de sa durée de vie l appareil ne peut être mis au rebut avec les déchets ménagers classiques L appareil doit être déposé dans un centre de collecte sélective de déchets prévu par l administrati...

Страница 54: ... Ihre Dunstabzugshaube Einführung 4 Sicherheit Achtung 5 Gebrauch Bedienung 7 Pflege Reinigen 14 Fettfilter 14 Aktivkohlefilter 16 Installation Allgemein 17 Elektroanschluss 18 Einbaumaße 19 Anlagen Entsorgung 27 ...

Страница 55: ...ge dieses Geräts schnell zu schätzen wissen Bitte lesen Sie auch die Sicherheitshinweise und die Empfehlungen zur Instandhaltung des Geräts Bewahren Sie die Gebrauchsanleitung und Installationsanweisungen auf Für spätere Benutzer könnten Sie von Vorteil sein IHRE DUNSTABZUGSHAUBE ...

Страница 56: ...ird Sorgen Sie für ausreichende Belüftung wenn Sie die Dunstabzugshaube zusammen mit einem Gaskochfeld verwenden Die Luftabfuhr darf nicht an einen Abzugskanal angeschlossen werden der auch für andere Geräte verwendet wird Unter der Dunstabzugshaube darf nicht flambiert werden reinigen Sie den Filter rechtzeitig Beim Frittieren ist eine ständige Aufsicht erforderlich um zu verhindern dass heißes F...

Страница 57: ...et werden Ziehen Sie den Stecker aus der Steckdose oder drehen Sie den Schalter im Stromkasten auf Null Fett und Öl können bei Überhitzung Feuer fangen Bleiben Sie während der Zubereitung von Speisen stets in der Nähe Es wird keinerlei Haftung übernommen für Fehler Schäden oder Brände des Gerätes die durch Nichteinhaltung der in diesem Handbuch aufgeführten Anweisungen verschuldet wurden Sicherhei...

Страница 58: ...en Falls Ihr Gerät in UMLUFTVERSION arbeitet muss die Funktion zur Anzeige der eingefügten Aktivkohlefilter aktiviert werden siehe diesbezüglichen Abschnitt Taste A Licht Softlight Einschalten Durch kurzes Drücken der Lichttaste schaltet sich das Licht bei maximaler Beleuchtungsstärke ein Aktivierung der Schnellfunktion des Softlight Einstellen Durch anhaltenden Druck der Lichttaste kann die Beleu...

Страница 59: ...g gedrückt wird schaltet sich die Dunstabzugshaube unabhängig davon welche Motorgeschwindigkeit gewählt wurde aus OFF Display C Display Das Display kann abwechselnd GRÜNE LEDs Anzeige der Motorgeschwindigkeit und ROTE LEDs Anzeige des Alarmstands aufweisen siehe Sonderfunktionen Geschwindigkeit 1 Geschwindigkeit 2 Geschwindigkeit 3 Geschwindigkeit 4 Taste D ON und Geschwindigkeitserhöhung Einschal...

Страница 60: ...nktion aktiviert wurde beginnt die LED der eingestellten Geschwindigkeit aufzublinken Bei eingeschalteten Lichtern reduzieren diese bei Beendigung der Funktion Timer automatisch die Beleuchtungsstärke um 30 40 Um die Funktion vor Beendigung der voreingestellten Zeit zu deaktivieren reicht ein weiterer Druck der Taste Timer und das Gerät schaltet sich aus Achtung Falls die Intensivgeschwindigkeit g...

Страница 61: ...en Für die Nullstellung des elektronischen Speichers die Taste OFF 5 Sekunden drücken bis LED 1 nicht mehr aufblinkt B Aktivkohlefilter Falls auf dem Display LED 2 ROT aufleuchtet und zu blinken beginnt bedeutet dies dass 120 Betriebsstunden vergangen sind und die Aktivkohlefilter ausgetauscht werden Für die Nullstellung des elektronischen Speichers die Taste OFF und ON gleichzeitig 5 Sekunden drü...

Страница 62: ...er eingefügten Aktivkohlefilter aktiviert oder deaktiviert ist gleichzeitig die Tasten LICHT und TIMER 5 Sekunden drücken falls die Funktion aktiviert ist leuchten auf dem Display 3 Sekunden alle LEDs GRÜN auf falls die Funktion deaktiviert ist leuchten auf dem Display 3 Sekunden alle LEDs ROT auf Achtung Überprüfen Sie dass die Summer Funktion nicht deaktiviert wurde siehe Hinweise am Anfang der ...

Страница 63: ...chtenden Led der Geschwindigkeitsstufe 3 angezeigt Die Intensivgeschwindigkeit dauert 10 Min anschließend kehrt die Dunstabzugshaube zu der letzten eingestellten Geschwindigkeit zurück Um die Intensivgeschwindigkeit auszuschalten drücken Sie die Taste Power die Dunstabzugshaube schaltet sich aus oder drücken Sie die Taste Fan speed woraufhin die Geschwindigkeit zu der zuvor eingestellten Stufe zur...

Страница 64: ...schaltet sich die Led der Filteranzeige aus und die 30h Einstellung beginnt erneut bei Null Nach 120h blinkt die Led im Dauermodus auf Dies bedeutet dass die Kohlefilter ausgetauscht werden müssen falls eingebaut Die Nullstellung der Funktion bei ausgeschalteter Dunstabzugshaube erfolgt indem die Taste Fan speed 5 Sek gedrückt wird Daraufhin schaltet sich die Led der Anzeige aus und die Einstellun...

Страница 65: ...chriften zurückzuführen sind Dunstabzugshaube Die Dunstabzugshaube können Sie mit Seifenlauge und einem weichen Tuch reinigen danach mit klarem Wasser nachspülen Gebrauchen Sie keine agressiven Putzmittel wie z B Soda Der Lack der Dunstabzugshaube bleibt gut wenn Sie ihn ab und zu mit Wachs einreiben Rostfreie Hauben Nicht mit einem Scheuerschwamm oder anderen Scheuermitteln behandeln Nachbehandel...

Страница 66: ...ts Papiertuch oder einem trocknen Tuch trockenreiben Filterkassette wieder einsetzen Der Filter ist mit dem Schließmechanismus an der seite einzusetzen Öffnen Sie den Schließmechanismus Die Stifte an der seite des Filters gleiten dadurch nach innen Halten Sie beim Einsetzen des Filters den Schließmechanismus in dieser Position 1 Drücken Sie die Stifte an der seite des Filters in die dafür bestimmt...

Страница 67: ...n vorgenommen werden bzw jedes Mal wenn das Vlies beschädigt ist Vor der Montage des Antifett Filters und des regenerierbaren Aktivkohlefilters ist es unbedingt nötig sicherzustellen dass diese gut getrocknet sind Beziehen Sie um die Dunstabzugshaube von der Abluftversion zur Filterversion umzuformen bei Ihrem Händler die Aktivkohlefilter und befolgen Sie die Einbauhinweise Wechsel der Aktivkohlef...

Страница 68: ...muss dieser Abstand mindestens 55 cm sein Die Abluftführung darf nur an einen zentralen mechanischen Abzugskanal angeschlossen werden Denken Sie an die örtlichen Vorschriften bezüglich Entlüftung von Gasgeräte Je kürzer das Abluftrohr und je weniger Krümmungen es hat um so besser ist die Wirkung der Dunstabzugshaube Kontrollieren Sie bevor Sie zu bohren beginnen ob in der Mauer keine Installations...

Страница 69: ... der Schutzklasse I an und muss somit geerdet werden Der Anschluss an das Stromnetz wird folgendermaßen ausgeführt BRAUN L Außenleiter BLAU N Neutralleiter GELB GRÜN Schutzleiter Der Neutralleiter muss an die Klemme mit dem Symbol N angeschlossen werden während der GELB GRÜNE Leiter an die Erdungsklemme mit dem Symbol angeschlossen werden muss Vergewissern Sie sich beim elektrischen Anschluss dass...

Страница 70: ...92NAM WS1011LAM WS1211MAX WS1211MAM WS1292MAM WS1511MAM Erforderlicher Abstand Der Abstand zwischen dem Gaskochfeld und dem niedrigsten Punkt der Abzugshaube muss mindestens 65 cm betragen Bei einem elektrischen Kochfeld einem Keramikfeld oder einem Induktionskochfeld muss dieser Abstand mindestens 55 cm sein Einbaumaße ...

Страница 71: ... Vorzeichnung an der Wand befindet Markieren Sie die Position der Löcher und bohren Sie diese Abb 2 Befestigen Sie den Bügel mit den zwei mitgelieferten Schrauben an der Wand Verwenden Sie für die Installation Schrauben und Spanndübel die für die Wandbeschaffenheit angemessen sind z B Stahlbeton Gipskartonplatte usw Wenn die Schrauben und Dübel zum Lieferumfang der Abzugshaube gehören prüfen Sie v...

Страница 72: ...N Befestigen Sie vor der Installation der Abzugshaube den Schaltkasten D Heben Sie den Schaltkasten an Abb 4 Abb 4 Abb 5 Sie den Bügel mit den 4 Schrauben G direkt in der Buchse an und ziehen Sie diese fest siehe Abb 5 ...

Страница 73: ... am Bügel indem Sie die Muttern auf die Schrauben setzen Abb 6 Schritt 2 Halten Sie mit einer Hand den Schraubenschlüssel und ziehen Sie mit der anderen Hand die Mutter mit einem zweiten Schraubenschlüssel an Abb 6 Schritt 3 Der Abstand zwischen der Mutter und dem Bügel sollte mindestens 3 mm betragen Abb 6 INSTALLATION ...

Страница 74: ...DE 23 INSTALLATION Richten Sie das Gerät waagerecht aus indem Sie die zwei Justierschrauben entsprechend einstellen Abb 7 Schritt 1 Abb 7 ...

Страница 75: ...m Sie die zwei Justierschrauben in der Nähe der Sicherheitsbohrungen entsprechend einstellen Abb 8 Schritt 3 Ziehen Sie nach der Ausrichtung der Abzugshaube sowohl die Schrauben der Abb 8 Schritt 4 als auch die Sicherheitsschrauben ganz an Abb 8 Schritt 5 Abb 8 ...

Страница 76: ...DE 25 installation Befestigen Sie das Gerät mit den zwei mitgelieferten Schrauben und den zwei Unterlegscheiben endgültig Abb 9 Schritt 2 Abb 9 ...

Страница 77: ...hrauben und Dübeln Abb 10 Abb 11 Abb 12 Verbinden Sie den Flansch mit einem flexiblen Rohr an der Luftabzugsöffnung Abb 11 Setzen Sie das Oberteil der dekorativen Verkleidung in dessen Unterteil und bringen Sie diese auf der Abzugshaube an Schieben Sie die dekorative Verkleidung bis zum Bügel und befestigen Sie diese mit den zwei Schrauben Abb 12 ...

Страница 78: ...ktrohaushaltsgeräte getrennt zu beseitigen ist das Produkt mit einer Mülltonne die durchgestrichen ist gekennzeichnet Dies bedeutet das am Ende seiner Nutzzeit das Produkt nicht zusammen mit dem Siedlungsabfall beseitigt werden darf Es kann zu den eigens von den städtischen Behörden eingerichteten Sammelstellen oder zu den Fachhändlern die einen Rücknahmeservice anbieten gebracht werden Die getren...

Страница 79: ...DE 28 ...

Страница 80: ...r hood Introduction 4 Safety Attention 5 Use Controls 7 Maintenance Cleaning 14 Metal grease filters 14 Active carbon filters 16 Installation General 17 Electrical connection 18 Building in dimensions 19 Appendice Disposal 27 ...

Страница 81: ...quickly be aware of all the facilities the appliance can offer you You can read about safety and how you should look after the appliance Keep the instructions for use and the installation instructions Any later user of this appliance could benefit from them Your COOKER hood ...

Страница 82: ...cated Make sure there is sufficient circulation when you use the cooker hood on a gas hub The exhaust exit must never be connected to a smoke duct which is also used for other heating appliances Never flambé under the cooker hood and always clean the filters on time Frying needs to be done under constant supervision to prevent the heated fat from catching fire The cooker hood needs to be cleaned r...

Страница 83: ...tion or cleaning Remove the plug from the mains current or turn the switch in the meter cupboard to zero Grease and oil are flammable when they are overheated Stay in the vicinity of the cooker when preparing food We will not accept any responsibility for any faults damage or fires caused to the appliance as a result of the non observance of the instructions included in this manual ...

Страница 84: ... to activate the active carbon filters indicator function which you find in the paragraph regarding this function Button A Light Softlight Starting A brief pressure on the light button will turn on the light at the maximum intensity activating the fast softlight function Adjustment By keeping the light button pressed the intensity can be adjusted from maximum to minimum and viceversa Switching off...

Страница 85: ...e the alarm status See special functions speed 1 speed 2 speed 3 speed 4 Button D ON and Speed Increase Starting In order to turn on the hood press button ON Adjustment A brief pressure of the ON button will increase the speed of the motor a step at a time 1 2 3 4 INTENSIVE speed function If the ON button is kept pressed for about 2 seconds the INTENSIVE speed function is activated for 10 minutes ...

Страница 86: ...er cannot be activated Clean Air function Special Functions Button E Clean Air function This function guarantees the continuous recycling of the air in the kitchen for a maximum of 12 hours By keeping the Timer button pressed for 4 seconds when the appliance is switched off the CLEAN AIR function is activated This turns on the motor for 10 minutes every hour at the first speed LED 4 flashes with a...

Страница 87: ... LED 2 stops flashing Activation of the function for the indication of inserted active carbon filters By pressing simultaneously the OFF and ON buttons for 5 seconds the active carbon filters indicator function is activated with an acoustic indicator of the Buzzer and the switching on for 1 second of all GREEN LEDs Deactivation of the inserted filters indicator function By pressing simultaneously ...

Страница 88: ...y all the GREEN LEDs for 3 seconds if the function is not active the screen will display all the RED LEDs for 3 seconds Warning Check that the Buzzer function has not been deactivated see the warning at the beginning of the instructions of this control USE ...

Страница 89: ... led indicating speed 3 The duration of the intensive speed is 10 minutes after this time the hood goes back to the last set speed In order to remove the intensive speed press the power button and the hood will switch off or press the Fan speed button and the speed goes back to the previously set one Speed of the hood with cyclic trend Button C Light There are three light levels high medium low Fr...

Страница 90: ...the setting of the 30 hours starts again from the beginning After 120 hours the led will flash continuously This means that the carbon filters have to be replaced if present To reset the function with hood off press the Fan speed button for 5 seconds After this operation the led of the indicator turns off and the setting starts again from the beginning Indicator G With the hood off press the Power...

Страница 91: ...r or any fire damage linked to inappropriate maintenance or failure to observe the above safety recommendations Cooker hood Clean the cooker hood with soapy water and a soft cloth Then wipe with clean water to rinse Do not use aggressive cleaning agents such as soda The cooker hood paintwork will stay looking nice if you wax it occasionally Stainless steel cooker hoods Do not use any sort of scour...

Страница 92: ... filter cassette The filter has to be installed with the locking mechanism to the side Open the locking mechanism This pulls the projections to the side of the filter inwards When installing the filters hold the locking mechanism in this position 1 Push the projections at the side of the filter into the openings provided for this purpose at the side of the extractor hood 2 Hinge the filter upwards...

Страница 93: ...ounting the anti grease filters and the regenerable active charcoal filters it is important that they are completely dry To transform the hood from a ducting version into a filtering version ask your dealer for the charcoal filters and follow the installation instructions Substitution of active carbon filters To replace the active carbon filters you must remove the antigrease filters and then pres...

Страница 94: ... or induction hob this distance must be at least 55 cm If the cooker hood is to be fitted to an existing duct no other appliances such as a geyser or heater may be connected to that same duct Consider local regulations with respect to the ventilation of gas appliances The shorter the duct and the fewer the bends in it the better the cooker hood will work Before you start drilling check that there ...

Страница 95: ...therefore be connected to the earth system Connection to the power mains must be carried out as follows BROWN Phase L BLUE N neutral YELLOW GREEN earth The neutral cable is to be connected to the clamp with symbol N while the YELLOW GREEN cable is to be connected to the clamp next to the earthing symbol During the electrical connection make sure that the electrical socket is equipped with earth co...

Страница 96: ...11LAM WS1211MAX WS1211MAM WS1292MAM WS1511MAM Clearance required The minimum distance between the supporting surface for the cooking vessels on the gashob and the lowest part of the range hood must be not less than 65 cm For use with an electric ceramic or induction hob this distance must be at least 55 cm Building in dimensions ...

Страница 97: ...incides with the one previously marked on the wall Mark the position of the holes and drill these Fig 2 Put the bracket on the wall and fasten it with the two screws provided For the mounting work use screws and expansion dowels suited to the type of wall e g reinforced concrete plasterboard etc If screws and dowels are provided with the hood make sure beforehand that these are suitable for the ty...

Страница 98: ...lation Before installing the hood fasten the electrical box D Lift the electrical box Fig 4 Position the bracket in line with the four screws G already in the bushing and do them up as shown in Figure 5 Fig 4 Fig 5 ...

Страница 99: ...e structure and fasten it on the bracket inserting the nut in the screw figure 6 step 2 Hold the suitable spanner in one hand and with the other hand pull the nut using a second spanner figure 6 step 3 The distance between the nut and the bracket should be a minimum of 3 mm Fig 6 installation ...

Страница 100: ...GB 23 installation Align the device horizontally adjusting the two levelling screws accordingly figure 7 step 1 Fig 7 ...

Страница 101: ...lign the device horizontally adjusting the two levelling screws near the safety holes Fig 8 step 3 After levelling the hood fully tighten the screws shown in figure 8 step 4 as well as the safety screws Fig 8 step 5 Fig 8 ...

Страница 102: ...GB 25 installation Fasten the structure definitively with the two screws and two washers provided figure 9 step 2 Fig 9 ...

Страница 103: ... place with the screws and dowels provided Fig 10 Connect the flange to the air evacuation hole with a flexible pipe Fig 11 Insert the top decorative chimney in the bottom decorative chimney and place them on the body of the hood Slide the top decorative chimney as far as the bracket and fasten it with the two screws Fig 12 ...

Страница 104: ... in accordance with official regulations To draw attention to the fact that the segregated processing of electric household appliances is compulsory this appliance carries the symbol of a crossed out dustbin This means that at the end of its working life you may not dispose of the appliance as household refuse Instead you should hand it in at a special refuse collection centre run by the local aut...

Страница 105: ...GB 28 ...

Страница 106: ......

Страница 107: ......

Страница 108: ...3LIK0876 ...

Отзывы: