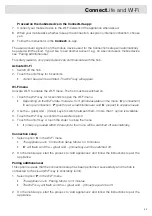
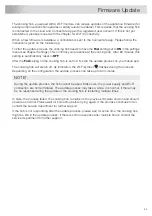
background image

You can tailor the behaviour of this induction hob to suit your cooking style! There are various settings
available for adjustment.

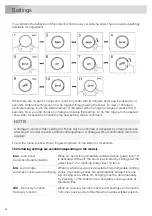
While there are no pans on any zone, touch any slider with two fingers and keep it pressed for 3
seconds. Different settings can now be toggled through using the slider. To view or change a
particular setting, touch the slider element of the slider with one finger and keep it pressed for 3
seconds. Now you can choose to change or disable that setting. To do this, toggle to the desired
value. After 3 seconds of innactivity the new setting will be confirmed.

NOTE!

A change to 'current limiter' setting (CON) can only be confirmed or accepted by a 3 second-press
after step 9, in order to avoid unintentional adjustment. A change without confirmation will not be
applied!

To exit the menu, press with two fingers anywhere on the slider for 3 seconds.

The following settings are available (depending on the model).

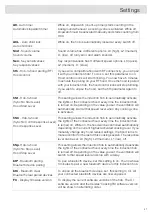
While on, boost is automatically activated when power level 12
is activated. While off, the boost is activated by sliding past the
power level 12 or touching power level 12 twice.

boo

- Auto boost

Automatic Boost activation

While on, when a new pan is detected on two bridgeable cooking
zones, the cooking zones are automatically bridged into one
big cooking zone. While off, bridging must be done manually
by pressing on the sliders of two bridgable cooking zones at
the same time.

brd

- Auto bridge

Automatic cooking zone bridging

While on, recovery function is active and settings can be moved
from one cooking zone to the other when a pan switches position.

rEC

– Recovery function

Recovery function

36

Settings

Содержание HI21471

Страница 1: ...AUCHSANWEISUNG Induktionskochfeld DE HI21471 21472 23272 26428 26471 26472 27471 27472 28471 28472 28571 28572 29571 29671 29672SV HI29672 28572SVI HI29571 29572SVL HI29571 29572SVM HI29572SVMI HI2647...

Страница 2: ...hutz 26 Kochen mit dem PLUS Men 28 Kochen mit Celsius Cooking 29 Kochen mit Celsius Cooking Kochgeschirr und Hestan Cue Programme 34 Schritt f r Schritt Kochanleitung auf CelsiusCooking com 35 Abzugha...

Страница 3: ...diese einen Stromschlag verursachen k nnen VORSICHT HINWEIS Der Kochvorgang muss beaufsichtigt werden Auch kurze Kochvorg nge m ssen beaufsichtigt werden Legen Sie auf die Induktionskochzone keine Geg...

Страница 4: ...n w hrenddessen beaufsichtigt WARNHINWEIS Bei eingeschaltetem Ger t k nnen die u eren Bauteile hei werden Kleinkinder sollten sich nicht in der N he des Ger tes aufhalten WARNHINWEIS Ber hrbare Teile...

Страница 5: ...l nicht mit hei en Kochzonen in Kontakt kommt Wurde das Netzkabel besch digt sollte es vom Hersteller oder einem autorisierten Servicetechniker ausgetauscht werden um Gefahren zu vermeiden Falls Sie d...

Страница 6: ...tion Ihres Kochger ts Er wird aktiviert wenn Sie vergessen Ihr Kochfeld auszuschalten Je nach der gew hlten Garstufe wird die Kochdauer wie folgt begrenzt Die Kochzone schaltet sich automatisch ab nac...

Страница 7: ...HINWEIS Timer f r die Kochzone haben Vorrang vor dem Kochzeit Begrenzer 7 Sicherheit...

Страница 8: ...nduktionskochfeld mit verschiedenen Termperatursicherungen und einer Restw rmeanzeige ausgestattet die anzeigt welche Kochzonen noch hei sind In dieser Bedienungsanleitung wird beschrieben wie Sie Ihr...

Страница 9: ...n der Gebrauchsanleitung INFORMATION Information Rat Tipp oder Empfehlung WARNUNG Warnung Gefahr ELEKTROSCHOCK Warnung Stromschlaggefahr HEI E OBERFL CHE Warnung hei e Oberfl che BRANDGEFAHR Warnung B...

Страница 10: ...4 kW 3 0 kW Boost 3 Kochzone 21 cm Max 2 3 kW 3 7 kW Boost 4 Kochzone 21 cm Max 2 3 kW 3 0 kW Boost 5 Kochzone 26 cm Max 2 6 kW 3 7 kW Boost 6 Bridge Induktionskochzone 18 x 22 cm Max 2 3 kW 3 7 kW B...

Страница 11: ...chieberegler um die Leistungsstufe der Kochzone einzustellen Wenn Sie den Schieberegler ber hren wird die ausgew hlte Leistungsstufe auf dem Kochzonen Display angezeigt Der ausgew hlte Teil des Schieb...

Страница 12: ...t Dieses Induktionskochfeld ist mit einem intelligenten Energiemanagementsystem ausgestattet Dieses System stellt sicher dass eine maximal zul ssige Leistung aus Sicherheitsgr nden nicht berschritten...

Страница 13: ...ers muss von einem zugelassenen und qualifizierten Installateur entsprechend Ihrem Anschluss und Ihren Leistungsschaltern vorgenommen werden siehe Strombegrenzer f r Details zu Stromst rke und elektri...

Страница 14: ...hilfe eines Magneten berpr fen ob Ihr Kochgeschirr geeignet ist Ein Topf ist geeignet wenn der Topfboden von dem Magnet angezogen wird Ungeeignet Geeignet Keramik Spezielle Edelstahlpfannen Edelstahl...

Страница 15: ...n eignet sich sehr gut f r das Kochen in Schnellkocht pfen Die Kochzone reagiert sehr schnell und der Schnellkochtopf kann sehr schnell Druck aufbauen Sobald Sie eine Kochzone abschalten wird der Vorg...

Страница 16: ...zur Pfanne verursacht Das ist bei manchen Pfannen v llig normal Dadurch werden weder die Pfannen noch das Kochfeld besch digt Der L fter macht Ger usche Um die Lebensdauer und Leistung der Elektronik...

Страница 17: ...ch Garen von Fisch Braten d nner panierter Fleischscheiben Verwenden Sie die Einstellung 12 f r Folgendes Anbraten von Fleisch Kochen von Fisch Zubereiten von Omeletts Braten von gekochten Kartoffeln...

Страница 18: ...indersicherung 4 Abzughaubensteuerung Minus VENTILATOR Plus Beleuchtung Display 5 Hestan Cue Erw rmen und braten Sieden Kochen in Wasser Langsames Kochen oder Sous Vide 6 PLUSProgramme Grill Frittiere...

Страница 19: ...hzone um anzuzeigen welche Kochzonen nach dem Ausschalten noch hei sind Obwohl das Kochfeld ausgeschaltet ist bleibt die Anzeige so lange eingeschaltet wie die Kochzone hei ist Ber hren Sie diese Koch...

Страница 20: ...st 60 Sekunden lang keine Kochzone aktiv schaltet sich das Kochfeld aus Kindersicherung Das Bedienfeld kann gesperrt werden um ein versehentliches Einschalten zu verhindern Schalten Sie das Kochfeld e...

Страница 21: ...F r schnelles Kochen kann Boost f r jede Kochzone aktiviert werden Auf diese Weise k nnen Sie gro e Mengen an Speisen mit zus tzlicher Leistung schnell erhitzen Boost ist nicht l nger als 10 Minuten a...

Страница 22: ...Kochzone zusammengelegt werden Die Topfpositionserkennung wird nach dem Einschalten des Ger tes automatisch aktiviert Wenn ein Topf auf das Kochfeld gestellt wird erkennt die Topferkennung dessen Posi...

Страница 23: ...inigen ohne Ihre Einstellungen zu verlieren Pause aktivieren Mindestens eine Kochzone muss aktiv sein Ber hren Sie die Pause Taste Es ert nt ein kurzes Signal Die Einstellungen aller aktiven Kochfelde...

Страница 24: ...und blinken auf der Kochzonenanzeige Stellen Sie die gew nschte Garzeit ein mit und Wenn die Zeit nicht innerhalb von f nf Sekunden eingestellt wird wird der Countdown Timer deaktiviert Wiederholen Si...

Страница 25: ...bleibt der innere Kreis beleuchtet Sinkt die Temperatur des Kochfelds unter 65 C gehen alle Leuchtanzeigen aus berhitzungsschutz Das Kochfeld ist mit einem L fter ausgestattet der die elektronischen K...

Страница 26: ...n leeren Topf Warm halten und aufheizen Mit dieser Funktion k nnen Sie beispielsweise Schokolade zum Schmelzen bringen 45 C Lebensmittel warm halten 70 C k cheln lassen 94 C oder zum Kochen bringen 10...

Страница 27: ...Fl ssigkeiten am Boden der Pfanne berlaufen und anbrennen INFORMATION Ab 100 C heizen die Programme Kochgeschirr mit unterschiedlichen Leistungsstufen auf Die eingestellte Temperatur dient als Anhalts...

Страница 28: ...t k nnen Sie auch zus tzliche angeschlossene Ger te kaufen mit denen Sie die Temperatur und den Zeitpunkt vollst ndig kontrollieren k nnen Mit diesem Ger t k nnen Sie die volle Leistung von Celsius Co...

Страница 29: ...nfalls k nnen Sie auf Schwierigkeiten sto en oder das System versehentlich besch digen Mit Celsius Cooking sind Sie sicher dass das Kochgeschirr immer genau die richtige Temperatur hat die f r die Zub...

Страница 30: ...Sie die Aufh ngungshalterung ber den Pfannenrand 2 Schieben Sie den Sondenstift von oben in die Aufh ngevorrichtung Die Spitze der Sonde sollte mind 1 cm vom Pfannenboden entfernt sein HINWEIS Lassen...

Страница 31: ...ochzone Das Hestan Cue Men wird ge ffnet Durch nochmaliges kurzes Dr cken kann es wieder geschlossen werden INFORMATION Bitte vergewissern Sie sich dass das Ger t bereits eingeschaltet ist bevor Sie d...

Страница 32: ...bis mittlerer Temperaturen damit keine hohen Temperaturen am Boden des Topfes oder der Pfanne entstehen k nnen Gr ere Mengen und festere Gerichte m ssen ab und zu umger hrt werden um eine gleichm ige...

Страница 33: ...n Sie es Die gemessene Temperatur wird gedimmt angezeigt Erkennung des Entfernens der Sonde Wenn der F hler w hrend des Kochens herausgezogen wird erkennt das Kochfeld dies und stoppt das Heizen Nach...

Страница 34: ...ig zeitlich abgestimmt wurde um Ihnen die perfekten Ergebnisse zu liefern Folgen Sie einfach den angegebenen Schritten Die Zeit und Temperaturamleitung sorgt daf r dass Ihr Essen perfekt zubereitet is...

Страница 35: ...rbtemperatur ndern Auch die Farbtemperatur kann ge ndert werden Dr cken Sie die Lichttaste zusammen mit der Taste um das Licht k lter zu machen oder die Lichttaste zusammen mit der Taste um das Licht...

Страница 36: ...Etikett mit dem QR Code der eindeutigen Ger te ID AUID zug nglich ist Sie m ssen es mit Ihrem Mobilger t scannen wenn die App dazu auffordert Vergewissern Sie sich dass Wi Fi auf dem Kochfeld aktivier...

Страница 37: ...Ber hren Sie die Ein Aus Taste 5 Sekunden lang Es ert nt ein kurzer Piepton Die Wi Fi Taste wird angezeigt WLAN Men Aktivieren Sie die Wi Fi Funktion um das Wi Fi Men zu starten Das Kochfeld muss ein...

Страница 38: ...des Netzwerks Alle Benutzer entkoppeln Diese Option setzt voraus dass der Verbindungsaufbau erfolgreich durchgef hrt wurde und das Kochfeld mit der Cloud verbunden ist Wi Fi Taste leuchtet konstant 1...

Страница 39: ...tet sich aus Das Wi Fi Symbol blinkt als Hinweis w hrend des Vorgangs Je nach Konfiguration kann der Update Vorgang bis zu 60 Minuten dauern HINWEIS W hrend des Aktualisierungsvorgangs kann das Kochfe...

Страница 40: ...n nach Schritt 9 nur durch 3 Sekunden langes Dr cken best tigt oder akzeptiert werden um ein unbeabsichtigtes Verstellen zu vermeiden Eine nderung ohne Best tigung wird nicht bernommen Um das Men zu v...

Страница 41: ...ood pairing RF Abzughaubensteuerung Wenn Sie die Verbindung der Abzughaube entkoppeln m chten setzen Sie den Parameter hth erneut auf Off Aus Mit dieser Einstellung kann das Induktionskochfeld bei jed...

Страница 42: ...Demo Mode Demo Modus f r H ndler Showrooms Wenn diese Option eingestellt ist wird dies nach dem Einschalten des Ger ts mit einem kurzen d angezeigt Ohne Benutzerinteraktion schaltet sich das Ger t nac...

Страница 43: ...abers bei einigen Modellen nicht mit der hei en Kochzone in Ber hrung kommt Halten Sie den Schaber niemals senkrecht zum Glas Kratzen Sie das Kochfeld nicht mit der Spitze des Schabers Dies kann bleib...

Страница 44: ...ld Reiniger und entfernen Sie Schmutz Fett vom Pfannenboden Kontaminierter Topf oder Pfannenboden auf der Kochzone Der Kreis des Topfbodens bleibt nach der Reinigung sichtbar Schalten Sie den Piepton...

Страница 45: ...om Schalten Sie das Kochfeld f r 10 Sekunden aus und oder wechseln Sie die Batterie Geringe Akkuladung des Kochgeschirrs oder instabile Bluetooth Verbindung Instabile Verbindung zwischen Kochgeschirr...

Страница 46: ...Nicht Celsius Cooking Kochgeschirr wird nicht unterst tzt Auf dem Display erscheint E65 zusammen mit Hestan Cue blinkt E65 Ersetzen Sie die Batterie berpr fen Sie den Status mit der Hestan App wenn S...

Страница 47: ...igt Sicherstellen dass das WLAN aktiviert ist und die Internetverbindung Ihres Heimnetzwerks funktioniert Wiederholen Sie den Verbindungsaufbau bei Bedarf WLAN ist deaktiviert oder Probleme mit dem He...

Страница 48: ...u die Abluft nur zur ck in den Raum abgeben Dunstabzugshauben und andere Ger te die Kochdunst absaugen k nnen den sicheren Betrieb von Ger ten die Gas oder andere Brennstoffe verbrennen auch in andere...

Страница 49: ...ahtung gem den Verdrahtungsregeln eingebaut werden Dies gilt auch f r Ger te mit Netzkabel und Stecker wenn der Stecker nach der Installation des Ger tes nicht zug nglich ist Die Verwendung eines omni...

Страница 50: ...es zu einem Stromschlag f hren Kundendienst Trennen Sie das Ger t vom Stromnetz bevor Sie Reparaturen ausf hren Defekte Teile d rfen nur durch Originalteile ersetzt werden Der Hersteller kann nur f r...

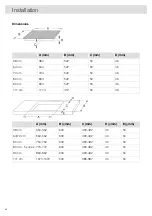
Страница 51: ...ussleisten aus massivem Holz auf der Arbeitsplatte hinter der Kochmulde ist nur dann zul ssig wenn der in den Einbauskizzen angegebene Mindestabstand freigelassen wird d mm b mm a mm 40 380 600 40 640...

Страница 52: ...2 804 80 cm 46 50 522 904 90 cm 46 50 412 1114 111 cm E mm D mm C mm B mm A mm 50 40 490 492 600 350 352 38 cm 50 40 490 492 600 560 562 64 72 cm 50 40 490 492 600 750 752 80 cm 50 40 490 492 600 770...

Страница 53: ...splatte eine Schublade befindet verwenden Sie diese nicht zum Aufbewahren von kleinen Gegenst nden oder Papier da diese wenn sie in den L fter eingesaugt werden den L fter und das K hlsystem besch dig...

Страница 54: ...el durch die Aussparung Stellen Sie das Ger t ber die Mitte des Ausschnitts Schlie en Sie das Ger t an das Stromnetz an siehe Kapitel Technische Installation Testen Sie vor dem Verschlie en unbedingt...

Страница 55: ...NG Die Serviceabteilung ist nur f r die Reparatur und Wartung des Kochfelds verantwortlich Wenden Sie sich bez glich der Neuinstallation des Unterputz Kochfelds an Ihren Fachh ndler f r K chenger te A...

Страница 56: ...92 514 515 560 562 724 725 72 cm 12 27 6 600 40 50 490 492 514 515 750 752 804 805 80 cm 4 Zonen 12 17 6 600 40 50 490 492 514 515 770 772 804 805 80 cm 5 Zonen 12 22 6 600 40 50 490 492 514 515 860 8...

Страница 57: ...e Serviceabteilung ist nur f r die Reparatur und Wartung des Kochfelds verantwortlich Wenden Sie sich bez glich der Neuinstallation des Unterputz Kochfelds an Ihren Fachh ndler f r K chenger te 57 Ins...

Страница 58: ...chtung Befestigen Sie die Dichtung an der Unterseite des Glases 2 3 mm vom Rand entfernt Die Dichtung muss entlang der gesamten Glaskante angebracht werden Die Dichtung darf sich an den Ecken nicht be...

Страница 59: ...0 240 V zwischen L und N sollte von einem Experten mit einem geeigneten Messger t berpr ft werden 2 ffnen Sie die Abdeckung des Anschlussklemmenkastens 3 Schlie en Sie die Kabel entsprechend Ihrem Ger...

Страница 60: ...itungen muss 380 415 V betragen Die Querschnittsfl che des Netzkabelkerns sollte mindestens den Angaben in der Tabelle f r die folgenden Strombegrenzereinstellungen entsprechen die an Ihre Leistungssc...

Страница 61: ...om Schutzschalter abgesichert werden Es ist nicht erlaubt L1 N1 mit einem anderen Fehlerstromschutzschalter als L2 N2 zu betreiben F r folgende Ger tetypen BI9CA BI9CB BI9CC HINWEIS Hinweis Den Ger te...

Страница 62: ...2 F 1 Phase 1 Neutralleiter 1x20A 3 x 4 0 mm H05V2V2 F 1 Phase 1 Neutralleiter 1x16A Weiterhin sind folgende Anschl sse m glich 1 Phase 1 Neutralleiter 220 240 V 50 60 Hz Um die maximale Nennleistung...

Страница 63: ...Sie die Leistungsbegrenzung in Einstellungen wenn n tig Siehe Kapitel Einstellungen Conzur Verbindungseinstellung WARNUNG Das Ger t darf nur von einem autorisierten Servicetechniker angeschlossen werd...

Страница 64: ...ellungen entsprechen die an Ihre Leistungsschalter angepasst werden sollten Anzahl und Querschnitt der Netzkabeldr hte Netzstromkabel Verbindungstyp S t r o m b e g r e n z e r E i n s t e l l u n g e...

Страница 65: ...in der Tabelle f r die folgenden Strombegrenzereinstellungen entsprechen die an Ihre Leistungsschalter angepasst werden sollten Anzahl und Querschnitt der Netzkabeldr hte Netzstromkabel Verbindungsty...

Страница 66: ...n 4 und 5 an Strombegrenzer Siehe Kapitel Einstellungen unter Parameter Con Strombegrenzer zum Einstellen des Parameters Dieser Parameter muss eingestellt werden bevor ein Topf auf das Kochfeld gestel...

Страница 67: ...Elektronikger te mindestens 400 m2 betragen oder die gesamten Lager und Versandfl chen mindestens 800 m2 betragen Vertreiber haben die R cknahme grunds tzlich durch geeignete R ckgabem glichkeiten in...

Страница 68: ...ul Funkger tetyp 2402 0MHz 2480 0MHz Frequenzbereich 10dBm Tr gerausgabe G1D Emissionsart Hiermit wird erkl rt Atagdass die oben genannte Funkanlage mit der Richtlinie 2014 53 EU bereinstimmt Der voll...

Страница 69: ...828859 Die Ger teidentifikationsplakette befindet sich auf der Unterseite des Ger ts Kleben Sie hier die Ger teidentifikationsplakette hin www atag nl www atag be a2...

Страница 70: ...TRUCTIONS FOR USE Induction hob EN HI21471 21472 23272 26428 26471 26472 27471 27472 28471 28472 28571 28572 29571 29671 29672SV HI29672 28572SVI HI29571 29572SVL HI29571 29572SVM HI29572SVMI HI26471S...

Страница 71: ...PLUS menu 25 Cooking with Celsius Cooking 26 Cooking with Celsius Cooking cookware and Hestan Cue programs 30 Step by Step cooking guide on CelsiusCooking com 31 Hood control 32 ConnectLife and Wi Fi...

Страница 72: ...supervised continuously Metallic objects such as knives forks spoons and lids should not be placed on the hob surface since they can get hot After use switch off the hob element by its control and do...

Страница 73: ...hock WARNING Unattended cooking on a hob with fat or oil can be dangerous and may result in fire NEVER try to extinguish a fire with water but switch off the appliance and then cover flame e g with a...

Страница 74: ...tergents spray cans etc WARNING Carefully read the instructions for use before connecting the appliance Repair or any warranty claim resulting from incorrect connection or use of the appliance shall n...

Страница 75: ...r switches the cooking zones off if the time in the table has elapsed The cooking zone switches automatically to setting 12 after Setting 10 minutes boost Cooking time limiter for specific cooking zon...

Страница 76: ...n hob is equipped with several temperature protections and a residual heat indicator which shows which cooking zones are still hot This manual describes how you can make the best possible use of the i...

Страница 77: ...hey have the following meanings INFORMATION Information advice tip or recommendation WARNING Warning general danger ELECTRIC SHOCK Warning danger of electric shock HOT SURFACE Warning danger of hot su...

Страница 78: ...W 3 0 kW boost 3 Cooking zone 21 cm Max 2 3 kW 3 7 kW boost 4 Cooking zone 21 cm Max 2 3 kW 3 0 kW boost 5 Cooking zone 26 cm Max 2 6 kW 3 7 kW boost 6 Bridge induction cooking zone 18 x 22 cm Max 2 3...

Страница 79: ...king zone power level touch the desired spot on the slider As you touch the slider the selected power level will appear on the cooking zone display unit The selected part of the slider will be fully l...

Страница 80: ...power management system This system ensures a maximum permissible power cannot be exceeded for safety reasons The smart power management system will arrange the power distribution across the zones aut...

Страница 81: ...r yourself whether your pans are suitable using a magnet A pan is suitable if the base of the pan is sufficiently attracted by the magnet Unsuitable Suitable Earthenware Special stainless steel pans S...

Страница 82: ...display lights up Integrated pan recognition If a certain power level is set for a cooking zone and there is no suitable pan or any pan on the cooking zone then the cooking zone will not deliver any p...

Страница 83: ...ed fish cook through fish fry thin slices of breadded meat Use setting 12 to sear meats cook fish cook omelettes fry boiled potatoes deep fry foods Use setting boost to bring the food or liquid to the...

Страница 84: ...ock 4 Hood control Minus Fan Plus Lighting Display 5 Hestan Cue Heating up and frying Boiling cooking with water Slow cooking or sous vide 6 PLUS programs Grill Frying wok Heating up keeping warm 7 Co...

Страница 85: ...ne to show which cooking zones are hot after cooking zone is turned off Although the hob is switched off the indicator will remain on for as long as the cooking zone is hot Avoid touching those cookin...

Страница 86: ...FORMATION When no cooking zone is active for 60 seconds the cooking hob will power off Child lock Cooking hob controls can be locked to prevent it from being switched on inadvertently Turn on the hob...

Страница 87: ...can be activated for any cooking zone This will allow you to rapidly heat large amounts of food using extra power Boost is active for no more than 10 minutes then the power level is automatically dec...

Страница 88: ...ecognition is activated automatically after the appliance is switched on When a pan will be placed on the hob the pan recognition function will recognize its position and automatically connect the bri...

Страница 89: ...me without losing your settings Switching on the pause At least one cooking zone must be active Touch the pause button You will hear a short beep The settings on all active hobs are reduced to level 2...

Страница 90: ...active cooking zone The key and will flash on the cooking zone display unit Set the desired cooking time with and If the time is not set within five seconds the count down timer is disabled Repeat the...

Страница 91: ...s still hot the inner circle remains illuminated When the temperature of the hob is reduced below 65 C all lights turn off Overheat protection The hob is fitted with a cooling fan which cools the elec...

Страница 92: ...mer 94 C or bring to boil 100 C Frying wok With this function you can cook vegetable fish bacon meat fried potatoes or eggs by using butter or oil Grill This function is exclusively for bridged cookin...

Страница 93: ...are with different timed power steps The set temperature serves as an indication which temperature range can be reached approximately Cooking process must be attended INFORMATION For more accuracy Cel...

Страница 94: ...Cooking you can also buy some additional connected equipment that will help you gain total control over temperatures and timings This equipment lets you unlock the full power of Celsius Cooking readin...

Страница 95: ...e all the preparation steps Otherwise you may run into difficulties or inadvertently cause damage to the system Using Celsius Cooking ensures you the cookware is always at just the right temperature n...

Страница 96: ...1 Slide the suspension bracket over the pan edge 2 Slide the Probe pin from the top into the suspension bracket The tip of the probe should be 1 cm or from the pan bottom NOTE Leave a minimum distance...

Страница 97: ...be closed INFORMATION Please make sure that the appliance is already switched on before placing the Celsius Cooking cookware so that the system can clearly identify its position Cooking with the embed...

Страница 98: ...ch it The measured temperature is displayed dimmed Probe removal detection If the probe is moved out during cooking the hob will detect that and stop heating When placed back the user can confirm that...

Страница 99: ...lsiusCooking com as each recipe has been carefully timed to give you the perfect results Just follow the steps The timing and temperature guide will make sure your food is prepared to perfection It ma...

Страница 100: ...temperature Press the light key together with the key to make the light colder or the light key together with the key to make the light warmer Synchro Start Settings This setting allows the induction...
Страница 101: ...th your mobile device when the App prompts to do so Make sure that Wi Fi is activated on the hob by checking if the Wi Fi key is visible when the hob is on Else see Activate Wi Fi Install the ConnectL...

Страница 102: ...nnection to set up a connection P pair to pair an additional user and U unpair to unpair all users 2 Use the plus and minus keys to switch between them if more than 1 option is available 3 Touch the W...

Страница 103: ...U in the Wi Fi menu to unpair all users and disconnect from the cloud The Wi Fi key will flash 3 times The hob will delete all paired users and disconnects from the cloud unpair Switching off Wi Fi 1...

Страница 104: ...ON start the update process on you mobile app The cooking hob will switch off As indication the Wi Fi symbol flashes during the process Depending on the configuration the update process can take up to...

Страница 105: ...unintentional adjustment A change without confirmation will not be applied To exit the menu press with two fingers anywhere on the slider for 3 seconds The following settings are available depending...

Страница 106: ...vel when any cooking zone is activated hSt Hob to hood Synchro Start Level Hood Start Level This setting allows the induction hob to automatically activate the lights of the connected hood every time...

Страница 107: ...liance will automatically switch off after 10 minutes If your electrical wiring or circuit breakers do not meet the specified current draw on the rating plate the current limiter can be activated by r...

Страница 108: ...lastic handle of the scraper in some models does not meet with a hot cooking zone Do not press the scraper perpendicularly against the glass Do not scratch the hob surface with the tips of the scraper...

Страница 109: ...om Contaminated pan bottom used on the cooking zone Circle of pan bottom remains visible after cleaning Switch off the beeping by touching the cooking zone blinking timer key The pre set time has ende...

Страница 110: ...re Non Celsius Cooking cookware is not supported E65 appears on display together with Hestan Cue is blinking E65 Replace battery check the status with the Hestan App when unsure Celsius Cooking cookwa...

Страница 111: ...connection setup process Ensure the Wi Fi is enabled and internet connection of your home network is working Repeat the connection setup if needed Wi Fi is disabled or Home network issues Cooking hob...

Страница 112: ...m Extraction hoods and other appliances that extract cooking vapours can affect the safe operation of appliances that burn gas or other fuel including those in other rooms by backflowing combustion ga...

Страница 113: ...ar switch with a contact separation of at least 3 mm fitted in the fixed wiring will fulfil this requirement The connection cable must hang freely and should not be fed through a drawer For connecting...

Страница 114: ...s damaged it must be replaced by the manufacturer its service agent or similarly qualified persons in order to avoid a hazard Installing a built in hob Use of solid wood corner trims on worktops behin...

Страница 115: ...804 80 cm 46 50 522 904 90 cm 46 50 412 1114 111 cm E mm D mm C mm B mm A mm 50 40 490 492 600 350 352 38 cm 50 40 490 492 600 560 562 64 72 cm 50 40 490 492 600 750 752 80 cm 50 40 490 492 600 770 7...

Страница 116: ...ted in its lower part If there is a drawer underneath the countertop do not use it to store small objects or paper as these could if sucked into the fan damage the fan and the cooling system Moreover...

Страница 117: ...er of the bottom of the glass panel First feed the power cord through the cutout Place the appliance over the centre of the cutout Connect the appliance to the power mains see chapter Technical instal...

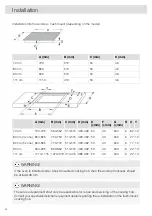
Страница 118: ...rvice department shall only be responsible for repair and servicing of the cooking hob Consult your specialized kitchen equipment dealer regarding the re installation of the flush mount cooking hob St...

Страница 119: ...12 17 6 600 40 50 490 492 514 515 770 772 804 805 80 cm 5 zone 12 22 6 600 40 50 490 492 514 515 860 862 904 905 90 cm 14 22 6 500 40 50 385 387 414 415 1070 1072 1114 1115 111 cm WARNING If the oven...

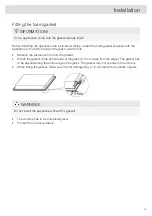
Страница 120: ...protective film from the gasket Attach the gasket to the bottom side of the glass 2 3 mm away from the edge The gasket has to be applied along the entire edge of the glass The gasket may not overlap...

Страница 121: ...power mains 220 240 V between L and N should be checked by an expert using an appropriate measuring device 2 Open the cover of the connection terminal box 3 Connect the wires according to your type o...

Страница 122: ...ord core cross sectional area should be at least as listed in Table for the following current limiter settings which should be adjusted to your circuit breakers Number and cross section of Power cord...

Страница 123: ...BI9CA BI9CB BI9CC NOTE Note The appliance type can be found on the rating plate on the bottom of the appliance Voltage between line and neutral conductor must be 220 240 V Voltage between lines must...

Страница 124: ...5V2V2 F 1 phase 1 neutral conductor 1x16A The following connections are possible 1 phase 1 neutral conductor 220 240 V 50 60 Hz To reach the rated maximum power a fuse of 48A is needed Install a jumpe...

Страница 125: ...gs when needed See chapter Settings Con for connection setting WARNING The appliance may only be connected by an authorised expert False connection can destroy parts of the appliance In such case ther...

Страница 126: ...cord type Connection type Current limiter settings 4x1 5 mm H05VV F 3 phase conductors 2x16A 4x1 5 mm H05VV F 3 phase conductors 2x13A 4x1 5 mm H05VV F 3 phase conductors 2x10A 4x1 5 mm H05VV F 3 phas...

Страница 127: ...pe Connection type Current limiter settings 4x4 0 mm H05V2V2 F 3 phase conductors 3x16A 4x4 0 mm H05V2V2 F 3 phase conductors 3x13A 4x4 0 mm H05V2V2 F 3 phase conductors 3x10A 4x4 0 mm H05V2V2 F 3 pha...

Страница 128: ...miter See chapter Settings under parameter Con Current limiter to set the parameter This parameter must be set before any pan is placed on the hob or cooking zone activated WARNING Current limiter set...

Страница 129: ...duct is marked with the symbol of a crossed out wheeled dustbin This means that at the end of its working life the product must not be disposed of as urban waste It must be taken to a special local au...

Страница 130: ...le Radio equipment type 2402 0MHz 2480 0MHz Frequency range 10dBm Carrier Output G1D Emission type Hereby Atag declare that the radio equipment mentioned above is in compliance with Directive 2014 53...

Страница 131: ...828824 The appliance identification card is located on the bottom of the appliance Stick the appliance identification card here www atag nl www atag be a2...

Отзывы: