background image

ASUS Tablet E-Manual

Gestures for the ASUS Tablet

Using the touch screen panel, the following gestures can be done to navigate, 

interact with, and launch the exclusive features included with your ASUS Tablet.

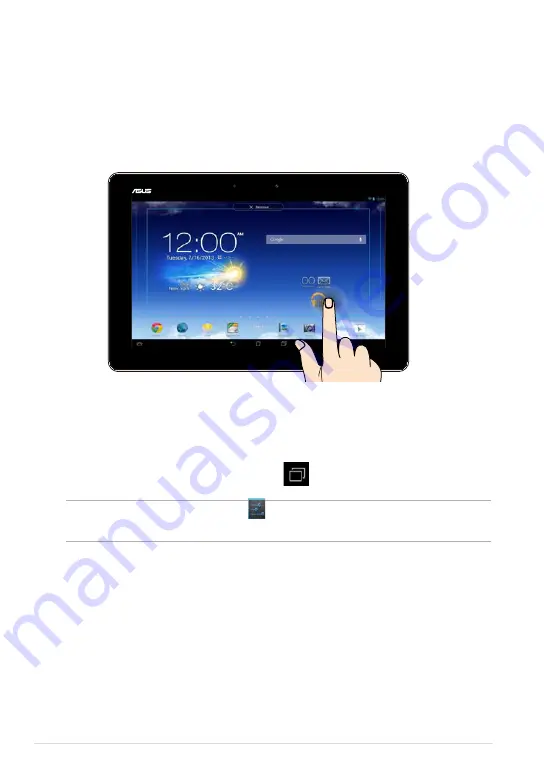
To move an app, tap and hold the app and drag it to a new location.

To delete an app from the main screen, tap and hold the app and drag it up 

to the top side of the screen.

To capture a screen image, tap and hold 

NOTE:  

To enable this setting, go to 

Settings


> ASUS Customized Setting

 then tick 

Capture screenshots by holding the Recent Apps Key.

Drag/Tap and hold/Long press

Содержание VTD-VPH

Страница 1: ...support asus com ...

Страница 2: ...WITHOUT NOTICE AND SHOULD NOT BE CONSTRUED AS A COMMITMENT BY ASUS ASUS ASSUMES NO RESPONSIBILITY OR LIABILITY FOR ANY ERRORS OR INACCURACIES THAT MAY APPEAR IN THIS MANUAL INCLUDING THE PRODUCTS AND SOFTWARE DESCRIBED IN IT Copyright 2013 ASUSTeK COMPUTER INC All Rights Reserved LIMITATION OF LIABILITY Circumstances may arise where because of a default on ASUS part or other liability you are enti...

Страница 3: ...Rear view 13 Chapter 2 Using your ASUSTablet Setting up your ASUS Tablet 18 Charging your ASUS Tablet 18 Installing a micro SIM card 20 Turning your ASUS Tablet on 21 Gestures for the ASUS Tablet 22 Connecting an HDMI compliant display 25 Chapter 3 Working with Android Starting up for the first time 28 Android lock screen 29 Unlocking your device 29 Adding a wallpaper on the lock screen 30 Adding ...

Страница 4: ...pp info 38 Creating app folder 39 Viewing apps under the Recents screen 40 Task Manager 42 File Manager 43 Accessing the internal storage 43 Accessing the external storage device 43 Settings 45 Turning your ASUS Tablet off 47 Putting your ASUS Tablet to sleep 47 Chapter 4 Pre installed Apps Featured pre installed apps 50 Play Music 50 Camera 51 Gallery 53 Email 60 Gmail 62 Play Store 63 Maps 64 My...

Страница 5: ...AR 89 Canada Industry Canada IC Notices 89 Canada avis d Industrie Canada IC 90 IC Warning Statement 90 EC Declaration of Conformity 91 Prevention of Hearing Loss 91 CE Mark Warning 92 RF Exposure information SAR CE 93 Power Safety Requirement 93 ASUS Recycling Takeback Services 93 Coating notice 93 Green ASUS notice 94 Regional notice for Singapore 94 Proper disposal 95 ...

Страница 6: ...components of your ASUS Tablet Chapter 2 Using your ASUSTablet This chapter shows you how to use the different parts of your ASUS Tablet Chapter 3 Working with Android This chapter provides an overview of using Android in your ASUS Tablet Chapter 4 Pre installed apps This chapter features the pre installed applications included with your ASUS Tablet Appendices This section includes notices and saf...

Страница 7: ...ask NOTE This message contains additional information and tips that can help complete tasks WARNING This message contains important information that must be followed to keep you safe while performing tasks and prevent damage to your ASUS Tablet s data and components Typography Bold This indicates a menu or an item that must be selected Italic This indicates sections that you can refer to in this m...

Страница 8: ...ded periods of time Using your ASUSTablet This ASUS Tablet should only be used in enviroments with ambient temperatures between 0 C 32 F and 35 C 95 F Long time exposure to extremely high or low temperature may quickly deplete and shorten the battery life To ensure the battery s optimal performance ensure that it is exposed within the recommended environment temperature Airplane Precautions Contac...

Страница 9: ...ckage contents NOTES If any of the items is damaged or missing contact your retailer The bundled power adapter varies with country or region Power adapter ASUS Tablet Micro USB cable User manual Warranty card ...

Страница 10: ...ASUS Tablet E Manual 10 ...

Страница 11: ...K005 11 Chapter 1 Hardware Setup Chapter 1 Hardware Setup ...

Страница 12: ...atically adjust the brightness of the display depending on the ambient light condition Front camera This built in 1 2 megapixel camera allows you to take pictures or record videos using your ASUS Tablet Touch screen panel The touch screen panel allows you to operate your ASUS Tablet using touch gestures Getting to know your ASUS Tablet Front view ...

Страница 13: ...olume button The volume button allows you to increase or decrease the volume level of your ASUS Tablet Audio speakers The built in audio speakers allow you to hear audios straight from your ASUS Tablet Audio features are software controlled Rear camera This built in 5 megapixel camera allows you to take high definition pictures or record high definition videos using your ASUS Tablet ...

Страница 14: ...by mode Forcing the system to restart may result to data loss We strongly recommend that you back up your data regularly Microphone The built in microphone can be used for video conferencing voice narrations or simple audio recordings Micro USB 2 0 port Use the micro USB Universal Serial Bus 2 0 to charge the battery pack or supply power to your ASUS Tablet This port also allows you to transfer da...

Страница 15: ...s MicroSD card slot The ASUS Tablet comes with a built in memory card reader slot that supports microSD and microSDHC card formats Manual reset hole If your system becomes unresponsive push inside the manual reset hole for ten 10 seconds using a straightened paper clip to force restart your ASUS Tablet IMPORTANT Forcing the system to restart may result to data loss We strongly recommend that you b...

Страница 16: ...ASUS Tablet E Manual 16 ...

Страница 17: ...K005 17 Chapter 2 Using your ASUS Tablet Chapter 2 Using your ASUS Tablet ...

Страница 18: ...let Charge your ASUS Tablet for eight 8 hours before using it in battery mode for the first time Connect the micro USB cable to the power adapter Plug the micro USB connector into your ASUS Tablet Plug the power adapter into a grounded power outlet To charge your ASUS Tablet ...

Страница 19: ...g a different power adapter may damage your ASUS Tablet Peel the protective film off from the power adapter and micro USB cable before charging the ASUS Tablet to prevent risk or injury Ensure that you plug the power adapter to the correct power outlet with the correct input rating The output voltage of this adapter is DC 5V 2A Do not leave the ASUS Tablet connected to the power supply once it is ...

Страница 20: ...ASUS Tablet you need to install a micro SIM Subscriber Identity Module card To install a micro SIM card A Insert the tip of the bundled micro SIM card tray eject pin to eject the micro SIM card tray B Pull out the micro SIM card tray and place the micro SIM card on the tray as shown Micro SIM card tray Micro SIM card ...

Страница 21: ...K005 21 Turning your ASUSTablet on To turn your ASUS Tablet on press the power button for about two 2 seconds C Align and insert the micro SIM card tray back to the slot ...

Страница 22: ...with your ASUS Tablet To move an app tap and hold the app and drag it to a new location To delete an app from the main screen tap and hold the app and drag it up to the top side of the screen To capture a screen image tap and hold NOTE To enable this setting go to Settings ASUS Customized Setting then tick Capture screenshots by holding the Recent Apps Key Drag Tap and hold Long press ...

Страница 23: ...K005 23 Tap touch Tap an app to launch it In the File Manager app tap to select and open a file Zoom out Bring together your two fingers on the touch panel to zoom out an image in Gallery Maps or Places ...

Страница 24: ...ur two fingers on the touch panel to zoom in an image in Gallery Maps or Places Swipe Swipe your finger to the left or to the right on the touch panel display to switch between screens or to flip through the pages of an e book or a gallery of images ...

Страница 25: ...connect an HDMI compliant display Connect the micro HDMI connector to the micro HDMI port of your ASUS Tablet Plug the HDMI cable to the HDMI port of an HDMI compliant display Connecting an HDMI compliant display ...

Страница 26: ...ASUS Tablet E Manual 26 ...

Страница 27: ...K005 27 Chapter 3 Working with Android Chapter 3 Working with Android ...

Страница 28: ...Select an input method or keyboard format then tap 4 From the list of available Wi Fi networks tap a network name then tap To skip connecting to a network tap NOTE Some Wi Fi networks may prompt you to key in a passcode 5 Select the type of data synchronization then tap 6 Follow the onscreen instructions to configure the following items q Google Account q Google location and services 7 Set the loc...

Страница 29: ...K005 29 Android lock screen Unlocking your device Tap and drag to Time and date panel Wallpaper and widget panel Lock icon Google Now launcher ...

Страница 30: ... and date panel to the right to view the wallpaper and widget panel then tap and select a widget Adding a wallpaper on the lock screen Swipe the time and date panel to the right to view the wallpaper and widget panel then tap and select a wallpaper from Gallery or Wallpapers ...

Страница 31: ...ogle icon Google Now Google Now is your ASUS Tablet s personal assistant giving you instant updates on weather conditions nearby restaurants flight schedules scheduled appointments and other related information based from your web history synced calendars and reminders ...

Страница 32: ...s screen Shortcuts Shortcuts Tap to set up the location date and time alarm settings Return to Home Screen Display recent apps Return to the previous screen System bar Open Google Voice search Open Google Text search Read e mails in Email app Shortcut to Android and ASUS utilities ...

Страница 33: ...sor and gyroscope of your ASUS Tablet enable automatic screen rotations depending on how you hold it You can quickly switch between a landscape or portrait view by steering your ASUS Tablet to the left or to the right Landscape view Portrait view ...

Страница 34: ... to exchange data wirelessly over a network To use Wi Fi enable the Wi Fi feature in your ASUS Tablet and connect to a wireless network Some wireless networks are secured with a key or protected with digital certificates and requires additional steps to set up others are open and you can easily connect to them NOTE Turn Wi Fi off when you are not using it to help save battery power To enable Wi Fi...

Страница 35: ...s screen then tap Settings Slide the Bluetooth switch to ON q Slide down the Notification area to display ASUS Quick Settings panel then tap Pairing your ASUSTablet with a Bluetooth device Before you can connect to a Bluetooth device you must first pair your ASUS Tablet to that device The devices stay paired unless you remove the paired connection between them To pair your ASUS Tablet to a device ...

Страница 36: ...de the Bluetooth switch to ON 2 Tap Bluetooth then tap beside the connected Bluetooth device that you want to unpair or configure 3 From Paired Bluetooth device screen you can do any of the following q Tap Unpair to unpair the device q Tap Rename to rename the Bluetooth device q Tap any of the listed profiles to enable or disable a profile 4 Tap on the system bar to go back to previous screen 3 If...

Страница 37: ...e All Apps screen 2 From the All Apps screen tap and hold the app s icon then drag it to the Home Screen Removing an app from the Home Screen Free up space for new app shortcuts by removing existing app shortcuts on your Home Screen To remove app shortcuts 1 Tap and hold an app until the X Remove appears on top of the screen 2 Drag the app to X Remove to remove it from the Home Screen ...

Страница 38: ...led app information while creating a shortcut for the app While holding an app on the All Apps screen the display switches to Home Screen and the App info will appear on the top of the Home Screen display Drag the app to App info to display its detailed information ...

Страница 39: ...e Screen To create an app folder 1 On the Home Screen tap and drag an app or shortcut onto another app until a black circle appears NOTES The created folder is shown in a black square You can add multiple apps in your folder 2 Tap the folder and tap Unnamed Folder to rename the folder ...

Страница 40: ... of app shortcuts based from your recently launched apps Using the Recents screen you can easily go back to or switch between the apps you recently launched To access the Recents screen 1 Tap on the system bar 2 A list shows up to display all of your recently launched apps Tap on the app you want to launch ...

Страница 41: ...ent app to display its menu 2 To remove the app from the list select Remove from list To view its information select App info NOTE You can also remove a recent app from the list by swiping it up or down To view a recent app s menu ...

Страница 42: ...pps individually or close all apps and utilities at once using the Close All function To manage Task Manager 1 Tap to go to the All Apps screen then tap WIDGETS to display the Widgets menu 2 Tap and hold ASUSTask Manager to display the ASUS Task Manager box on the Home Screen 3 Swipe the list up and down to view all launched apps 4 Tap beside the running app to close it Tap Close All to close all ...

Страница 43: ...then tap an item to select If a microSD card is inserted tap MicroSD to view the contents of your microSD card Accessing the external storage device To access the external storage device 1 Swipe down the notification bar on top of the screen to display the notification box 2 Tap to display the contents of your microSD card To unmount the microSD card from your ASUS Tablet tap IMPORTANT Ensure to s...

Страница 44: ...ernal storage device When you customize a file or folder tick the box beside the file or folder and the action bar appears on the upper right corner of the screen NOTES The action will only appear if you customize a file or files inside the folder You can also tick the file or folder then drag and drop it to your desired destination folder Action bar ...

Страница 45: ...to launch the Settings screen 1 From the All Apps screen tap Settings to display the menu 2 Swipe down the notification bar on top of the screen to display ASUS Quick Settings panel then tap ASUS Quick Setting Displays local date and time Wi Fi settings Settings menu Display settings Brightness manual adjustment Auto Brightness Quick Setting Adjustment panel Audio Wizard Wireless display settings ...

Страница 46: ...nel Notification panel appears under the Quick Setting panel for alerts or updates of apps incoming e mails and utility status NOTE Swipe the notification to the left or to the right to remove the item from the list GPS Wi Fi Instant Dictionary Auto rotate Bluetooth Smart Saving Mobile Data Silent Mode Auto sync Airplane Mode Wi Fi Hotspot ...

Страница 47: ...ompted tap Power Off then tap OK If your ASUS Tablet is unresponsive press and hold the power button for about ten 10 seconds until your ASUS Tablet turns off IMPORTANT Forcing the system to shut down may result to data loss Ensure that you back up your data regularly Putting your ASUSTablet to sleep To put your ASUS Tablet to sleep press the power button once ...

Страница 48: ...ASUS Tablet E Manual 48 ...

Страница 49: ...K005 49 Chapter 4 Pre installed Apps Chapter 4 Pre installed Apps ...

Страница 50: ...ome Screen tap Play Music to play your music files Settings for Play Music Search for a music file Tap to sort the audio files by Recent Albums Artists Songs Playlists and Genres NOTES The following audio and video codec are supported by your ASUS Tablet Decoder Audio Codec AAC LC LTP HE AACv1 AAC HE AACv2 enhanced AAC AMR NB AMR WB MP3 FLAC MIDI PCM WAVE Vorbis WAV a law mu law WAV linear PCM WMA...

Страница 51: ...ze Exposure White balance Display settings Camera settings Zooming slider Camera The camera app allows you to take pictures and record videos using your ASUS Tablet To launch the Camera app tap on the Home Screen then tap Camera NOTE The pictures and video files are automatically saved to File Manager ...

Страница 52: ...ASUS Tablet E Manual 52 Mode switch Capture button Preview Camera switch Effects Video quality Exposure White balance Display settings Camera settings Video mode ...

Страница 53: ...it share or delete image and video files stored in your ASUS Tablet From Gallery you can display images in a slideshow or tap to view the selected image or video file To launch Gallery tap on the Home Screen then tap Gallery Gallery main screen Gallery settings Tap to quick launch Camera Tap to sort videos and photos ...

Страница 54: ...album tap and hold an album until a tool bar appears on top of the screen You can upload or share the selected albums online or delete them from your ASUS Tablet Tap to share the selected album through sharing apps Tap this icon to delete the selected album Tool bar ...

Страница 55: ... image tap to open an image then tap on the image to launch the tool bar on top of the screen Sharing images To share an image 1 From Gallery screen open an album containing the image that you want to share 2 Tap to select then tap and select from the list of sharing apps ...

Страница 56: ... Manual 56 To share multiple images 1 From Gallery screen open an album containing the images that you want to share 2 Tap and hold one image then tap the other images 3 Tap then select from the list of sharing apps ...

Страница 57: ...om Gallery screen open an album containing the image that you want to edit 2 Tap an image to open then tap Edit 3 Tap the editing tools to start editing Tap to share Tap to save the changes Editing tools Tap to undo redo reset or show edit history ...

Страница 58: ...open an album containing the image that you want to delete 2 Tap an image to open then tap Delete 3 Tap OK To delete multiple images 1 From the Gallery screen open an album containing the images that you want to delete 2 Tap and hold one image then tap the other images 3 Tap then tap OK ...

Страница 59: ...e Gallery Photo widget on the Home Screen 1 Tap to display the All apps screen 2 Tap WIDGETS tab to display the widgets menu 3 Tap and hold Photo Gallery until the widget box moves to the Home Screen and displays the Choose images dialog box 4 Choose an option from the Choose images dialog box that you want to place as a widget on the Home Screen ...

Страница 60: ...must be connected to the Internet so you can add an e mail account or send and receive e mails from added accounts Setting up an e mail account To set up an e mail account 1 Tap to display the All apps screen 2 Tap Email to launch the Email app 3 From the Email app screen key in your e mail address and password then tap Next NOTE Wait while your ASUS Tablet automatically checks your incoming and o...

Страница 61: ... in the outgoing messages then tap Next to log into your inbox Adding e mail accounts To add e mail accounts 1 Tap to display the All apps screen 2 Tap Email then login using your account 3 Tap Settings Then tap Add account on the upper right corner of your screen ...

Страница 62: ... use Email app to set up and access all your e mail accounts at the same time Gmail Using the Gmail app you can create a new Gmail account or synchronize your existing Gmail account so you can send receive and browse e mails right from your ASUS Tablet Enabling this app allows you to access other Google apps that may require a Google account such as Play Store Setting up a Gmail account To set up ...

Страница 63: ...ap Existing and key in your e mail account and password If you do not have an account tap New and follow the on screen instructions to create an account 3 After signing in you can start downloading apps from Play Store and install them in your ASUS Tablet IMPORTANT Download the latest version of Adobe Flash Player for Android devices NOTES You cannot restore the deleted apps but you can log in wit...

Страница 64: ...so allows you to check your current location and share the information with others Using Google Maps To use Google Maps 1 Tap to display the All apps screen then tap Maps 2 Use the tool bar on top of the screen to customize your search Directions Layers Tool bar Current location Local places Advanced settings Search ...

Страница 65: ...pps screen then tap MyLibrary IMPORTANT You may need to install Adobe Flash Player to open some e books Download Adobe Flash Player before using MyLibrary NOTE MyLibrary supports e books in ePub PDF and TXT formats MyLibrary main screen Your bookshelves Tap to sort e books by title author date or My Array Search an e book Tap to select and move or delete e books Advanced settings Your books on the...

Страница 66: ...r swipe your finger from left to right to go back to the previous page Flipping a page To move to the next page swipe from right to left To go back to the previous page swipe from left to right Chapter list Search keywords Marker Text to speech function Zoom out Zoom in Insert bookmark Bookmark list Day or Night mode Page scroll ...

Страница 67: ...k so that you can easily return to the last page you read To place a bookmark 1 Tap anywhere on the screen to show the tool bar 2 Tap to mark the page You can mark as many pages as you like 3 To view the bookmarked pages tap Bookmark list then tap the page that you want to open ...

Страница 68: ... the page Annotating in your e books allows you to see the definition of a word copy a word or a phrase share via e mail or listen through text to speech function Annotating a word Annotating a phrase Action bar Action bar Dictionary note ...

Страница 69: ...ary note does not appear 2 From the action bar choose from the following options a Tap Highlight to mark a word or phrase b Tap Note to record a word or phrase c Tap Text to Speech to listen to the selected word or phrase d Tap Copy to copy the selected word or phrase and paste it to a text app e Tap Translation to see the translation of the selected phrase f Tap Share to share a phrase then selec...

Страница 70: ...books via your ASUS WebStorage account To launch SuperNote Lite on the Home Screen tap SuperNote Lite then tap Enter SuperNote Lite main screen Tap to view by type Tap to add a new notebook Tap to select and delete notebooks or export them as PDF or SuperNote Lite formats Tap to sort import or show locked notebooks All your notebooks Tap to open advanced settings Tap to upload your notebooks to yo...

Страница 71: ...new note page appears instantly SuperNote Lite Notebook interface NOTE The mode settings and notebook tool bar changes when you tap Write mode Type mode or Draw mode Tap to return to previous screen Share and export Save the page Add a page Delete a page Bookmark a page Settings tool bar Mode settings Previous Next page Page number Enable Read only mode ...

Страница 72: ... may vary depending on the mode that you selected To customize your notebook 1 In the SuperNote Lite main screen tap the notebook that you want to customize 2 Tap any of the icons on the toolbar to start editing your notebook NOTES For Write mode tap Baseline for penmanship guidelines when necessary For Write and Type modes tap Color to select text or stroke color and weight SuperNote Lite Read on...

Страница 73: ...reen tap and hold the notebook file then tap Lock to hide 2 Key in your password then tap OK NOTES You will be prompted to key in a new password when you hide your notebook for the first time To view the hidden notebooks on the main screen tap then tap Show locked notebook 1 In the SuperNote Lite main screen tap and hold the notebook file then tap Delete 2 Tap Delete to confirm deletion of the not...

Страница 74: ...are them via e mail or social networking sites To launch ASUS Studio tap on the Home Screen then tap ASUS Studio ASUS Studio main screen Viewing your saved photos To view your photos tap a photo album then swipe your finger up or down to scroll your saved pictures Watching your saved videos To watch your saved vidoes tap a video album then tap to select and watch the video Photo and video files So...

Страница 75: ...to customize then tap the photo to select and launch the tool bar Tap to go back to previous screen Settings Tool bar The tool bar consists of the following functions Tap to add the photo as favorite Tap to tag the photo and select a category Tap to edit the photo Tap to delete the photo Tap to share the photo ...

Страница 76: ...ASUS Tablet E Manual 76 Editing a photo To edit a photo 1 Tap on the tool bar 2 Tap the editing tools to start editing Editing tool bar Tap to go back to previous screen ...

Страница 77: ...Buzz 1 On the Home Screen tap then tap BuddyBuzz 2 Log in to your social networking accounts 3 Tap to launch BuddyBuzz main screen BuddyBuzz main screen Tap to view news updates from your friends tagged news sites and events Tap to post your status Tap to view your current location Tap to configure account settings Tap to read updates and view photos that you posted on My Board Tap to view your bu...

Страница 78: ... Wizard tap on the Home Screen then tap AudioWizard Using AudioWizard To use AudioWizard 1 In the AudioWizard window tap the sound mode that you want to activate NOTE Tap OFF if you want to deactivate any of the sound modes you previously saved 2 Tap OK to save the selected sound mode and exit the AudioWizard window Tap to turn AudioWizard off Preset modes Tap to confirm mode selection ...

Страница 79: ...ting app that allows you to create an image file or add calligraphy effects and photos on an existing image file To launch ASUS Artist tap on the Home Screen then tap ASUS Artist MyWorks screen Your paintings Tap to create a painting Tap to delete a painting ...

Страница 80: ...ASUS Tablet E Manual 80 Creating a painting To create a painting 1 On MyWorks screen tap 2 On the template screen tap to select a template ...

Страница 81: ...g screen Editing a painting To edit a painting 1 On MyWorks screen tap to select a painting 2 Tap the editing tools to start editing Painting tool bar Tap to share the painting Tap to create new painting Tap to save the painting ...

Страница 82: ...r is a security app that prevents selected apps and files from being opened Using App Locker To use App Locker 1 On the Home Screen tap then tap App Locker 2 Tap Start set up your password then tap OK 3 Tap OK to proceed to the App Locker screen ...

Страница 83: ...able the App Locker and activate the app list Tap the apps that you want to lock To unlock the app just tap the app that you previously locked NOTES The apps that you locked will appear as locked icons on the Home Screen App Locker prompts you to key in your password every time you launch a locked app ...

Страница 84: ...d files that you want to lock Protected files pane Using File Protection To use File Protection 1 Tap to open File Manager app 2 Tap to select the files that you want to protect then tap The files that you want to protect appear on the File Protection screen ...

Страница 85: ...e selected widget then drag it to the Home Screen IMPORTANT You may be prompted to perform additional tasks such as registration or activation before you can use a selected widget If there is not enough space on the screen where you placed the widget the widget will not be added to the screen Removing a widget from the Home Screen From the Home Screen tap and hold the widget until X Remove appears...

Страница 86: ... Home Screen then tap WIDGETS Displaying the ASUS Battery widget on the Home Screen From the Widgets screen swipe your finger to the left or to the right to look for ASUS Battery widget Tap and hold the widget then drag it to the Home Screen NOTE You can also view your ASUS Tablet s battery status in ASUS Quick Setting and notification area For more details refer to sections ASUS Quick Setting and...

Страница 87: ...K005 87 Appendices Appendices ...

Страница 88: ...es harmful interference to radio or television reception which can be determined by turning the equipment off and on the user is encouraged to try to correct the interference by doing one or more of the following measures Reorient or relocate the receiving antenna Increase the separation between the equipment and receiver Connect the equipment into an outlet on a circuit different from that to whi...

Страница 89: ...gov oet ea fccid after searching on FCC ID MSQK005 Canada Industry Canada IC Notices This Class B digital apparatus complies with Canadian ICES 003 and RSS 210 Operation is subject to the following two conditions 1 this device may not cause interference and 2 this device must accept any interference including interference that may cause undesired operation of the device The IC ID for this device i...

Страница 90: ...à l appareil dans la liste d équipement radio REL Radio Equipment List d Industrie Canada rendez vous sur http www ic gc ca app sitt reltel srch nwRdSrch do lang eng Pour des informations supplémentaires concernant l exposition aux RF au Canada rendez vous sur http www ic gc ca eic site smt gst nsf eng sf08792 html ICWarning Statement The device could automatically discontinue transmission in case...

Страница 91: ... French Article L 5232 1 À pleine puissance l écoute prolongée du baladeur peut endommager l oreille de l utilisateur The Country Code Selection feature is disabled for products marketed in the US Canada For product available in the USA Canada markets only channel 1 11 can be operated Selection of other channels is not possible EC Declaration of Conformity This product is compliant with the regula...

Страница 92: ...t and Commission from 9 March 1999 governing Radio and Telecommunications Equipment and mutual recognition of conformity The highest CE SAR value for the device is 0 765 W Kg This equipment may be operated in AT BE BG CH CY CZ DE DK EE ES FI FR GB GR HU IE IT IS LI LT LU LV MT NL NO PL PT RO SE SI SK TR DFS controls related to radar detection shall not be accessible to the user ...

Страница 93: ...uidelines and the European Standard EN 62311 and EN 62209 2 SAR is measured with the device directly contacted to the body while transmitting at the highest certified output power level in all frequency bands of the mobile device Power Safety Requirement Products with electrical current ratings up to 6A and weighing more than 3Kg must use approved power cords greater than or equal to H05VV F 3G 0 ...

Страница 94: ...the impact on the environment The reduction of the number of the manual pages complies with the reduction of carbon emission For the detailed user manual and related information refer to the user manual included in the ASUS Tablet or visit the ASUS Support Site at http support asus com Regional notice for Singapore This ASUS product complies with IDA Standards ...

Страница 95: ...reuse of parts and recycling The symbol of the crossed out wheeled bin indicates that the product electrical electronic equipment and mercury containing button cell battery should not be placed in municipal waste Check local regulations for disposal of electronic products DO NOT throw the ASUS Tablet in fire DO NOT short circuit the contacts DO NOT disassemble the ASUS Tablet Manufacturer ASUSTeK ...

Страница 96: ...N 300 328 V1 7 1 2006 10 EN 300 440 1 V1 6 1 2010 08 EN 300 440 2 V1 4 1 2010 08 EN 301 511 V9 0 2 2003 03 EN 301 908 1 V5 2 1 2011 05 EN 301 908 2 V5 2 1 2011 07 EN 301 908 13 V5 2 1 2011 07 EN 301 893 V1 6 1 2011 11 EN 50332 2 2003 EN 301 489 1 V1 9 2 2011 09 EN 301 489 3 V1 4 1 2002 08 EN 301 489 7 V1 3 1 2005 11 EN 301 489 17 V2 1 1 2009 05 EN 301 489 24 V1 5 1 2010 09 EN 62209 2 2010 EN 62311...

Страница 97: ...K005 97 ...

Страница 98: ...ASUS Tablet E Manual 98 ...

Отзывы: