background image

52

VivoMini UN Series

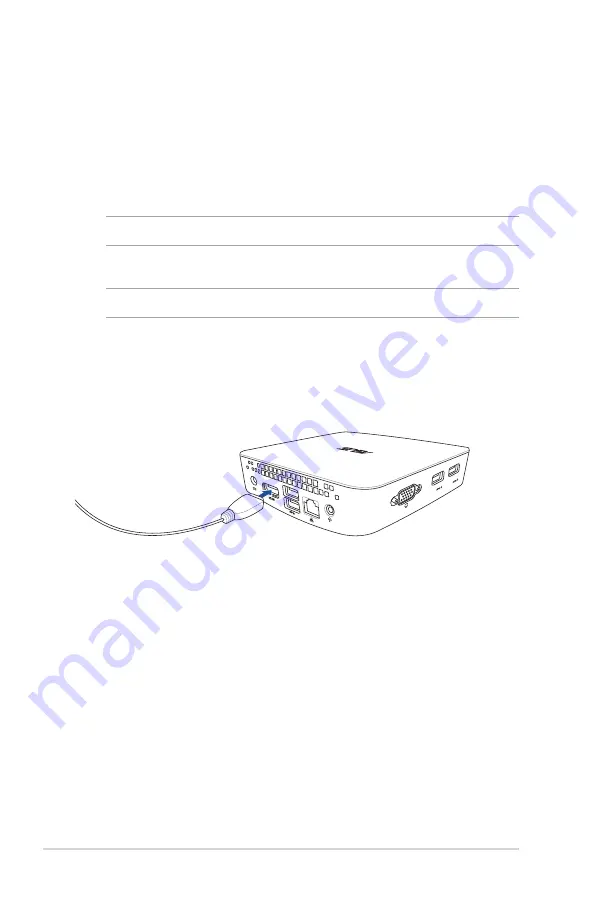
Connecter un périphérique d’affichage

Vous pouvez connecter le VivoMini à un écran externe ou un 

projecteur par le biais des interfaces de connexion suivantes:

•  

Prise HDMI

•  

Connecteur MiniDisplayPort

REMARQUE :

 Varie selon le pays ou la région.

•  

Prise VGA

REMARQUE :

 Varie selon le pays ou la région.

Pour connecter un dispositif d’affichage externe à votre 

VivoMini :

Connectez un câble d’affichage au port HDMI.

Содержание VivoMini UN45

Страница 1: ...VivoMini UN45 Series User Manual ...

Страница 2: ...A COMMITMENT BY ASUS ASUS ASSUMES NO RESPONSIBILITY OR LIABILITY FOR ANY ERRORS OR INACCURACIES THAT MAY APPEAR IN THIS MANUAL INCLUDING THE PRODUCTS AND SOFTWARE DESCRIBED IN IT Copyright 2015 ASUSTeK COMPUTER INC All Rights Reserved LIMITATION OF LIABILITY Circumstances may arise where because of a default on ASUS part or other liability you are entitled to recover damages from ASUS In each such...

Страница 3: ...Getting started 15 Connecting the AC power adapter 15 Connecting a display panel 17 Connecting USB keyboard or mouse 18 Turning on your VivoMini 18 Turning off your VivoMini 19 Putting your VivoMini to sleep 19 Entering the BIOS Setup 19 Quickly enter the BIOS 19 Memory upgrade Upgrading memory modules 21 Appendix Safety information 29 Setting up your system 29 Care during use 29 Regulatory notice...

Страница 4: ... au VivoMini 50 Connecter un périphérique d affichage 52 Connecter un clavier ou une souris USB 53 Allumer le VivoMini 53 Éteindre le VivoMini 54 Mettre le VivoMini en veille 54 Accéder au BIOS 54 Accès rapide à l interface de configuration du BIOS 54 Mise à niveau des composants Installer des modules mémoire 56 Appendice Consignes de sécurité 64 Configurer votre système 64 Précautions à suivre lo...

Страница 5: ...oMini Appendix This section includes notices and safety statements of your VivoMini Conventions used in this manual To highlight key information in this manual some text are presented as follows IMPORTANT This message contains vital information that must be followed to complete a task NOTE This message contains additional information and tips that can help complete tasks WARNING This message conta...

Страница 6: ...ty of these items vary with your VivoMini package If the device or any of its components fail or malfunction during normal or proper use and it is still within the warranty period bring the device and the warranty card to you nearest ASUS Service Center Your VivoMini package contains the following items VivoMini Power cable Technical documentations AC power adapter Driver DVD ...

Страница 7: ...VivoMini UN Series 7 ...

Страница 8: ...1 Getting to know your VivoMini ...

Страница 9: ...activity indicator This indicator lights up when your VivoMini is accessing the internal storage drive Power button The power button allows you to turn the VivoMini on or off You can also press the power button once to put your VivoMini to sleep mode ...

Страница 10: ...this port may be a MiniDP port USB 3 0 port The USB 3 0 Universal Serial Bus 3 0 port provides a transfer rate of up to 5 Gbit s and is backward compatible to USB 2 0 The icon indicates this port s USB Charger feature which allows you to quick charge mobile devices Right side The Kensington security slot allows you to secure your VivoMini using Kensington compatible security products ...

Страница 11: ...ilation IMPORTANT For optimum heat dissipation and air ventilation ensure that the air vents are free from obstructions Power input DC 19V The supplied power adapter converts AC power to DC power for use with this jack Power supplied through this jack supplies power to the VivoMini To prevent damage to the VivoMini always use the bundled power adapter WARNING The power adapter may become warm to h...

Страница 12: ...s a transfer rate up to 5 Gbit s and is backward compatible to USB 2 0 LAN port The 8 pin RJ 45 LAN port supports a standard Ethernet cable for connection to a local network Headphone output microphone input combo jack port This port allows you to connect your VivoMini to amplified speakers or headphones You can also use this port to connect your VivoMini to an external microphone NOTE This port d...

Страница 13: ...VivoMini UN Series 13 ...

Страница 14: ...2 Using your VivoMini ...

Страница 15: ...ter To connect the AC power adapter to your VivoMini A Connect the AC power adapter into a 100 V 240 V power source B Connect the DC power connector into your VivoMini s power DC input port NOTE The power adapter may vary in appearance depending on the model or region ...

Страница 16: ... voltage 19 V IMPORTANT We strongly recommend that you use only the AC power adapter and cable that came with your VivoMini We strongly recommend that you use a grounded wall socket while using your VivoMini The socket outlet must be easily accessible and near your VivoMini To disconnect your VivoMini from its main power supply unplug your VivoMini from the power socket ...

Страница 17: ... panel or projector to your VivoMini that has the following connectors HDMI connector MiniDisplayPort connector NOTE Varies by country or region VGA connector NOTE Varies by country or region To connect a display panel to your VivoMini Connect a display cable to the HDMI port ...

Страница 18: ...use to your VivoMini You can also connect a USB dongle for a wireless keyboard and mouse set To connect a keyboard and mouse to your VivoMini Connect the USB cable from your keyboard and mouse to any of the USB ports of your VivoMini Turning on your VivoMini Press the power button to turn on your VivoMini ...

Страница 19: ...ss F2 or Del during POST NOTE POST Power On Self Test is a series of software controlled diagnostic tests that run when you turn on your PC Entering the BIOS Setup BIOS Basic Input and Output System stores system hardware settings that are needed for system startup in the VivoMini In normal circumstances the default BIOS settings apply to most conditions to ensure optimal performance Do not change...

Страница 20: ...3 Memory upgrade ...

Страница 21: ...dules of the same version or date code D C from the same vendor Check with the retailer to get the correct memory modules Refer to http www asus com for the list of compatible DIMMs You can only install 1 35 V DDR3L SO DIMM to the VivoMini s DIMM slots To install or upgrade the memory modules 1 Turn off yourVivoMini then disconnect all cables and peripherals 2 Place theVivoMini on a flat stable su...

Страница 22: ...d the number printed under each rubber foot These indicate the sequence you must follow when removing the rubber foot from its slot Refer to the following illustration for details 3 Using a flat head screwdriver or straightened paper clip remove the rubber feet from the bottom side then set them aside ...

Страница 23: ... UN Series 23 5 Get one screw from the ones you previously removed then place it into the hole Leave a portion of the screw head that would be enough for you to hold 4 Remove the four screws securing the cover ...

Страница 24: ...24 VivoMini UN Series 6 Hold the screw then gently pull out the cover from the bottom side of the VivoMini Use your other free hand to hold the VivoMini in place ...

Страница 25: ...urely seated in place Repeat the same steps to install the other memory module IMPORTANT Always install into the upper slot first 8 Remove the screw you previously attached on the bottom cover A then align and insert the bottom cover back on your VivoMini B NOTE The CPU model N3000 only has one DIMM memory slot ...

Страница 26: ...cover back on the bottom side of the main box IMPORTANT Take note of the orientation of the holed rubber foot on the cover and the number printed under each rubber foot These indicate the sequence you must follow when replacing the rubber foot back into each slot Refer to the following illustration for details ...

Страница 27: ...VivoMini UN Series 27 ...

Страница 28: ...28 VivoMini UN Series Appendix ...

Страница 29: ...nvironments with ambient temperatures between 0 C and 35 C If you use an extension cord make sure that the total ampere rating of the devices plugged into the extension cord does not exceed its ampere rating Care during use Do not walk on the power cord or allow anything to rest on it Do not spill water or any other liquids on your system When the system is turned off a small amount of electrical ...

Страница 30: ...ended by the manufacturer Dispose of used batteries according to the manufacturer s instructions DO NOT throw the VivoMini in municipal waste This product has been designed to enable proper reuse of parts and recycling This symbol of the crossed out wheeled bin indicates that the product electrical electronic equipment and mercury containing button cell battery should not be placed in municipal wa...

Страница 31: ...s applied to insulate the device except on the areas where the I O ports are located Federal Communications Commission Statement This device complies with Part 15 of the FCC Rules Operation is subject to the following two conditions This device may not cause harmful interference and This device must accept any interference received including interference that may cause undesired operation This equ...

Страница 32: ...structions and the antenna s used for this transmitter must be installed to provide a separation distance of at least 20 cm from all persons and must not be co located or operating in conjunction with any other antenna or transmitter End users and installers must be provide with antenna installation instructions and transmitter operating conditions for satisfying RF exposure compliance Declaration...

Страница 33: ...e 2446 5 2483 5 MHz band Use outdoors on public property is not permitted In the departments listed below for the entire 2 4 GHz band Maximum authorized power indoors is 100mW Maximum authorized power outdoors is 10mW Departments in which the use of the 2400 2483 5 MHz band is permitted with an EIRP of less than 100mW indoors and less than 10mW outdoors 01 Ain 02 Aisne 03 Allier 05 Hautes Alpes 08...

Страница 34: ...dian Department of Communications This class B digital apparatus complies with Canadian ICES 003 IC Radiation Exposure Statement for Canada This equipment complies with IC radiation exposure limits set forth for an uncontrolled environment To maintain compliance with IC RF exposure compliance requirements please avoid direct contact to the transmitting antenna during transmitting End users must fo...

Страница 35: ...th This equipment complies with the requirements of Directive 1999 5 EC of the European Parliament and Commission from 9 March 1999 governing Radio and Telecommunications Equipment and mutual recognition of conformity Wireless Operation Channel for Different Domains N America 2 412 2 462 GHz Ch01 through CH11 Japan 2 412 2 484 GHz Ch01 through Ch14 Europe ETSI 2 412 2 472 GHz Ch01 through Ch13 Reg...

Страница 36: ...ndard and the power management feature is enabled by default The monitor and computer are automatically set to sleep after 10 and 30 minutes of user inactivity To wake your computer click the mouse or press any key on the keyboard Please visit http www energystar gov powermanagement for detail information on power management and its benefits to the environment In addition please visit http www ene...

Страница 37: ... http usa asus com Technical Support Support fax 1 812 284 0883 General support 1 812 282 2787 Online support https support asus com techserv techserv aspx ASUS COMPUTER GmbH Germany and Austria Address Harkort Str 21 23 D 40880 Ratingen Germany Fax 49 2102 959931 Web site http www asus com de Online contact http eu rma asus com sales Technical Support Telephone 49 2102 5789555 Support Fax 49 2102...

Страница 38: ...VivoMini Séries UN45 Manuel de l utilisateur ...

Страница 39: ...RREUR OU INEXACTITUDE QUI POURRAIT APPARAÎTRE DANS CE MANUEL INCLUANT LES PRODUITS ET LOGICIELS QUI Y SONT DÉCRITS Copyright 2015 ASUSTeK COMPUTER INC Tous droits réservés CLAUSE DE RESPONSABILITÉ LIMITÉE Des dommages peuvent survenir suite à un défaut sur une pièce fabriquée par ASUS ou un tiers Vous avez le droit à des dommages et intérêts auprès d ASUS Dans un tel cas indépendamment de la base ...

Страница 40: ... certain nombre de notices relatives à la sécurité Messages Pour mettre en valeur les informations essentielles offertes par ce guide les messages sont présentés de la manière qui suit IMPORTANT Ce message contient des informations vitales devant être suivies pour compléter une tâche REMARQUE Ce message contient des informations et des astuces additionnelles pouvant vous aider à exécuter certaines...

Страница 41: ...on des modèles de VivoMini Si l appareil ou l un de ses composants tombe en panne dans des conditions d utilisation normales et ce lors de la période de garantie rendez vous dans le centre de service ASUS le plus proche munis de la carte de garantie pour une prise sous garantie de votre ordinateur La boîte de votre VivoMini contient les éléments suivants VivoMini Cordon d alimentation Documentatio...

Страница 42: ...42 VivoMini UN Series ...

Страница 43: ...1 Présentation de votre VivoMini ...

Страница 44: ...du disque dur Cet indicateur lumineux s allume lorsque le VivoMini accède au disque de stockage interne Bouton d alimentation Le bouton d alimentation permet d allumer ou d éteindre le VivoMini Vous pouvez également utiliser ce bouton pour basculer l ordinateur en mode veille ...

Страница 45: ...e un port MiniDP Ports USB 3 0 L interface USB 3 0 Universal Serial Bus 3 0 offre des taux de transfert de données pouvant atteindre jusqu à 5 Gbit s et est rétro compatible avec la norme USB 2 0 L icône indique la fonctionnalité USB Charger de ce port qui vous permet de charger rapidement des appareils mobiles Côté droit L encoche de sécurité Kensington permet de sécuriser l ordinateur à l aide d...

Страница 46: ...ue les ouvertures d aération afin d éviter tout risque de surchauffe Prise d alimentation CC 19V Branchez l adaptateur secteur sur cette prise pour convertir le courant alternatif en courant continu Le courant passant par cette prise permet d alimenter l ordinateur Utilisez toujours l adaptateur secteur fourni pour éviter d endommager l ordinateur AVERTISSEMENT L adaptateur peut atteindre une temp...

Страница 47: ...orts USB 3 0 L interface USB 3 0 Universal Serial Bus 3 0 offre des taux de transfert de données pouvant atteindre jusqu à 5 Gbit s et est rétro compatible avec la norme USB 2 0 Port réseau Insérez un câble réseau RJ45 sur ce port pour établir une connexion à un réseau local Port audio 2 en 1 sortie casque sortie audio Ce port est utilisé pour connecter la sortie audio de l ordinateur à des encein...

Страница 48: ...48 VivoMini UN Series ...

Страница 49: ...2 Utilisation de votre VivoMini ...

Страница 50: ... votre VivoMini A Branchez le cordon d alimentation sur une prise électrique fournissant un courant compris entre 100V et 240V B Connectez l adaptateur secteur à la prise d alimentation du VivoMini REMARQUE L apparence de l adaptateur secteur peut en varier en fonction du modèle et ou du pays ou de la région d achat ...

Страница 51: ...IMPORTANT Il est fortement recommandé d utiliser le cordon d alimentation et l adaptateur secteur fournis Il est fortement recommandé d utiliser une prise reliée à la terre lors de l utilisation de votre VivoMini La prise électrique doit se trouver à proximité du VivoMini et être aisément accessible Pour déconnecter le VivoMini de sa source d alimentation débranchez l adaptateur secteur de la pris...

Страница 52: ...ne ou un projecteur par le biais des interfaces de connexion suivantes Prise HDMI Connecteur MiniDisplayPort REMARQUE Varie selon le pays ou la région Prise VGA REMARQUE Varie selon le pays ou la région Pour connecter un dispositif d affichage externe à votre VivoMini Connectez un câble d affichage au port HDMI ...

Страница 53: ...USB Vous pouvez également y connecter le dongle USB d un clavier ou d une souris sans fil Pour connecter un clavier ou une souris USB à votre VivoMini Connectez le câble USB de votre clavier ou souris à l un des ports USB 2 0 de votre VivoMini Allumer le VivoMini Appuyez sur le bouton d alimentation pour allumer votre VivoMini ...

Страница 54: ...rrage du système et requiert l accès au BIOS Un composant installé nécessite un réglage spécifique ou une mise à jour du BIOS AVERTISSEMENT Une mauvaise utilisation du BIOS peut entraîner une instabilité du système ou un échec de démarrage Il est fortement recommandé de ne modifier les paramètres du BIOS qu avec l aide d un technicien qualifié Accès rapide à l interface de configuration du BIOS Po...

Страница 55: ...3 Mise à niveau des composants ...

Страница 56: ... installer des modules mémoire de la même version ou du même code de date D C provenant du même fournisseur Consultez le détaillant pour obtenir les modules mémoire corrects Seuls des modules mémoire DDR3 So DIMM de 1 35V peuvent être installés dans le VivoMini Rendez vous sur le site http www asus com pour obtenir la liste des modules mémoire compatibles Pour installer ou mettre à niveau les modu...

Страница 57: ...utchouc ainsi que du chiffre imprimé sous chacun d entre eux Ces derniers indiquent la séquence de retrait à suivre Consultez l illustration suivante pour plus de détails 3 Utilisez un tournevis à tête plate ou un trombone déplié pour retirer les patins en caoutchouc du dessous de l ordinateur ...

Страница 58: ...ez l une des vis précédentes et placez la dans l ouverture Conservez une portion suffisante de la tête de vis en dehors du couvercle d ordinateur de sorte à pouvoir la prendre en main 4 Retirez les quatre vis sécurisant le couvercle ...

Страница 59: ...VivoMini UN Series 59 6 Tirez d une main sur la vis pour désengager le couvercle Utilisez votre autre main pour maintenir le VivoMini en place ...

Страница 60: ... qu il soit bien en place Répétez les mêmes étapes pour installer un module de mémoire supplémentaire REMARQUE Le modèle de CPU N3000 n a qu un emplacement mémoire DIMM 8 Retirez la vis attachée au couvercle A puis replacez le couvercle en place B IMPORTANT Toujours installez dans le slot supérieur en priorité ...

Страница 61: ...sécuriser le couvercle au boîtier principal IMPORTANT Faites attention à l orientation de chacun des patins en caoutchouc ainsi que du chiffre imprimé sous chacun d entre eux Ces derniers indiquent la séquence de retrait à suivre Consultez l illustration suivante pour plus de détails ...

Страница 62: ...62 VivoMini UN Series ...

Страница 63: ...Appendice ...

Страница 64: ... les bloquer ou les recouvrir N insérez jamais d objet dans les ouvertures de ventilation Utilisez ce produit dans un environnement avec une température ambiante comprise entre 0 C et 35 C Sivousutilisezunerallonge vérifiezquelasommedesintensités nominalesdeséquipementsconnectésàlarallongenedépassepas cellesupportéeparcettedernière Précautions à suivre lors de l utilisation Ne pas marcher sur le c...

Страница 65: ...t électrique ou électronique ne doit pas être placé dans une décharge publique Vérifiez auprès de votre municipalité les dispositions locales en matière de recyclage des déchets électroniques PAS DE DÉMONTAGE La garantie ne couvre pas les appareils ayant été désassemblés par les utilisateurs Avertissement sur les batteries Lithium Ion MISE EN GARDE Danger d explosion si la batterie n est pas rempl...

Страница 66: ...isolation un revêtement a été appliqué pour isoler le châssis de cet appareil Veuillez toutefois noter que les zones de l appareil où se trouvent les différentes interfaces de connexion ne disposent pas de ce revêtement spécial Rapport de la Commission Fédérale des Communications Ce dispositif est conforme à l alinéa 15 des règles établies par la FCC L opération est sujette aux deux conditions sui...

Страница 67: ...t équipement Note sur l exposition aux ondes radio Cet équipement doit être installé et opéré en accord avec les instructions fournies La distance entre le s antenne s et l utilisateur ne doit pas être inférieure à 20cm Cet appareil ne doit pas être colocalisé ou opéré conjointement avec d autres antennes ou émetteurs Les instructions d installation de l antenne ainsi que les conditions de fonctio...

Страница 68: ...arleMinistèredelaDéfense avecunepuissance maximale autorisée de 100mW dans la plage 2446 5 2483 5 MHz L utilisation en extérieur dans des propriétés publiques n est pas permise Danslesdépartementslistésci dessous pourlaplagede2 4GHzentière La puissance maximale autorisée en intérieur est de 100mW La puissance maximale autorisée en extérieur est de 10mW Départements pour lesquels l utilisation de l...

Страница 69: ...e département canadien des communications Cet appareil numérique de la classe B est conforme à la norme NMB 003 du Canada Rapport d Industrie Canada relatif à l exposition aux radiations Cet équipement a été testé et s est avéré être conforme aux limites établies par industrie Canada en termes d exposition aux radiations dans un environnement non contrôlé Afin de rester en conformité avec ces exig...

Страница 70: ... tensions Marque CE pour les appareils dotés d un module réseau sans fil Bluetooth Cet appareil est conforme aux directives 1999 5 CE du Parlement Européen et du Conseil votées le 9 Mars 1999 concernant les équipements hertziens et les terminaux de télécommunications et la reconnaissance mutuelle de leur conformité Canaux d opération sans fil régionaux Amérique du Nord 2 412 2 462 GHz C 01 au C 11...

Страница 71: ...ctionnalité d économie d énergie activée par défaut L ordinateur bascule automatiquement en mode veille après un délai d inactivité de 10 à 30 minutes Pour sortir l ordinateur du mode veille cliquez sur la souris ou sur une touche quelconque du clavier Veuillez visiter le site Web http www energystar gov powermanagement pour plus de détails sur la gestion d énergie et ses avantages pour la protect...

Страница 72: ... Fax 1 510 608 4555 Site Web http usa asus com Support technique Téléphone 1 812 282 2787 Fax 1 812 284 0883 Support en ligne https support asus com techserv techserv aspx ASUS France SARL Adresse 10 Allée de Bienvenue 93160 Noisy Le Grand France Téléphone 33 0 1 49 32 96 50 Site Web www france asus com Support technique Téléphone 33 0 8 21 23 27 87 Fax 33 0 1 49 32 96 99 Support en ligne support ...

Страница 73: ...5 EN 301 908 2 V5 2 1 2011 07 EN 301 893 V1 7 1 2012 06 EN 302 544 2 V1 1 1 2009 01 EN 302 623 V1 1 1 2009 01 EN 50360 2001 EN 62479 2010 EN 50385 2002 EN 62311 2008 EN 301 489 1 V1 9 2 2011 09 EN 301 489 3 V1 4 1 2002 08 EN 301 489 4 V1 4 1 2009 05 EN 301 489 7 V1 3 1 2005 11 EN 301 489 9 V1 4 1 2007 11 EN 301 489 17 V2 2 1 2012 09 EN 301 489 24 V1 5 1 2010 09 EN 302 326 2 V1 2 2 2007 06 EN 302 3...

Страница 74: ...mber UN45 Conforms to the following specifications FCC Part 15 Subpart B Unintentional Radiators Supplementary Information This device complies with part 15 of the FCC Rules Operation is subject to the following two conditions 1 This device may not cause harmful interference and 2 this device must accept any interference received including interference that may cause undesired operation Representa...

Страница 75: ... 2011 05 EN 301 908 2 V5 2 1 2011 07 EN 301 893 V1 7 1 2012 06 EN 302 544 2 V1 1 1 2009 01 EN 302 623 V1 1 1 2009 01 EN 50360 2001 EN 62479 2010 EN 50385 2002 EN 62311 2008 EN 301 489 1 V1 9 2 2011 09 EN 301 489 3 V1 4 1 2002 08 EN 301 489 4 V1 4 1 2009 05 EN 301 489 7 V1 3 1 2005 11 EN 301 489 9 V1 4 1 2007 11 EN 301 489 17 V2 2 1 2012 09 EN 301 489 24 V1 5 1 2010 09 EN 302 326 2 V1 2 2 2007 06 E...

Страница 76: ...ber UN45H Conforms to the following specifications FCC Part 15 Subpart B Unintentional Radiators Supplementary Information This device complies with part 15 of the FCC Rules Operation is subject to the following two conditions 1 This device may not cause harmful interference and 2 this device must accept any interference received including interference that may cause undesired operation Representa...

Отзывы: