


2-29
ASUS RS520-E8-RS8 V2, RS520-E8-RS12-EV2
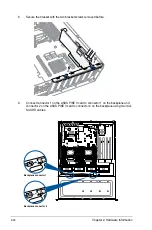
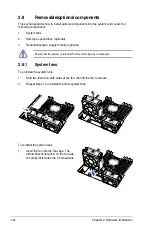
2.8.2
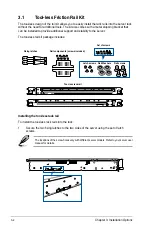
Slim optical drive (optional, for RS520-E8-RS8 V2
only)
1.
Remove 2 screws that secure the slim
optical drive cover to the chassis.
2.
Secure two screws on each side of
the optical drive to secure it into the
expansion bracket.
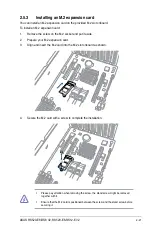
3.
Place the slim optical drive into the
expansion bay.
4.
Ensure the expansion tray is completely
inserted into the bay. (The drive tray
is correctly placed when its front edge
aligns with the bay edge.)
To install the optional optical drive:
Содержание RS520-E8-RS12-EV2
Страница 1: ...Server User Guide RS520 E8 RS8 V2 RS520 E8 RS12 EV2 ...
Страница 12: ...xii ...
Страница 56: ...Chapter 2 Hardware Information 2 32 ...
Страница 82: ...Chapter 4 Motherboard Information 4 22 ...
Страница 106: ...5 24 Chapter 5 BIOS Setup 5 5 IntelRCSetup menu ...
Страница 136: ...5 54 Chapter 5 BIOS Setup ...
Страница 174: ...6 38 Chapter 6 RAID Configuration ...
Страница 202: ...7 28 Chapter 7 Driver Installation ...
Страница 203: ...A Contact Information Appendices ...


