


ASUS RS300-H8-PS12
5-15
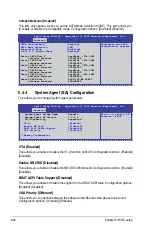
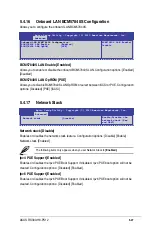
5.4.3
SATA Configuration
While entering Setup, the BIOS automatically detects the presence of SATA devices. The
SATA Port items show Not Present if no SATA device is installed to the corresponding SATA
port.
SATA Controller(s) [Enabled]
This allows you to enable or disable the SATA Device. Configuration options: [Enabled]
[Disabled]
SATA Mode Selection [AHCI]
This allows you to choose how SATA controller(s) should operate. Configuration options:
[AHCI] [IDE] [RAID]
S.M.A.R.T. Status Check [Enabled]
Self-Monitoring, Analysis, and Reporting Technology (S.M.A.R.T.) is a monitor system. When
read/write of your hard disk errors occur, this feature allows the hard disk to report warning
messages during the POST. Configuration options: [Enabled] [Disabled]
Aptio Setup Utility - Copyright (C) 2013 American Megatrends, Inc.
Advanced
SATA Controller(s)
[Enabled]
SATA Mode Selection
[AHCI]
S.M.A.R.T. Status Check
[Enabled]
Serial ATA Port 0 HardDisk (250.0GB)
Software Preserve SUPPORTED
Port 0 [Enabled]
Hot Plug [Enabled]
SATA Device Type [Hard Disk Drive]
Spin Up Device [Disabled]
Serial ATA Port 1 HardDisk (250.0GB)
Software Preserve SUPPORTED
Port 1 [Enabled]
Hot Plug [Enabled]
SATA Device Type [Hard Disk Driver]
Spin Up Device [Disabled]
Serial ATA Port 2 HardDisk (250.0GB)
Software Preserve SUPPORTED
Port 2 [Enabled]
Hot Plug [Enabled]
SATA Device Type [Hard Disk Driver]
Spin Up Device [Disabled]
Enable or disable SATA
Device.
Содержание RS300-H8-PS12
Страница 1: ...1U Rackmount Server RS300 H8 PS12 User Guide ...
Страница 12: ...xii ...
Страница 29: ...2 7 ASUS RS300 H8 PS12 4 Secure the airduct cover to the motherboard with a screw ...
Страница 72: ...Chapter 4 Motherboard information 4 24 ...
Страница 110: ...5 38 Chapter 5 BIOS setup ...
Страница 148: ...6 38 Chapter 6 RAID configuration ...
Страница 175: ...ASUS RS300 H8 PS12 7 27 8 Click Install to continue 9 When done click Finish to complete the installation ...
Страница 186: ...7 38 Chapter 7 Driver installation 7 Click Install to start installing the drivers 8 When done click Finish ...
Страница 188: ...7 40 Chapter 7 Driver installation 8 When done click Finish ...
Страница 192: ...A 4 Appendix ...


