background image

3-1

Chapter 3: General Instruction

Chapter 3: General Instructions

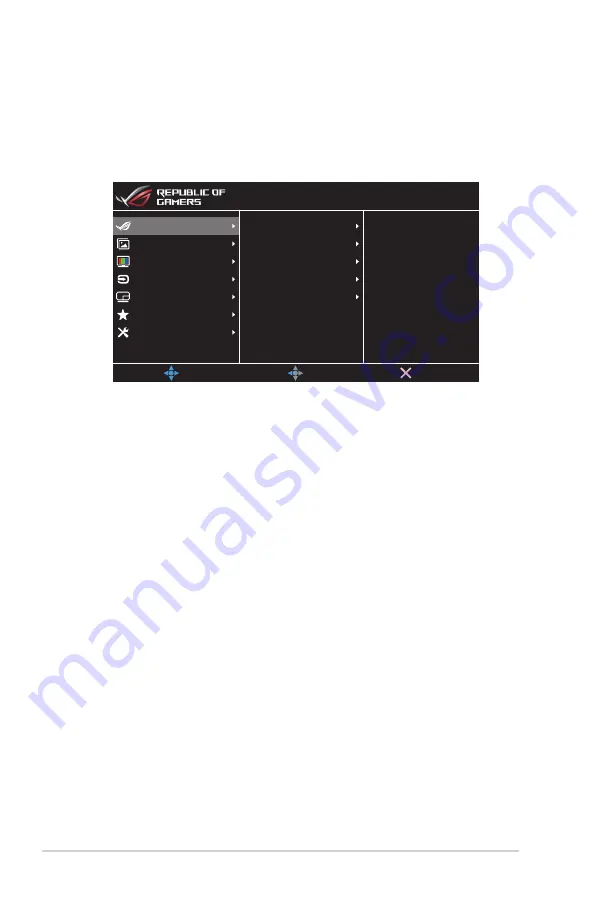
3.1  OSD (On-Screen Display) Menu

3.1.1 

How to Reconfigure

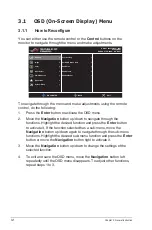
You can either use the remote control or the 

Control

 buttons on the 

monitor to navigate through the menu and make adjustments.

Gaming

System Setup

MyFavorite

PIP/PBP Setup

Color

Input Select

Image

Overclocking

Shadow Boost

GameVisual

GamePlus

Variable Refresh Rate

MOVE/ENTER

EXIT

BACK

HDR OFF

HDMI-1  3840x2160@  60Hz

Racing Mode

ROG Swift PG48UQ

To navigate through the menu and make adjustments using the remote 

control, do the following:
1.  Press the 

Enter

 button to activate the OSD menu.

2.  Move the 

Navigation

 button up/down to navigate through the 

functions. Highlight the desired function and press the 

Enter

 button 

to activate it. If the function selected has a sub-menu, move the 

Navigation

 button up/down again to navigate through the sub-menu 

functions. Highlight the desired sub-menu function and press the 

Enter


button or move the 

Navigation

 button right to activate it.

3.  Move the 

Navigation

 button up/down to change the settings of the 

selected function.

4.  To exit and save the OSD menu, move the 

Navigation

 button left 

repeatedly until the OSD menu disappears. To adjust other functions, 

repeat steps 1 to 3.

Содержание ROG SWIFT PG48UQ

Страница 1: ......

Страница 2: ...A PARTICULAR PURPOSE IN NO EVENT SHALL ASUS ITS DIRECTORS OFFICERS EMPLOYEES OR AGENTS BE LIABLE FOR ANY INDIRECT SPECIAL INCIDENTAL OR CONSEQUENTIAL DAMAGES INCLUDING DAMAGES FOR LOSS OF PROFITS LOSS OF BUSINESS LOSS OF USE OR DATA INTERRUPTION OF BUSINESS AND THE LIKE EVEN IF ASUS HAS BEEN ADVISED OF THE POSSIBILITY OF SUCH DAMAGES ARISING FROM ANY DEFECT OR ERROR IN THIS MANUAL OR PRODUCT SPECI...

Страница 3: ...us Function 1 5 1 3 5 GameVisual Function 1 7 Chapter 2 Setup 2 1 Attaching the Stand 2 1 2 2 Cable Management 2 2 2 3 Detaching the Stand for VESA wall mount 2 3 2 4 Connecting the Cables 2 4 2 5 Turning On the Monitor 2 5 Chapter 3 General Instructions 3 1 OSD On Screen Display Menu 3 1 3 1 1 How to Reconfigure 3 1 3 1 2 OSD Function Introduction 3 2 3 2 Specifications 3 9 3 3 Outline Dimensions...

Страница 4: ... on the user is encouraged to try to correct the interference by one or more of the following measures Reorient or relocate the receiving antenna Increase the separation between the equipment and receiver Connect the equipment to an outlet on a circuit different from that to which the receiver is connected Consult the dealer or an experienced radio TV technician for help The use of shielded cables...

Страница 5: ... are not sure of the type of power supply to your home consult your dealer or local power company Use the appropriate power plug which complies with your local power standard Do not overload power strips and extention cords Overloading can result in fire or electric shock Avoid dust humidity and temperature extremes Do not place the monitor in any area where it may become wet Place the monitor on ...

Страница 6: ...be removed with a cloth dampened with mild cleaner Avoid using a cleaner containing alcohol or acetone Use a cleaner intended for use with the LCD Never spray cleaner directly on the screen as it may drip inside the monitor and cause an electric shock The following symptoms are normal with the monitor The screen may flicker during the initial use due to the nature of the fluorescent light Turn off...

Страница 7: ...tes worldwide provide updated information on ASUS hardware and software products Refer to http www asus com 2 Optional documentation Your product package may include optional documentation that may have been added by your dealer These documents are not part of the standard package Takeback Services ASUS recycling and takeback programs come from our commitment to the highest standards for protectin...

Страница 8: ...erience With these features you can enjoy the convenience and delightful visual experience that the monitor brings to you 1 2 Package Contents Check your package for the following items OLED Monitor Monitor Base Quick Start Guide Warranty Card Power Cord Ultra High Speed HDMI 2 1 Cable DP Cable USB Cable Remote Control Battery Input Output Port Cover Color Calibration Testing Report ROG Sticker If...

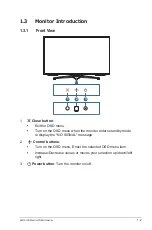
Страница 9: ...utton Exit the OSD menu Turn on the OSD menu when the monitor enters standby mode or display the NO SIGNAL message 2 Control buttons Turn on the OSD menu Enact the selected OSD menu item Increase Decrease values or moves your selection up down left right 3 Power button Turn the monitor on off ...

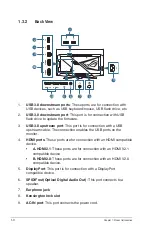
Страница 10: ...s for connection with a USB upstream cable The connection enables the USB ports on the monitor 4 HDMI ports These ports are for connection with an HDMI compatible device A HDMI2 1 These ports are for connection with an HDMI V2 1 compatible device B HDMI2 0 These ports are for connection with an HDMI V2 0 compatible device 5 DisplayPort This port is for connection with a DisplayPort compatible devi...

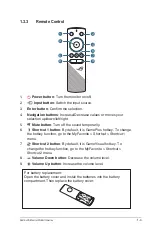
Страница 11: ...ound temporarily 6 Shortcut 1 button By default it is GamePlus hotkey To change the hotkey function go to the MyFavorite Shortcut Shortcut1 menu 7 Shortcut 2 button By default it is GameVisual hotkey To change the hotkey function go to the MyFavorite Shortcut Shortcut2 menu 8 Volume Down button Decrease the volume level 9 Volume Up button Increase the volume level For battery replacement Open the ...

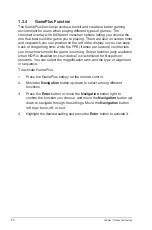
Страница 12: ...ounter lets you know how smooth the game is running Sniper function only available when HDR is disabled on your device is customized for first person shooters You can select the magnification ratio and the type of alignment in sequence To activate GamePlus 1 Press the GamePlus hotkey on the remote control 2 Move the Navigation button up down to select among different functions 3 Press the Enter bu...

Страница 13: ...on the background color NEXT BACK EXIT GamePlus Crosshair Practice Mode FPS FPS Counter Timer Stopwatch Sniper Practice Mode NEXT BACK EXIT GamePlus FPS OFF Dynamic Crosshair OFF NEXT BACK EXIT GamePlus GamePlus Sniper GamePlus Timer OFF NEXT BACK EXIT GamePlus 1 2x 1 2x 1 5x 1 5x 2 0x 2 0x NEXT BACK EXIT GamePlus OFF GamePlus Stopwatch ...

Страница 14: ... choice for Real Time Strategy RTS Role Playing Game RPG playing with GameVisualTM Video intelligence Technology FPS Mode This is the best choice for First Person Shooter game playing with GameVisualTM Video intelligence Technology sRGB Mode This is the best choice for viewing photos and graphics from PCs MOBA Mode This is the best chioce for Multiplayer Online Battle Arena MOBA games playing with...

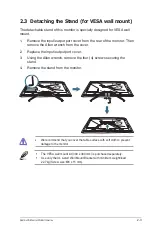
Страница 15: ...om the rear of the monitor Then remove the Allen wrench from the cover 2 Replace the input output port cover Then align and install the stand onto its slot 3 Using the Allen wrench secure the stand with the four 4 screws We recommend that you cover the table surface with soft cloth to prevent damage to the monitor ...

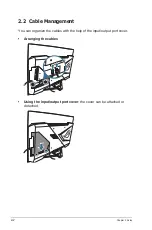
Страница 16: ...ent You can organize the cables with the help of the input output port cover Arranging the cables HDMI 4 HDMI 3 HDMI 1 HDMI 2 HDMI 1 HDMI 2 Using the input output port cover the cover can be attached or detached HDMI 4 HDMI 3 HDMI 1 HDMI 2 ...

Страница 17: ...emove the Allen wrench from the cover 2 Replace the input output port cover 3 Using the Allen wrench remove the four 4 screws securing the stand 4 Remove the stand from the monitor We recommend that you cover the table surface with soft cloth to prevent damage to the monitor The VESA wall mount kit 300 x 300 mm is purchased separately Use only the UL Listed Wall Mount Bracket with minimum weight l...

Страница 18: ...wer cord to the power adapter and the other end to a power outlet To connect the DisplayPort HDMI cable a Plug one end of the DisplayPort HDMI cable to the monitor s DisplayPort HDMI port b Connect the other end of the DisplayPort HDMI cable to your computer s DisplayPort HDMI port To connect the audio cable connect the speaker to the monitor s audio out port To use the earphone connect the end wi...

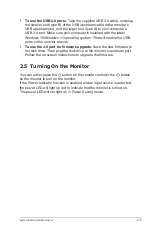
Страница 19: ...B ports on the monitor to work To use the 3 0 port for firmware upgrade Save the new firmware to the disk drive Then plug the disk drive to the monitor s upstream port Follow the on screen instructions to upgrade the firmware 2 5 Turning On the Monitor You can either press the button on the remote control or the button on the monitor to turn on the monitor If the Power Indicator function is enable...

Страница 20: ...s using the remote control do the following 1 Press the Enter button to activate the OSD menu 2 Move the Navigation button up down to navigate through the functions Highlight the desired function and press the Enter button to activate it If the function selected has a sub menu move the Navigation button up down again to navigate through the sub menu functions Highlight the desired sub menu functio...

Страница 21: ... DisplayPort cable and use the monitor OSD menu to try again with a safer Max Refresh rate Variable Refresh Rate Allow an Adaptive Sync supported graphics source to dynamically adjust display refresh rate based on typical content frame rates for power efficient virtually stutter free and low latency display update This function can only be activated within 48Hz 120Hz for HDMI1 HDMI2 and 48Hz 120Hz...

Страница 22: ...ing Set the HDR mode to ASUS Gaming HDR ASUS Cinema HDR or Console HDR The HDR brightness can be adjusted when the Brightness Adjustable function is enabled Aspect Control Select the aspect ratio and adjust the screen position Blue Light Filter Reduce the energy level of blue light emitted from the LED backlight Level 0 No change Level 1 4 The higher the level the less blue light is scattered When...

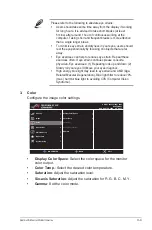
Страница 23: ...lt a physician Eye exercises 1 Repeating look up and down 2 Slowly roll your eyes 3 Move your eyes diagonal High energy blue light may lead to eye strain and AMD Age Related Macular Degeneration Blue light filter to reduce 70 max harmful blue light to avoiding CVS Computer Vision Syndrome 3 Color Configure the image color settings Display Color Space Color Temp Six axis Saturation Gamma Saturation...

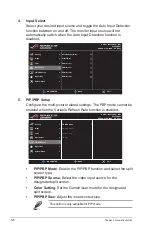
Страница 24: ... ROG Swift PG48UQ 5 PIP PBP Setup Configure the multi picture related settings The PBP mode cannot be enabled when the Variable Refresh Rate function is enabled PIP PBP Mode Color Setting PIP Size PIP PBP Source MOVE ENTER EXIT Gaming System Setup MyFavorite PIP PBP Setup Color Input Select Image BACK HDR OFF HDMI 1 3840x2160 60Hz Racing Mode ROG Swift PG48UQ PIP PBP Mode Enable the PIP PBP functi...

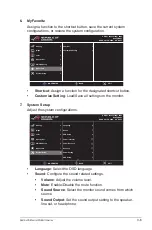
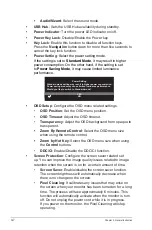
Страница 25: ...etting Load Save all settings on the monitor 7 System Setup Adjust the system configurations Language Key Lock Power Key Lock Power Indicator USB Setup Sound Power Setting OSD Setup MOVE ENTER EXIT BACK Gaming System Setup MyFavorite PIP PBP Setup Color Input Select Image HDR OFF HDMI 1 3840x2160 60Hz Racing Mode ROG Swift PG48UQ Language Select the OSD language Sound Configure the sound related s...

Страница 26: ... settings OSD Position Set the OSD menu position OSD Timeout Adjust the OSD timeout Transparency Adjust the OSD background from opaque to transparent Zoom By Remote Control Select the OSD menu size when using the remote control Zoom by Hot Key Select the OSD menu size when using the Control buttons DDC CI Enable Disable the DDC CI function Screen Protection Configure the screen saver related set u...

Страница 27: ...quality issues DisplayPort Stream Select DisplayPort 1 2 or DisplayPort 1 4 according to the graphic card DP version DSC Enable Disable the DSC Display Stream Compression function HDMI CEC Enable Disable the HDMI CEC function If the function is enabled you can use the remote control to control the devices connected to the monitor through the HDMI ports Information Display the monitor information A...

Страница 28: ...v2 1 x 2 Earphone jack Yes Audio output Yes Speaker Built in Yes USB 3 0 port Upstream x 1 Downstream x 4 5V 0 9A 2 5V 2A 2 Colors Black Power LED Red On Orange Standby Blinking Orange Pixel Cleaning Tilt Forward 5 Backward 4 Swivel No Height adjustment No VESA wall mount 300 x 300 mm Kensington lock Yes Voltage rating AC 100 240V 50 60Hz Power consumption Power On 300W Standby 0 3 W Power Off 0 5...

Страница 29: ...anese Korean Thai Indonesian Accessories DP cable HDMI cable USB cable power cord quick start guide warranty card input output port cover color calibration testing report ROG sticker Compliance and Standards cTUVus CB CE ErP FCC ICES 3 CCC BSMI CU C Tick VCCI PSE J MOSS RoHS WEEE Windows 7 10 WHQL KC KCC E STANDBY TUV Flicker Free TUV Low Blue Light UkrSEPRO PSB MEPS CE Specifications subject to c...

Страница 30: ...3 11 Chapter 3 General Instruction 3 3 Outline Dimensions 300 M 6 0 X 1 0 300 4 2 40 750 265 8 101 109 4 1067 9 611 8 685 9 ...

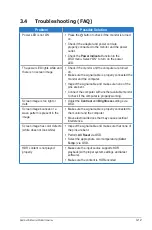
Страница 31: ...s are bent Connect the computer with another available monitor to check if the computer is properly working Screen image is too light or dark Adjust the Contrast and Brightness settings via OSD Screen image bounces or a wave pattern is present in the image Make sure the signal cable is properly connected to the monitor and the computer Move electrical devices that may cause electrical interference...

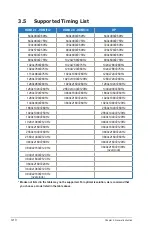
Страница 32: ...920x2160 60Hz 1280x1024 60Hz 1280x1024 60Hz 2560x1440 120Hz 1440x900 60Hz 1280x720 50Hz 3840x1600 60Hz 1680x1050 60Hz 1280x720 60Hz 3840x2160 24Hz 1920x1080 60Hz 1440x900 60Hz 3840x2160 60Hz 1920x1080 120Hz 1680x1050 60Hz 2560x1440 60Hz 1920x1080 50Hz 2560x1440 120Hz 1920x1080 60Hz 3440x1440 120Hz 1920x1080 120Hz 3840x1080 120Hz 1920x2160 60Hz 3840x1600 120Hz 2560x1440 60Hz 3840x2160 24Hz 2560x144...

Страница 33: ......

Отзывы: