background image

25

Connect the AC power adapter to your Meeting 

Computer System

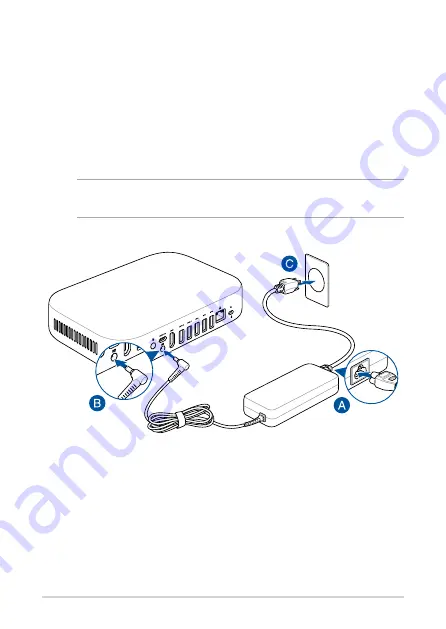
To connect the AC power adapter to your Meeting Computer System:

A. 

Connect the AC power cord to the AC/DC adapter.

B. 

Connect the DC power connector into your Meeting Computer 

System’s power (DC) input port. 

C. 

Plug the AC power cord into a 100V~240V power source.

NOTE: 

The power adapter may vary in appearance, depending on models and 

your region.

Содержание GQE10A

Страница 1: ...ASUS Google Meet hardware kit GQE10A User Guide ...

Страница 2: ......

Страница 3: ...S A COMMITMENT BY ASUS ASUS ASSUMES NO RESPONSIBILITY OR LIABILITY FOR ANY ERRORS OR INACCURACIES THAT MAY APPEAR IN THIS MANUAL INCLUDING THE PRODUCTS AND SOFTWARE DESCRIBED IN IT Copyright 2020 ASUSTeK COMPUTER INC All Rights Reserved LIMITATION OF LIABILITY Circumstances may arise where because of a default on ASUS part or other liability you are entitled to recover damages from ASUS In each su...

Страница 4: ...nect the speakermic 19 Connect the camera 20 Connect the touchscreen 21 Connect the remote control dongle to your Meeting Computer System 24 Connect the AC power adapter to your Meeting Computer System 25 Turn on your Meeting Computer System 27 Configuring your Meet hardware kit Before you begin using your device for video conferencing 30 Setup requirements 30 Setup your system 32 Enroll your devi...

Страница 5: ...Appendix Safety information 50 Setting up your system 50 Care during use 50 Regulatory notices 52 ASUS contact information 65 ...

Страница 6: ... hardware kit for video conferencing Troubleshooting This section includes instructions on how to fix a problem that you may encounter when using your Meet hardware kit Appendix This section includes notices and safety statements for your Meeting Computer System Conventions used in this user guide To highlight key information in this user guide some text are presented as follows IMPORTANT This mes...

Страница 7: ... also refer to the Meet hardware kit peripheral table for details on the peripheral items included in the different kits Meeting Computer System Wall mounting plate Power cable Wall mounting plate screw set AC power adapter Standing mount Technical documentations Meeting Computer System items ...

Страница 8: ...apter Touchscreen Touchscreen adapter plug heads Touchscreen HDMI cable Green Touchscreen USB power cable Red Touchscreen USB data cable Blue Camera Speakermic Remote Control USB dongle Camera USB cable Type A to USB Type C Speakermic cable Type A to Micro USB Batteries Peripheral items ...

Страница 9: ...placement of the defective components Some bundled accessories may vary with different models For details on bundled accessories refer to their respective user manuals Meet hardware kit Small Medium Room Kit Large Room Kit Starter Kit Meeting computer system V V V Speakermic V V V Camera V V Touchscreen control panel V V Remote control V Meet hardware kit peripheral table ...

Страница 10: ...10 ...

Страница 11: ...1 Getting to know your Meeting Computer System ...

Страница 12: ...hones You can also use this port to connect your headset or an external microphone USB 3 1 Gen 1 Type C DisplayPort combo port This USB Type C Universal Serial Bus port provides a transfer rate of up to 5 Gbit s supports DisplayPort 1 2 3840 x 2160 at 60Hz with 24 bit color and supports Power Delivery at 5v 3A Use a USB Type C adapter to connect your Meeting Computer System to an external display ...

Страница 13: ... supports a standard Ethernet cable for connection to a local network Reset button The reset button allows you to reset the Meeting Computer System Power input The supplied power adapter converts AC power to DC power for use with this jack Power supplied through this jack supplies power to the Meeting Computer System To prevent damage to the Meeting Computer System always use the supplied power ad...

Страница 14: ...an optimum heat dissipation and air ventilation ensure that the air vents are free from obstructions Right side view Air vents exhaust vent The air vents allow your Meeting Computer System chassis to expel hot air out IMPORTANT For an optimum heat dissipation and air ventilation ensure that the air vents are free from obstructions ...

Страница 15: ...15 Mount pad slot The mount slot is used to attach the Meeting Computer System to the standing mount Bottom view ...

Страница 16: ...16 ...

Страница 17: ...2 Using your Meet hardware kit ...

Страница 18: ...playPort USB Type C DVI connector used with an HDMI DVI adapter NOTE The HDMI DVI adapter is purchased separately The USB Type C HDMI cable is purchased separately Connect display via HDMI port Connect display via USB Type C DisplayPort To connect a display panel to your Meeting Computer System Connect a display cable either to the HDMI port or the USB Type C DisplayPort ...

Страница 19: ...akermic Connect the speakermic to a USB 3 2 Gen 1 port on the rear of your Meeting Computer System NOTE Please refer to pages 37 38 for more information on the recommended USB 3 2 Gen 1 port to connect the speakermic to ...

Страница 20: ...he camera Connect the camera to a USB 3 2 Gen 1 port on the rear of your Meeting Computer System NOTE Please refer to pages 37 38 for more information on the recommended USB 3 2 Gen 1 port to connect the camera to ...

Страница 21: ... Blue to the data USB port on your touchscreen B Connect the touchscreen to a USB 3 2 Gen 1 port on the rear of your Meeting Computer System Ensure to connect the USB 3 2 Gen 1 connector to connect to your Meeting Computer System NOTE Please refer to pages 37 38 for more information on the recommended USB 3 2 Gen 1 port to connect the touchscreen to Touchscreen USB data cable Blue ...

Страница 22: ...dapter B Connect the Touchscreen USB power cable Red to the power USB port on your touchscreen C Attach the appropriate adapter plug head to the adapter then plug the AC power adapter into a 100V 240V power source NOTE For more information on attaching the adapter plug head to the adapter refer to the user guide bundled with the touchscreen Touchscreen USB power cable Red ...

Страница 23: ...n HDMI cable Green A Connect the Touchscreen HDMI cable Green to the HDMI port on your touchscreen B Connect the touchscreen to a device s such as a laptop HDMI out port for local presentations WARNING Do not connect the HDMI cable Green to your Meeting Computer System Touchscreen HDMI cable Green ...

Страница 24: ...24 Connect the remote control dongle to your Meeting Computer System Connect the remote control USB dongle to a USB 3 2 Gen 1 port on the rear of your Meeting Computer System ...

Страница 25: ...our Meeting Computer System A Connect the AC power cord to the AC DC adapter B Connect the DC power connector into your Meeting Computer System s power DC input port C Plug the AC power cord into a 100V 240V power source NOTE The power adapter may vary in appearance depending on models and your region ...

Страница 26: ... System The socket outlet must be easily accessible and near your Meeting Computer System To disconnect your Meeting Computer System from its main power supply unplug your Meeting Computer System from the power socket NOTE Please refer to the following information on the adapter 90W Power adapter Input voltage 100 240 Vac Input frequency 50 60 Hz Rating output current 4 62 A 90W Rating output volt...

Страница 27: ...er System Press the power button to turn on your Meeting Computer System IMPORTANT Ensure that all peripherals speakermic camera touchscreen and AC power adapter are connected properly before you turn on your Meeting Computer System ...

Страница 28: ...28 ...

Страница 29: ...3 Configuring your Meet hardware kit ...

Страница 30: ... The network requirements are the same as those for Hangouts In addition we recommend a minimum bandwidth of 1 mbps or 2 mbps up down for group video conferencing NOTE Although you can use your Meeting Computer System device over a wireless network connection we recommend using a wired network connection for best sound and video quality Space requirements For the Meeting Computer System device you...

Страница 31: ...t of the conference room For rooms where participants sit at one end of the room facing the display we recommend placing the speakermic at the end of the table closest to the Meeting Computer System and the display In larger rooms where participants sit talking around a table independent of the position of the display we recommend daisy chaining up to 5 speakermics depending on your meeting room s...

Страница 32: ...Computer System to a wall Please follow the steps below to install the wall mount and Meeting Computer System IMPORTANT The equipment should not be mounted higher than 2 m from the floor or should not be mounted higher than 75 cm from a flat surface Setup your system You can mount your Meeting Computer System to the wall mounting plate or mount the Meeting Computer System to the standing mount WAR...

Страница 33: ...head type screws 2 Locate the mount pad slot on the bottom of your device and orientate it as shown in the illustration below so that the exhaust air vents faces upwards NOTE Please refer to Chapter 1 Getting to know your Meeting Computer System for more information on the location of the exhaust air vents Air vent exhaust vent ...

Страница 34: ...d slots are aligned with the wall mount before placing the device onto the wall mount plate NOTE Please refer to Chapter 1 Getting to know your Meeting Computer System for more information on the location of the mount pad slots 4 Manually adjust your device if needed for a more secure fit ...

Страница 35: ...s below 1 Locate the mount pad slot on the bottom of your device and orientate it as shown in the illustration below so that the exhaust air vents faces upwards NOTE Please refer to Chapter 1 Getting to know your Meeting Computer System for more information on the location of the exhaust air vents Air vent exhaust vent ...

Страница 36: ... device s mount pad slot to the standing mount then bring the device closer to the mount Your device will be magnetized and attach onto the standing mount 3 Manually adjust your device if needed for a more secure fit ...

Страница 37: ...UCH PANEL MICROPHONE SPEAKER CABLING SURFACE CONCEALED RUN CHROMEBOX WITH VESA MOUNT MOUNTED TO DISPLAY GQE10A WALL MOUNT Recommended meeting room configuration 1 System setup Place your camera You may install your camera below or on top of the display depending on the screen height NOTE Keep the camera as close to eye level as possible ...

Страница 38: ...38 Room layout example 120 note 2 DISPLAY MEET CAMERA FRONT WALL FRONT WALL NOTES 1 Nearest viewing position recommend 1 5 x screen height 2 Camera field of view D note 1 AUTOZOOM RANGE 3 5M 11 6 ...

Страница 39: ...BOX MEET CAMERA DISPLAY OPTIONAL USB HUB TOUCH PANEL MICROPHONE SPEAKER MEET CAMERA CABLING SURFACE CONCEALED RUN CREDENZA GQE10A NOTE Ensure that the credenza you wish to install your Meeting Computer System to is not tightly packed with cables or other objects which may obstruct the air vents of your Meeting Computer System and has openings to allow proper air flow ...

Страница 40: ...40 Room layout example 120 DISPLAY MEET CAMERA FRONT WALL FRONT WALL ...

Страница 41: ...ns are recommended you may adjust the connections accordingly to suit your needs 1 6 5 3 2 4 LAN port connects to a router NOTE Although you can use your Meeting Computer System device over a wireless network connection we recommend using a wired network connection for optimal sound and video quality 1 3 2 4 USB 3 2 Gen 1 port connects the speakermic assembly 5 6 7 3 1 2 4 ...

Страница 42: ...he camera 1 6 5 3 2 7 4 USB 3 2 Gen 1 port connects to the touchscreen 1 6 5 3 2 7 4 HDMI connects a display with HDMI connector 1 6 5 3 2 7 4 DisplayPort connects a display with USB Type C connector 6 5 3 2 7 4 Power port connects to a power outlet IMPORTANT Be sure to connect to a power outlet last after you have made all the other connections ...

Страница 43: ...TE We recommend connecting a USB keyboard to make entering the enrollment information easier To complete basic enrollment 1 Turn on the display 2 Turn on the Meeting Computer System 3 Verify or change your language keyboard layout and network NOTE If your network doesn t appear in the Select a network list select Join Network and enter the correct settings Ask your network administrator for the se...

Страница 44: ... Ensure that your camera and speakermic were connected to your Meeting Computer System before you turned on your device Ensure that your camera and speakermic are connected to your device properly Unplug the cables and plug them in again then restart your device 9 Click through the screens to view tips on using Meeting Computer System At the end of device enrollment the screen displays a URL for t...

Страница 45: ...voice prompts and more The options you select here apply to the setup process and Out of box experience OOBE process To select the Accessibility link press the Continue or Accept and continue button NOTE High contrast mode only takes effect during enrollment and not in the OOBE process Help make Chrome OS better Allows your device to send usage and crash info to Google helping us improve the Chrom...

Страница 46: ... and rooms You can view modify and update your Meeting Computer System and rooms through the Google Admin console For more details on managing your devices and rooms please visit the Meeting Computer System Help website ...

Страница 47: ...Troubleshooting ...

Страница 48: ...evice to click you can identify the correct one by its serial number You can find your device s serial number on the card that was included in the box and on the bottom of the device itself Help and support Visit support google com chromedevicesformeetings for more detailed set up and provisioning instructions customizable table mats or to print guides for your users ...

Страница 49: ...Appendix ...

Страница 50: ...ventilation openings Use this product in environments with ambient temperatures between 0 C and 35 C If you use an extension cord make sure that the total ampere rating of the devices plugged into the extension cord does not exceed its ampere rating This equipment should be installed and operated with a minimum distance of 20cm between the radiator and your body Care during use Do not walk on the ...

Страница 51: ... cutting of a battery that can result in an explosion Leaving a battery in an extremely high temperature surrounding environment that can result in an explosion or the leakage of flammable liquid or gas A battery subjected to extremely low air pressure that may result in an explosion or the leakage of flammable liquid or gas By means of a power cord connected to a socket outlet with earthing conne...

Страница 52: ...een tested and found to comply with the limits for a Class A digital device pursuant to part 15 of the FCC Rules These limits are designed to provide reasonable protection against harmful interference in a commercial installation This equipment generates uses and can radiate radio frequency energy and if not installed and used in accordance with the instruction manual may cause harmful interferenc...

Страница 53: ...ody This transmitter must not be co located or operating with any other antenna or transmitter Le rayonnement de la classe b respecte ISED fixaient un environnement non contrôles et mise en oeuvre de ce matériel devrait avec échangeur distance minimale entre 20 cm ton corps Lanceurs ou ne peuvent pas coexister cette antenne ou capteurs ave d autres Operation in the band 5150 5250 MHz is only for i...

Страница 54: ...62 GHz Ch01 through CH11 Japan 2 412 2 484 GHz Ch01 through Ch14 Europe ETSI 2 412 2 472 GHz Ch01 through Ch13 Regional notice for Singapore This ASUS product complies with IMDA Standards Complies with IMDA Standards DA105282 Déclaration de conformité de Innovation Sciences et Développement économique Canada ISED Le présent appareil est conforme aux CNR d ISED applicables aux appareils radio exemp...

Страница 55: ...formation disclosure based on regulation requirements ASUS is complied with EU REACH and Article 33 Complying with the REACH Registration Evaluation Authorization and Restriction of Chemicals regulatory framework we publish the chemical substances in our products at ASUS REACH website at http csr asus com english REACH htm EU RoHS This product complies with the EU RoHS Directive For more details s...

Страница 56: ... Turkey RoHS AEEE Yönetmeliğine Uygundur ASUS Recycling Takeback Services ASUS recycling and takeback programs come from our commitment to the highest standards for protecting our environment We believe in providing solutions for you to be able to responsibly recycle our products batteries other components as well as the packaging materials Please go to http csr asus com english Takeback htm for d...

Страница 57: ... enabled by default The monitor is automatically set to sleep within 10 minutes of user inactivity the computer is automatically set to sleep within 30 minutes of user inactivity To wake your computer click the mouse press any key on the keyboard or press the power button Please visit http www energystar gov powermanagement for detail information on power management and its benefits to the environ...

Страница 58: ...rcial Desktop ASUS Hangouts Meet hardware kit HelpDesk_Declaration Dans la plage de fréquence 5150 5350 MHz le Wi Fi est restreint à une utilisation en intérieur dans les pays listés dans le tableau ci dessous Vereinfachte EU Konformitätserklärung ASUSTek COMPUTER INC erklärt hiermit dass dieses Gerät mit den grundlegenden Anforderungen und anderen relevanten Bestimmungen der Richtlinie 2014 53 EU...

Страница 59: ...e com os requisitos essenciais e outras disposições relevantes relacionadas às diretivas 2014 53 UE O texto completo da declaração de conformidade CE está disponível em https www asus com Commercial Desktop ASUS Hangouts Meet hardware kit HelpDesk_Declaration O WiFi operando na banda 5150 5350MHz deve ser restrito para uso interno para os países listados na tabela abaixo Pojednostavljena EU Izjava...

Страница 60: ... اروپا اتحادیه بیانیه این از پیروی کامل متن دارد مطابقت EU https www asus com Commercial Desktop ASUS Hangouts Meet hardware kit HelpDesk_ Declaration جدول در شده فهرست کشورهای برای ساختمان داخل فضای در استفاده برای باید WiFi برای مگاهرتز 5150 5350 عملکرد شود محدود Απλοποιημένη Δήλωση Συμμόρφωσης ΕΕ Διά του παρόντος η ASUSTek Computer Inc δηλώνει ότι αυτή η συσκευή είναι σύμμορφη με τις βασικές πρ...

Страница 61: ...t for EU samsvarserklæringen finnes på https www asus com Commercial Desktop ASUS Hangouts Meet hardware kit HelpDesk_Declaration Wi Fi området 5150 5350 MHz skal begrenses til innendørs bruk for landene som er oppført i tabellen Uproszczona deklaracja zgodności UE Firma ASUSTek Computer Inc niniejszym oświadcza że urządzenie to jest zgodne z zasadniczymi wymogami i innymi właściwymi postanowienia...

Страница 62: ... v pasovnem območju 5150 5350 MHz mora biti v državah navedenih v spodnjem seznamu omejen na notranjo uporabo Declaración de conformidad simplificada para la UE Por la presente ASUSTek Computer Inc declara que este dispositivo cumple los requisitos básicos y otras disposiciones pertinentes de la directiva 2014 53 EU En https www asus com Commercial Desktop ASUS Hangouts Meet hardware kit HelpDesk_...

Страница 63: ...им відповідним вимогам Директиви 2014 53 EU Повний текст декларації відповідності нормам ЄС доступний на https www asus com Commercial Desktop ASUS Hangouts Meet hardware kit HelpDesk_Declaration Робота Wi Fi на частоті 5150 5350 МГц обмежується використанням у приміщенні для країн поданих у таблиці нижче Function Frequency Maximum Output Power EIRP WiFi 2412 2472 MHz 16 dBm 5150 5350 MHz 20 dBm 5...

Страница 64: ...rer ASUSTeK Computer Inc Tel 886 2 2894 3447 Address 1F No 15 Lide Rd Beitou Dist Taipei City 112 Taiwan Authorised representative in Europe ASUSTeK Computer GmbH Address Harkortstrasse 21 23 40880 Ratingen Germany ...

Страница 65: ...1 510 739 3777 Fax 1 510 608 4555 Web site https www asus com us Technical Support Support fax 1 812 284 0883 Telephone 1 812 282 2787 Online support https qr asus com techserv ASUS COMPUTER GmbH Germany and Austria Address Harkortstrasse 21 23 40880 Ratingen Germany Web site https www asus com de Online contact https www asus com support Product ContactUs Services questionform lang de de Technica...

Страница 66: ...ereby declares that the product Product Name Meeting Computer System Model Number GQE10A compliance statement This device complies with part 15 of the FCC Rules Operation is subject to the following two conditions 1 This device may not cause harmful interference and 2 this device must accept any interference received including interference that may cause undesired operation Ver 180620 ...

Отзывы: