background image

LED projector E-Manual

23

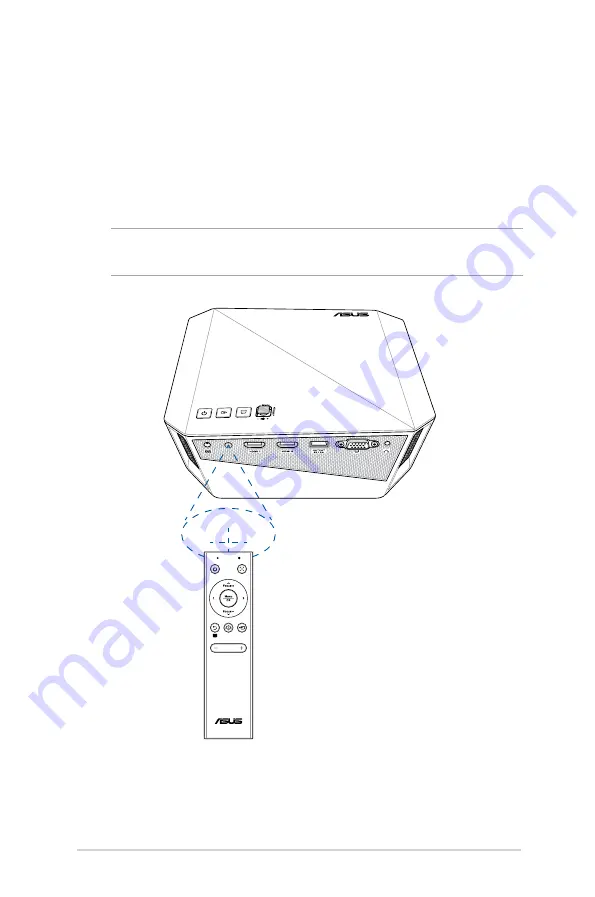
Remote control effective range

The remote sensor is located on the rear of your LED projector. 

The remote control must be held at an angle of ±30


degrees 

perpendicular to the projector’s remote control to function correctly. 

The distance between the remote control and the sensor should not 

exceed 8 meters (about 26 feet). 

NOTE:

 Ensure sure that there are no obstacles between the remote 

control and the remote sensor on your LED projector.

±30 degrees

Содержание F1 Series

Страница 1: ...T H R R O O H S 1 8 W EN S 0 LED projector E Manual F1 Series ...

Страница 2: ...HIS MANUAL ARE FURNISHED FOR INFORMATIONAL USE ONLY AND ARE SUBJECT TO CHANGE AT ANY TIME WITHOUT NOTICE AND SHOULD NOT BE CONSTRUED AS A COMMITMENT BY ASUS ASUS ASSUMES NO RESPONSIBILITY OR LIABILITY FOR ANY ERRORS OR INACCURACIES THAT MAY APPEAR IN THIS MANUAL INCLUDING THE PRODUCTS AND SOFTWARE DESCRIBED IN IT Copyright 2019 ASUSTeK COMPUTER INC All Rights Reserved LIMITATION OF LIABILITY Circu...

Страница 3: ...0 Top view 10 Front view 12 Rear view 13 Left side 14 Right side 15 Bottom view 16 Mounting your LED projector 17 Projecting files from a mounted position 18 Ceiling mount hole details 18 LED projector remote control 19 Replacing the battery 21 Remote control effective range 23 Chapter 2 Setting up Operating your LED projector 26 Connect the LED projector to the power adapter 26 Connect the LED pr...

Страница 4: ...ns 40 Image 40 Display 41 Input 42 System 43 Turning off your LED projector 45 Using 3D glasses 46 Multi language versions 47 Appendices Federal Communications Commission Statement 50 Regional notice for California 51 Global Environmental Regulation Compliance and Declaration 52 ASUS Recycling Takeback Services 52 Specifications for F1 series LED projector 53 Supported PC Timings 56 ...

Страница 5: ...e parts of your LED projector and its accompanying remote control Chapter 2 Setting up This chapter shows you how to set up your LED projector and use its parts for input device connection Chapter 3 Using the onscreen display menu This chapter talks about the features of your LED projector s onscreen display menu and how to navigate it using the control panel Appendices This section includes safet...

Страница 6: ...ion and tips that can help complete tasks WARNING This message contains important information that must be followed to keep you safe while performing tasks and prevent damage to your LED projector s data and components Typography Bold This indicates a menu or an item that must be selected Italic This indicates sections that you can refer to in this manual Multi language versions Download other lan...

Страница 7: ...mance Keep the LED projector s plastic packages out of the reach of children Do not block or place anything near the LED projector s ventilation holes Doing so may cause internal heat build up that can degrade picture quality and damage the projector Ensure that the operating voltage of your LED projector matches the voltage of your power source Servicing and replacement of parts Do not disassembl...

Страница 8: ...old location When the LED projector is exposed to a drastic change in temperature moisture may condense on the lens and its other internal parts To prevent this use the unit two 2 hours after an extreme or sudden change in temperature occurs Proper disposal Do not throw your LED projector in municipal waste This product has been designed to enable proper reuse of parts and recycling The symbol of ...

Страница 9: ...LED projector E Manual 9 Chapter 1 Knowing your LED projector Chapter 1 Knowing your LED projector ...

Страница 10: ...10 LED projector E Manual Features Top view ...

Страница 11: ...t until your LED projector shuts down Joystick This joystick allows you to navigate the onscreen display menu and select menu settings This joystick also correspond to specific LED projector settings as indicated below Open main menu OK push center Adjust focus move up or down Adjust volume move left or right NOTE For more information on using your LED projector s settings refer to the Using the o...

Страница 12: ...ches and possible dirt build up IMPORTANT Remove the lens cover before using your LED projector Lens The lens projects video or image files onscreen from your input device WARNING Do not touch the lens using your hands or any sharp object Auto focus camera This camera helps the LED projector with the auto focus feature ...

Страница 13: ...ce IMPORTANT Use only the bundled power adapter to supply power to your LED projector Remote sensor The remote sensor detects signal from your LED projector s remote control allowing you to access the LED projector s control panel from a distance of up to 8 meters and a receiving angle of 30degrees HDMI ports These ports are for the HDMI High Definition Multimedia Interface connectors These port a...

Страница 14: ... to connect your LED projector to other VGA compatible devices Audio output jack port The audio output jack port allows you to connect your LED projector to amplified speakers or headphones Air vents The air vents allow cool air to enter and warm air to exit your LED projector WARNING Ensure that paper books clothing cables or other objects do not block any of the air vents or else overheating may...

Страница 15: ...ur LED projector using Kensington compatible LED projector security products Air vents The air vents allow cool air to enter and warm air to exit your LED projector WARNING Ensure that paper books clothing cables or other objects do not block any of the air vents or else overheating may occur Right side ...

Страница 16: ... comes with a built in stand that allows you to adjust the height of the projector by either 5 7 degrees or 8 2 degrees Ceiling mount holes Use these holes to connect the LED projector to a ceiling mount Tripod socket Connect the LED projector to a tripod using this socket ...

Страница 17: ...in this manual to specify the right distance for mounting your LED projector on the ceiling Keep a reasonable space between the bracket and the projector to allow for proper heat distribution In addition to the ceiling mount kit and screws we also recommend using a metal bar or wire to hold the ceiling mounted LED projector for added protection and to prevent it from falling due to natural causes ...

Страница 18: ...ilize its position Projecting files from a mounted position After mounting your LED projector you need to change its image position settings to ensure that files are automatically flipped and projected correctly onscreen To change your image position settings 1 Navigate to Display Projection Position on your LED projector 2 Select Front Ceiling or Rear Ceiling to change the settings of your LED pr...

Страница 19: ... may vary depending on model Battery compartment The battery compartment allows you to use CR2032 lithium coin batteries to power your LED projector s remote control NOTE For more details on using the battery compartment refer to the Replacing the battery section in this manual ...

Страница 20: ...on to adjust the keystone of your projection onscreen Input Press this button to change the input source Volume down Press this button to decrease the volume Volume up Press this button to increase the volume Focus up Up Press this button to increase the focus or move up Focus down Down Press this button to decrease the focus or move down Left Press this button to move left Right Press this button...

Страница 21: ...LED projector E Manual 21 Replacing the battery A Slide the battery cover down and remove it completely B Remove the old batteries ...

Страница 22: ...E Manual C Insert the new CR2032 lithium coin batteries with the positive sides facing up D Slide the battery cover up all the way in until you hear a soft click indicating that the battery cover is locked back in place ...

Страница 23: ...trol must be held at an angle of 30degrees perpendicular to the projector s remote control to function correctly The distance between the remote control and the sensor should not exceed 8 meters about 26 feet NOTE Ensure sure that there are no obstacles between the remote control and the remote sensor on your LED projector 30 degrees ...

Страница 24: ...24 LED projector E Manual ...

Страница 25: ...LED projector E Manual 25 Chapter 2 Setting up Chapter 2 Setting up ...

Страница 26: ... your LED projector Connect the LED projector to the power adapter A Connect the AC DC power cord to the power adapter B Connect the AC power cord to a power source C Connect the DC power connector to your LED projector Power adapter information Input voltage 100 240Vac Input frequency 50 60Hz Rating output current 6 32A max 120W Rating output voltage 19V ...

Страница 27: ... dealer if the AC power cord bundled with your LED projector does not match your local power source NOTE We highly recommend that you use a video source device that also uses a grounding type plug to prevent signal interference due to voltage fluctuations For Australia and Mainland China For U S A Canada and Taiwan For Continental Europe For U K ...

Страница 28: ...28 LED projector E Manual Connect the LED projector to your device A Audio output jack ...

Страница 29: ...LED projector E Manual 29 B HDMI ...

Страница 30: ...30 LED projector E Manual C Power output 5V 2A ...

Страница 31: ...LED projector E Manual 31 D VGA ...

Страница 32: ...creen WARNING Ensure that the built in stand is fully retracted before placing the LED projector inside the projector bag NOTES Place the LED projector on a stable flat surface Keep a space of 30 cm or more between the sides of the LED projector Consult your dealer for special installation procedures like suspending the LED projector from the ceiling ...

Страница 33: ...Size Projection Distance Screen Diagonal Width Height inch cm inch cm inch cm ft m 25 63 5 21 79 55 35 12 26 31 13 1 41 0 45 56 5 143 51 49 24 125 08 27 70 70 36 3 28 1 00 65 165 1 56 65 143 9 31 87 80 94 3 773 1 15 80 203 2 69 73 177 11 39 22 99 62 4 66 1 42 100 254 87 16 221 38 49 03 124 53 5 81 1 77 160 406 4 135 68 344 63 84 80 215 4 9 28 2 83 210 533 4 178 08 452 32 111 30 282 7 12 14 3 70 ...

Страница 34: ...34 LED projector E Manual Press the power button ...

Страница 35: ...nual 35 Adjust the image focus Push the focus button on the LED projector up or down or press the focus button on the remote control to adjust the image focus NOTE Use a still image when adjusting the onscreen display OR ...

Страница 36: ...36 LED projector E Manual ...

Страница 37: ...LED projector E Manual 37 Chapter 3 Using the onscreen display menu Chapter 3 Using the onscreen display menu ...

Страница 38: ...first time We strongly recommend that you use a grounded wall socket while using your LED projector on power adapter mode 1 Set up your LED projector then press the power button 2 Move the joystick left or right on your LED projector to browse through the available language options 3 After you have chosen your preferred language press the center of the joystick to set this language for use on your...

Страница 39: ...wn button on your remote control to select the menu option you would like to adjust 3 Press the center of the joystick or press the Menu OK button on your remote control to open the selected option s settings 4 Move the joystick left or right or press the Left or Right button on your remote control to adjust the settings according to your preference 5 When finished press the center of the joystick...

Страница 40: ... option to adjust the contrast of your projection onscreen Saturation Select this menu option to adjust the saturation of your projection onscreen Sharpness Select this menu option to adjust the sharpness of your projection onscreen Tint Select this menu option to adjust the tint of your projection onscreen Splendid This option allows you to select a Splendid mode for your LED projector Color Temp...

Страница 41: ...llows you to change the way your projections are oriented onscreen based from the current location of your LED projector Auto Ceiling Rotation This option allows you to turn Auto Ceiling detection on or off Keystone Select this menu option to adjust the keystone of your projection onscreen Aspect Ratio Select this menu option to adjust the screen ratio of your projection onscreen Display The optio...

Страница 42: ...jector Auto Source This option allows you to turn Auto Source on or off Turn this option on to scan the connected devices to your LED projector automatically VGA PC Select this menu option to project images from the VGA port HDMI 1 Select this menu option to project images from the HDMI 1 port HDMI 2 Select this menu option to project images from the HDMI 2 port Wireless Mirroring Select this menu...

Страница 43: ...o automatically turn on when it is connected to a power source Power Off Timeout This option allows you to set the number of minutes before your LED projector automatically shuts down when not in use AURA RGB Select this menu option to adjust the AURA RGB LED of your projector Language This option allows you to select the language to use on your LED projector s onscreen display menu System The opt...

Страница 44: ...ee an overview of information about your LED projector Reset all This option allows you to reset all the settings you have currently set up for your LED projector NOTE Please wait for at least eight 8 seconds for the reset process to complete then reselect a language ...

Страница 45: ...LED projector E Manual 45 Turning off your LED projector 1 Press the power button 2 When the following screen appears press the power button again to completely turn off your LED projector ...

Страница 46: ...ng 3D files refer to the user guide that comes with your 3D glasses To view 3D files 1 Play your 3D file then navigate to Display 3D on your LED projector NOTE The 3D mode is set to Off by default 2 Select Auto to allow your LED projector to automatically select a 3D mode best suited for your 3D file NOTE Select a 3D mode manually if your LED projector cannot detect which 3D mode to use IMPORTANT ...

Страница 47: ...LED projector E Manual 47 Multi language versions Download other language versions of this E Manual via this website https www asus com support ...

Страница 48: ...48 LED projector E Manual ...

Страница 49: ...LED projector E Manual 49 Appendices Appendices Appendices ...

Страница 50: ...ce will not occur in a particular installation If this equipment does cause harmful interference to radio or television reception which can be determined by turning the equipment off and on the user is encouraged to try to correct the interference by one or more of the following measures Reorient or relocate the receiving antenna Increase the distance between the equipment and receiver Connect the...

Страница 51: ...y interference including interference that may cause undesired operation of the device CAN ICES 3 B NMB 3 B Déclaration de conformité de Innovation Sciences et Développement économique Canada ISED Le présent appareil est conforme aux CNR d Innovation Sciences et Développement économique Canada applicables aux appareils radio exempts de licence L exploitation est autorisée aux deux conditions suiva...

Страница 52: ...csr asus com english Compliance htm for information disclosure based on regulation requirements ASUS is complied with Japan JIS C 0950 Material Declarations EU REACH SVHC Korea RoHS ASUS Recycling Takeback Services ASUS recycling and takeback programs come from our commitment to the highest standards for protecting our environment We believe in providing solutions for you to be able to responsibly...

Страница 53: ...ance 0 43 3 7 meters Projection Screen Size 25 210 inches Projection Offset 105 5 Zoom Ratio Fixed Video Features Picture Modes 6 Modes Standard Mode Dynamic Mode sRGB Mode Scenery Mode Theater Mode Game Mode Keystone adjustment Vertical Horizontal Auto Keystone Yes Vertical Aspect Ratio Auto 16 10 16 9 4 3 Projector Placement Front Table Rear Table Front Ceiling Rear Ceiling Audio Features Built ...

Страница 54: ...4dB Theater mode 28dB 30dB Input or Output PC Signal Input 1 x D sub 2 x HDMI HDCP support Audio Out Earphone out USB port Yes 1 x Type A for 5V 2A charging Wireless Wi Fi 802 11 a b g n 2 4GHz and 5GHz Mechanical Design Chassis Colors Black Tripod Socket Yes Supporting Stand Yes Two steps Ceiling Mount Yes Lens Cover Yes Security Kensington lock Yes Dimension Physical Dimension 250 W x 75 H x 210...

Страница 55: ...C Operating Humidity 20 90 Accessories Carrying bag power adapter power cord HDMI cable Quick Start Guide remote control warranty card Specifications are subject to change without prior notice Product availability may vary by region All brand and product names mentioned are trademarks of their respective companies ...

Страница 56: ... 63 981 SXGA_75 75 025 79 976 1280 x 960 1280 x 960_60 60 60 1360 x 768 1360 x 768_60 60 015 47 712 1440 x 900 WXGA _60 59 887 55 935 1600 x 1200 UXGA 60 75 1680 x 1050 1680 x 1050_60 59 95 62 29 640 x 480 67Hz MAC13 66 667 35 832 x 624 75Hz MAC16 74 546 49 722 1024 x 768 75Hz MAC19 74 93 60 241 1920 x 1080 60Hz 1920 x 1080_60 60 67 5 3D Video Format Timings HDMI only Timing Frame Packing Side by ...

Страница 57: ...70 70 087 31 469 640 x 480 VGA_60 59 94 31 469 VGA_72 72 809 37 861 VGA_75 75 37 5 800 x 600 SVGA_60 60 317 37 879 SVGA_72 72 188 48 077 SVGA_75 75 46 875 1024 x 768 XGA_60 60 004 48 363 XGA_70 70 069 56 476 XGA_75 75 029 60 023 1152 x 864 1152 x 864_60 60 1280 x 720 1280 x 720_60 60 45 1280 x 720_120 120 1280 x 800 WXGA_60 59 81 49 702 1280 x 1024 SXGA_60 60 02 63 981 SXGA_75 75 025 79 976 1280 x...

Страница 58: ...of EU declaration of conformity is available at https www asus com support The WiFi operating in the band 5150 5350MHz shall be restricted to indoor use for countries listed in the table below AT BE BG CZ DK EE FR DE IS IE IT EL ES CY LV LI LT LU HU MT NL NO PL PT RO SI SK TR FI SE CH UK HR F1 output power table Function Frequency Maximum Output Power EIRP WiFi 2412 2472 MHz 18 78 dBm 5150 5350 MH...

Отзывы: