background image


TrojanTwo-Compact User Guide v3.8 

Page | 21 


4.1.2  Rolling direction rewinder 

The rewinder can place the label material on the outside or inside of the roll. The criteria are the same as 
for the unwinder, please refer to the above for placement and direction and update the Media settings to 
reflect this. 

4.2


Threading the label material from scratch 


1.


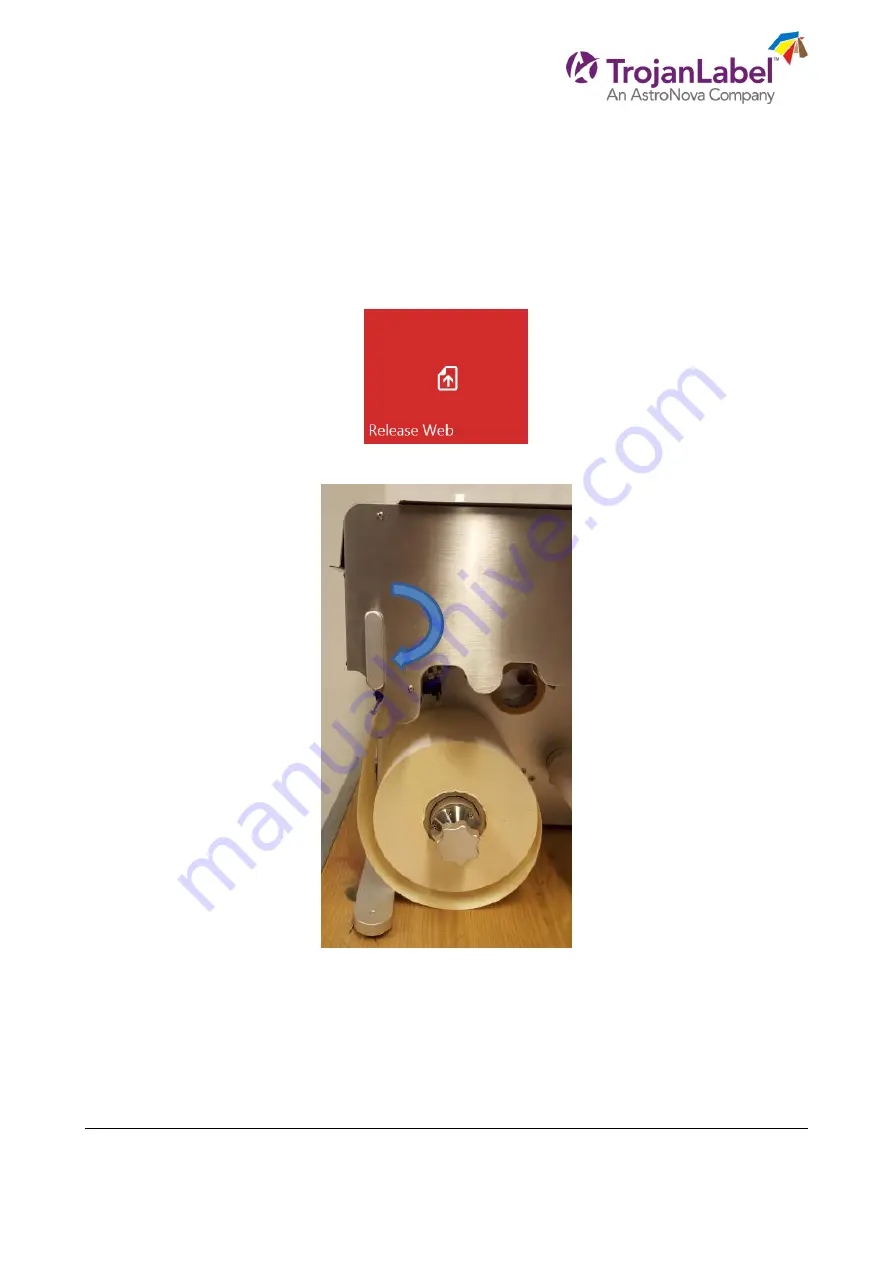
Press 

‘Release Web’

 button at TrojanTwo tab -> Handling menu. 


2.


Make sure that 

NIP clamp

 is in open position. 


NIP clamp open 


3.


Place the chosen label material roll on the unwinder shaft according to chapter 4.1.1. 


Содержание Trojanlabel Trojan T2-C

Страница 1: ...User Guide Version 3 8...

Страница 2: ...ion agreements currently in effect with your organization Copies of this document any portion of this document or attachments may not be transmitted or disclosed to any third party without the prior w...

Страница 3: ...4 1 1 Rolling direction unwinder Ink jet coating on the inside or outside 20 4 1 2 Rolling direction rewinder 21 4 2 Threading the label material from scratch 21 4 3 Adjusting label edge sensor 25 4 4...

Страница 4: ...2 1 Updating via online updater 75 12 2 Updating via offline updater 76 13 Using the built in slitter for T2 C press 78 13 1 Purpose 78 13 2 Usage 78 13 3 Replacing the slitter blades 80 14 Maintenanc...

Страница 5: ...TrojanTwo Compact User Guide v3 8 Page 4 16 1 Error States 101 16 2 Error messages on screen 104 17 Appendix 106...

Страница 6: ...TrojanTwo Compact User Guide v3 8 Page 5 1 Certificate of compliance and Safety information...

Страница 7: ...is the duty of the employer the owner of the machine to ensure that anyone who is to operate service maintain or repair the machine have read the instructions As a minimum they should have read the p...

Страница 8: ...chnical specifications Physical dimensions in inches and millimeters Length 23 8 x Width 22 8 x Height 31 3 Length 606 mm x Width 580 mm x Height 795 mm Weight 132 3 lbs 60 kg without ink tanks and la...

Страница 9: ...l print quality some non coated materials will also work Please contact Trojanlabel or your distributor for recommendations of suited materials It is imperative to have a local source of material to e...

Страница 10: ...litter knifes 4 Built in slitter knifes 5 Unwinder 6 Rewinder 1 Lid for easy access to gap blackmark sensor and maintenance 2 Sensor for gap blackmark detection 3 Label edge sensor 4 Waste Ink bottle...

Страница 11: ...6mm x Width 22 8 580mm x Height 31 3 795mm The machine is standing on 4 height adjustable feet In case it is not possible to set the worktable to level then each foot s height can be adjusted by turni...

Страница 12: ...up the machine The network cable is necessary for sending new print jobs to the T2 C press and for remote support software updates 1 Ethernet port 2 Power On Off switch 3 Power Supply NOTE Ethernet c...

Страница 13: ...f for safety reasons It is advised to press the ER button whenever the operator wants to perform any other actions on the web path system than threading the label material or splicing and installing a...

Страница 14: ...ain 2 liters of ink when opened Every T2 C ink tank is QA chip protected ensuring that only genuine Trojanlabel ink tanks can be used The tray for the ink tanks is situated on top of the machine The i...

Страница 15: ...tanks directly This refilling process is performed automatically by the system when ink level drops under a certain limit for the particular reservoir ink tank NOTE During the first time installation...

Страница 16: ...omised NOTE If a poor seal is suspected DO NOT USE the printhead Report the issue to your supplier 2 Carefully rip the foil packaging open at the notch Use scissors if your foil bag does not have a no...

Страница 17: ...ulling on the strip NOTE Dispose of the removed strip immediately and do not allow the removed strip to contact the electrical contacts or the printhead nozzles IMPORTANT Do not throw away the printhe...

Страница 18: ...ce menu to open printhead latch NOTE The above warning label can be found on the printhead latch Trying to open the blue plastic latch manually by the handle will most likely break the latch Breaking...

Страница 19: ...t printhead by the handle into the cradle a Open printhead latch all the way up b Insert printhead into the cradle by the handles c Pull the printhead backwards until it snaps into the proper place st...

Страница 20: ...is ready for printing IMPORTANT Printhead can only filled up with ink when reservoir ink tanks are filled For the first time installation the printhead can only be primed up when filling up the reser...

Страница 21: ...label roll on the unwinder core according to the ink jet coated side coated side must be up for printing 1 Outside If the ink jet coating is on the outside of the material which is the most common pla...

Страница 22: ...me as for the unwinder please refer to the above for placement and direction and update the Media settings to reflect this 4 2 Threading the label material from scratch 1 Press Release Web button at T...

Страница 23: ...7 3mm 2 25 from the wall This ensures that the media left edge will be at the same position as the left edge of the printhead nozzles where printing zone begins NOTE Does not have to be exactly 57 3mm...

Страница 24: ...l over the first metal roll 1 then between the NIP clamps 2 then over the metal roll under the printhead 3 then over the last metal roll 4 and fix it with adhesive tape to an empty paper core on the r...

Страница 25: ...uide v3 8 Page 24 7 Close the NIP clamp NIP clamp closed 8 Press Calibrate Web button at TrojanTwo tab Handling menu 9 Tension calibration is completed when Web State becomes ready at right side statu...

Страница 26: ...ng position for the sensor it is advised to align the sensor to the 0 position on the metric scale at the axis where the sensor can be moved Further adjustments can be done even during printing as if...

Страница 27: ...ly Not calibrated 2 Go to TrojanTwo tab Media settings menu and select the correct Media Profile that fits the paper or create a profile that matches the material and print job 3 Press the apply setti...

Страница 28: ...r the label roll 2 Cut the media above the unwinder shaft somewhere close to the unwinder 3 Load the new media roll to the Unwinder shaft Direction according to chapter 4 1 1 4 Use the built in adhesi...

Страница 29: ...3 4 for full Job Library description 2 Select a job by pressing the image the selection is indicated with a red box around the selection 3 Choose number of copies or from which page number to print fr...

Страница 30: ...he overview screen If the queue is active the print job will start immediately and print job progress is viewed in the Overview screen which is automatically displayed when starting a print Print queu...

Страница 31: ...use resume and stop of print job is done from the TrojanTwo tab Overview menu Pause Press the Pause Resume button Print state will change to Paused Print job paused Resume of paused job Press the Paus...

Страница 32: ...rojanTwo Compact User Guide v3 8 Page 31 Stop Press the stop button Print state will change to NA and current print job is canceled and removed from print queue Print job canceled NOTE NA Not Availabl...

Страница 33: ...s pressed the four buttons are replaced with one single stop button Pressing the button will stop the web moving See section 11 3 2 for Handling menu Moving the label web from Handling menu Setting th...

Страница 34: ...e field then press the Save apply button to apply the setting changes NOTE TOF Top of Form the top of form algorithm describes how to detect the top of the next label The currently active TOF mode is...

Страница 35: ...rinting mode go to TrojanTwo tab Media settings menu and select the Diecut button at TOF mode field then press the Save apply button to apply the setting changes NOTE TOF Top of Form the top of form a...

Страница 36: ...utton to change output from Dark On to Light On Output LED turns on when label in view or output LED turns on when gap in view 1 Cut a piece from the liner only peel off the label from top and put the...

Страница 37: ...printing mode Blackmark label material format is when the label material has pre printed registration marks so called blackmarks on the label material can be on front or back side of the label roll T...

Страница 38: ...ing conditions provides a solution that is easy to implement and simple to understand Light Dark Push the LT DK button to change output from Dark On to Light On output turns on when label in view or o...

Страница 39: ...d blackmark height is 4 mm Minimum 3 mm high blackmarks at 12IPS mode height measured according to print direction and recommended blackmark height is 4 mm 8 4 Gap size and speeds The minimum gap size...

Страница 40: ...o HOME tab 2 Press Shut down menu 3 Press the big red Shutdown TrojanController button 4 Reconfirm by selecting ok 5 Green info button is displayed no need to press ok on that button 6 The machine is...

Страница 41: ...supplied with the T2 C package The TrojanLabel Universal Driver is available for downloading on the Internet as well http www trojanextranet com media 60728 universalstoreonlywin_driver_13 sirius_r13...

Страница 42: ...t User Guide v3 8 Page 41 Select I accept the terms in the license agreement checkbox and press Next button to continue Select Configure to print over the Network NOTE USB printing is not supported fo...

Страница 43: ...ddress of the machine manually NOTE Current IP address of the T2 C press can be checked on the touchscreen at HOME Settings Network menu You might be asked a couple of times depending on Microsoft Win...

Страница 44: ...the particular PC meaning that the T2 C will be on the top of the printer list when printing is selected After the driver setup is completed it is advised to rename the printer device at driver prope...

Страница 45: ...TrojanTwo Compact User Guide v3 8 Page 44 Select the TrojanLabel Universal Driver field and rename to Trojanlabel TrojanTwo Compact Installation completed...

Страница 46: ...osoft Windows environment Handles ICM color profiles provided by Trojanlabel General driver settings Orientation Adopts software settings like from Adobe Reader Portrait Landscape orientation modes Ro...

Страница 47: ...which is 762mm TIPS TRICKS The maximum printable label length is 762mm If 762mm label height is not enough then stitching is the workaround option In practice create a multipage PDF where the long im...

Страница 48: ...mizes the image processing for the majority of the printing applications used by the end users However for some users particularly those using FlexMail printing artefacts appear in the output If this...

Страница 49: ...ture can import media sizes list and print settings profiles from a file that is exported from another driver installation Ink type selection Niagara by default Guthega IMPORTANT All T2 C presses are...

Страница 50: ...Available if there is no error state Print state NA if T2 C is in idle state Printing if T2 C is printing and Pause if current print job is paused Web state displays the current status of the web pat...

Страница 51: ...ce distance set at TrojanTwo tab Media Settings Advanced menu Slitter enabled Yes if slitter option is enabled No if slitter option is disabled Slitter can be enabled disabled at TrojanTwo tab Media S...

Страница 52: ...nning on the machine Trojanlabel technicians or the local Trojanlabel distributor fills out the owner and distributor contact information field at installation This field is not editable for end users...

Страница 53: ...Button Select Use DHCP checkbox to acquire IP address for the T2 C press from the local network as long as DHCP mode is selected the T2 C press ignores any static IP settings Current IP address field...

Страница 54: ...System language Select the desired language from the list Press blue Save button next to scroll down menu to apply selected language Print preview generation method When idle default creates one prev...

Страница 55: ...nu see section 11 3 3 will be active and only accepts input from a connected Barcode scanner the virtual keyboard is disabled on screen when searching for job names NOTE Rename print jobs to match wit...

Страница 56: ...Passwords can only contain numbers WARNING Do not lock out yourself At least one user must have User Management right otherwise there is no way to add or change properties of other users In case you...

Страница 57: ...ead maintenance during print jobs Post job maintenance enabled disabled When disabled there is no print head maintenance after print jobs Startup maintenance enabled disabled When disabled there is no...

Страница 58: ...Off default Batch mode is switched off by default On Batch mode is on Default batch mode timeout seconds If batch mode is on the press is waiting for the print jobs to be sent until the timeout inter...

Страница 59: ...l web physically throughout the paper path for perfect roll up on the rewinder Web move speed in IPS defines the movement speed when using the Forward Backward Web buttons in Handling menu see section...

Страница 60: ...ection 11 3 3 for details NOTE Prices marked by contain estimated cost of maintenances as well pre mid post job maintenance Prices without mark are pure printing cost of 1 label without maintenance co...

Страница 61: ...gs Network menu CAUTION Always wait until shutdown process finishes before shutting down the power supply Otherwise the Maintenance Module inside the machine might end up in the wrong position and can...

Страница 62: ...s into a browser at a user PC Exporting statistics page Press Export to CSV button on page to save the statistics into a CSV file Closer view NOTE Ink consumption is more detailed in this view and dis...

Страница 63: ...enu when T2 C press is printing Pause Resume print job Stop Cancel print job Information from currently printed job including Preview image of the label which is being printed at the moment Label coun...

Страница 64: ...rinting Preferences menu see chapter 11 2 2 Fast Backward Forward Web button Moving label web fast backward forward movement speed is defined at HOME Settings User Preferences menu see chapter 11 2 2...

Страница 65: ...he unwinder core to align label edge and label edge sensor to the print head s left edge See chapter 4 3 for adjusting label roll on unwinder core NOTE This function is only active when the web state...

Страница 66: ...ral minutes NOTE During first time installation until the reservoir tanks are not filled with enough ink the printhead priming does not begin until reservoir tank ink levels are high enough Pressing t...

Страница 67: ...sited page and job when returning to the Job Library menu Any stored print job can be selected by tapping onto it and can be printed any times from the job library The selected job is highlighted with...

Страница 68: ...d print job see below for more details Deleting the selected print job Information button Cost label calculation button NOTE Pressing this button will simulate printing does not have to print for this...

Страница 69: ...until a print job is renamed it can be very much for testing only however when renamed the user confirms that the particular print job is not for testing but to print as a production batch Applied co...

Страница 70: ...rint queue status if running or paused is also displayed always at right side status bar The number in indicates the number of print jobs pending in the print queue Information button Same as in job l...

Страница 71: ...ight before printing will be adjusted to environmental temperature This field is filled up automatically based on the temperature sensor but can be overwritten by the user NOTE User defined temperatur...

Страница 72: ...labels are pre die cut on the liner Blackmark pre printed blackmarks on the media blackmarks can be outside or inside on roll Unwinder label position Inside Outside Unwinder is rotating according to p...

Страница 73: ...terial Square meter price for Continuous and Blackmark label material Used for total cost label calculation See section 11 2 3 Gap size Setting the gap size between printed labels NOTE Maximum gap is...

Страница 74: ...us avoid slipping of the label media Minimum value is 0 maximum value is 10 Recommended is 5 Mid job maintenance distance m Setting mid job maintenance frequency in printed linear meters Mid job maint...

Страница 75: ...degree of KWS has effect on printhead life The higher KWS level is set the more protection the printhead gets against dehydration of nozzles ALTHOUGH switching KWS off 0 does not result in loosing wa...

Страница 76: ...over the internet by just pressing the download button and going through the installation process If internet connection is not available for T2 C press directly then offline update package can be do...

Страница 77: ...during the update process 7 After updating the Trojan Control interface the updater is detecting current Firmware version and will start updating the firmware when needed 12 2 Updating via offline up...

Страница 78: ...button 8 Installation starts automatically 9 Press NEXT button when asked during the installation TrojanTwo is being updated update looks similar for T2 C press 10 Check Trojan Control version number...

Страница 79: ...ilt in slitter blades can only be used with pre diecut label material Therefore the slitter can only be enabled if TOF mode is set to diecut at TrojanTwo tab Media settings menu 1 Thread the diecut la...

Страница 80: ...ed checkbox and pressing Save and Apply button Save and apply 6 The slitter blades will move down onto cut position when save and apply button is pressed and slitter is enabled Also 2 additional butto...

Страница 81: ...ced time and time again when the blade wears and slit edges are not sharp anymore Part number for the slitter blade is 10000036 Blade set 6 blades type LUTZ 0700 0400 Slitter blade Replacement procedu...

Страница 82: ...User Guide v3 8 Page 81 3 Loosen brass finger screw that fixes the blade holder bracket 1 and remove the blade holder 2 4 Remove the 2 screws that fix the blade onto the blade holder using a hex key...

Страница 83: ...the old blade and replace with a brand new blade 6 Fix the new blade with the 2 screws see point 4 above for screws 7 Attach the blade holder bracket back to where it was and fix it with the screw se...

Страница 84: ...sembly includes a rubber roller NIP clamp and a metal roller that the label material is sitting on Based on weekly visual checking it is recommended to clean these rollers when they look dusty dirty S...

Страница 85: ...he dust and debris off with a wet lint free cloth from the rubber and metal rollers NIP clamp rubber roller marked with arrow NIP metal roller marked with arrow Use a wet lint free cloth and roll NIP...

Страница 86: ...rollers Visually inspect all other metal rollers throughout the web path and use wet lint free cloth to wipe the ink dust off from each roller Remove label web from web path if needed to gain access t...

Страница 87: ...ste ink bottle at least on a weekly bases and empty it regularly Depending on printed volumes it might be needed to check empty more often in case the printed volumes are really high Steps 1 Remove th...

Страница 88: ...not improve print quality and fine streak s remain on the printouts after the routines has been run multiple times already If ink puddles remain on the printhead surface after a wipe printhead mainten...

Страница 89: ...the wiper roller 1 Open top left side lid on machine 2 Press Home Maintenance Module button in TrojanTwo tab Handling menu to gain access to the wiper module The maintenance module slides out from un...

Страница 90: ...ve the used micro fiber roller MFR Unclick and pull the micro fiber roller out from under the plastic latch Micro fiber roller out On the right side where there is a gear mounted to the micro fiber ro...

Страница 91: ...wiper roller Fit the gear on the right end of the micro fiber roller onto the proper place from above The gear has to fit to the gear of the wiper motor Push the axis of the micro fiber roller under...

Страница 92: ...debris and particles Prevents dehydration of the printhead nozzles Forms a wet film layer on the printhead nozzle surface thus creates some vacuum and help to prevent air bubbles blocking some nozzle...

Страница 93: ...Manual wiping process 1 Open top right side lid on T2 C press to gain access to the print engine 2 Press Home Maintenance Module button at TrojanTwo tab Handling menu to gain access to printhead from...

Страница 94: ...of lint free cloth wet Wet lint free cloth NOTE USE LINT FREE CLOTH ONLY Using other than lint free cloth can cause blocked printhead nozzles due to lose fibers or scratch the printhead damaging it p...

Страница 95: ...r Guide v3 8 Page 94 WARNING DO NOT MOVE THE CLOTH BACK AND FORTH Always wipe with a single move from one end to the other Do not apply to much pressure either Just gently wipe the surface of the prin...

Страница 96: ...umable and needs to be checked and if necessary cleaned or replaced time and time again 1 Open the top right lid to gain access to the filters 2 The filter is in a drawer that can be pulled out upward...

Страница 97: ...printhead and pumping all the ink from this area back to the reservoir ink tanks 3 When release printhead process is finished the blue printhead latch will be released and can be opened up all the way...

Страница 98: ...g along with the orange covered print head Ensure printhead is packaged securely to avoid further damage in box with flat orientation CAUTION DO NOT touch the printhead cartridge s ink couplings nozzl...

Страница 99: ...dden service menu is reserved for skilled technicians only End users are not advised to use other functions in the hidden service menu unless technical support of Trojanlabel is asking for this than t...

Страница 100: ...k levels are displayed When there is no more movement indicated on status bar then the script is completed 15 4 Removing the ink from the ink filters To remove the ink from the ink filters the same se...

Страница 101: ...can be done simply by washing the waste ink bottle under tap water 15 6 Removing the ink tanks 1 Disconnect all the connectors from the ink tanks 2 Use the orange plastic caps that came with the ink...

Страница 102: ...ns A Servo motor NIP 2 and or servo motor rewinder 3 and or servo motor unwinder 4 fails to calibrate B Check cabling of the servo motor s C Servo motor s factory calibration parameters are not correc...

Страница 103: ...the BOF and allow the PH to print until the full image is printed Error display Data Path Underrun Error A Make sure preview generation is not set to Instantly B Reduce image complexity C Reduce comp...

Страница 104: ...which connect with the printhead couplings there might be a loose revolver cap contact support D Check ink tubes throughout the ink delivery system for any loose luers ink leaking kinked tubes etc E T...

Страница 105: ...n Or gap size is set 0mm at continuous mode make sure that gap size is set according to the gap size requirements Too much TOF and or BOF offset is set in Media Settings menu Bag Out error One of the...

Страница 106: ...nk tank and smaller reservoir tank status bar Running out of disc space When new print job is sent to the machine but free disc space on hard drive reaches the 1 GB limit For example the amount of pri...

Страница 107: ...AGARA VOLUME PRESS 10003074 Assy DPCA with Holder 10003075 Pen Driver PCA 10003076 T2 Assy Cartridge Locator 10002078 Assy Dock Fluidic Pump Side Revolver closest to ink coonectors 10002079 Assy Dock...

Страница 108: ..._0C Ink Connector FTLL230 6005 Female Luer Thread Style to 200 Series Barb 1 8 3 2 mm ID Tubing MTLL230 6005 Male Luer Integral Lock Ring to 200 Series Barb 1 8 3 mm ID Tubing FCLBFFM 001 Stopcock val...

Страница 109: ...miniB 0 5m Mini USB to USB A cableT1021 to PC Extender USB A to USB B Angle 0 5m USB A to B cable from MPCA to Industrial PC TTL 232R 3V3 AJ TTL 232R 3V3 AJ cable from MPCA to Industrial PC ATCAM007 5...

Отзывы: