6000 Series Grade 1 Exit Devices
58
Handing Instructions
Copyright © 2015-2020, ASSA ABLOY Access and Egress Hardware Group, Inc. All rights reserved.
Reproduction in whole or in part without the express written permission of ASSA ABLOY Access and
Egress Hardware Group, Inc. is prohibited. Patent pending and/or patent www.assaabloydss.com/patents.
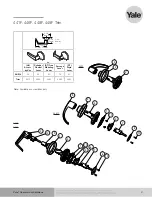
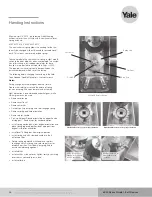
Castle Nut
Spring Hub
Flat Gear
Cotter Pin
Stop Post
Notch for spring to
engage for left hand
reverse operation
Spring orientation for
right hand reverse
operation
Effective April 16, 2010, the following Free-Wheeling
exit device lever trims will ship with a new universal lever
spring and hub:
626F, 627F, 628F, 629F, 690F, 691F
The new universal spring allows the handing for the trim
to easily be changed without the need for any additional
parts. This means no more red or blue springs!
To accommodate the new universal spring, a slight modifi-
cation to the door prep has been incorporated. In anticipa-
tion of this change, revised door templates for these
functions were posted to our website in August 2009.
The required trim handing should be specified on the
purchase order and will be set at the factory.
The following details changing the handing in the field:
Tools Needed: Needle Nose pliers, Crescent wrench
Notes:
During change ensure black gear does not rotate.
Please wear safety glasses and be aware of spring
tension on spring hub upon removal and assembly.
Light lubrication is recommended under flat gear, white
lithium grease can be used.
• Remove cotter pin
• Remove castle nut
• Remove washer
• Carefully pull up on spring hub to disengage spring
• Remove spring and note orientation
• Remove lever handle
• Pick-up flat gear, flip and orient stop on opposite side
of stop post. See pictures for hand orientation.
• Install spring upside down from original orientation and
place spring leg on opposite side of stop post from
original installation orientation
• Install lever 180 degrees from original position
• Install spring hub with stamped number in the 6
o’clock position
• Rotate spring leg around with needle nose pliers
to engage notch in spring hub, refer to pictures for
reference position. Press down on spring hub to
ensure complete engagement.
• Install washer
• Install castle nut, do not over tighten, verify by ensuring
lever returns horizontally on its own
• Install cotter pin
Left Hand Reverse Shown
Left Hand Reverse gear & spring orientation Right Hand Reverse gear & spring orientation

