background image


16

B. 

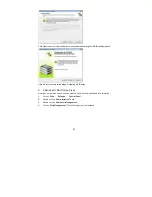
Double click on 

Administrative Tools

.  

C. 

Double click on 

Computer Management

.  

D. 

Click on 

Disk Management

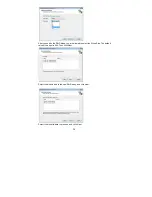
. The following screen is displayed.   


E. 

The 153.38 GB is for the two disk striped array that was created earlier. To create 
a partition on it, right click on the Unallocated partition and select New Partition.   


F. 

  Follow the Wizard for setting up and formatting the partition. Once that is done, 
you can start using the newly created stripped array.   


Содержание ALIVENF5-ESATA2 R3.0

Страница 1: ...64 bit With RAID Functions 5 1 3 1 Installing Windows 2000 XP XP 64 bit With RAID Functions 5 1 3 2 Installing Windows Vista Vista 64 bit With RAID Functions 6 1 4 Create Disk Array 8 2 NVIDIA Windows RAID Installation Guide 11 2 1 NVIDIA Windows RAID Installation Guide for Windows 2000 XP XP 64 bit Users 11 2 2 NVIDIA Windows RAID Installation Guide for Windows Vista Vista 64 bit Users 21 ...

Страница 2: ... 1 Introduction to RAID The term RAID stands for Redundant Array of Independent Disks which is a method combining two or more hard disk drives into one logical unit For optimal performance please install identical drives of the same model and capacity when creating a RAID set RAID 0 Data Striping RAID 0 is called data striping that optimizes two identical hard disk drives to read and write data in...

Страница 3: ...n processing relational database applications enterprise resource planning and other business systems Use a minimum of three identical hard disk drives for this setup 1 2 RAID Configurations Precautions 1 Please use two new drives if you are creating a RAID 0 striping array for performance It is recommended to use two SATA drives of the same size If you use two drives of different sizes the smalle...

Страница 4: ...RAID array WARNING Please backup your data first before you create RAID functions In the process you create RAID the system will ask if you want to Clear Disk Data or not It is recommended to select Yes and then your future data building will operate under a clean environment ...

Страница 5: ...vanced screen IDE Configuration B Set the SATA Operation Mode option to RAID STEP 2 Make a SATA SATAII driver diskette A Insert the ASRock Support CD into your optical drive to boot your system B During POST at the beginning of system boot up press F11 key and then a window for boot devices selection appears Please select CD ROM as the boot device C When you see the message on the screen Generate ...

Страница 6: ...m At the beginning of Windows setup press F6 to install a third party RAID driver When prompted insert the SATA SATAII driver diskette containing the NVIDIA RAID driver After reading the floppy disk the drivers will be presented Select the drivers to install The drivers are as below 1 3 2 Installing Windows VistaTM VistaTM 64 bit With RAID Functions If you want to install Windows VistaTM Windows V...

Страница 7: ...ollowing path in the Support CD RAID Installation Guide install Windows page please insert the ASRock Support CD into your optical drive and click the Load Driver button on the left on the bottom to load the NVIDIA RAID drivers NVIDIA RAID drivers are in the following path in our Support CD I386 Vista32_RAID For Windows VistaTM OS AMD64 Vista64_RAID For Windows VistaTM 64 bit OS After that please ...

Страница 8: ...few seconds to press F10 before the window disappears After you press F10 the NVIDIA RAID Utility Define a New Array window appears By default RAID Mode is set to Mirroring but please set it to Striping if you want to create RAID 0 And the Striping Block is set to Optimal as default We take RAID 0 for example to show you how to use NVRAID RAID Utility to create RAID 0 Striping If you plan to use N...

Страница 9: ...ks The disks that you enabled from the RAID Config BIOS setup page appear in the Free Disks block These are the drives that are available for use as RAID array disk A Tab to the Free Disks section The first disk in the list is selected B Move it from the Free Disks block to the Array Disks block by pressing the right arrow key C Continue pressing the right arrow key until all the disks that you wa...

Страница 10: ...l master slave status of each hard disk is given in the Loc location columns of the Free Disks and Array Disks lists For example 1 0 M 1 Channel Typically channel 0 is used for Parallel ATA drives while channel 1 is used for Serial ATA drives 0 Controller M M means Master S means Slave Serial ATA 1 0 M Channel 1 controller 0 Master 1 1 M Channel 1 controller 1 Master Finally the Array List window ...

Страница 11: ...here are different installation procedures Please follow the instructions below according to the OS you install 2 1 NVIDIA Windows RAID Installation Guide for Windows 2000 XP XP 64 bit Users A Enter NVRAIDMAN RAID driver is built in NVIDIA ALL in one driver provided in our support CD After you finish the driver installation you can create delete or rebuild any RAID array Please enter NVRAIDMAN by ...

Страница 12: ...ollow the instruction in this section to create RAID arrays The RAID items which may be mentioned in this section are as below RAID 0 Striping RAID 1 Mirroring RAID 0 1 Stripe Mirroring JBOD Spanning RAID 5 NOTE Under Windows XP OS the connector naming on our motherboard is different from NVIDIA utility naming Please refer to below table for detailed information SATAII_BLACK PORT 1 0 Means SATA Pr...

Страница 13: ...ease do the following A Go to the system BIOS and make sure that the drives that you want to use are RAID enabled B Boot to Windows and launch the NVRAIDMAN application C Create Array and the following screen will appear D Click Next and the following screen shot will appear ...

Страница 14: ...rrow and select Striping and leave the Stripe Size with its default value as shown in the following screen shot F Click Next and the following screen shot will appear G Select the two disks that you want to include in the stripe set ...

Страница 15: ...t and the following screen shot will appear I Click Finish and the following screen shot will appear The RAID 0 is created successfully C Initializing NVRAID Array Disks Now that the two disk array has been created it needs to be partitioned and formatted A Click on Start Settings Control Panel ...

Страница 16: ...screen is displayed E The 153 38 GB is for the two disk striped array that was created earlier To create a partition on it right click on the Unallocated partition and select New Partition F Follow the Wizard for setting up and formatting the partition Once that is done you can start using the newly created stripped array ...

Страница 17: ... NVRAIDMAN application and right click on the RAID array that you want to delete assuming that you have a RAID array already created as shown in the following screen shot The above screen shot shows that there is a Mirrored array that will be deleted After the Delete Array has been selected the following screen shot appear ...

Страница 18: ...lies only to fault tolerant arrays such as RAID 1 RAID 0 1 as well as a RAID 5 For example assuming you have a three disk RAID 5 array and one of the drives fail then you need to replace the failed drive with a new one and rebuild the array to re generate the lost data on the newly added drive After creating a mirrored array you can rebuild the array using the following steps A Go to Windows and r...

Страница 19: ...19 D Click Next The Disk Selection page appears E Select the drive that you want to rebuild by clicking it from the list then click Next The Completing the NVIDIA Rebuild Array page appears ...

Страница 20: ...mirrored array using any available Free Disk or Dedicated Disk G Synchronizing a RAID Array Synchronizing an array will force a rebuild of redundancy or parity The operation is applicable to any fault tolerant array such as RAID 1 0 1 and RAID 5 For RAID1 and RAID 0 1 sync results in copying the data to the redundancy disk For RAID 5 sync results in rebuilding the parity To sync an array do the fo...

Страница 21: ...lation Guide for Windows Vista Vista 64 bit Users A Enter Storage RAID driver is built in NVIDIA ALL in one driver provided in our support CD After you finish the driver installation you can create delete or rebuild any RAID array Please enter Storage by clicking on Start Programs NVIDIA Corporation Storage There is also a Storage shortcut on the desktop Then the below screen appears ...

Страница 22: ...22 Click Create array Then you can start to build up RAID B Creating RAID Arrays Click Next and the following screen shot will appear ...

Страница 23: ...t the type of RAID array to create You need to choose the RAID Mode first and click Next Here we take Striping RAID 0 for example to show you how to use Storage to create Striping RAID 0 If you plan to use Storage to create other RAID arrays the operation procedures are similar to the steps of creating Striping RAID 0 ...

Страница 24: ...he RAID Mode you are allowed to select the Stripe Size The default value of this item is 64K Then click Next Select the disks to add to the new RAID array and click Next Select the disk with data to preserve and click Next ...

Страница 25: ...eps of creating RAID array C Initializing NVRAID Array Disks Now that the two disk array has been created it needs to be partitioned and formatted A Click on Start Settings Control Panel B Double click on Administrative Tools C Double click on Computer Management D Click on Disk Management The following screen is displayed ...

Страница 26: ... Right click on the unallocated partition and select New Simple Volume Follow the Wizard for setting up and formatting the partition Once that is done you can start using the newly created stripped array ...

Отзывы: