

Step 1:
Getting Started
Step 2:
1
2
Insert the supplied CD-ROM into your CD-ROM drive.
Windows:
Execute “Asante SmartBot Setup.exe” and
follow steps until it is finished.
Mac OS:
Double-click the “Asante SmartBot Setup.dmg” file
to open it up. Another new icon with a name similar to the
Asante SmartBot Setup.dmg” file will appear on your
desktop. Drag and drop it into your “Applications” directory.
Quick Start Guide
. . . . . . . . . . . . . . . . . . . . . . . . . . . . . . . . . . . . . . . . . . . . . . . . . . . . . . . . . . . . . . . . . . . . . . . . . . . . . . . . . . . . . . . . . . . . . . . . . . . . . . . . . . . . . . . . . . . . . . . . . . . . . . . . . . . . . . . . . . . . . . . . . . . . . . . . . . . . . . .
. . . . . . . . . . . . . . . . . . . . . . . . . . . . . . . . . . . . . . . . . . . . . . . . . . . . . . . . . . . . . . . . . . . . . . . . . . . . . . . . . . . . . . . . . . . . . . . . . . . . . . . . . . . . . . . . . . . . . . . . . . . . . . . . . . . . . . . . . . . . . . . . . . . . . . . . . . . . . . .
Connecting to a Network
The IP camera can be connected to an Ethernet network using
the RJ-45 port as shown. Connect the camera to a wireless router,
by using a standard cable. The IP address will be acquired
automatically. Plug in the cables as shown.
Connect your PC/laptop to router via wire or wireless.
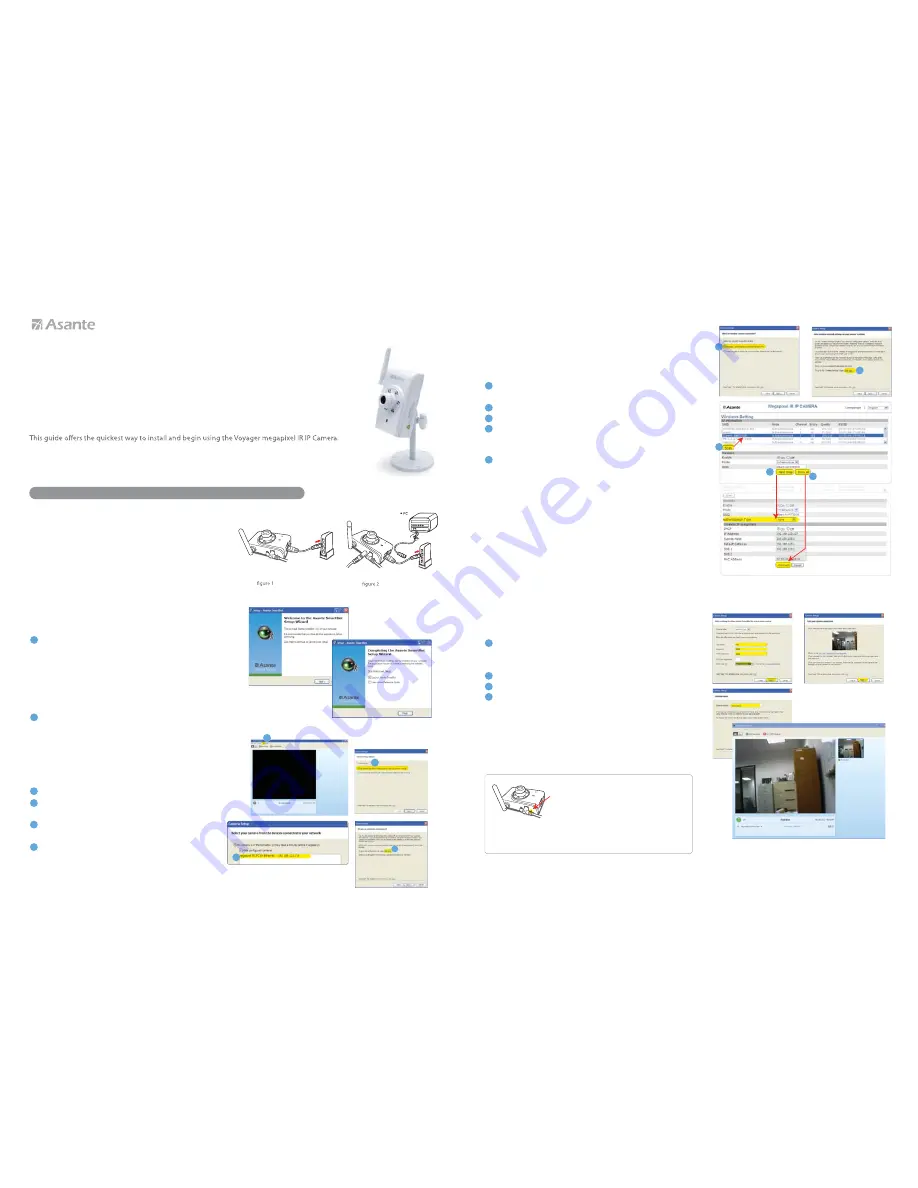
Step 5:
Final Set up
Enter default Username
“root”
, password
“root”
(or the username/password you have changed on
Step 3
)
Select your desire video resolution.
Wait for few seconds, you should see a test video.
Give a name for the location of the camera.
You should be able to see video on the screen.
1
2
3
4
4
5
1
2
3
4
Thank you for choosing Asante
Voyager
SmartBot
megapixel IR IP Camera.
No advanced installation options are discussed here. For more detailed information,
please refer to the User’s Manual on the supplied CD, or visit www.asante.com product page.
Set up SmartBot
Launch SmartBot
Windows:
Click SmartBot icon on desktop
Mac OS:
Click SmartBot icon in Applications
Step 4:
Set up Wireless
If you wish to use
Wired(Ethernet Wire) network interface
,
you may skip
Step 4
and go directly to
Step 5.
On Camera Setup dialog window, Select
Wirelessly,
connected to my network using Wi-Fi.
Click
here
to go to
Wireless Setting
Click
Scan
and
Select
your Wifi Router
Click
Next Step
and select your Wifi encryption
( if the router has encryption, please identify the passcode
and enter accordingly.
Click
Show All
and click
Connect.
You may close this window
after the camera connecting the WiFi router successfully with
a working IP address.
Disconnect Ethernet Cable
and power cycle the unit . Wait for
Reboot
as shown on the following pages
.
Step 3:
Add Cameras
1
1
2
3
4
Go to
tools
and select
Add Camera
Select
Use Asante SmartBot to help me get my network
camera working.
Click next.
Click the Camera shown on the list (If not, go back Step 1).
Select the IP camera you just conncted. Click next.
Click
here
to change username & password
(Select setting >user > update and save),
otherwise you may use default user name &
password root/root
and proceed to next step.
4
2
3
2
1
3
5
4
Reset the camera
If for any reason you need to start over the setup process,
simply reset the camera by using the following procedure.
1. Locate the reset button on the left side of the camera
2. Using a pin, press and hold down the reset button until
the light in front of the camera comes on. This usually
takes 10 seconds.
Please note that after a factory reset, your username and
password will return to factory defaults (root/root).
You can also refer to video tutorials on the supplied CD for more setup instruction.
Router
Router