

March 9, 2020
1
Arxys | 435 West Bradley Ave, Suite C | El Cajon, CA 92020 | (800) 257-1666 | www.arxys.com
VideoX Professional Quick Installation Guide
Box Contents:
•
One (R8P or R12P) VideoX Professional Appliance
•
Rackmount Rail Kit
•
Accessories box
•
Hard disk drives (quantity as ordered)
•
Two 110V AC power cords
•
VideoX Professional Front Bezel / Cover
•
VideoX Professional Quick Installation Guide (this document)
•
VideoX Professional Quick Reference
Step 1
– Unpack the components
The VideoX Professional Appliance is shipped separately from its hard disk drives. The contents of the VideoX
Professional Appliance box can be unpacked by a single person, but it is recommended that two people
remove the server from the box.
Step 2
– Install the Rackmount Kit on the Chassis
A rackmount rail kit is included with VideoX Professional Appliance. Refer to the VideoX Professional Quick
Reference guide for installation instructions or the documentation shipped with the rackmount rail kit.
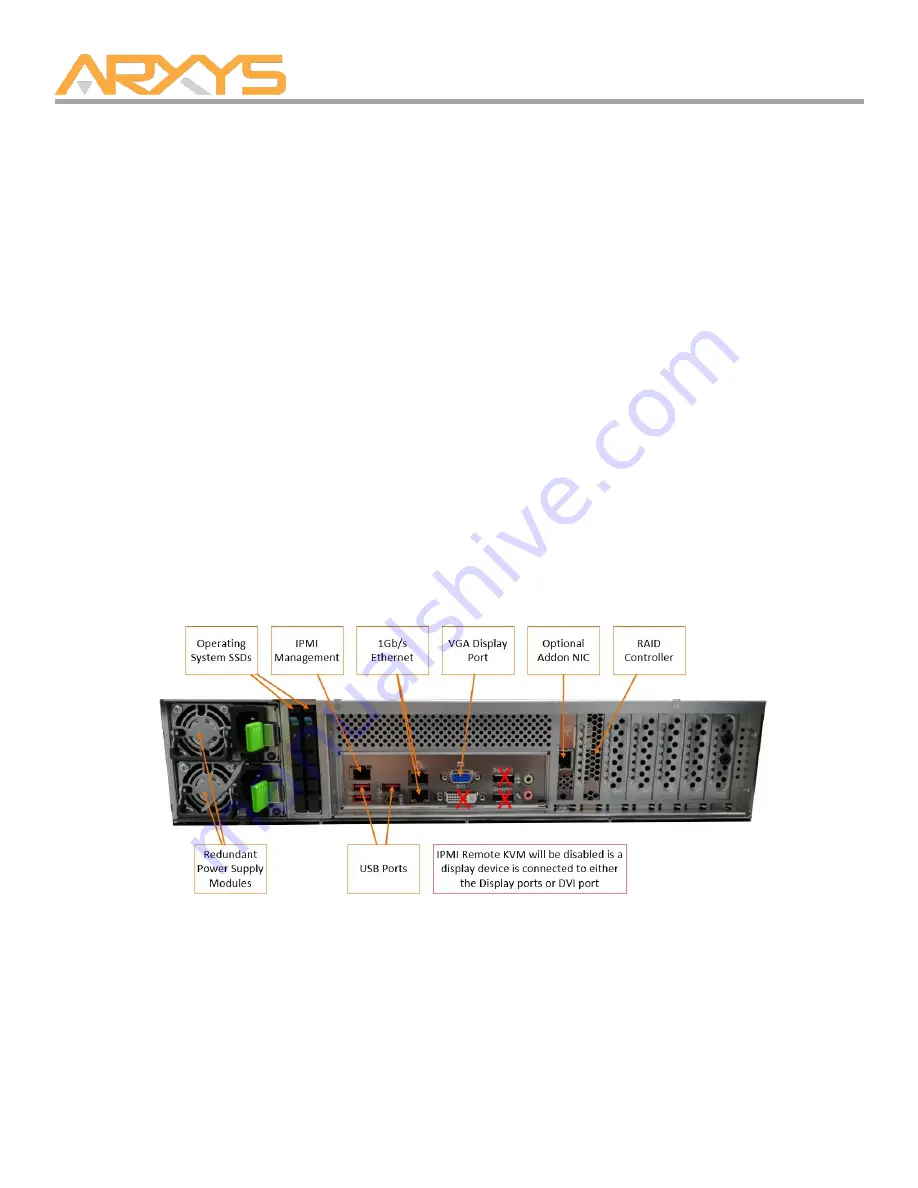
Step 3
– Cabling the VideoX Professional
Two NEMA-15 power cords are included with the VideoX Professional appliance. The VideoX Professional
Appliance requires two AC power sources. Connect both power cords. Only connect a monitor to the VGA port
(do NOT connect a monitor to the DisplayPort or DVI port as this will cause the remote KVM function in IPMI to
not function) as well as a Keyboard and mouse to their respective USB ports. Network connectivity is required
during the operation of the VideoX Professional. Plug in at least one Ethernet cable into an Ethernet port of the
VideoX Professional. A network cable can be connected to the IPMI management port for later usage, but it is
not required for basic operation.


