background image

4.2.5. Limiter Section (Main Panel)

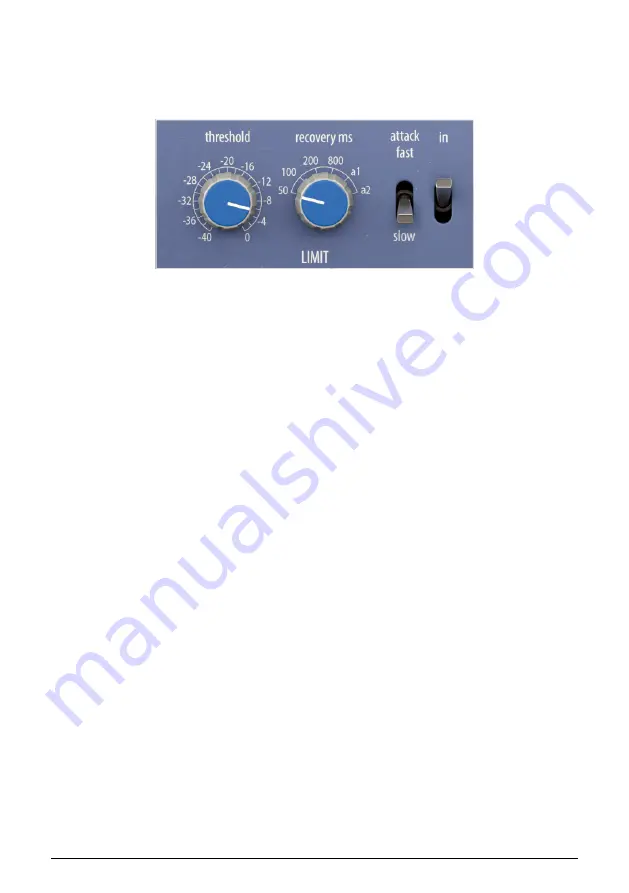
This is where you control the Limiter section of the Comp DIODE-609. A Limiter is a special

kind of compressor, that basically acts as a ceiling for the audio, with an infinite ratio

compression. That's why you don't have a ratio controller here.

4.2.5.1. Threshold

The Threshold here works in much the same way as in the Compressor section. This is

where you define the level around which the Limiter section starts to act (in this case, it is

the ceiling the audio level will reach). The behavior of the Threshold depends on the knee,

as is the case with the Compressor, but the Limiter curve is much harder.

In the Limiter section, the Threshold has the same range as in the Compressor section.

Therefore, it goes as low as -40 dB (meaning almost any audio will be limited) and all the

way up to 0 dB (basically no limiting). A good range usually varies from -3 dB to 0 dB. On a

masterbus, limiting is just a safety measure, therefore the threshold shouldn't be very low.

Ideally, the Threshold here should be set so that it is rarely reached. By default, it is

positioned at 0 dB, which we can consider a "neutral" position (basically, no limiting).

The limiter ratio of the Comp DIODE-609 is very high. Therefore, any value above the

Threshold is effectively prevented from leaving the plug-in.

4.2.5.2. Recovery

The Recovery in the Limiter section is very similar to its counterpart in the Compressor

section. The only difference is the values available. In this case, you can go lower (which is

understandable, since this is a Limiter, and the audio needs to recover faster from limiting).

The fastest Recovery value is 50 ms, and you have 100 ms, 200 ms and 800 ms. Besides

these fixed values (which are much lower than those available in the Compressor, as you

have probably noticed), we also have the automatic "

a1

" and "

a2

" positions.

As explained in the hands-on section and the Compressor section, these are automatic,

program-dependent recovery times. This means that the recovery (release) time is

controlled by the signal so that it is shorter for isolated peaks and extended in the case of

high average levels. The

a1

position has a release that varies from 100 ms to 2 seconds. The

a2

position has a release that varies from 50 ms to 5 seconds.

By default, the Limiter Recovery time is set to 50 ms.

Arturia - User Manual Comp DIODE-609 - Comp DIODE-609 CONTROL PANEL

24

Содержание COMP DIODE-609

Страница 1: ...USER MANUAL _COMP DIODE 609...

Страница 2: ...Barbier Thomas Barbier Matthieu Bosshardt Emmanuelle Le Cann Florian Marin Germain Marzin Aur lien Mortha Benjamin Renard Roger Schumann Adrien Soyer Christophe Tessa BETA TESTING Paul Beaudoin David...

Страница 3: ...r the terms of a license agreement or non disclosure agreement The software license agreement specifies the terms and conditions for its lawful use No part of this manual may be reproduced or transmit...

Страница 4: ...to Change The information contained in this manual is believed to be correct at the time of printing However Arturia reserves the right to change or modify any of the specifications or features withou...

Страница 5: ...time dedicated to one of the most important tasks in audio processing bus sound processing ARTURIA has a passion for excellence and accuracy This has led us to conduct an extensive analysis of every...

Страница 6: ...figuration Mono Stereo 15 4 2 Main Control Panel 16 4 2 1 Stepped Controls 16 4 2 2 Limiter Make Up Gain Left and Right 17 4 2 3 Right Section 18 4 2 4 Compressor Section Main Panel 21 4 2 5 Limiter S...

Страница 7: ...with top quality in mind and more expensive and retro parts are sometimes used like real tubes for example All in all the objective is a sound that s richer fuller and with more body maybe supplemente...

Страница 8: ...tifully fitting the FX Collection 2 This is a stereo bus compressor unit inspired by classic designs first seen in vintage mixing desks of a very famous British manufacturer These classical mixing des...

Страница 9: ...n analog EQ such as the the SITRAL 295 also featured in this FX Collection 2 to warm up digital stereo tracks But many also swear by it as a killer kick snare or even vocal compressor Others also ment...

Страница 10: ...ersion of the installer that you need for your system macOS or Windows Follow the installation instructions and then Launch the Arturia Software Center ASC Log into your Arturia account Scroll down to...

Страница 11: ...right side to control Mid Side changing from Stereo to Dual Mono and channel linking We also have a pair of VU meters to display the amount of gain reduction Clicking on these changes them to a digit...

Страница 12: ...ve which works as a preamp before the signal goes to the Compressor Module It also induces a certain amount of saturation to the signal when it is above 0 00 dB After this stage the signal reaches the...

Страница 13: ...n as parallel compression And that s it This is the complete signal flow of the Comp DIODE 609 Study the circuit carefully spend some time with the controls of each module try the different routings a...

Страница 14: ...e audio you may check this by switching the plug on off and on again Switching it off will put it in Bypass leaving the audio untouched only the VU meters remain active That s because with the control...

Страница 15: ...ing effect you can opt for a very short value in this case with a higher compression ratio If you are using the compressor in a bus channel as is the case here you probably want longer attack times to...

Страница 16: ...o release times are tied to attack times Fast attack with slow release work as a protective leveler while slow attack and slow release work as a slow RMS program leveler On the other hand fast release...

Страница 17: ...n set to 0 dB you will only have to move the Threshold In most cases you will only need to adjust the Threshold slightly and it is not advisable for the GR line above the volume lines to move too much...

Страница 18: ...e chain equalizer It s time to process the side chain signal in order to achieve a better detection signal Remember that this processing is just for the detection path it will not affect the audio out...

Страница 19: ...entry in the Control Panel chapter of this manual To the right of the M S switch you have the Mix Dry Wet knob This is the usual Dry Wet mixer control With it you can control the amount of unprocesse...

Страница 20: ...ono tracks in which case you will not be able to use the mono configuration 4 1 Channel Configuration Mono Stereo In stereo mode the plug in loads in full with two processing modules one for each chan...

Страница 21: ...olbars and their features are covered in detail in the User Interface chapter p 29 We ll now look at all the controls available explaining what they do their ranges and how to interpret their numbers...

Страница 22: ...trols for the Limiter output of each channel By default they are set to 0 00 dB which means the Limiter will limit the volume output to that value That s also the minimum value You can change this up...

Страница 23: ...nd whether they are independent or not When the switch is in the Dual Mono position the compressor acts as two channels with independent side chains If the mode is Stereo the compression is driven by...

Страница 24: ...ult in a more spacious wider stereo sound In M S mode the controls corresponding to the Left will affect the Mid channel while the controls corresponding to the Right will affect the Side channel The...

Страница 25: ...ressing the Bypass button in the Lower Toolbar it bypasses all audio processing in the the plug in However when the plug in is bypassed by turning the power switch off it still receives audio to displ...

Страница 26: ...if you are using this on a drums bus or even for individual drums like kick or snare you may want a lower threshold Ideally the Threshold should be just above the average signal level By default it is...

Страница 27: ...on section p 9 for details on how to use these two parameters combined Release times in the Comp DIODE 609 are also expressed in milliseconds This control only accepts fixed predetermined values The...

Страница 28: ...music and the results you are striving for of course Generally it is better to start with the lowest compressor ratio and raise it when you feel the need Remember that Attack and Release times are al...

Страница 29: ...oned at 0 dB which we can consider a neutral position basically no limiting The limiter ratio of the Comp DIODE 609 is very high Therefore any value above the Threshold is effectively prevented from l...

Страница 30: ...be processed by it which still may not have any influence since when the controls are in their default positions the audio will not be processed anyway When the switch is in the Off position the audi...

Страница 31: ...ion In Comp DIODE 609 we have both Internal and External sources By default Internal source is selected which means that the audio that will drive compression is the same audio being compressed Please...

Страница 32: ...Off Mid Freq This is a very broad bell peak band with a center frequency that may go from 80 Hz quite low up to 10 kHz and a variable range range varies according to the Gain By default it is placed a...

Страница 33: ...sten to the result of EQing that signal This may also be important when using an external side chain signal When it is On the red LED lits up By default it is Off 4 2 6 6 Input Drive This knob allows...

Страница 34: ...ave also the gain controls for the Limiter The parameter values appear in small floating window cells next to the parameter control The values update in real time when you move the controls To see the...

Страница 35: ...You can export presets in two ways as a single preset or as a bank Export Preset Exporting a single preset is handy when you want to share it with someone else The default path to these files will ap...

Страница 36: ...ser p 35 can be opened by clicking the library symbol on the toolbar The filter name field and Up Down arrows in the toolbar all assist with preset selection Select a preset by clicking the preset nam...

Страница 37: ...rols The plug in controls only move to predetermined values This behavior reproduces the original behavior of the vintage unit which inspired this plug in To change to the usual behavior where you can...

Страница 38: ...the session from the latest ones to the earliest ones 5 2 5 History This button lists all the latest parameter changes performed in the current session You can always see the last four edited paramet...

Страница 39: ...s used to monitor how much of your computer s CPU is being used by the plug in If you stress your computer too much the global performance of your system and the audio may suffer Arturia User Manual C...

Страница 40: ...tyles Banks Genres and Characteristics If you click in one of these buttons a list opens in the middle column where you can select the tag you want to search for A button appears in the left column sh...

Страница 41: ...opens with that preset still selected In the right hand column you have the info column for the preset with the preset name To the right of the name you have a button with three dots Clicking it opens...

Страница 42: ...that s it We have just finished describing all the controls you have at your disposal to process sound in your DAW using the Comp DIODE 609 plug in We hope you ll enjoy your new plug in and the resul...

Страница 43: ...other than storage purposes You shall have no further right or interest to use the software other than the limited rights as specified in this Agreement Arturia reserves all rights not expressly grant...

Страница 44: ...ply to you All programs and accompanying materials are provided as is without warranty of any kind The complete risk as to the quality and performance of the programs is with you Should the program pr...

Отзывы: