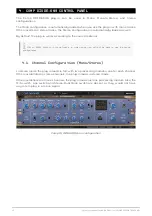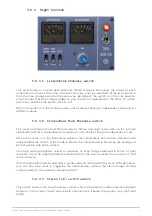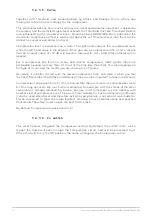
Now it's time to start processing the audio:
3.3.2. The Compressor
• With the audio playing, turn the Threshold knob until you start to see the GR line
move. The GR level indicator will also start to show an orange fill in the upper
part. This means that some gain reduction is now applied. The threshold sets the
volume around which the compressor starts applying gain reduction;
• Now that you are compressing, you have to define the compression ratio. This
ratio sets the amount of gain reduction. It shows the "ratio" between the output
level (the value on the left) and the input level (the value on the right, which is
always 1, for comparison purposes). The level of any signal above the threshold
will be divided by the value on the left. So, when you have a ratio of 2:1 it means
that for a level 1 dB above the threshold, the output will be reduced to half of it. For
example, if a signal exceeds the threshold level by 2 dB, it will be attenuated to a
value just 1 dB above the threshold level. Bear in mind that compression reduces
the dynamic range, and the dynamic range is what makes the music "breathe".
Let's pick a ratio that's not too high, like 2:1;
• Now that you have set threshold and ratio, it's time to define the attack and
release values. You may think of these as envelope segments, like the ones you
have in synthesizers. Attack marks the time it takes for the compressor to react
(reach the set compression ratio) once the audio goes over the threshold;
• The Attack time must be defined according to the type of audio you are dealing
with. Vocals don't have much in the way of attack transients you may want to
preserve, therefore the attack time there may be shorter. On complete drum
tracks, where you need to preserve the attack transients, the attack time may be
longer, but if you want a "pumping" effect, you can opt for a very short value (in
this case with a higher compression ratio). If you are using the compressor in a
bus channel, as is the case here, you probably want longer attack times, to avoid
messing with the attack transients. The original hardware unit has a fixed attack
time of around 3 ms, but here you have other options too. Let's pick something
like 25 ms;
• Rules of thumb for setting Attack: faster attack times make the sound tighter
and more even. They may give you a smoother front end sound. But there is
also the risk of cutting off the attack transients, making the overall sound duller
and lifeless. Slower attacks allow for a lot of initial impact so they may result in
a punchier sound. Attack transients will be more present, which gives a better
definition. On the other hand, any time inconsistencies will be exposed and
accentuated;
• Now, it's time to set the other envelope segment. Recovery is a parameter that
is nowadays usually referred to as Release. In a compressor, it sets the time it
takes to "restore" the original dynamics after the audio falls under the threshold
level. You need to give the processor enough time for a smooth transition. Again,
this also depends on the type of audio you are dealing with. There are a few
things to take into account when setting release times, Please refer to the point
below about the rules of thumb;
• In complex programs, some events might need a short release and others a long
one, so a fixed value is a compromise. An automatic release may fix that. We
have two automatic recovery times (labeled
a1
and
a2
).
a1
varies the release
times between 100 ms and 2 seconds, while
a2
varies the release times between
50 ms and 5 seconds. You may start by trying those. If you don't get the result
you're aiming for, start with a longer recovery time, and then try reducing it until
you feel something "strange" (like a pumping effect) happening. Then restore the
previous value;
Arturia - User Manual Comp DIODE-609 - Comp DIODE-609 OVERVIEW
10
Содержание COMP DIODE-609
Страница 1: ...USER MANUAL _COMP DIODE 609...


