


2.1
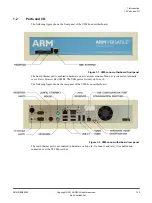
Connecting to a host computer
A set of files that are stored on an SD card on the board determines the configuration of the V2M-Juno
motherboard. The SD card can be accessed using a USB-B socket on the rear panel of the board. When
connected to a host computer, the SD card appears as a USB mass storage device with a FAT16
filesystem. The files in the filesystem are edited to control the configuration of the V2M-Juno
motherboard.
Follow these steps:
1. Connect a serial terminal to the top 9-pin UART0 connector on the rear panel.
2. Connect a USB cable between the USB-B connector on the rear panel and a USB port of your host
computer.
3. Connect the 12 volt power supply to the V2M-Juno motherboard.
The serial terminal shows the command prompt
Cmd>
.
Note
If the command prompt is not shown, ensure that both configuration switches are in the top position.
Also reset the V2M-Juno motherboard using the hardware reset button. The hardware reset button is
on the rear panel.
4. At the
Cmd>
prompt on the serial terminal, issue the command
usb_on
.
Cmd> usb_on
The configuration SD card is now visible on the host computer as a mass storage device.
2 Configuration
2.1 Connecting to a host computer
ARM DEN0928F
Copyright © 2015 ARM. All rights reserved.
2-17
Non-Confidential