background image

8

                                 Product Overview 

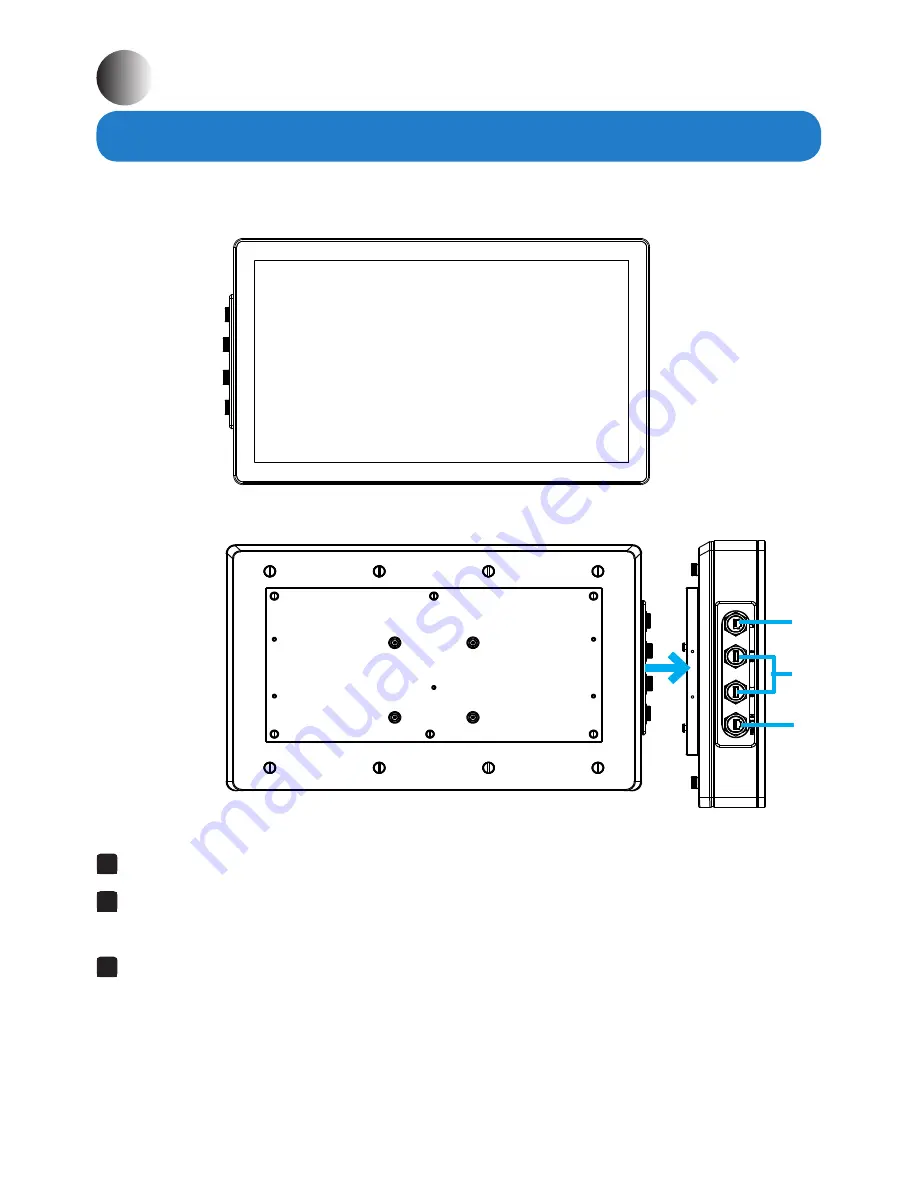
Front View

Rear View

Chapter 2  Basics

Side View

1


RJ45 LAN port -

  For network connection, connect to network device.


 USB1/USB2 Port -

  Connect mouse or keyboard for control of  Remote PC on ADM-

5821AX display.

3

   Remote IN port - 

Connect video extender transmitter(ARD-1007TX or ARD-5816TX) 

for transmitting all signals via CAT5e/6 LAN cable.

1

2

3

            ADM-5821AX Display

Содержание ADM-5821AX

Страница 1: ... operate the product Arista Corporation recommends users to read through the entire manual and follow instructions to avoid any kind of obscurity in using the product For any questions or support please call us at 1 877 827 4782 Monday through Friday 8 00am to 5 00PM Pacific Time Industrial Waterproof Touch Screen Display USER MANUAL Talk to us We listen ...

Страница 2: ...this unit For any reason a different power cord is used it should be certified by local and national standards and used under guidance of authorized technician Never use a faulty power cord with this unit Please contact the manufacturer or nearest authorized repair service right away for a replacement if damaged power cord is received The power supply cord is used as the main disconnect device Ens...

Страница 3: ...ions 11 Chapter 3 Connections 14 Mounting the ARD 1007TX HDMI extender 15 Mounting the display 17 Connecting to ARD 1007TX HDMI extender 25 Connecting to ARD 5816TX digital extender cluster 26 Chapter 4 Appendix 28 Maintenance and Troubleshooting 28 Product Limited Warranty 30 Frequently Asked Questions 35 Disposal and Recycling Information 36 Disclaimer and Copyright Notice 36 Contents ...

Страница 4: ...der cluster is also compatible with ADM 5821AX The high resolution display is capable of displaying large amounts of critical production and process information and provides floor personnel with easy to see and read production targets cadence alarms machine uptime and downtime measurements with OEE overall equipment effectiveness With one CAT5e 6 LAN cable the industrial waterproof LCD display sys...

Страница 5: ...s up to 8 bits per color total 16 7 million colors Extends uncompressed HDMI video signal up to 330ft 100m at 4K UHD 3840 x 2160 resolution and 1080P video signal up to 495ft Supports the touch screen and keyboard mouse signal transmission Strengthened protective glass anti reflective optional Sunlight readable option High brightness contrast and wide viewing angles Single control operation and tr...

Страница 6: ...pports Video HDMIVGA DVI SDI DP CVBS YPbPr Audio Touch Control keyboard mouse Ethernet Power Video bandwith 350MHz Transmission cable Cat5e Cat6 Cat7 cable Transmission distance Supports 4K 60Hz and 2K 60Hz video signal up to 330ft 1080P video signal up to 495ft Physical information Mounting Wall VESA Benchtop Stand Pedestal Mounting Physical Dimension Lx W x D Display 21 15 x 12 98 x 3 69 inch 53...

Страница 7: ...ing please inspect the shipping carton for any external damage Please contact for assistance if any damage is visible Keep original packaging material safe in case of any return repair or transport to other location 6 feet RS 232 cable x1 AC DC power adapter x1 AC power cable x1 6 feet HDMI cable x1 6 feet USB cable x1 ...

Страница 8: ... network connection connect to network device 2 USB1 USB2 Port Connect mouse or keyboard for control of Remote PC on ADM 5821AX display 3 Remote IN port Connect video extender transmitter ARD 1007TX or ARD 5816TX for transmitting all signals via CAT5e 6 LAN cable 1 2 3 ADM 5821AX Display ...

Страница 9: ...ntrol In Out Connect to a Remote control connector terminal for remote control on the display 5 Service For debugging use 6 LED indicators Power indicator Lights in green the unit is powered on Link indicator Lights in green the network connection works well 7 48V DC IN 48V DC power input 8 HDMI Loop OUT HDMI video signal output to display 9 Local OUT Connect remote device for transmitting all sig...

Страница 10: ...dicators 4 Power button 2 USB Service connector 5 AC power input jack 3 Remote control IR connector A B C D E F G H Extender Transmitter channels Input and output connectors for 16 channels 16 Way of different signal transmission ARD 5816TX 16 Way Digital Extender Cluster Optional ...

Страница 11: ...93 7mm 3 69 78 7mm 3 10 532 0mm 20 94 537 2mm 21 15 431 0mm 16 97 1500 329 8mm 12 98 207 4mm 8 17 ADM 5821AX Display The diagrams below show the physical and specific dimensions of the ADM 5821AX industrial waterproof touch screen display ...

Страница 12: ...12 5 12 5 65 2 76 70mm 144mm 34mm 130mm 157mm 6 19 103mm 4 04 1 35 ARD 1007TX HDMI Extender ...

Страница 13: ...13 ARD 5816TX Digital Extender Cluster Front View Bottom View 466 0mm 18 33 133 5mm 5 26 4 x R 09 2 25 222 2mm 8 75 442 0mm 17 40 262 2mm 10 32 482 0mm 18 98 ...

Страница 14: ...HDMI Extender Warning Make sure your display is grounded at all times Also make sure that it is on the same ground as any other equipment connected to its communications ports Connectors Connectors Connectors Chapter 3 Connections This section describes the connections connectors available on the ADM 5821AX industrial LCD display Rear Front ...

Страница 15: ...l mounting and DIN rail mounting 1 Wall mounting The extender can be placed on a shelf table or mounted onto a wall or board To mount them onto a wall or board you will require the mounting screws found in the accessory box Please follow the steps shown in the diagram below Step1 Situate the ARD 1007TX HDMI digital extender on a board or a wall Firmly secure it by screwing it in with the four 8 32...

Страница 16: ... to tighten the screws to affix the Din Rail onto the wall or board Step 2 Snap the metal clasp by the built in iron loop spring on the Din rail to mount the ARD 1007TX HDMI digital Extender onto the wall or board Step 3 You can also slide ARD 1007TX around the Din rail to move it to a desired position To remove the ARD 1007 Extender from Din rail press the iron loop spring built in the metal clas...

Страница 17: ... board on the VESA bracket and tightly bolt four screws to the VESA bracket and metal board Step 4 Place VESA bracket with the metal board on wall or board align holes on the VESA bracket with holes on the wall or board Step 5 Use screwdriver to tighten screws to fix the VESA bracket on the wall or board Step 6 Mount the display onto the wall or board through the metal mounting plate and VESA brac...

Страница 18: ...18 Physical dimensions for VESA mounting 265 1mm 10 44 93 7mm 3 69 78 7mm 3 10 532 0mm 20 94 537 2mm 21 15 431 0mm 16 97 1500 329 8mm 12 98 207 4mm 8 17 ...

Страница 19: ...crews to fix the metal mounting plate on the display Step 3 Place the VESA bracket on the wall or board and align holes on the VESA bracket with holes on the wall or board Step 4 Use a screwdriver to tighten screws to fix the VESA bracket onto the wall or board Step 5 Mount the display onto the wall or board through the mounting plate and VESA bracket Visually inspect the display to be sure that i...

Страница 20: ...20 Physical dimensions for Wall mounting 265 1mm 10 44 93 7mm 3 69 78 7mm 3 10 532 0mm 20 94 537 2mm 21 15 431 0mm 16 97 1500 329 8mm 12 98 207 4mm 8 17 ...

Страница 21: ... 5821AX waterproof industrial display and align holes on the mounting plate with holes on the display Step 2 Use a screwdriver to tighten six 8 32UNC sized screws to fix the metal mounting plate on the display Step 3 Take the metal benchtop stand and place the ADM 5821AX display into the benchtop stand Mount the display onto the benchtop stand through the mounting plate and VESA bracket on the met...

Страница 22: ...unting 265 1mm 10 44 93 7mm 3 69 78 7mm 3 10 532 0mm 20 94 537 2mm 21 15 431 0mm 16 97 1500 329 8mm 12 98 207 4mm 8 17 532 0mm 20 94 329 8mm 12 98 429 4mm 16 91 169 7mm 6 68 2 0mm 0 079 78 0mm 3 07 93 7mm 3 69 13 6 0 54 286 6mm 11 28 215 0mm 8 46 ...

Страница 23: ...late on the back of the ADM 5821AX industrial display and align holes on the mounting plate with holes on the display Step 2 Use a screwdriver to tighten the six 8 32UNC sized screws to fix the metal mounting plate on the display Step 3 Take the pedestal and fit it on a firmly fixed shaft or bracket through the shaft or screw hole Mount the display onto the pedestal through the mounting plate Step...

Страница 24: ...24 Physical dimension for Pedestal mounting 265 1mm 10 44 93 7mm 3 69 78 7mm 3 10 532 0mm 20 94 537 2mm 21 15 431 0mm 16 97 1500 329 8mm 12 98 207 4mm 8 17 ...

Страница 25: ...e 4 Connect one end of the Cat5e Cat6 cable to the Local Out connector of ARD 1007TX and connect the other end to the Remote In port on the side of the ADM 5821AX 5 Insert a USB device or USB keyboard on the ADM 5821AX if you have USB connection between the PC and ARD 1007TX 6 Connect one end of the supplied power adapter to DC48V power connector of the ARD 1007TX and connect the other end to the ...

Страница 26: ... Out connector of ARD 5816TX and connect the other end to the Remote In port on the side of ADM 5821AX display 4 Insert a USB mouse or keyboard on the ADM 5821AX for controlling on PC if you have USB connection between the PC and ARD 5816TX 5 Connect one end of the supplied power adapter to the ARD 5816TX and connect the other end to the wall AC outlet 6 If you require network connection connect e...

Страница 27: ...of the Cat5e Cat6 cable to the Local Out connector of ARD 5816TX and connect the other end to the Remote In port on the side of ADM 5821AX display 4 Connect one end of the supplied power adapter to the ARD 5816TX and connect the other end to the wall AC outlet Make sure your Cat5e Cat6 cable is correctly connected and not loose Make sure all cables have been connected properly before using the uni...

Страница 28: ...be very faintly seen in strong external light Note The backlights are not user serviceable If the backlights need to be replaced you must return the unit to Arista for service Symptom Possible Causes Actions No LCD display image No power No video signal Verify that the Power On LED is lit Check to see that the video source is on and operating Perhaps the source is outputting to a different display...

Страница 29: ... Cat6 cable is connected properly The video signal is not stable Check if connectors are in good condition Video signal with snow Faulty Cat5e Cat6 cable replace with a good one Power cable is connected poorly reconnect it No touch function with the display Check if the RS 232 cable for touch screen is connected properly The mouse or keyboard doesn t work Check if USB cable between your PC and ARD...

Страница 30: ...ista Corporation technical support Limited warranty does not apply to damages caused by failure or negligence this include accidents misuse abuse mishandling misapplication alteration faulty installation set up adjustment improper maintenance power surge issues with electrical stability failure to maintain environmental conditions specified by the manufacturer wrong attempt to relocate the system ...

Страница 31: ...sales representative will inform the customer of the estimated repair cost Return of the product will be counted as the authorization to repair and agreement to pay for the cost of repair whether or not it exceeds the original estimate 5 RMA Credit Policy Returns for Credit Credit Types Returns for credit that require Arista s management approval may take up to 48 hours for processing approval Pro...

Страница 32: ... Corporation will cover the cost of returning products that are under warranty via UPS Ground to customers in the United States after repair or replacement International customers are responsible for all transportation insurance duties and other similar charges for all returned products shipped outside of the United States and must ensure that the product is appropriately packaged Shipping damages...

Страница 33: ...To avoid any discrepancy of items received please do not return accessories manuals driver CDs OS CDs cables etc with the RMA unit in need of repair If available use the original box packaging to ship back RMA units to avoid transit damage RMA Rejection Policy Arista reserves the rights to return any RMA product received that does not comply with the information given on the original Return Materi...

Страница 34: ...rsement for lost time lost revenue and cost of having someone remove or re install an installed unit if applicable or travel to and from the service providers All expressed and implied warranties including the limited warranty of Merchantability are limited to the period of the limited warranty unless otherwise indicated in writing by Arista Corporation 9 Customer Responsibilities By requesting se...

Страница 35: ... Light comes in the form of electromagnetic waves Electric and magnetic fields oscillate in a direction perpendicular to the propagation of the light beam The direction of these fields is called the polarization direction Normal or non polarized light has fields in several directions polarized light has a field in only one direction What kind of wide angle technology is available How does it work ...

Страница 36: ...heir personal archival purposes The manufacturer reserves the right to revise this user s manual and all accompanying documentation and to make changes in the content without obligation to notify any person or organization of the revision or change IN NO EVENT WILL THE VENDOR BE LIABLE FOR DIRECT INDIRECT SPECIAL INCIDENTAL OR CONSEQUENTIAL DAMAGES ARISING OUT OF THE USE OR INABILITY TO USE THIS P...

Страница 37: ...Arista Corporation 40675 Encyclopedia Circle Fremont CA 94538 U S A Tel 510 226 1800 Fax 510 226 1890 http www goarista com Talk to us We listen TM ...

Отзывы: