

ARC AUDIO
BTM
Installation and Setup
Congratulations on your purchase of the ARC Audio BTM (Bluetooth Module) for your PS8 digital sound processor. Please
follow the instructions on this document to installation and setup of your BTM for easy operation.
Preparation and tools needed – (Turn off the processor and audio system, 2mm Allen head screw driver of Allen Key, laptop
computer)
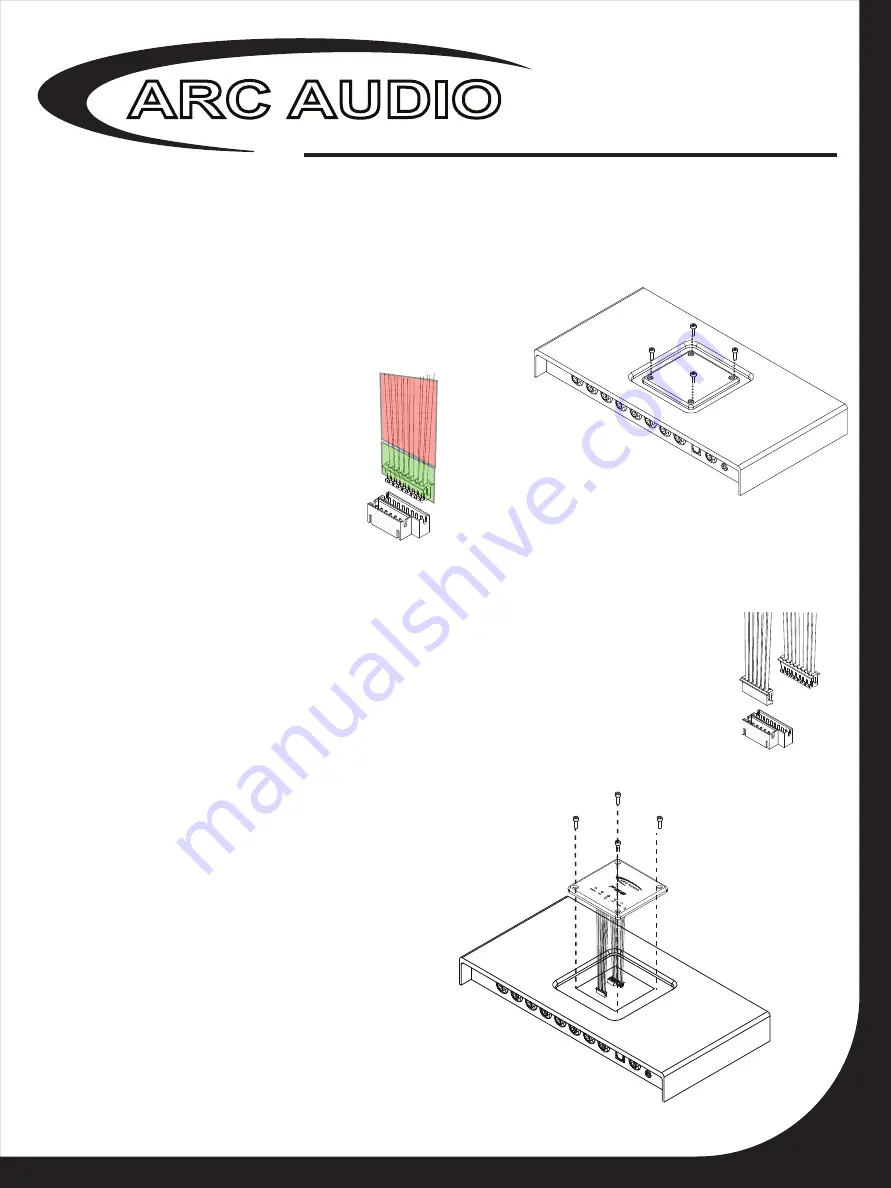
Step 1-
Unscrew the four 2mm Allen head screws that hold your
illuminated display panel to the PS8. These Please use the correct tool
for the removal and installation of these four screws (See Figure 1)
Step 2-
Lift the original illuminated display
panel from the PS8 and unplug the connecting
cable from the main circuit board by grabbing
ahold of the cable and plug at the port on the
main circuit board. (It is best to rock the plug
out of the socket back and forth for easy
removal) (See Figure 2)
Step 3-
Remove the BTM module from the packaging
Step 4
- First note that there is two different size plugs and two cables on the BTM replace-
ment display. Find and locate the smaller of the two plugs and plug it into the matching port on
the main circuit board (please note that the plug has guide bars on the side and this will allow it
to only go into the port in one direction. Please do not try to force it in). (See Figure 3)
Step 5-
Then grab the other cable off of the BTM Display. This should be the larger of the two plugs.
Place and install this plug into the larger port on the main circuit board for the PS8 (please note that
the plug has guide bars on the side and this will allow it to only go into the port in one direction. Please
do not try to force it in).(See Figure 3)
Step 6
- Carefully press and wrap the BTM cables into the
PS8 main housing and align the display with the mounting
holes. Be sure to double check that you are not pinching
either of the cables. Now with the display flat on the
casing reinstall the four 2mm Allen head screws (be
careful to not overtighten as this can crack and break the
display panel)(See Figure 4)
OK
NOT
OK
Figure 1
Figure 2
Figure 3
www.arcaudio.com
Step 7-
Turn on your audio system and the PS8, and startup and
connect the PS8 to your Windows Laptop.
Step 8-
Start the PS8 users interface
Step 9-
Find and locate the “Firmware” button on the top header
tabs of the GUI.
(See Figure 5)
Step 10-
Locate the sub panel labeled “Bluetooth (See Figure 5) .
This panel will currently have information in it such as
BT Name – Arc Audio PS8 BT
Version - ********
Date- *********
In this panel you can choose to rename your BT module to something personalized. This will allow you to see
this new name on your BT device when connecting.
Step 11-
After updating the name (If desired) find and
click on the button called “Upload Bluetooth Config”.
This will begin the update process and should take
about 2-3 seconds. (See Figure 6)
Step 12–
Wait about 30 seconds and then power the
system off and then back on
Step 13-
Go to your search Bluetooth devices menu
on your Bluetooth device and find your updated PS8
Bluetooth Module. (See Figure 7)
Step 14-
Start your music player on your BT enabled
device
Step 15-
Enjoy
Figure 4