background image

 AQUA SALT EVO 


MAINTENANCE AND INSTRUCTION MANUAL


Salt chlorine generator 


ENGLISH 


ADSP7000753 

rev. 2.0 

23/04/2019 

75/96


75 

6.2 

Returning the product 

to the manufacturer's 

after sales service


The material must be sent back in its packaging with all the original protections before the end of 
the warranty period. The system must be clean. 
 
In  case  these  conditions  are  not  observed,  the  manufacturer  will  not  be  held  responsible  for 
possible damages occurred during transportation.


6.3 

Warranty 

certificate


The manufacturer warranty covers the devices for a period after the delivery date. Within the warranty  
terms, the manufacturer undertakes to supply for free the spare parts that, according to them or to one 
of their authorized representatives, present manufacturing or material defects, or to repair them 
personally or through authorized workshops. 
The manufacturer will not be held responsible for other costs, damages and direct or indirect losses 
provoked by the use of or the impossibility to use, both totally or partially, the chlorine generator. 
Repairs or spare parts will not extend nor renew the warranty period. 
The user will personally meet the costs arising from the assembly or disassembly of the devices, as 
well as transport and consumables costs (plates, sensors etc.). 
The above-mentioned obligations for the manufacturer will not be valid in case:


The devices are not used following the instructions on the use and maintenance manual; 
The devices are repaired, disassembled or modified by unauthorized workshops; 
Non-original spare parts have been used; 
The electric system is damaged due to external factors like over-voltage, electric discharges, etc.; 

After the warranty period, the manufacturer will not be held responsible for any of the above-mentioned 
points. 


7 Annexes


The annexes

 contain important additional information for quick 

reference, like menu graphs and default parameters 


7.1 

Annex A Exploded 

views


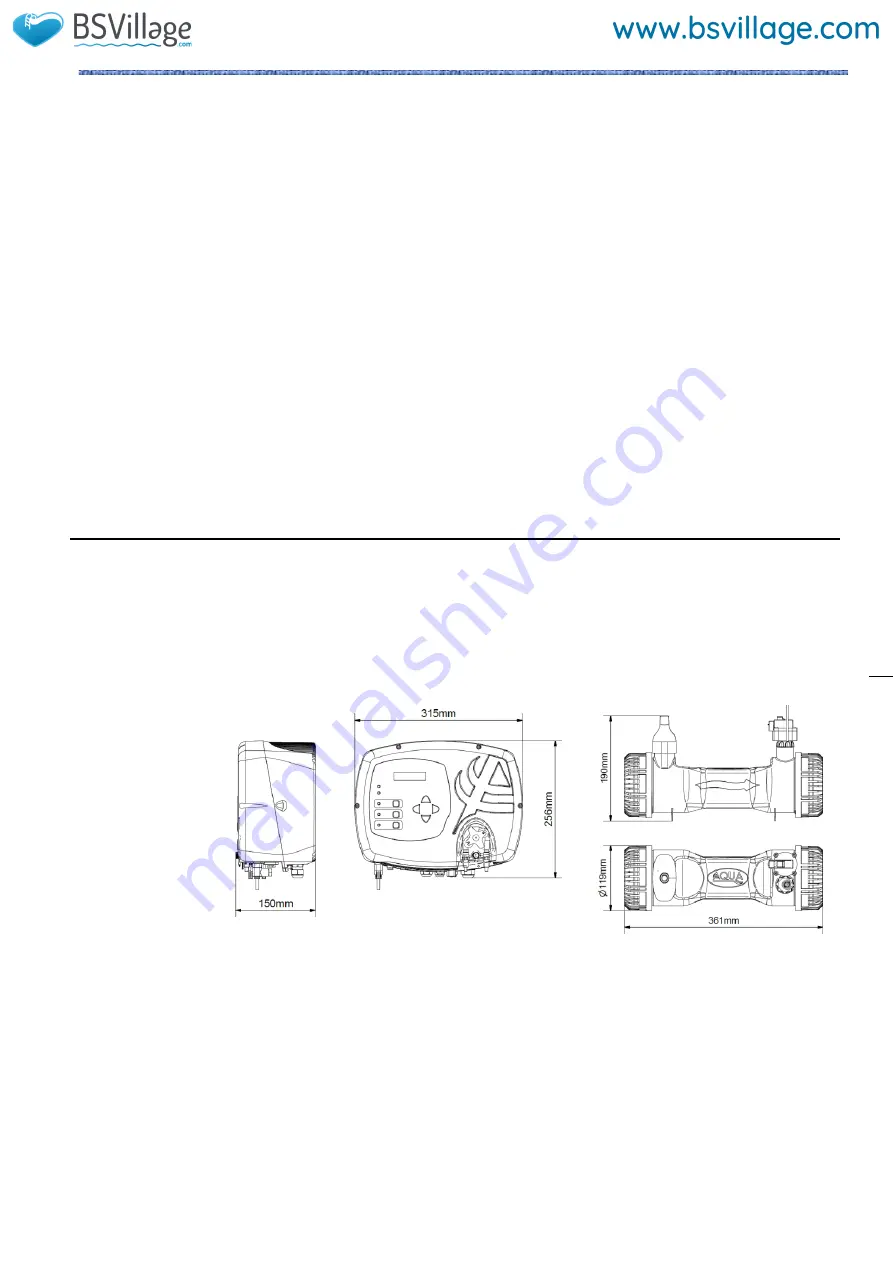
Control system

– weight: 3 Kg.   Cell – weight: 1.5 Kg (model 100) 


Содержание Salt Evo

Страница 1: ...UA SALT EVO MANUALE ISTRUZIONE E MANUTENZIONE Generatore di Cloro a sale ITALIANO ADSP7000753 rev 2 0 23 04 2019 1 96 AQUA SALT EVO ITALIANO Manuale istruzioni Pagina 2 ENGLISH Instruction Manual page 46 ...

Страница 2: ...il tasto F scorrere le voci fino ad arrivare alla voce Tipo cella 13 Con i tasti Up e Down selezionare la dimensione delle celle installate 14 Premere Enter a lungo per salvare le modifiche e ritornare al menu Installatore 15 Con F scorrere le voci fino ad arrivare a Programmazione Enter per entrare nel sottomenu 16 Con i tasti Up and Down modificare la percentuale di produzione di cloro desiderat...

Страница 3: ... il tasto F scorrere le voci fino a Impostazioni Sistema Enter per entrare nel sottomenu 11 Con il tasto F scorrere le voci fino ad arrivare alla voce Tipo cella 12 Con i tasti Up e Down selezionare la dimensione delle celle installate 13 Premere Enter a lungo per salvare le modifiche e ritornare al menu Installatore 14 Premere Enter per entrare nel sottomenu 15 Con F scorrere le voci fino a Progr...

Страница 4: ...EDURA PER L AGGIUNTA DEL SALE NELLA VASCA DI COMPENSO O NEGLI SKIMMER 1 VERIFICARE LA QUANTITA DI SALE NECESSARIA 2 SPEGNERE LA CENTRALINA 3 AGGIUNGERE LA QUANTITA DI SALE CONSIGLIATO 4 ATTENDERE LO SCIOGLIMENTO DI TUTTO IL SALE AGGIUNTO MANTENENDO L IMPIANTO DI CIRCOLAZIONE ATTIVO 12 24 ORE 5 ACCENDERE NUOVAMENTE LA CENTRALINA PER IL NORMALE FUNZIONAMENTO 6 VERIFICARE CHE LA SALINITA SIA TORNATA ...

Страница 5: ...llegamenti elettrici 16 3 5 Avvio dell impianto 17 4 Programmazione 17 4 1 I menu 18 4 2 Menu Utente 18 4 4 Menu Password 20 4 5 Menu Installatore 20 4 5 1 Menu impostazioni piscina 21 4 5 2 Menu impostazioni sistema 22 4 5 3 Menu calibrazione sonda cloro 23 4 5 4 Menu calibrazione sonda redox 23 4 5 5 Menu calibrazione sonda pH 24 4 5 6 Menu programmazione 25 4 5 7 Menu Allarmi 26 4 5 8 Menu Comu...

Страница 6: ...tware 38 8 1 COME COLLEGARE L APPARATO AL PC E CONFIGURARE IL SISTEMA 38 8 2 PRESENTAZIONE AQUA SALT EVO SOFTWARE 39 8 3 I MENU 39 8 4 LE ICONE 40 8 5 LE SCHEDE 41 8 6 I PULSANTI PER I PROGRAMMI 45 9 Garanzia 45 10 Registro manutenzioni 47 11 Montaggio pressostato 92 12 Connessioni con altrre versioni 93 13 Download software 94 ...

Страница 7: ...guarda eventuali guasti dovuti a manomissioni o utilizzo di ricambi e accessori non conformi L impianto elettrico deve essere conforme alle normative vigenti nel paese dove esso è realizzato La temperatura dell ambiente di utilizzo non deve superare i 45 C Affinché avvenga la generazione di Cloro la temperatura dell acqua della piscina deve essere di almeno 5 C Prima di iniziare il montaggio legge...

Страница 8: ...cqua a una pressione uguale o superiore a 0 5bar vedi figura sotto Quando ciò si verifica il cloro generato è direttamente proporzionale alla corrente che attraversa la cella ai cui elettrodi viene applicata una differenza di potenziale costante A sua volta la corrente dipende dalla concentrazione di sale disciolto e dalla geometria degli elettrodi La cella elettrolitica funziona con una successio...

Страница 9: ...ile da 1 a 12 ore Terminato tale intervallo temporale la produzione di cloro continua a diminuire linearmente finchè non si raggiungono 24 ore dall inizio della copertura A questo punto la produzione del cloro ha raggiunto il 10 del valore iniziale e rimane costante finchè persiste la copertura Il dispositivo prevede un ingresso per il riconoscimento della presenza della copertura sull impianto Il...

Страница 10: ...staltica per il dosaggio del correttore del pH e di una sonda di livello pH Redox comprensivo di due sonde per il monitoraggio del valore del pH e del redox in piscina di una pompa peristaltica per il dosaggio del correttore del pH e di una sonda di livello Modelli disponibili Standard pH pH ClJ pH Redox Uscita pompa elettromagnetica pH Uscita pompa elettromagnetica per dosaggio salamoia Sonda di ...

Страница 11: ...ere qualche minuto a prendere visione di cosa comprende e familiarizzare con i vari componenti Queste sezione del manuale ha lo scopo di fornire tutte le informazioni necessarie per un opportuna installazione del generatore di cloro e dei suoi componenti 3 1 1 Montaggio cella Seguire questi semplici passi per installare all interno del proprio impianto la cella elettrolitica 1 Tagliare il tubo nel...

Страница 12: ...io collegare la cella elettrolitica alla centralina di controllo collegando il sensore di flusso pressione la sonda di temperatura e la parte che fornisce tensione alle piastre 1 1 tensione di alimentazione della cella 2 sensore di temperatura 2 Collegare il sensore di temperatura 3 Inserire la cuffia bianca in gomma per coprire i fili dei vari collegamenti 3 1 4 Kit di messa a terra Lo scopo del ...

Страница 13: ...e di cloro Descrizione A Interruttori bipolari B Contattore per azionamento pompa di circolazione C Relè di comando del contattore D Feedback di segnalazione funzionamento pompa di circolazione E Azionamento ausiliario esterno Descrizione 1 Sistema di controllo AQUA SALT EVO 2 Cella elettrolitica 3 Scambiatore di calore 4 Piscina capacità max 200 m3 5 Sale per piscine NaCl 6 Pompa di ricircolo 7 F...

Страница 14: ...rlo in posizione applicare la parte superiore del portasonda sul tubo della piscina Inserire le due viti se il tubo è DN63 utilizzare i due distanziali tra il porta sonda superiore e il collare inferiore applicare la parte inferiore del porta sonda sul tubo e serrare i dadi sulle viti Avvitare le viti di serraggio in modo uniforme in modo da ottenere un corretto fissaggio non serrare completamente...

Страница 15: ...gare la pompa al connettore PPh e il segnale di livello al connettore indicato con LPh figura 3 3 2 2 Esempio di installazione L esempio dello schema di montaggio sotto riportato si riferisce ai modelli pH pH Rx pH ClJ Descrizione 1 Sistema di controllo AQUA SALT EVO 2 Cella elettrolitica 3 Scambiatore di calore 4 Piscina capacità max 200 m3 5 Sale per piscine NaCl 6 Pompa di ricircolo 7 Filtro a ...

Страница 16: ... contattando il produttore il rappresentante locale o personale qualificato al fine di evitare ogni rischio per la sicurezza I collegamenti elettrici devono essere effettuati esclusivamente da un professionista autorizzato e qualificato nel pieno rispetto della normativa in vigore nel paese di installazione Per un esempio sui collegamento elettrici vedi la figura sotto riportata E possibile alimen...

Страница 17: ...rogrammare le sue attività e impostare i valori dei suoi parametri Per fare questo il sistema mette a disposizione un interfaccia utente dotata di Display Tasti Led Il sistema è programmabile anche utilizzando un software che si può installare su PC Windows Nella figura 9 è riportata l interfaccia utente vediamo ora le sue caratteristiche principali I tasti Up Down consentono di modificare i valor...

Страница 18: ...o all altro quando ci si trova in una qualsiasi delle loro voci Segue poi una spiegazione dettagliata dei singoli menu e delle voci appartenenti ad essi La figura sotto riportata mostra i tre menu presenti e come passare dall uno all altro Regole generali per l utilizzo di tutti i menu 1 Alcune voci di menu sono proprie di alcuni modelli e o modalità di funzionamento e o stati o fasi dell apparato...

Страница 19: ...rata la fase in cui si trova ad operare l apparato e nella colonna di destra l orologio o il tempo residuo L orologio mostra l orario corrente ed è mostrato durante le seguenti fasi Pausa Wait timer Wait flusso press Il tempo residuo decrementa il suo valore al trascorrere del tempo ed è relativo alle fasi di Stabilizzazione flusso press Work on Work off Clean il tempo di polarizzazione indica la ...

Страница 20: ...posta da quattro cifre Se si commettono 1 o 2 errori si torna alla prima voce di questo menu dalla quale è possibile digitare nuovamente la password Se si commettono 3 errori si ritorna al menu Utente 4 5 Menu Installatore Il menu Installatore consente di accedere ad una serie di sottomenù come mostrato nella figura sottostante Premere il tasto Enter per entrare all interno dei sottomenu Premendo ...

Страница 21: ...ui sono state apportate le ultime modifiche ad almeno uno dei parametri del sistema Consente di transitare al sottomenu delle impostazioni della piscina Consente di transitare al sottomenu delle impostazioni del sistema Consente di transitare al sottomenu per eseguire la calibrazione della sonda del cloro o del redox Consente di transitare al sottomenu per eseguire la calibrazione della sonda del ...

Страница 22: ...te di impostare una propria password di quattro cifre Premendo il tasto Enter si conferma il carattere e si passa al successivo Permette di impostare la data rispettando il formato Lun Dom GG MM AA Premendo il tasto Enter si conferma il carattere e si passa al successivo Permette di impostare l ora rispettando il formato HH MM Premendo il tasto Enter si conferma il carattere e si passa al successi...

Страница 23: ...tasti Up and Down fino a modificare tale valore al valore misurato con fotometro metodo DPD Premendo per circa un secondo il tasto Enter si torna alla voce Calibrazione Cloro del menu Installatore 4 5 4 Menu calibrazione sonda redox Il menu Calibrazione Sonda Redox consente di effettuare la calibrazione della sonda redox nel caso in cui il modello utilizzato ne prevede la presenza La calibrazione ...

Страница 24: ... pressione del tasto Enter viene mostrato il valore del pH della soluzione 7 00 e quello letto dalla sonda ed espresso in mV 5 Se si effettua la calibrazione ad un solo punto premere il tasto F e andare al punto 8 altrimenti sciacquare la sonda nella bottiglia di acqua potabile e immergerla nella soluzione a pH 4 01 Muovere lentamente per 3 secondi poi premere Enter 6 Attendere avendo cura di non ...

Страница 25: ...rzionale Permette di visualizzare e modificare il valore stabilito per il setpoint del redox tra 0 1000 mV Voce visualizzata solo se il tipo di centralina prevede la presenza della sonda Redox e il funzionamento è Proporzionale Inserire la sonda nella soluzione Attesa pH 7 00 Lavare la sonda Attesa pH 4 01 Qualità della sonda Cloro base Cloro WM cloro set point Rx set point pH set point pH modo la...

Страница 26: ... che riguardano i vari allarmi vedi la sezione 5 ad essi dedicata Premendo per un secondo il tasto Enter si torna alla voce Allarmi del menu Installatore 4 5 8 Menu Comunicazione Il menu Comunicazioni consente di modificare alcune caratteristiche riguardanti la modalità con cui mettere in comunicazione il programma utente che risiede sul PC e l apparato Premendo per un secondo il tasto Enter si to...

Страница 27: ... bassa temperatura sul display 3 Nel caso in cui la temperatura rilevata dalla sonda scende al di sotto dei 2 5 C e dal menu Allarmi è stato abilitato l allarme ghiaccio si attiverebbe anche quest ultimo unitamente all allarme di bassa temperatura Come viene segnalato dal dispositivo Segnalazione acustica tramite buzzer se l opzione risulta abilitata vedi Allarme Sonoro Menu Allarmi LED Rosso di A...

Страница 28: ...e a quello impostato nella relativa voce di menu Cambio Cella del menu Allarmi Il tempo per la sostituzione della cella elettrolitica è impostabile nel range 5000 20000 ore a step di 1000 ore Come viene segnalato dal dispositivo Segnalazione acustica tramite il buzzer qualora sia abilitata vedi Allarme Sonoro su Menu Allarmi Led rosso di manutenzione acceso fisso lampeggio di Allarme cambio cella ...

Страница 29: ...osatrici prima di spegnerle Effettuare una pulizia del prefiltro lasciandolo aperto rimuovendo il cestello e scaricando il prefiltro stesso Scaricare completamente il filtro La manutenzione mensile Dopo ogni pulizia del filtro oppure ogni tre mesi si consiglia di controllare lo stato delle piastre della cella Ogni 1000 ore di funzionamento il sistema avverte l utente di eseguire tale operazione me...

Страница 30: ... i tre o ring che si trovano dentro l inserto 7 Estrarre le piastre in titanio da pulire Non perdere il setto per il blocco elettrodi presente nel tubo trasparente 8 In un recipiente contenente 9 parti di acqua aggiungere 1 parte di acido cloridrico in modo che gli elettrodi siano completamente immersi nella soluzione Non far pervenire a contatto con la soluzione acida gli elettrodi di collegament...

Страница 31: ...ette derivanti dall uso o dall impossibilità di uso del generatore di cloro sia totale che parziale La riparazione o la fornitura sostitutiva non prolungherà ne rinnoverà la durata del periodo di garanzia Rimangono tuttavia a carico dell utente le spese di montaggio e smontaggio dei dispositivi dall impianto spese di trasporto e materiali di consumo piastre sensori etc Gli obblighi del produttore ...

Страница 32: ...RRENTE AQUA SALT EVO AISI 316 M3 PERNO MASCHIO 2 19 ADSP6002209 PIN PORTACORRENTE AQUA SALT EVO AISI 316 M4 PERNO MASCHIO 1 20 ADSP6001042 CAPPUCCIO PROTEGGI PIN FEMMINA PIASTRE TITANIO AQUA SALT EVO 3 21 PTEPL050106F PIASTRA TITANIO ELETTRODO PORTACORRENTE L 50 AQUA SALT EVO 3 PTEPL100107F PIASTRA TITANIO ELETTRODO PORTACORRENTE L 100 AQUA SALT EVO 3 PTEPL150108F PIASTRA TITANIO ELETTRODO PORTACO...

Страница 33: ...appa del menu Menu Utente Menu Password stato cloro pH Redox Cloro tempo residuo fase orologio fase tempo residuo tempo di polarizzazione VOut IOut cloro generato stimato funzioname nto generatore temperatura salinità istantanea stimata salinità media stimata flusso pressione verifica cella cambio cella Password Menu Installatore Menu Utente ...

Страница 34: ...mpostazioni Piscina Menu Impostazioni Sistema Data ultima modifica Impostazioni piscina Impostazioni sistema Calibrazione Cl Rx Calibrazione pH Programmazione Allarmi Comunicazione Capacità vasca Funzionamento generatore Filtro tapparella Ripristina parametri Lingua Imposta password Data Ora Tipo cella Unità temperatura Sistema unità Unità salinità ...

Страница 35: ...Menu Calibrazione Sonda Cloro Menu Calibrazione Sonda Redox Menu Calibrazione sonda pH Inserire la sonda nell acqua Attesa Cloro mA Cloro misurato Cloro impostato Inseriere la sonda nell acqua Attesa Rx 475 mV Qualità della sonda Inserire sonda nella soluzione Attesa pH 7 00 Lavare la sonda Attesa pH 4 01 Qualità della sonda ...

Страница 36: ... 36 96 36 Menu Programmazione Menu Allarmi Menu Comunicazione Cloro base Cloro WM cloro set point Rx set point pH set point pH modo lavoro Salinità set point Polarizzazione Allarme ghiaccio Manutenzione cella Cambio cella Reset allarme manutenzione cella Reset allarme cambio cella Tipo connessione Indirizzo Modbus ...

Страница 37: ...nto e il suo sistema di equilibrio è piuttosto complesso 7 6 Appendice E Cose da sapere per la tua piscina La prima informazione che devi conoscere sulla tua piscina è il suo volume Per calcolare il volume di una piscina applica una delle formule sotto riportate che dipendono dalla forma della piscina vasca rettangolare lunghezza x larghezza x profondità media vasca ovale lunghezza x larghezza x p...

Страница 38: ...vi sia possibile è necessario utilizzare un cavo seriale null modem oppure un cavo seriale dritto con un adattatore null modem Installare il software che si trova nel cd fornito e avviare l applicazione cliccando sull icona presente sul desktop dopo l installazione Cliccare sull icona presente nella barra delle icone per avviare il collegamento seriale con il PC Inserire la password di default 000...

Страница 39: ...o apri per aprire i file in cui vengono salvati alcuni parametri di funzionamento del generatore salva salva con nome uscita per chiudere l applicazione Il menu Configurazioni comprende le voci imposta lingua per scegliere la lingua desiderata cartella dati per scegliere il path per gli utenti di Windows 7 e Vista non scegliere come path la root C in cui salvare i file di dati del generatore porta...

Страница 40: ...e terminali sono connessi e la procedura termina Nel caso in cui si presenti la finestra di errore Verificare che i collegamenti fisici dei cavi siano corretti e che il cavo sia di tipo seriale incrociato Nel caso in cui compaia la finestra di errore L apparato non è di tipo generatore di cloro verificare che l apparato sia effettivamente un generatore di cloro e che la versione del firmware e del...

Страница 41: ...gano compensazioni come ad esempio temperatura o UV Set Point pH Indica il valore del Set Point del pH Ghiaccio Indica lo stato dell allarme possibile formazione di ghiaccio Cloro impostato Winter Indica e permette di impostare la percentuale di cloro che deve essere generata nel caso in cui l apparato sia in Winter mode Corrisponde al rapporto tra tempo di on e tempo di ciclo nel caso in cui non ...

Страница 42: ...giorni Indica o imposta la durata dello stato di Startup Cella elettrolisi Cloro Funz Generatore timer interni o esterno Tempo di ciclo minuti Indica o imposta il tempo di ciclo della generazione del Cloro ossia della somma tra il tempo di on e quello di off Cloro impostato Indica o imposta la percentuale di cloro che deve essere generata rispetto al massimo possibile Corrisponde al rapporto tra t...

Страница 43: ...r di ricircolo Tipo Indica o imposta il tipo di timer di ricircolo Off Lun Ven Lun Dom Sab Dom Inizio Indica o imposta l ora di attivazione del timer di ricircolo Durata Indica o imposta la durata di attivazione del timer di ricircolo Con la scheda ALLARMI è possibile abilitare disabilitare e impostare gli allarmi che si desidera Abilitazioni Allarmi Manutenzione Cella Elettrolisi Abilitazione all...

Страница 44: ...d corrente nel caso in cui si voglia sostituire questa password con una nuova Nuova Il campo deve essere compilato con una nuova password nel caso in cui si voglia sostituire la password corrente La scheda INDICE SATURAZIONE permette di calcolare un indice che fornisce un indicazione sulla qualità dell acqua presente in piscina Calcolo Indice Saturazione SI pH Indica o imposta il valore di pH da u...

Страница 45: ...isultasse eccessivamente onerosa rispetto al valore del prodotto valutata ad insindacabile giudizio della casa produttrice Aqua si impegna a sostituire l apparecchiatura al Cliente finale lasciando immutati la scadenza e i termini di garanzia di cui al contratto originario e comprovato dal documento fiscale rilasciato al momento dell acquisto Nel caso di sostituzione dell apparecchio qualora non f...

Страница 46: ...ia stato riscontrato alcun difetto come denunciato dal Cliente o per presunti problemi di funzionamento derivanti da errata impressione dell utente Situazioni in cui viene riscontrata una portata degli impianti elettrici insufficiente o non a norma Situazioni nelle quali si riscontra negligenza incuria manomissione rottura accidentale danneggiamento nel trasporto errata movimentazione così come us...

Страница 47: ... sale ITALIANO ADSP7000753 rev 2 0 23 04 2019 47 96 47 Etichetta 10 Registro manutenzioni Registro interventi di verifica e manutenzione Numero DESCRIZIONE ATTIVITÀ VERIFICHE E MANUTENZIONE DATA MANUTENZIONE ORE IMPIEGATE DATA PROSSIMA MANUTENZIONE NOTE FIRMA 1 2 3 4 5 6 ...

Страница 48: ...ess F to scroll down to Cell Type 13 Select the dimensions of the installed cells using UP or Down 14 Press and hold Enter to save the modifications and go back to the Installer Menu 15 Press F to scroll down to Programming Press Enter to access the submenu 16 Insert the desired percentage of chlorine production using Up and Down 17 Press and hold Enter to save the modifications and go back to the...

Страница 49: ...ll Type 12 Select the dimensions of the installed cells using UP or Down 13 Press and hold Enter to save the modifications and go back to the Installer Menu 14 Press Enter to access the submenu 15 Press F to scroll down to Programming Press Enter to access the submenu 16 Press F to scroll down to pH Set Point 17 Insert the desired value with UP and Down standard values 6 8 7 2 18 Press F to switch...

Страница 50: ...CE WITH ELECTROLYTIC CELL TO 200 mc PROCEDURE FOR ADDITION OF SALT IN THE BALANCE TANK OR IN SKIMMER 1 CHECK THE NEEDED QUANTITY OF SALT 2 SWITCH OFF THE DEVICE 3 ADD THE QUANTITY OF SALT RECOMMENDED 4 WAIT FOR DISSOLUTION OF SALT ADDED MAINTAINING THE SYSTEM OF CIRCULATION ASSETS 12 24 HOURS 5 TURN ON AGAIN THE DEVICE 6 CHECK THE SALINITY IS RETURNED TO NEEDED VALUES ...

Страница 51: ...nections 62 3 4 Electrical connections 62 3 5 System activation 63 4 Programming procedure 63 4 1 The Menus 64 4 2 User Menu 64 4 4 Password Menu 66 4 5 Installer Menu 66 4 5 1 Pool settings menu 67 4 5 2 System settings menu 68 4 5 3 Chlorine probe calibration menu 68 4 5 4 Redox probe calibration menu 69 4 5 5 pH probe calibration menu 69 4 5 6 Programming Menu 70 4 5 7 Alarms Menu 71 4 5 8 Comm...

Страница 52: ...2 8 Software 82 8 1 HOW TO CONNECT THE DEVICE TO THE PC AND CONFIGURE THE SYSTEM 82 8 2 AQUA SALT EVO SOFTWARE PRESENTATION 82 8 3 MENUS 83 8 4 ICONS 83 8 5 TABS 85 8 6 PROGRAMME KEYS 89 9 Warranty 89 10 Maintenance regestry 91 11 Pressure switch assembly 92 12 Connections with other versions 93 13 Download software 94 ...

Страница 53: ... the correct operation of the generator it is necessary to use original spare parts or accessories The manufacturer will not be held responsible for any fault or damaged provoked by tampering or non original spare parts and accessories The electrical system must be complying with the standards of the Country it is installed in The temperature of the environment must not be above 45 C In order for ...

Страница 54: ...chlorine production takes place only if a stabilized water flow goes through the cell with a pressure equal to or greater than 0 5 bar see figure below When this occurs chlorine generated is directly proportional to the current of the cell whose electrodes have a constant potential difference In its turn the current depends on the concentration of salt in the water and on the disposition of the el...

Страница 55: ...ows the proportional adjustment of chlorine generation When the pool is covered chlorine generation is automatically reduced by 50 of the starting value for 1 to 12 hours programmable After this lapse chlorine generation linearly decreases for 24 hours since the initial covering input At this point chlorine production has reached 10 of the initial value and stays constant for the whole duration of...

Страница 56: ... of the generated chlorine that includes the ratio between salinity concentration current efficiency and temperature Models available Standard pH pH ClJ pH Redox pH electromagnetic pump output Brine dosing electromagnetic pump output Temperature sensor Electrolytic cell self clearing Replaceable electrolytic cell Automatic chlorine regulation Superchlorination mode boost Shutter mode Winter mode w...

Страница 57: ...all information required for a correct installation of the chlorine generator and its components 3 1 1 Electrolytic Cell Installation Follow these simple steps to install the electrolytic cell in your system 1 Cut the pipe where the electrolytic cell must be placed according to the dimensions shown in the picture above 2 Insert the blue ring nuts labelled with number 1 and stick the reducers indic...

Страница 58: ... the plates as indicated in the image sequence below 1 1 cell supply voltage 2 temperature sensor 2 Connect the temperature probe 3 Insert the white rubber cap to cover the connection wires 3 1 4 Grounding Kit The kit prevents electric noise from plastic pipes and tubes which may cause wrong indications on measurement instruments especially pHmeters and Rxmeters Please install the grounding electr...

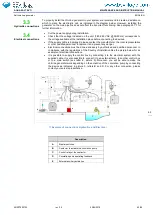
Страница 59: ...andard chlorine generator 7 Standard model installation example Description A Bipolar switches B Contactor to activate the circulation pump C Control relay of the contactor D Circulation pump operating feedback E External auxiliary activation Description 1 AQUA SALT EVO control system 2 Electrolytic cell 3 Heat exchanger 4 Pool max capacity 200 cu m 5 Pool salt NaCl 6 Recirculation pump 7 Sand fil...

Страница 60: ...Position the O ring in place and hold it there Apply the upper part of the probe holder on the pool tube Insert the two screws if it is a DN63 tube use the two spacers between the upper probe holder and the lower collar Apply the lower part of the probe holder on the tube and tighten the nuts on the screws Screw the clamping screws evenly to achieve proper fastening Do not tighten a screw fully ho...

Страница 61: ...ber 13 in picture 9 indicates an external pump to correct pH If you want to use the external pH pump connect it to the PPh connector and connect the level signal to the connector indicated with LPh shown in picture 8 ID Description A Bipolar switches B Contactor to activate the circulation pump C Control relay of the contactor D Circulation pump operating feedback E External auxiliary activation I...

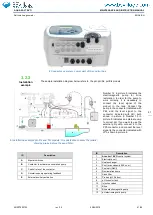
Страница 62: ...r qualified personnel to replace it and prevent any danger Electrical connections must be done exclusively by authorized and qualified personnel in compliance with the regulations of the Country of installation See the picture below for an example of electrical connections It is possible to supply the control box by connecting it to the electrical system with the supplied cable It is also possible...

Страница 63: ... from your chlorine generator programme its activity and set the values of its parameters To do so the system comes with a user interface equipped with Display Keys Led The system can be also programmed through a software you can install on your Windows PC Picture 9 shows the user interface We will now see its main characteristics Up Down keys modify the numerical values for every menu section and...

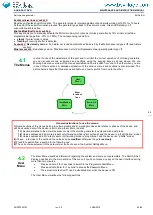
Страница 64: ...the various menus and sections is also provided The picture below shows the three menus available and how to switch from one to the other General instructions to use the menus 1 Some sections of the menus belong to certain models and or working modes and or states or phases of the device and will be visualized only if the device is set to show them More in detail 1 1 Sections related to the pH wil...

Страница 65: ... the current work phase is visualized The left column shows the current phase of the device and the right one shows the clock or the remaining time The clock shows the current time and it is shown during the following phases Pause Wait timer Wait flow pressure The value of the remaining time decreases with the time and it regards the following phases Flow pressure stabilization Work on Work off Cl...

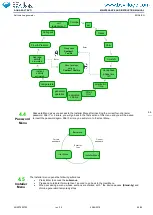
Страница 66: ...aller Menu after inserting the correct four character password After 1 or 2 errors you will go back to the first section of this menu and you will be asked to insert the password again After 3 errors you will return to the User Menu 4 5 Installer Menu The Installer menu opens the following submenus Press Enter to access the submenus Press and hold Enter for more than 1 second to go back to the Use...

Страница 67: ...nerator operation Cover filter It shows the date of the last modification to at least one of the system parameters Switches to the Pool Settings submenu Switches to the System Settings submenu Switches to the submenu to calibrate chlorine or Redox probe Switches to the submenu to calibrate the pH probe Switches to the Programming Menu Switches to the Alarms Menu to enable or disable the alarms Swi...

Страница 68: ...ell among the following four 50 100 150 200 Choose the temperature unit between Celsius or Fahrenheit Sets the reference measurement system between Metric or English Choose the salinity unit between g l or ppm 4 5 3 Chlorine probe calibration menu The Menu Calibration of chlorine probe allows you to perform the calibration of the chlorine probe if the Aqua Salt EVO model provides for their presenc...

Страница 69: ...475 mV and the value read by the probe will be shown 4 The procedure ends visualizing the quality of the probe with a percentage from 0 to 100 If quality is below 25 we recommend to replace the probe 5 Place the probe in the probe holder or in the filtration system Press Enter to scroll the menu sections Press and hold Enter for about 1 second to go back to the Redox Calibration section of the Ins...

Страница 70: ...n 4 01 and the value read by the probe in mV will be shown 8 The procedure ends visualizing the quality of the probe with a percentage from 0 to 100 If quality is below 25 we recommend to replace the probe 9 Place the probe back in the probe holder or on the piping of the filtration system Press Enter to move through the calibration steps Press and hold Enter for about 1 second to go back to the p...

Страница 71: ...isualize and change the value set for the salinity set point choosing between 0 0 5 0 g l or 0 5000 ppm Visualize and change the value set for the polarisation period from 1 to 16 hours To learn what Polarisation is see par 2 2 4 5 7 Alarms Menu The Alarms Menu allows to enable or disable the alarms Read more about the Alarms menu sections at section 5 Press and hold Enter for 1 second to go back ...

Страница 72: ... Alarm flashing on the display The ice alarm is reset when the alarm is disabled from the Alarms Menu It is automatically reset when the probe reads a temperature above 2 5 C The Low temperature alarm is reset when the values read are above 5 C 5 2 Flow Pressure alarm The flow pressure alarm which cannot be disabled goes off whenever the generator is operating but water flow pressure is absent The...

Страница 73: ...stem When water temperature is below 15 winter mode automatically activates It can be manually activated by the user as well In this operating mode dosing values are reduced by 15 of the standard While public pools must be emptied at least once a year by law private pools do not need to be emptied that often which saves water and money In this case filtration system must be kept active to preserve...

Страница 74: ...odes with a tubular key 8 mm Don t loose the three o ring you find inside 7 Remove titanium plates Don t loose electrodes locking baffler 8 In a bowl put 9 parts of water and add 1 part of hydrochloric acid so that fully dip titanium plates in solution Avoid to get in contact brass electrodes with acid solution prepared 9 After cleaning insert plates in the cell slots Go on from right to left acco...

Страница 75: ...onsible for other costs damages and direct or indirect losses provoked by the use of or the impossibility to use both totally or partially the chlorine generator Repairs or spare parts will not extend nor renew the warranty period The user will personally meet the costs arising from the assembly or disassembly of the devices as well as transport and consumables costs plates sensors etc The above m...

Страница 76: ...K VITON 3 18 ADSP6002208 PIN HOLDER AQUA SALT EVO AISI 316 M3 MALE PIN 2 19 ADSP6002209 PIN HOLDER AQUA SALT EVO AISI 316 M3 MALE PIN 1 20 ADSP6001042 AQUA SALT EVO PROTECTIVE CAP FEMALE PLATE TITANIUM 3 21 PTEPL050106F TITANIUM PLATE HOLDER RANGE ELECTRODE L 50 AQUA SALT EVO 3 PTEPL100107F TITANIUM PLATE HOLDER RANGE ELECTRODE L 100 AQUA SALT EVO 3 PTEPL150108F TITANIUM PLATE HOLDER RANGE ELECTRO...

Страница 77: ...ine pH Redo x Chlor time left clock phase phase time left polarization time VOut IOut estimated chlorine generator operation temperature instant salinity estimated Average salinity estimated Flow Pressure Cell check cell replacement Password Installer Menu User Menu Last modification Pool settings System settings Chlorine Redox calibration pH Calibration Programming Alarms Comunication ...

Страница 78: ...019 78 96 78 Pool Settings Menu System Settings Menu Chlorine Probe Calibration Menu Pool capacity Generator operation Cover filter Restore Parameters Language Set password Date Time Cell Type temperature unit System unit Salinity unit Dip the probe in the water Waiting Chlorine mA read chlorine Set chlorine ...

Страница 79: ...Probe Calibration Menu pH Probe Calibration Menu Programming Menu Dip the probe in the water Waiting Rx 475 mV Probe Quality Dip the probe in the water Waiting pH 7 00 Rinse the probe Waiting pH 4 01 Probe Quality Chlorine base Chlorine WM chlorine set point Rx set point pH set point pH work mode Salinity set point Polarisation ...

Страница 80: ...dard one to be restored if the pool is frequently used or if the new values recorded are different Avoid water with unknown chemical qualities like water from fire fighting systems rivers ponds wells or spring water These kinds of water may contain impurities that will make the initial treatment and ordinary maintenance difficult and very onerous To ensure a longer useful life to the cell avoid ex...

Страница 81: ...eatment system This is necessary to maintain a good level of health and comfort which in turn are indispensable for a pleasant and correct use of the pool Pool water treatments ensure the chemical physical and microbiological balance of the water In a properly built pool recirculation and filtration systems clean the water but they are not enough to avoid algae and bacteria proliferation To improv...

Страница 82: ...y clicking on the icon that will appear on the desktop at the end of installation Click on the icon on the icon bar to activate the serial connection with the PC Insert the default password 0000 and confirm the connection request Click on the Configurations Serial port modbus and set the required fields The default values are usually correct You can also connect the device to the PC through the Bl...

Страница 83: ...he Download Upload menu includes the following sections download to download within the remote management software the configuration of the device upload to upload the configuration of the software installed on the PC to the device 8 4 ICONS Icons allow to quickly perform some operations of the menus see menus described above or of the tabs see tabs described below The last four icons provide info...

Страница 84: ...s over In case the error window should appear Check the correct connections of the cables and make sure that the serial cable is a crossed one In case the error window non chlorine generating device appears check that the device connected is a chlorine generator and that firmware and software are compatible Clicking on one the user settings timer alarms password saturation index and graphs icons y...

Страница 85: ... pH Indicates the pH value read by the probe if supported Too much salt Indicates the state of the Too Much Salt alarm Chlorine set Indicates and sets the chlorine percentage to be generated Corresponds to the ratio between ON time and cycle time in case other compensations such as temperature or UV are not involved pH set point Indicates the pH Set Point value Ice Indicates the state of the alarm...

Страница 86: ...ogrammes and sets all the functionalities of the chlorine generator Pool Chlorine Rx Generator work mode proportional States phases duration Pool type Indicates or sets the pool type pool or SPA Ppm max ppm Indicates or sets the maximum Chlorine value depending on the type of chlorine probe you are using Boost hours Indicates or sets the duration of the Boost state Pool Capacity cu m gal Indicates...

Страница 87: ...s two kinds of timers recirculation timers manage ignition and shut down of the recirculation pump internal timers programme the ignition and shut down of the chlorine generator if set on Internal timers mode Recirculation timer Timer Enabling Indicates or sets the global enabling state of the 12 recirculation timers On Off 1 4 Identification number of the Internal timer Type Indicates or sets the...

Страница 88: ... Index SI calculation pH Indicates or sets the pH value to be used to calculate the Saturation Index SI This value can be automatically acquired by the pH probe if supported Total Alkalinity TAC ppm Sets the total alkalinity value of the pool water to be used to calculate the saturation index SI Calcium hardness TH ppm Sets the calcium hardness value of the pool water to be used to calculate the s...

Страница 89: ...me purpose LIMITATIONS OF LIABILITY The defect is not attributable to Aqua if the Technical staff found that as cause intervened conditions external to the operation of the product Also excluded from the guarantee the work carried out for the replacement of parts subject to wear and or removable unless their break and or their failure is not due to defects in origin Still they are excluded from th...

Страница 90: ...ntee work regarding the installation and connection to the power supply as well as the necessary maintenance Situations where lack of compliance as reported and recommended in the operating manual including the incorrect maintenance of the product and the use or non compliance with the provisions of the plant in the instruction manual of the product The instruction manual is an integral part of th...

Страница 91: ...ev 2 0 23 04 2019 91 96 91 Label 10 Maintenance regestry Registro interventi di verifica e manutenzione Registry of the verification and maintenance Number DESCRIPTION OF THE ACTIVITIES OF VERIFICATION AND MAINTENANCE MAINTENANCE DATE HOURS WORKED NEXT MAINTENANCE DATE NOTE SIGNATURE 1 2 3 4 5 6 ...

Страница 92: ...AQUA SALT EVO ADSP7000753 rev 2 0 23 04 2019 92 96 92 11 Pressure switch assembly ...

Страница 93: ...AQUA SALT EVO ADSP7000753 rev 2 0 23 04 2019 93 96 93 12 Connections with other versions ...

Страница 94: ...AQUA SALT EVO ADSP7000753 rev 2 0 23 04 2019 94 96 94 13 Download software ...

Отзывы: