background image

6

GB

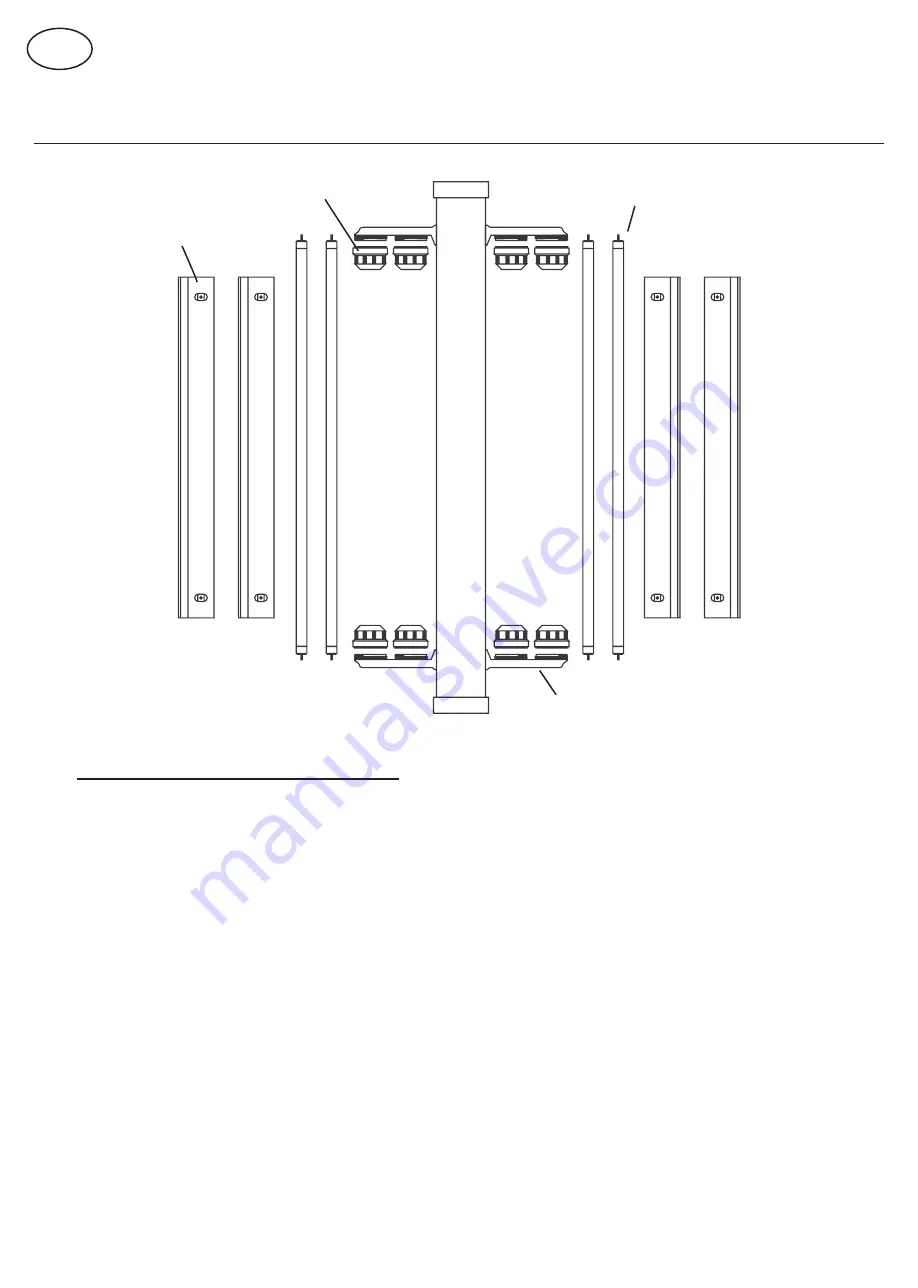
Know Your Light Unit

Reflector

Screw Cap

T5 Fluro Tube

Lamp holder end cap

Changing Light tubes

1. Turn power off and remove the light unit from the

aquarium.

2. Remove the stainless steal reflectors from the light 

tubes. They clip onto the light tube.

CAUTION: the reflectors may have sharp edges.

3.  Loosen  off  the  screw  caps  from  each  end  of  the 

tube.

4. Gently twist the tube either clockwise or anti clockwise 

and slide it out from the tomb stone to remove.

5. Take screw caps off old tubes and place them onto 

the new ones.

6. Reassemble the light unit in reverse order.

CAUTION: be gentle when reattaching the reflectors to 

the light tubes.

7.  Prior  to  reinstalling  the  light  unit  on  the  aquarium, 

plug it in and turn it on to ensure it is working correctly.

If you are not confident in performing this task, contact

a qualified electrician or take the light unit to you Aqua

One retailer for assistance. 

Содержание AquaReef 300

Страница 1: ...Inspiring Excellence in Fish Keeping AquaReef 300 400 www aquaone com au Instruction version 28 03 2011 ...

Страница 2: ...pannage Spécifications Garantie Belangrijke voorzorgsmaatregelen Vóór eerste gebruik Voorbereiding Over uw verlichtingseenheid Verlichtingsbuizen vervangen Installatie instructies Onderhoud Problemen oplossen Specificaties Garantie Important Safeguards Before First Use Preparation Kow Your Light Changing Light Tubes Set Up Instructions Maintenance Trouble Shooting Specifications Guarantee Page 4 5...

Страница 3: ... luminosi Istruzioni di montaggio Manutenzione Ricerca dei Guasti Specifiche Garanzia 重要保障措施 首次使用 准备 灯箱 灯管更换 安装说明 维修 辨别故障 参数 保修 本文件中的资讯如有变更 恕不另行通知 Medidas de precaución Antes de su uso Preparación Conozca su unidad de luz Cambio de los tubos de luces Instrucciones de montaje Mantenimiento Solución de problemas Especificaciones Garantía Página 36 37 38 39 40 41 42 42 43 Pagina 52 53 54 55 56 57 58 ...

Страница 4: ... wet do not unplug the appliance Disconnect the fuse or circuit breaker that supplies the power to the appliance then unplug and examine for presence of water in the socket 5 Always unplug the appliance from the electrical outlet when not in use before putting on or taking off parts before any type of maintenance or cleaning 6 Never yank the cable to pull it from the socket Pull the plug carefully...

Страница 5: ...g material until all the parts of the product have been found and the product has been assembled This product is shipped to you in a factory sealed carton Should the product malfunction in any way or if the unit is damaged and requires replacement contact the retailer where the product was purchased for inspection Replacement Parts Filter Media Use Aqua One Genuine Spare Parts Only See your local ...

Страница 6: ...tube 4 Gently twist the tube either clockwise or anti clockwise and slide it out from the tomb stone to remove 5 Take screw caps off old tubes and place them onto the new ones 6 Reassemble the light unit in reverse order CAUTION be gentle when reattaching the reflectors to the light tubes 7 Prior to reinstalling the light unit on the aquarium plug it in and turn it on to ensure it is working corre...

Страница 7: ...onents Place the cabinet in position and carefully place the aquarium on the cabinet Ensure the aquarium is centered on the cabinet 2 3 4 1 T5 Light unit 2 Aquarium 3 Cabinet 4 Sump filter The protein skimmer mounts externally on the left hand side of the sump Refer to the protein skimmer instructions for installation Two glass lids are provided Set Up Instructions 1 ...

Страница 8: ...ible outlet 5 to the return pipe The threaded section should pass through a hole in the overflow grill 6 Ensure the hole in the top of the drain pipe remains free this will minimise noise caused as water exits the aquarium 7 Follow the instructions provided with the return pump to install into the sump Place the pump in the position noted on page 5 and use the elbow intake as described in the inst...

Страница 9: ...xed natural salt water The fish and corals do not need to be removed while performing a water change 1 Wash your hands 2 Mix up your salt water according to the directions on the packaging of the salt mix Or have your premixed natural salt water ready 3 Check the pH temperature and specific gravity of both the aquarium water and the new water Make any adjustments that need to be made to the new wa...

Страница 10: ...city office your household waste disposal service or the shop where you have purchased the product Trouble Shooting BUBBLES ARE COMING OUT THE OUTLET INTO THE AQUARIUM 1 The water level in the sump is too low Check specific gravity after topping up to the correct level 2 The elbow has become loose or come off the pump inlet WATER FLOW INTO THE AQUARIUM HAS DROPPED 1 Pump needs to be cleaned Refer ...

Страница 11: ...ated on the rating plate j modification or tampering to electrical cord or plug k vermin insects or foreign object l liquid spillage or submersion of goods not designed to sustain such use or duress 3 3 Where inspections reveal goods are in normal working order including where noise or vibration is consistent with normal goods operation 3 4 Attempted repairs or modifications by unauthorised person...

Страница 12: ... wird bevor Sie neue Komponenten installieren oder abbauen und bevor Sie mit der Wartung bzw Reinigung beginnen 6 Ziehen Sie niemals am Kabel um den Stecker aus der Steckdose zu entfernen Greifen Sie den Stecker sorgfältig um ihn aus der Steckdose zu ziehen 7 Zweckentfremden Sie das Gerät niemals Die Benutzung von Zusatzgeräten die nicht vom Hersteller vertrieben oder empfohlen sind können die Sic...

Страница 13: ...cht alle Zubehörteile gefunden haben und das Produkt vollständig aufgebaut ist Sie erhalten dieses Produkt originalverpackt und im vom Hersteller versiegelten Karton Sollte das Produkt beschädigt sein oder nicht richtig funktionieren so setzen Sie sich bitte mit dem Händler in Verbindung bei dem Sie es erworben haben ERSATZTEILE UND FILTERMEDIEN BittebenutzenSieausschließlichOriginalersatzteile de...

Страница 14: ...e 4 Drehen Sie die Röhre vorsichtig entweder mit oder gegen den Uhrzeigersinn und ziehen Sie sie auch der Einspannvorrichtung 5 Nehmen Sie die Schraubabdeckungen von den alten Röhren und schieben Sie sie auf die neuen 6 Bauen Sie die Beleuchtung in umgekehrter Reihenfolge wieder zusammen ACHTUNG SeienSievorsichtigbeimWiederanklemmen der Reflektoren an die Leuchtröhren 7 Überprüfen Sie ob die Beleu...

Страница 15: ...g darauf Vergewissern Sie sich dass das Becken zentriert auf dem Unterschrank steht Wie unten zu sehen verfügt die Glasstütze 1 T5 Beleuchtung 2 Aquarium 3 Unterschrank 4 Sammelbeckenfilter im Aquarium über zwei vertikale Befestigungspunkte Sie dienen zurAufnahme der Beleuchtung Nähere Informationen zur Installation der Beleuchtung finden Sie in der Anleitung zu Aufbau und Bedienung der Beleuchtun...

Страница 16: ...ng angebracht werden kann 5 Befestigen Sie den flexiblen Auslauf 5 am Rücklaufrohr Das Gewindestück sollte durch eine Öffnung im Überlaufgitter führen 6 Achten Sie darauf dass die Öffnung auf der Oberseite des Lufteinlasses freibleibt Geräuschbildung wird dadurch minimiert 7 Eine Anleitung zur Installation der Rücklaufpumpe im Filtersumpf finden Sie in den dem Gerät beigefügten Anweisungen Platzie...

Страница 17: ...s Salz oder fertiges Salzwassergemisch natürliches Meerwasser Für den Wasserwechsel ist es nicht nötig Fische und Korallen aus dem Becken zu entfernen 1 Waschen Sie ihre Hände gründlich 2 Bereiten Sie das Salzwasser laut Anweisung auf der Salzverpackung vor Halten Sie alternativ ihr fertiges Salzwassergemisch natürliches Meerwasser bereit 3 Testen Sie den pH Wert die Temperatur und die Dichte sowo...

Страница 18: ...ss ist blockiert Entfernen und reinigen Sie den flexiblen Auslass DAS ABLAUFROHR MACHT EIN GURGELNDES GERÄUSCH 1 Der Lufteinlass könnte blockiert sein Nehmen Sie ihn heraus und spülen Sie ihn gründlich mit Leitungswasser aus Salzablagerungen könnten der Grund für die Blockierung sein 2 Das Ablaufrohr ist verstopft Nehmen Sie den Lufteinlass heraus und überprüfen Sie das Rohr auf Verstopfungen Ents...

Страница 19: ...schild angegeben ist j Veränderungen oder Anpassungen des Kabels oder des Steckers k Ungeziefer Insekten or Fremdkörper l Kontakt mit Flüssigkeiten wo das Produkt nicht dazu bestimmt ist 3 3 Produkte die nach Inspektion keinen Fehler aufweisen und wo Betriebsgeräusche oder Vibrationen einhergehend sind mit normalen Betriebsbedingungen 3 4 Reparaturversuche oder Veränderungen durch nicht autorisier...

Страница 20: ...brancher le fusible ou le coupe circuit qui assure l alimentation de l appareil puis débranchez l appareil et vérifiez si de l eau a pénétré dans la prise 5 Débranchez toujours l appareil de la prise électrique lorsqu il ne sert pas avant de monter ou d enlever des pièces et avant tout entretien ou nettoyage 6 Ne tirez jamais sur le câble pour le débrancher Débranchez le en tenant la prise 7 N uti...

Страница 21: ... du service de garantie Déballez avec soin l aquarium en vous assurant de ne pas jeter l emballage avant d avoir trouvé toutes les parties du produit et d avoir assemblé le produit Ce produit vous est livré dans un carton fermé en usine Si le produit présente un dysfonctionnement quelconque ou si l unité est endommagée et doit être remplacée contactez le revendeur chez qui le produit a été acheté ...

Страница 22: ...émité du tube 4 Tournez doucement le tube dans le sens horaire ou antihoraire et glissez le hors de la douille support pour le retirer 5 Retirez les bouchons à vis des anciens tubes et placez les sur les nouveaux 6 Réassemblez l unité lumineuse dans l ordre inverse ATTENTION rattachez en douceur les réflecteurs aux tubes lumineux 7 Avant de réinstaller l unité lumineuse sur l aquarium branchez la ...

Страница 23: ... Vérifiez que l aquarium est centré sur l armoire L entretoiseenverredansl aquariumcomprend 2 points de montage en verre verticaux tels que représentés ci dessous L unité d éclairage 1 Unité d éclairage T5 2 Aquarium 3 Armoire 4 Filtre de vidange doit y être montée Consultez les instructions fournies avec l unité d éclairage pour son installation Des couvercles en verre sont prévus pour reposer en...

Страница 24: ...ez la sortie flexible 5 au tuyau de retour La section filetée doit passer au travers d un trou dans la grille de trop plein 6 Vérifiezqueletrouenhautdutuyaud évacuation reste libre Ceci minimisera le bruit causé lorsque de l eau sort de l aquarium 7 Suivez les instructions fournies avec la pompe de retour pour l installer dans le puisard Placez la pompe à la position notée à la page 5 et utilisez ...

Страница 25: ...rez besoin un seau un nettoyeur de gravier une serviette un racloir à algues un conditionneur d eau et soit un sel synthétique soit de l eau salée naturelle Il n est pas nécessaire de retirer les poissons et le corail pendant le remplacement de l eau 1 Lavez vous les mains 2 Mélangez l eau salée selon les instructions de l emballage Ou préparez votre eau prémélangée salée naturelle 3 Vérifiez le p...

Страница 26: ...ic equipment By separating and recycling your waste equipment at the time of disposal you will help to conserve natural resources and ensure that the equipment is recycled in a manner that protects human health and the environment For more information about recycling this product please contact your local city office your household waste disposal service or the shop where you have purchased the pr...

Страница 27: ...que j une modification du cordon électrique ou de la prise k des animaux indésirables des insectes ou un objet étranger l un renversement de liquide ou une immersion de produits non conçus pour résister à une telle utilisation 3 3 lorsque les inspections révèlent que les produits sont en état de fonctionnement normal et que le bruit ou les vibrations sont conformes au fonctionnement normal des pro...

Страница 28: ... stroomonderbreker die het apparaat van stroom voorziet haal vervolgens de stekker uit het stopcontact en controleer of er water in het stopcontact aanwezig is 5 Haal altijd de stekker van het apparaat uit het stopcontact als het apparaat niet in gebruik is voordat u onderdelen verwijdert of monteert en voordat u onderhoud uitvoert of het apparaat schoonmaakt 6 Trek nooit aan het snoer om de stekk...

Страница 29: ...onden en het product is gemonteerd Dit product werd aan u geleverd in een in de fabriek dichtgemaakte doos Indien het product in welk opzicht dan ook niet goed functioneert of indien de eenheid beschadigd is en vervangen moet worden neemt u contact op met de winkel waar u het product heeft aangeschaft voor nadere inspectie Vervangende onderdelen en filtermedia Gebruik uitsluitend de reserveonderde...

Страница 30: ...ng of tegen de richting van de klok in en schuif ze weg van het eindkapje om ze te verwijderen 5 Haal de schroefdopjes van de oude buizen af en zet ze op de nieuwe buizen 6 Zet de verlichtingseenheid in omgekeerde volgorde weer in elkaar LET OP ga voorzichtig te werk bij het terugplaatsen van de reflectoren op de verlichtingsbuizen 7 Voordat u de verlichtingseenheid weer op het aquarium plaatst mo...

Страница 31: ...t kastje staat De glazen versteviging aan de binnenzijde van het aquarium beschikt over twee verticale glazen montagepunten zoals in 1 T5 Verlichtingseenheid 2 Aquarium 3 Kastje 4 Sumpfilter de onderstaande afbeelding Dit is waar de verlichtingseenheid moet worden bevestigd Lees de instructies bij de verlichtingseenheid voor informatie over installatie van de verlichtingseenheid Er zijn glazen kle...

Страница 32: ...e retourpijp Het gedeelte met de schroefdraad moet door een opening in het overlooprooster worden gedaan 6 Zorg ervoor dat de opening bovenin de afvoerpijp open blijft dit beperkt de herrie die bij het verlaten van het aquarium door het water wordt veroorzaakt 7 Volg de instructies bij de retourpomp op voor installatie in de sump Plaats de pomp in de juiste positie volgens de aanwijzingen op pagin...

Страница 33: ...terconditioner en òf synthetisch zout òf voorgemengd natuurlijk zout water De vissen en koralen hoeven tijdens het vervangen van water niet verwijderd te worden 1 Was uw handen 2 Meng het zoute water volgens de aanwijzingen op de verpakking van de zoutmix Of heb uw voorgemengde natuurlijk zoute water gereed 3 Controleer de pH temperatuur en specifieke zwaartekracht van zowel het water in uw aquari...

Страница 34: ...JP MAAKT EEN GORGELEND GELUID 1 De luchtinlaat kan verstopt zijn Verwijder de luchtinlaat en spoel deze schoon in nieuw water de opbouw van zout kan een kleine verstopping veroorzaken 2 De afvoerpijp is verstopt Verwijder de luchtinlaat en controleer de pijp op verstoppingen Afvoer van gebruikte elektrische en elektronische apparatuur van toepassing op landen van de Europese Unie en op andere Euro...

Страница 35: ...ngedierte insecten of vreemde objecten l morsen van vloeistof of onderdompeling van goederen die een dergelijk gebruik of behandeling niet kunnen weerstaan 3 3 Gevallen waarbij inspecties uitwijzen dat goederen normaal werken inclusief gevallen waarbij geluidsoverlast of vibraties overeenstemmen met de normale werking van de goederen 3 4 Pogingen tot reparatie of aanpassing door niet erkende perso...

Страница 36: ... luego desconecte y compruebe si el receptáculo tiene agua 4 Es necesaria una supervisión exhaustiva si el aparato se usa cerca de niños 5 Desconecte siempre el calentador del enchufe cuando no esté usándolo antes de poner o quitar partes antes de cualquier tipo de mantenimiento o limpieza No tire del cable ni lo arranque tome el enchufe y desconéctelo 6 No utilice el calentador para fines diferen...

Страница 37: ... del producto y lo haya montado Este producto ha sido enviado en una caja de cartón cerrada Si el producto está dañado roto o defectuoso contacte con su distribuidor para que el producto pueda ser inspeccionado Aquareef 300 400 Partes para la instalación Entrada 1 Esponja 2 Separador de proteínas 3 Bandeja de goteo 4 Biobolas 5 Bomba de retorno 6 Partes de repuesto Medios de filtración Utilice par...

Страница 38: ...e suavemente el tubo en el sentido de las manecillas del reloj o el sentido contrario y deslícelo hacia fuera de los soportes para quitarlo 5 Tome las tapas enroscables de los tubos anteriores y colóquelas a los nuevos 6 Monte la unidad de luz en el orden inverso PRECAUCIÓN sea cuidadoso al colocar los reflectores en los tubos de luz 7 Antes de volver a colocar la unidad de luz en el acuario enchú...

Страница 39: ... de que el acuario esté centrado Las abrazaderas de vidrio dentro del acuario tienen dos puntos de montaje de vidrio verticales tal como se ilustra a continuación 1 Unidad de luz T5 2 Acuario 3 Gabinete 4 Filtro de desborde Allí debe montarse la unidad de iluminación Consulte las instrucciones provistas con la unidad de iluminación respecto a la instalación de la unidad de luz Las tapas de vidrio ...

Страница 40: ...orno La sección roscada debería pasar a través de un agujero en la parrilla de desborde 6 Asegúrese de que el agujero de la parte superior del tubo de drenaje no esté obstruido para minimizar el ruido causado por el agua al salir del acuario 7 Siga las instrucciones suministradas con la bomba de retorno para instalarla en el desborde Coloque la bomba en la posición ilustrada en la página 5 y utili...

Страница 41: ... raspador para algas un acondicionador de agua y sal sintética o agua salada premezclada natural No necesita quitar los peces ni los corales mientras realiza el cambio de agua 1 Lávese las manos 2 Mezcle el agua salada siguiendo las instrucciones del paquete de la mezcla de sal O tenga el agua salada premezclada natural preparada 3 Controle el pH la temperatura y el peso específico tanto del agua ...

Страница 42: ...E UN GORGOTEO 1 Es posible que la entrada de aire esté bloqueada Quítela y enjuáguela en agua dulce la sal puede crear una pequeña obstrucción 2 Hay un bloqueo en el tubo de drenaje Quite la entrada de aire y controle que el tubo no esté bloqueado Eliminación de Equipos Eléctricos y Electrónicos usados aplicable en la Unión Europea y otros países europeos con sistemas de recolección por separado E...

Страница 43: ...ado en la etiqueta de características técnicas j modificación o manipulación del cable o enchufe eléctricos k bichos insectos u objetos extraños l derrame de líquido o inmersión de productos cuando los productos no están diseñados para dicho uso o presión 3 3 Cuando las inspecciones revelan que los productos están funcionando normalmente incluyendo el ruido o vibración asociados al funcionamiento ...

Страница 44: ...ente Desligue o quadro eléctrico e depois desligue o da corrente e verifique se existe água na tomada 5 Desligue sempre o equipamento da corrente quando não estiver a utilizá lo antes de colocar ou retirar qualquer peça antes de qualquer tipo manutenção ou limpeza 6 Nunca puxe pelo cabo para o desligar da tomada Puxe a ficha cuidadosamente para o desligar 7 Não use o equipamento para fins diversos...

Страница 45: ... produto sejam encontradas e o produto esteja montado Este produto é lhe enviado em cartão selado na fábrica No caso do produto se encontrar danificado partido ou com problemas de funcionamento de qualquer natureza deve contactar o responsável pela venda onde o produto foi adquirido para inspecção Partes de Repuesto Medios de Filtración Utilice las partes de repuesto deAqua One Genuine únicamente ...

Страница 46: ...das 3 Solte as roscas das extremidades das lâmpadas 4 Gire gentilmente a lâmpadas nas duas direcções e faça deslizar do suporte 5 Retire as roscas das lâmpadas antigas e coloque as nas lâmpadas novas 6 Volte a montar a unidade luminosa CUIDADO seja cuidadoso quando voltar a colocar os reflectores 7 Antes de voltar a colocar a unidade luminosa no aquário ligue a à corrente para verificar se está a ...

Страница 47: ... aquário está centrado no móvel A abraçadeira de vidro no interior do aquário tem dois pontos de fixação verticais no vidro conforme ilustrado abaixo É aqui que deve ser 1 Unidade de Iluminação T5 2 Aquário 3 Móvel 4 Filtro do colector montada a unidade de iluminação Consulte as instruções fornecidas com a unidade de iluminação relativamente à instalação da unidade de iluminação São fornecidas tam...

Страница 48: ...o cilindrica 5 Acople a saída flexível 5 ao tubo de retenção A secção roscada deve passar por um orifício que se encontra na grelha de transbordo 6 Certifique se de que o orifício no topo do tubo de drenagem fica livre assim minimizará o ruído causado à medida que a água sai do aquário 7 Siga as instruções fornecidas com a bomba de retenção para instalar no colector Coloque a bomba na posição indi...

Страница 49: ...dras areia toalha raspador de algas produto de tratamento para a água condicionador e sal sintético ou água salgada já misturada natural Ospeixesecoraisnãoprecisam de ser retirados enquanto muda a água 1 Lave as mãos 2 Misture a água salgada de acordo com as indicações da embalagem da mistura de sal Ou tenha preparada a água salgada já misturada natural 3 Verifique o pH a temperatura e a gravidade...

Страница 50: ...está obstruído Retire o escoadouro flexível e limpe o O TUBO DE DRENAGEM ESTÁ A FAZER UM RUÍDO GORGOLEJANTE 1 Aentradadearpodeestarobstruída Retire a e passe a por água limpa a acumulação de sal pode causar uma pequena obstrução 2 Há uma obstrução no tubo de drenagem Retire a entrada de ar e verifique se existe obstrução no tubo Tratamento de resíduos de equipamentos eléctricos e electrónicos apli...

Страница 51: ...ção ou adulteração do cabo de alimentação ou da ficha k bichos insectos ou objectos estranhos l derrame de líquidos ou submersão das mercadorias não adequadas a esse tipo de utilização ou coacção 3 3 Sempre que as inspecções revelem que as mercadorias se encontram num estado de funcionamento normal incluindo quando o ruído ou a vibração forem consistentes com o funcionamento normal das mercadorias...

Страница 52: ...ssero bagnare non scollegate il dispositivo Scollegare il fusibile o disattivare l interruttore generale che fornisce corrente al dispositivo estrarre la spina e verificare che non vi sia acqua nella presa elettrica 5 Scollegare sempre il dispositivo dalla presa di corrente quando non lo si utilizza prima di inserire o estrarre componenti e prima di qualunque tipo di manutenzione o pulizia 6 Non t...

Страница 53: ... del prodotto ed averlo montato Questo Prodotto vi viene inviato in un cartone sigillato dalla fabbrica Qualora il Prodotto fosse danneggiato fosse caduto o in qualche modo non funzionante contattare il venditore presso il quale tale prodotto è stato acquistato per un controllo Aquareef 300 400 Elenco dei Componenti Ingresso 1 Spugna 2 Schiumatoio per Proteine 3 Vaschetta di Gocciolamento 4 Bio Ba...

Страница 54: ...elicatamente il tubo sia in senso orario che antiorario ed estrarlo facendolo scorrere fuori dallo zoccolo portalampada 5 Togliere i tappi a vite dai vecchi tubi e posizionarli su quelli nuovi 6 Rimontare l unità luce seguendo l ordine inverso ATTENZIONE ricollegare con delicatezza i riflettori ai tubi luminosi 7 Prima di reinstallare l unità luce sull acquario collegare quest ultimo alla corrente...

Страница 55: ...he l acquario sia centrato sull armadio Il braccio di rinforzo in vetro all interno dell acquario ha 2 punti di montaggio verticali in vetro come mostrato in basso Questi si trovano dove deve essere montata l unità luce 1 Unità Luce T5 2 Acquario 3 Armadio 4 Filtro Sump Far riferimento alle istruzioni sull installazione dell unità luce fornite con l unità stessa I coperchi in vetro a corredo debbo...

Страница 56: ...scita flessibile 5 al tubo di ritorno La sezione filettata dovrebbe passare attraverso un foro nella griglia di traboccamento 6 Assicurarsi che il foro in cima al tubo di drenaggio rimanga libero ciò minimizzerà il rumore causato dalla fuoriuscita dell acqua dall acquario 7 Seguire le istruzioni fornite con la pompa di ritorno per l installazione nella pompa di drenaggio Mettere la pompa nella pos...

Страница 57: ...rve Un secchiello un pulitore per ghiaia un asciugamano un raschietto per alghe un sistema di trattamento dell acqua e sale sintetico o acqua salata premiscelata naturale I pesci ed i coralli non debbono essere tolti durante il cambio dell acqua 1 Lavatevi le mani 2 Miscelate l acqua salata secondo le istruzioni apposte sull imballo della miscela di sale Oppure preparate la vostra acqua salata pre...

Страница 58: ...La presa d aria potrebbe essere bloccata Toglierla e pulirla in acqua dolce i depositi di sale possono provocare un piccolo blocco 2 C è un blocco nel tubo di drenaggio Togliere la presa d aria e controllare che il tubo non sia bloccato Smaltimento di Apparecchiature Elettriche ed Elettroniche usate Applicabile in tutta l Unione europea e negli altri Paesi con sistemi di raccolta differenziata Ils...

Страница 59: ... non designati a tale uso o forzatura 3 3 Nel caso in cui i controlli evidenzino che i prodotti funzionano regolarmente incluso il caso in cui il rumore o la vibrazione prodotta sono conformi al normale funzionamento dei prodotti 3 4 Tentativi di riparazioni o modifiche effettuate da persone non autorizzate incluso ma non limitato a il caso in cui il vetro dell acquario sia stato forato da parte d...

Страница 60: ...水 对插头附近的电线做好防水保护 为防止溢水和漏水触电事故 请避免使用多条配电线路和加长加线 请加强防范 不要让孩子摆弄 在没有正常成年人培同下儿童或体弱者不能触摸及使用 请不要在可燃性物体 汽油 稀释剂等 附近使用 请不要把电源线拉直使用 要留一个 U形 见图表 作用防止漏电 防止水从电源线流入电源插座里 如有故障不要试图自行修理 交给授权服务中心维修 注意 购买后请尽早确认产品是否有破损或零件缺漏的情况 运行前请再次确认连接是否正确 运行后请持续观察一段时间 看是否有运转不正常 本产品只限室内观赏鱼水槽使用 请不要用作其他用途 請安装在机身能保持平衡的地方 请勿将机身横放 把物品放在上面或者套上东西 电线和线圈已做防水保护 损坏无法修理或替换 请小心使用 请使用本产品指定的替换配件 耗材各部分 定期清洁及替换耗材各部分 可以减少故障和延长马达寿命 请您保留您的购买收据 保证书等文件 如...

Страница 61: ...厂Aqua One备件 只要到Aqua One售 卖店说出所要的备件号码 号码在下面列出 或者你 会发现这些号码己印在产品参数的标签上 300 400 15ppi 蓝棉 414S 414S 首次使用 准备 部件 请您保留您的购买收据 保证书等文件 如果产品 发生 故障 联系零售商或指定的维修站进行检查 阅读并遵守所有指示 即使你觉得你很熟悉产品 Aquareef 300 400 部件 进水 1 过滤棉 2 蛋白质分离器 3 水滴盘 4 生物球 5 水泵 6 1 3 2 4 5 6 ...

Страница 62: ...62 中文 灯箱 反射片 螺丝盖 灯管 灯脚 灯管更换 1 关闭电源 取出灯箱 2 拿走反射片 注意 反射片可能有锋利的边 3 扭开两边螺丝盖 4 取出灯管 5 灯管上两个螺丝盖取出 裝在新灯管里 6 新灯管装回灯箱 再装回反射片 7 放回缸顶 如果你没有信心更换 联系合格的电工或你的购买店提 供援助 ...

Страница 63: ...63 中文 1 T5灯组 2 水族馆 3 地櫃 4 滤箱 如下所示 水族館頂部內有2個垂直玻璃支撐 安裝點 安裝灯组 另配有玻璃盖面 安装说明 1 2 3 4 ...

Страница 64: ...2步骤装上回 水管 将回水管插入排水槽的小孔里 确保上面出水口面向前面的水族馆 4 弯型排水管 3 将弯型排水管接上排水管 2 然后拧紧 出水口对正过滤棉 5 活动出水咀 5 将活动出水咀从排水槽外 面插入然后拧紧 6 不要堵塞排水管顶部的洞 这将会减少噪 音 7 按照水泵说明韦的指示装好水泵 按第5页 指出的位置放置水泵 使用提供的软管及管夹 连接水泵与回水管 7 8 检查滤材的放置是否跟第5页上显示的相 同 出水口 3 对正过滤棉 9 将水注入水族馆直至水溢出至过滤箱 当 过滤箱的水填至最高工作水位标记时停止入 水 当水泵运行时水位要保持在最高及最低标 记之间 10 保温棒应放置在过滤箱里的左边 水保持 在最高水位 注意 每次拆下螺纹水管后必需从新加回水管 专用胶布在带有螺纹的部位才好装上 1 2 3 5 6 7 4 ...

Страница 65: ... 质 有些品种需要特定的水分条件 请向您的海洋 水族馆的专家意见 双周刊 25 的水变化 你将需要 一个水桶 砾石洁净 毛巾 刮 刀藻类 水空调 要么合成盐或预混 天然盐 水 鱼类和珊瑚并不需要删除在执行水的变 化 1 洗手 2 您的咸水混合根据对盐混合包装的方向 或者 您的预混 天然海水准备 3 检查pH值 温度 两水族馆的水 新水比 重 作出任何调整 需要作出新的水 您可能 需要购买热水器的第二个温暖的新的水 4 一旦水可以使用 删除光单位和玻璃盖和 把他们安全的地方 他们从不会被破坏或损坏 的水了 5 打开加热器和泵了 6 放置在前面的发言水族馆一条毛巾 以防 止水泄漏 7 使用藻类刮刀轻轻地消除任何藻类是在玻 璃上增长 8 使用碎石清洁 去除25 的水水族馆 记 下多少水被删除 并确保有足够的准备水取代 所有被删除 9 笔芯水族馆利用水准备约高于最低水位标 记经营10厘米 10 打...

Страница 66: ...ass Thickness 10mm Return Pump Flow Rate 3500L hr Light Wattage 4 x 54W T5 Power Requirements 220 240V Suitable Tropical Marine 辨别故障 泡沫出来进入水族插座 1 水池中的水位太低 检查比重后补 足到正确的水平 2 肘部已经松动或脱落泵的入口 水流入水族下降 1 泵需要清理 是指与泵维修提供指 导 2 出口受阻 删除和清洁灵活的出路 排水管正在为潺潺噪声 1 进气可能被阻止 删除并在淡水冲 洗 盐可以导致建立一个小型阻塞 2 有一个在排水管堵塞 删除 并检查 进气管道的堵塞 處置廢棄電氣和電子設備 適用於歐洲聯盟和其他歐洲國家的單獨收集系統 這個符號在產品或其包裝上表明 該產品 不能正常 處理家庭廢物 相反 它是您的責任您的 廢物處理 設備 安排返回到一個指定的收...

Страница 67: ...款 在遵守当地法律所准许的条件下 下面的除外和限制条款适用于本保证 3 1 购买鱼缸后 无论任何原因造成的玻璃裂口 3 2 要求索赔的货物出现故障是由于以下原因 但不仅限于 a 误用 b 忽视 c 滥用 d 火灾或洪水 e 正常磨损 f 意外断裂 g 不可抗力 h 电源电压波动或供 应问题 i 连接到安全使用标准 以外的电压 j 修改或篡改电线或插头 k 寄生虫 昆虫或异物 L 液体泄漏或物品浸没水中 如果该产品不是为维持这种使用而设计 3 3 如果检查发现该产品可正常工作 包括在正常作业条件下产生一定程度的噪音或振动 3 4 未经授权的人试图修理或修改 包括但不仅限于修改电源线或插头 3 5 当产品的安全标准评级板已被删除 更改 损坏或变得难以辨认 3 6 如果产品没有按照Aqua One产品说明书 产品规格或此质量保证书规定安装 运行或维护 3 7 替换或修理磨损 消耗品 或替换丢失产...

Страница 68: ...68 www aquaone com au Aqua One is a registered trademark ...

Отзывы: