7
- 27
3$57(&,&/2
&+$66,63$576
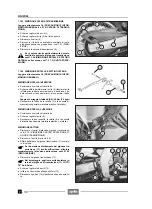
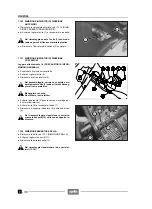
7.1.19 DESMONTAJE SOPORTE SALPICADERO
Lea con cuidado 1.4 (PRECAUCIONES E INFORMA-
CIONES GENERALES).
X
Quite el salpicadero, véase 7.1.16 (DESMONTAJE
SALPICADERO).
Durante el reensamblaje coloque los cables y
las abrazaderas en la misma posición.
X
Suelte los cables de todas las abrazaderas (siete).
Prepare el mismo número de abrazaderas
para sustituirlas a las originales durante el
reensamblaje.
X
Desconecte los seis conectores eléctricos (1).
X
Extraiga el relé luces largas (2) de su propio engan-
che.
X
Destornille y quite el tornillo (3) soltando el soporte (4)
de sostén conectores eléctricos.
X
Afloje y quite las dos tuercas (5) y extraiga los corres-
pondientes tornillos del lado opuesto.
X
Quite el soporte salpicadero (6).
7.1.20 DESMONTAJE INTERRUPTOR DE
ENCENDIDO/SEGURO DE DIRECCION
Lea con cuidado 1.4 (PRECAUCIONES E INFORMA-
CIONES GENERALES).
X
Quite el carenado delantero, véase 7.1.14 (DESMON-
TAJE CARENADO DELANTERO).
X
Suelte los cables de las dos abrazaderas (7-8).
Prepare el mismo número de abrazaderas
para sustituirlas a las originales durante el
reensamblaje.
X
Desconecte el conector eléctrico (9).
X
Destornille y quite el tornillo (10).
X
Golpee con un cincel la cabeza del tornillo especial
(11) y gírelo hasta aflojarlo.
X
Destornille manualmente y quite el tornillo (11).
Durante el reensamblaje utilice un tornillo del
mismo tipo, apretándolo hasta romper la ca-
beza.
X
Quite el interruptor de encendido/seguro de dirección
(12) soltándolo desde abajo y guarde el arco guíaca-
bles (13).
7.1.19 REMOVING THE DASHBOARD SUPPORT
Read 1.4 (PRECAUTIONS AND GENERAL INFORMA-
TION) carefully.
X
Remove the dashboard, see 7.1.16 (REMOVING THE
DASHBOARD).
Upon reassembly, put the wiring and the fas-
tening clamps in the same position.
X
Release the cables from all the fastening clamps (sev-
en).
Get other clamps to be used for the reassem-
bly.
X
Disconnect the six electric connectors (1).
X
Withdraw the high beam relay (2) from its coupling.
X
Unscrew and remove the screw (3), releasing the sup-
port (4) of the electric connectors.
X
Loosen and remove the two nuts (5) and withdraw the
corresponding screws from the opposite side.
X
Remove the dashboard support (6).
7.1.20 REMOVING THE IGNITION SWITCH/STEERING
LOCK
Read 1.4 (PRECAUTIONS AND GENERAL INFORMA-
TION) carefully.
X
Remove the front fairing, see 7.1.14 (REMOVING THE
FRONT FAIRING).
X
Release the wiring from the two fastening clamps (7-
8).
Get other clamps to be used for the reassem-
bly.
X
Disconnect the electric connector (9).
X
Unscrew and remove the screw (10).
X
By means of chisel, cut into the head of the special
screw (11) and turn it until it loosens.
X
Unscrew the screw (11) by hand and remove it.
For the reassembly, use another screw of the
same type, tightening it until the head comes
off.
X
Remove the ignition switch/steering lock (12) by with-
drawing it from below and take the cable guide arch
(13).
Содержание Pegaso 650
Страница 1: ......
Страница 3: ...0 4 NOTE NOTES ANMERKUNGEN ...
Страница 4: ...1 1 1 2 3 4 5 6 7 8 INFORMAZIONI GENERALI INFORMACIONES GENERALES GENERAL INFORMATION ...
Страница 42: ......
Страница 69: ...3 1 1 2 3 4 5 6 7 8 MOTORE MOTOR ENGINE ...
Страница 90: ...3 22 MOTORE NOTE NOTAS NOTES ...
Страница 91: ...4 1 1 2 3 4 5 SISTEMA DI ALIMENTAZIONE SISTEMA DE ALIMENTACIÓN FUEL SYSTEM ...
Страница 116: ...4 26 SISTEMA DI ALIMENTAZIONE NOTE NOTAS NOTES ...
Страница 117: ...5 1 1 2 3 4 5 6 7 8 IMPIANTO DI RAFFREDDAMENTO SISTEMA DE REFRIGERACIÓN COOLING SYSTEM ...
Страница 130: ...5 14 IMPIANTO DI RAFFREDDAMENTO SISTEMA DE REFRIGERACIÓN COOLING SYSTEM NOTE NOTAS NOTES ...
Страница 131: ...6 1 6 1 2 3 4 5 6 7 8 IMPIANTO ELETTRICO INSTALACIÓN ELÉCTRICA ELECTRICAL SYSTEM ...
Страница 176: ...IMPIANTO ELETTRICO INSTALACIÓN ELÉCTRICA ELECTRICAL SYSTEM 6 46 NOTE NOTAS NOTES ...
Страница 177: ...7 1 1 2 3 4 5 6 7 8 CICLISTICA PARTE CICLO CHASSIS PARTS ...
Страница 226: ... 67 3 57 2 66 6 3 576 7 50 5827 3267 5 25 58 75 6 5 5 5 ...
Страница 242: ... 67 3 57 2 66 6 3 576 7 66 5 12 17 5 25 5 12 17 52 5217 5 ...
Страница 246: ... 67 3 57 2 66 6 3 576 7 70 5 12 3267 5 25 5 12 75 6 52 5 5 5 ...
Страница 272: ... 67 3 57 2 66 6 3 576 7 96 NOTE NOTAS NOTES ...
Страница 273: ...8 1 1 2 3 4 5 6 7 8 INFORMAZIONI PER LE RIPARAZIONI INFORMACIONES PARA LAS REPARACIONES REPAIRS ...
Страница 301: ...INFORMAZIONI PER LE RIPARAZIONI INFORMACIONES PARA LAS REPARACIONES REPAIRS 8 29 E F E F G H G H ...
Страница 302: ...INFORMAZIONI PER LE RIPARAZIONI INFORMACIONES PARA LAS REPARACIONES REPAIRS 8 30 I L I M L N M N ...
Страница 303: ...INFORMAZIONI PER LE RIPARAZIONI INFORMACIONES PARA LAS REPARACIONES REPAIRS 8 31 O P Q P O R Q R ...
Страница 310: ...INFORMAZIONI PER LE RIPARAZIONI INFORMACIONES PARA LAS REPARACIONES REPAIRS 8 38 NOTE NOTAS NOTES ...
Страница 311: ...INFORMAZIONI PER LE RIPARAZIONI INFORMACIONES PARA LAS REPARACIONES REPAIRS 8 39 ...


