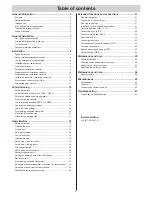
Aperto X-Box 550 Скачать руководство пользователя страница 3

3

Symbols

Warning signs:
Indicates imminent danger. 
If it is not observed serious injuries may occur.

Important information symbol:
Information, useful advice!

Refers to a respective picture in the introduction or main text.

Safety instructions

General


These installation and operating manual must be read, understood 
and complied with by persons who install, use or perform maintenance 
on the operator.


Installation, connection and initial commissioning of the operator 
may only be carried out by technically knowledgeable persons.


Only install the operator on correctly aligned and weight-balanced 
doors. An improperly aligned door can cause serious injuries 
or damage the operator.


The manufacturer assumes no liability for injuries, damage or break-
downs that occur due to non-compliance with the installation and 
operating instructions.


Make sure that this installation and operating manual is kept within 
easy reach in the garage.


Always ensure compliance with accident prevention regulations 
and current standards in each respective country.


Observe and comply with the Employer’s Liability Rules 
“Power-operated windows, doors and gates – BGR 232”. 
(Applies to operators in Germany)


Always disconnect the plug for the control unit before working 
on the operator.


Only use OEM (Original Equipment Manufacturer) spare parts, 
accessories and mounting material.


If the operator is used only occasionally, the batteries should be 
recharged after no later than two months in accordance 
with regulations.


The service life of the battery may decrease at low temperatures 
and as the battery gets older. 
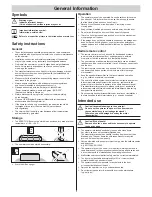
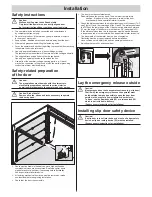
Storage


The APERTO X-Box must be stored in an enclosed, dry area at a room 
temperature of –20 – +50 °C.

+50°

–20°


The operator should be stored horizontally.

+50°

–20°


Store the X-Box upright.

Operation


The operator may only be operated if a non-hazardous force value 
has been set. This force value must be set low enough to ensure 
that the closing force poses no risk of injury.


Never put your hand near the door when it is moving or near 
moving parts.


Keep children, disabled persons and animals away from the door.


Do not drive through the door until it has been fully opened.


There is a risk of persons being crushed or cut by the mechanism 
or sharp edges of the door.


If the garage does not have a separate entrance or the garage door 
does not have a built-in slip door, you must install an emergency 
release (release lock or Bowden cable) that can be operated from 
outside.

Radio remote control


The remote control must only be used for devices and systems 
in which radio interference will not endanger people, animals 
or objects, or the risk is reduced by other safety devices.


The user must be made aware that systems that pose an accident 
risk should only be remote controlled, if at all, if the user can actually 
see the door.


The radio remote control may only be used if the door’s movement 
can be watched and no persons or objects are within the range 
of movement.


Keep the handheld transmitter so that an unintended operation 
e.g., by children or animals, is prevented.


The user of the radio system is not protected from faults due to other 
telecommunications equipment or devices (e.g. radio-controlled 
systems that are licensed to operate in the same frequency range). 
If substantial interference occurs, please contact your appropriate 
telecommunications of

fi

 ce which has radio interference measuring 

equipment (radio location).


Do not operate handheld transmitters near locations or installations 
that are sensitive to radio interference (e.g.: airports, hospitals).

Intended use

Caution! Irreparable damage to the operator!
Do not use the operator to open or close doors unless 
the counterbalance is set (springs tensioned). 
Otherwise, you will damage or destroy the motor 
(transmission).

Caution! Risk of death!
Remove all cords, straps and locks necessary to operate 
the door by hand.


The operator is intended exclusively to open and close doors. 
Any other use does not constitute intended use. 
The manufacturer accepts no liability resulting from use other than 
intended use. The user bears the sole responsibility for any risk 
involved. It also voids the warranty.


Doors automated with an operator must comply with the valid standards 
and directives: 
e.g. EN 12604, EN 12605.


The operator may only be used if it is in perfect working order and is 
used as intended, in conscious observation of safety and hazards and 
in accordance with the installation and operating instructions.


Malfunctions which could affect safety must be corrected immediately.


The door must be stable and torsionally stiff, i.e. it must not bend 
or twist when being opened or closed.


The operator cannot compensate for any defects in the door 
or incorrect installation of the door.


Only use the operator in a dry, non-hazardous area.


Do not install the operator in areas with a corrosive atmosphere 
(e.g. salty air).

General Information

Содержание X-Box 550

Страница 1: ...X Box 550 X Box 800 EN TRANSLATION OF THE ORIGINAL INSTALLATION AND OPERATING MANUAL 46725V001 422016 0 DRE Rev C_EN...

Страница 2: ...afety instructions 18 Opening the door 18 Closing door 18 Emergency release 18 Control unit reset 18 Intermediate stop 18 Safety stop 1 power cut off 18 Safety stop 2 safety input 18 Overload protecti...

Страница 3: ...in slip door you must install an emergency release release lock or Bowden cable that can be operated from outside Radio remote control The remote control must only be used for devices and systems in...

Страница 4: ...x General Rated voltage 24 V DC Lighting Integrated LED lighting Operational temperature range 10 C to 45 C IP code IP 20 Working environmental emissions value 75 dBA operator only Operator 550 800 Ma...

Страница 5: ...5 14 17 15 Item Name Quantity 14 Control unit with button and LED light field 1 15 Battery units left and right 2 16 Support rail centre housing is already installed on the track 1 17 Charger 1 Cautio...

Страница 6: ...ty EMC interference resistance EN 60335 2 95 04 2011 General safety requirements for household and similar electrical appliances Part 2 Particular requirements for operators for vertically moving gara...

Страница 7: ...tely mandatory if there is not a separate access point Slip door Pass door Built in pass door Caution If a slip door in set into the door a slip door safety device 20 must be installed Not included in...

Страница 8: ...cessary before installation Ask a specialist retailer for advice All existing mechanical door locks must be removed or made non functional before beginning installation Check that the door runs smooth...

Страница 9: ...disabled depending on the design of the door it could be possible to manually raise the door approx 50 mm To counteract this spring catches can installed to lock the door in addition to the operator T...

Страница 10: ...3 1 1 2 4 Push trolley 1 onto C track 2 Insert two C track parts 1 in the connecting sleeve 2 up to the stop position C A B 90 D a c 90 b 1 2 3 4 5 6 V V 5 Attach tensioner 1 to chain 2 and turn it 9...

Страница 11: ...2 1 3 1 1 2 4 Push trolley 1 onto C track 2 Insert two C track parts 1 in the connecting sleeve 2 up to the stop position a c 1 6 2 3 4 5 90 b 5 Attach tensioner 1 to chain 2 and turn it 90 Insert co...

Страница 12: ...M VM 13 The operator can be mounted on the header S or on the ceiling D Measure the front of the centre of the door VM and mark on the door and on the lintel or ceiling Caution Wear safety glasses whe...

Страница 13: ...cy unlocking cord N The carriage 1 is unlocked Tighten screw 8 on header fitting Slide the carriage 1 all the way to the front 3 with the connecting rod 2 If necessary loosen guide idler 4 Align door...

Страница 14: ...t yet connect the XLR plug of the operator to the X Box Caution Note the wall thickness of the garage 1 72 m 23 Mark horizontal holes for the support rail on the wall drill 4 holes minimum height of 1...

Страница 15: ...heck the following Have all mechanical door locks been removed Can the emergency release be activated from outside using a Bowden cable or release lock Important information When opening and closing t...

Страница 16: ...he guide idlers Check whether the door opens and closes completely If this isn t the case then the running path must be adjusted Activate command initiator e g button handheld transmitter once Door op...

Страница 17: ...imum of 112 storage locations for each radio receiver are available Mount the information sign N 46502V000 172006 0 OCE_Rev A The information sign concerning the function of the emergency release plea...

Страница 18: ...ave a built in slip door or the garage does not have a separate entrance you must install an emergency release a release lock or Bowden cable that can be operated from outside see accessories instruct...

Страница 19: ...esponds to the illustration Required charging time 6 12 hours Important information Disconnect the charger from the mains power and the battery unit after no later than 12 hours Charge the battery in...

Страница 20: ...ess the handheld transmitter button whose code should be deleted in the radio receiver LED goes out The deletion procedure is ended Reattach the rubber cover 1 Repeat the procedure for all buttons and...

Страница 21: ...the additional button Caution When actuating the button the drive must keep clear of the movement zone of the door and must have a direct view of it Important information Only necessary if an extra bu...

Страница 22: ...e control unit Important information A safety connection is no longer available A photo eye cannot be connected in parallel Button 2 can be used as needed for the following functions Defined opening a...

Страница 23: ...24 V max 0 1 A Terminal 9 DC 24 V Terminal 10 Earth Settings see Obstacle detection DIP 1 2 3 Pulse sequence of door movement DIP7 2 1 O N D I P 3 4 5 6 8 7 1x 1x 1x 1x STOP STOP DIP switch 7 OFF stan...

Страница 24: ...opens the door completely Button 2 only opens the door partially if it is closed If the door is to be completely opened with button 1 or partially opened with button 2 pressing button 2 again closes t...

Страница 25: ...plug to the solar module if necessary 1 2 3 4 5 6 7 Remove the four screws 1 on the front side Remove front housing 2 Caution First note the position of the plug and boards Make sure the board and plu...

Страница 26: ...ective Decommission the system and lock it to prevent reactivation Then contact customer service Photo eye if present Open close the door and interrupt photo eye Adjust the behaviour of the door as se...

Страница 27: ...o low Wipe force values and teach again Switch trigger incorrectly adjusted Adjust switch trigger see chapter Adjusting end switches Door incorrectly adjusted or defective e g spring shaft Have door a...

Страница 28: ...he chain see chapter Installation Displays on radio receiver Malfunction Possible cause Corrective action All LEDs flashing All memory locations occupied max 112 Delete any handheld transmitters that...

Отзывы: