background image


8


USE OF THE REMOTE CONTROL 


<  > button 

Use this button  to confirm 

selection or  adjust the 

desired parameter; 

otherwise, to increase 

/decrease the volume. 


 button 

Wh

i

d


OPERATING INSTRUCTIONS


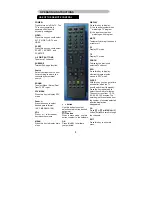
POWER: 

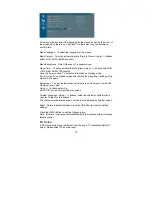
Press to turn on/off the TV. The 
TV is never completely 
powered off unless it is 
physically unplugged. 
 

VIDEO 

Press this key you could select 
AV1, S-VIDEO, HDTV and 
HDMI. 
 

SCART 

Press this key you could select 
SCART 1 SCART2 and 
SCART2-S. 
 

0~9 DIGIT BUTTONS 

To select a TV channel. 
 

SUBPAGE 

Teletext Sub-page function. 
 

Source  

Select your input source from 
list, according to where you 
connected your external 
source.  
 

SOUND 

To select Mono/ Stereo/Dual 
from TV RF input. 
 

DTV MENU 

Press this key to display DTV 
menu. 
 

Zoom +,-

Press these key to select 
desired picture format.   
(4:3, CINERAMA,16:9) 
 

VOL


Press + or – to increase or 
decrease the volume. 
 

MENU


Press this key to display main 
menu. 

<  > button 

Use this button to confirm 
selection or adjust the desired 
parameter. 


 button 

When in menu mode, use this 
button to select to the up/down. 

DISPLAY 

Press this key to display: 
(1) the channel number when 

watching a TV program. 

(2) the input source when 

watching an AV program. 

 
MUTE 

Temporarily interrupt the sound 
or restore it.   
 

PC 

Display PC mode   
 

TV 

Display TV mode   
 

PRE-CH 

To display the previously 
selected TV channel. 
 

EPG


Press this key to display 
electronic program guide 
screen in DTV mode. 
 

SLEEP  

With this key you can set a time 
period after which the TV 
should switch itself to standby. 
Press the key repeatedly to 
select the number of minutes. 
The counter runs from 15, 30, 
45, 60, 90, 120 minutes. The 
timer begins to count down from 
the number of minutes selected 
after the display has 
disappeared. 
 

CH  

Press   or   (or 

MENU 

/


button) buttons to scroll through 
the channels. 
 

EXIT 

Press this key to exit main 
menu. 

OK


Press this KEY to validate 
your selected. 

Содержание L26W781B

Страница 1: ...LCD TV User Manual L26W781B L32W781B L37W781B L42W781B ...

Страница 2: ...ENT 24 Control Knobs 24 Preparation 25 Video recorder 26 SCART connection 26 Camera camcorder Video Game set 27 Wall Mount 27 Headphone 28 Tips 28 BEFORE CALLING SERVICE 29 Glossary 30 Product specification 31 Thank you very much for choosing the LCD TV We recommend that you take a few minutes to read carefully through this manual before installing and switching on the TV Please keep this manual i...

Страница 3: ...ly Disposal of Waste Equipment by Users in Private Household in the European Union This symbol on the product or on its packaging indicates that this product must not be disposed of with your other household waste Instead it is your responsibility to dispose of your waste equipment by handing it over to a designated collection point for the recycling of waste electrical and electronic equipment Th...

Страница 4: ... trademarks of SRS Labs Inc This product is designed using SRS technology with permission from SRS Labs Inc Declaration of RoHS Compliance This product has been designed and manufactured in compliance with Directive 2002 95 EC of the European Parliament and the Council on restriction of the use of certain hazardous substances in electrical and electronic equipment RoHS Directive and is deemed to c...

Страница 5: ...y mentioned in the Annex of RoHS Directive 2 Lead in glass of cathode ray tubes electronic components fluorescent tubes and electronic ceramic parts e g piezoelectronic devices 3 Lead in high temperature type solders i e lead based alloys containing 85 by weight or more lead 4 Lead as an allotting element in steel containing up to 0 35 lead by weight aluminium containing up to 0 4 lead by weight a...

Страница 6: ...erated only from the type of power source indicated on the label If you are not sure of the type of power supplied to your home consult your dealer or local power company 14 Unplug this apparatus during lightning storms or when unused for long periods of time 15 Refer all servicing to qualified service personnel Servicing is required when the apparatus has been damaged in any way such as power sup...

Страница 7: ...on against voltage surges and built up static charges Section 810 of the National Electric Cord ANSI NFPA No 70 1984 provides information with respect to proper grounding of the mats and supporting structure grounding of the lead in wire to an antenna discharge unit size of grounding connectors location of antenna discharge unit connection to grounding electrodes and requirements for the grounding...

Страница 8: ...he back cover To prevent any unsafe situations no naked flame sources such as lighted candles should be placed on or in the vicinity Avoid heat direct sunlight and exposure to rain or water The equipment shall not be exposed to dripping or splashing 2 Insert the aerial plug firmly into the aerial socket ANT IN 75Ω at the back of the TV PREPARATION ...

Страница 9: ...es supplied Type AA 1 5V 4 Power Insert the power cord in the wall socket having an AC power supply 5 Turn the TV on Press the power button of the TV to turn it on When the TV is ON the indicator turns green If the TV is in power off the indicator in front of the TV illuminates amber ...

Страница 10: ...se the volume MENU Press this key to display main menu button Use this button to confirm selection or adjust the desired parameter button When in menu mode use this button to select to the up down DISPLAY Press this key to display 1 the channel number when watching a TV program 2 the input source when watching an AV program MUTE Temporarily interrupt the sound or restore it PC Display PC mode TV D...

Страница 11: ...to operate the Teletext screen INDEX Press INDEX to return to the main index page SUBTITLE Press to select the next page marked as a subtitle page and request it as the display page HOLD Press HOLD to hold the Teletext page when viewing information Press again to return to automatic page update REVEAL Press REVEAL to display reveal hidden words e g quiz page answers Press again to hide PAGE SELECT...

Страница 12: ...ure Setup Preset choose between Standard Mild Personal Personal gives access to following adjustments Contrast Brightness Colour and Sharpness adjust these settings as required using the buttons Tint This option is only available for NTSC audio visual sources Reset Return to default settings Press OK button to return to default settings Press the MENU button to exit the Picture menu Note this menu...

Страница 13: ...ff SRS function SRS is an audio technology which improve the sound quality Reset Return to default settings Press OK button to return to default settings Press the MENU button to exit the Sound menu Note this menu is removed automatically after a few seconds without using the remote control SRS WOW SRS and 0 are registered trademarks of SRS Labs Inc This product is designed using SRS technology wi...

Страница 14: ...y mode after setting the sleep timer setting will be erased Set it again Bule screen To have a blue screen when there is no video input or when the RF signal is very bad Using buttons select On Select Off if you do not want the blue screen Teletext Language Using buttons select the character set that will be used for Teletext on this channel The character set determines how characters are displaye...

Страница 15: ...the screen Phase use the buttons to move the picture phase on the screen Auto Sync this function is used to automatically adjust the VGA input Press the buttons to start the adjustment process Colour temp to select the colour temperature at your convenience Reset Return to default settings Press the OK button to return to default settings ...

Страница 16: ...ollow all the steps in turn specified on this page Auto Installation Select Auto Installation Press OK button to display the Auto Installation Country Select the relevant country using the buttons This is the country you are in or the country whose channels you want to receive if you live near its borders If you do not find your country select Auto Start Press the OK button to start channels searc...

Страница 17: ... button Using the 0 9 digit and the buttons enter desire frequency and press the OK button Name Allows to edit the channel name Using the button select the Name option Using the botton select the first letter field By pressing the 0 9 digit repeatedly and using the following table select the first character Repeat the procedure for each letter field Press the OK button to confirm Store prog Allows...

Страница 18: ...for France and Luxembourg D K for Eastern Europe the Middle East and Asia B G for Western Europe Australia and New Zealand Skip Allows to skip a channel Using the button select the Skip option Using the buttons select On the channel will be skip Skip Allows to skip next channel when it is on and Using the buttons select store prog ok Repeat this procedure to skip other channels Fine tuning If the ...

Страница 19: ...TION To select TV VIDEO source To select desire input source press the SOURCE button to display the selection menu Using the buttons to select each input sources Press the OK button to display the desire input source ...

Страница 20: ...ovided to enable the user to configure elements of the Reference Application In normal viewing operation a user can access the Main Menu by pressing the DTVMENU key The Main Menu is hierarchically organized into categories in order to fit on the screen Channel List A user may configure the Reference Application to use exclusively TV Radio or Data services this feature is know as channel List Model...

Страница 21: ...responding current and next programmes is displayed The user can navigate up and down the list of channels and highlight either the now or next programme Information for the highlighted programmes can be displayed by pressing Info This information includes the start end time of the programme the programme genre in brackets and a synopsis of the programme content A user may select a service by high...

Страница 22: ...ntal Settings Press SELECT to enter the parental lock menu Press DTV MENU to exit this screen If you don t know how to use above function you can select i info button in remote control for get information press i info button again will exit Language Settings System To change the system languages this changes the language used in all menus and dialogs Noted Pan Europe system language include Englis...

Страница 23: ...ic tune no service will be selected A dialog is displayed during automatic tuning that shows the progress of the scan through the channels The user may cancel automatic tuning If the previous list already stored the lowest number from the service list it will return to normal viewing operation The Reference Application can support up to 70 services at any one time When you select Automatic search ...

Страница 24: ... for services a separate dialog is displayed showing the service found whilst scanning is taking place Newly discovered services are merged with the current list of services The user may cancel manual tuning in such cases any newly discovered services are disregarded When a manual tune is complete the application will attempt to select the previously selected service and return to normal viewing o...

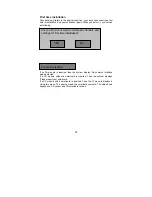
Страница 25: ...e system display No common interface mode detected If a CA module without a smartcard is inserted Then the system displays Please insert your smartcard If a CA module with a smartcard is inserted Then the CI menu is displayed Using this menu The user can read the smartcard contents The data shown depends on CA vendor and CA smartcard version Are you sure your want to delete all channels and settin...

Страница 26: ...nd channel 5 MENU Key Press to show the OSD menu and exit OSD menu 6 Source Key Press to select your input source 7 Power Key Press to turn on or off the TV There is a wide range of video and audio equipment that can be connected to your TV The following connection diagrams show you how to connect them CONNECT PERIPHERAL EQUIPMENT ...

Страница 27: ...al equipment Please take your precautions not to damage the screen 1 Audio output 2 SPDIF output 3 SCART2 CVBS SCART2 S 4 SCART1 RGB CVBS 5 DTV 6 ATV 7 Component video HDTV 8 Component Audio 9 VGA 10 VGA Audio input 11 HDMI2 12 HDMI1 13 AC power 14 S Video 15 AV1 CVBS 16 AV1 S video Audio output 17 HEADPHONE ...

Страница 28: ...connected to provide sound AV and S terminal share one audio input Watching VCR 1 If you use connection ATV select the TV channel auto search 2 If you use connection AV select video AV1 input 3 Insert videotape in the VCR and press the PLAY button SCART CONNECTION How to connect 1 The SCART socket can be connected a VCR a camcorder a DVD player a satellite receiver a decoder or a game console form...

Страница 29: ...rminal input 2 Enable the exterior AV equipment Warning In case you notice scrolling images wrong colors or no color no picture or even combinations of these on your screen check if the connections are done in the right way Check if the cable colors match with the Input connector colors Use of Wall Mount Bracket 1 Remove the hinger cover 2 Remove the four units M4 0 screws 3 Remove the base ass y ...

Страница 30: ... cleaning use a clean damp cloth Do not use liquid cleaners or aerosol cleaners Mobile telephone warning To avoid disturbances in picture and sound malfunctioning of your TV or even damage to the TV keep away your mobile telephone from the TV End of life directives We are paying a lot of attention to produce environmentally friendly in green focal areas Your new receiver contains materials which c...

Страница 31: ...ed Captions control Some TEXT modes could block the screen Good picture but no sound Increase the VOLUME Check that the TV is not muted press the button on the remote control Good sound but poor color Adjust the contrast color and brightness settings Poor picture Sometimes poor picture quality occurs when having activated an S VHS camera or camcorder connected and having connected another peripher...

Страница 32: ...arity Menu An on screen listing of feature controls shown on the TV screen that are made available for user adjustments Programming The procedure of adding or deleting channel numbers into the TV s memory In this way the TV remembers only the locally available or desired channel numbers and skips over any unwanted channel numbers SRS SRS audio solutions provide greater listening enjoyment for comp...

Страница 33: ... 60000 hr 60000 hr LCD Panel Color Temperature 6500 9300 Kelvin degree 6500 9300 Kelvin degree 6500 9300 Kelvin degree 6500 9300 Kelvin degree Analog PAL B K DK I and L L Multi Europe Full Channel with Electronic PLL Tuner TV Tuning System Digital COFDM Band Width 7 8 MHz Format MP ML Aspect ratio 4 3 16 9 Picture Resolution 720 576i Analog Nicam A2 Sound System Digital MPEG I II Sample rate 32 44...

Страница 34: ...r Consumption 120W 150W 170W 250W Panel Tilt Forwards Backwards Rotation None None None None Dimension W x H x D with stand 674 9mm 527 95mm 114mm 805 9mm 604 95mm 239 27mm 928 90mm 681 45mm 254 84mm 1049 9mm 709 89mm 58 58 mm Weight net Kg w o Accessories 11kg 14kg 18 90KG 24kg Accessories Remote controller Batteries x2 AC Power cord Operation manual SCART1 SCART2 21 Pin SCART RGB CVBS 1 S Video ...

Отзывы: