background image


12


VIDEO RECORDER 


How to connect


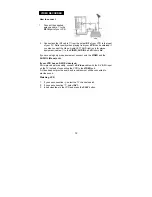
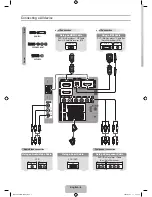
2.  Connect another RF cable 

 from the output 

RF

 of your VCR to the input 

of your TV. Better quality when playing from your 

VCR

 can be obtained if 

you also connect the Video, Audio LEFT AND right (only for stereo 
equipment) cables 

 to the 

VIDEO, AUDIO L

 and 

R

 inputs 

AV

 
If you are using only mono equipment, connect only the 

VIDEO

 and the 

AUDIO L (Mono) 

ports. 


If your VCR has an S-VHS video jack: 

For improved picture quality, connect a 

S-Video

 cable with the S-VIDEO input 

on the TV instead of connecting the VCR to the 

VIDEO

 port. 

S-Video does not provide audio, audio cables must still be connected to 
provide sound. 

 
Watching VCR 

 
1.  If you use connection 

, select the TV channel search. 

2.  If you use connection 

, select 

AV1.


3.  Insert videotape in the VCR and press the 

PLAY

 button. 


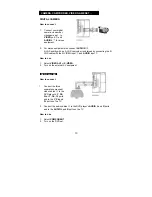
1.  Connect the supplied 

antenna cable 

 to the


RF IN

 port of your VCR.

Содержание A27W231

Страница 1: ...ration 11 Video recorder 12 Camera camcorder Video Game set 13 DVD player 13 Digital Set TOP box 14 PC 14 Headphone 15 Tips 15 PRODUCT SPECIFICATION 16 BEFORE CALLING SERVICE 18 Glossary 19 Thank you very much for choosing the AOC LCD TV We recommend that you take a few minutes to read carefully through this manual before installing and switching on the TV Please keep this manual in a safe place f...

Страница 2: ...k of electrical shock to persons SA 1966 INSTRUCTIONS The exclamation point within on equilateral triangle to alert the User to the presence of important operating and maintenance servicing instruction In the literature accompanying the appliance Apparatus shall not be exposed to dripping or splashing and no objects filled with liquids Such as vases Shall be placed on the apparatus Caution Danger ...

Страница 3: ... table specified by the manufacturer or sold with the apparatus When a cart is used use caution when moving the cart apparatus combination to avoid injury from tip over 13 The TV should be operated only from the type of power source indicated on the label If you are not sure of the type of power supplied to your home consult your dealer or local power company 14 Unplug this apparatus during lightn...

Страница 4: ...a is connected to the receiver be sure the antenna system is grounded so as to provide some protection against voltage surges and built up static charges Section 810 of the National Electric Cord ANSI NFPA No 70 1984 provides information with respect to proper grounding of the mats and supporting structure grounding of the lead in wire to an antenna discharge unit size of grounding connectors loca...

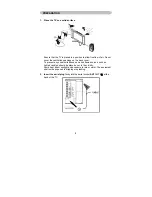
Страница 5: ...he back cover To prevent any unsafe situations no naked flame sources such as lighted candles should be placed on or in the vicinity Avoid heat direct sunlight and exposure to rain or water The equipment shall not be exposed to dripping or splashing 2 Insert the aerial plug firmly into the aerial socket ANT IN 75Ω at the back of the TV PREPARATION ...

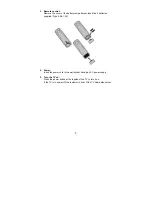
Страница 6: ... the 2 batteries supplied Type AAA 1 5V 4 Power Insert the power cord in the wall socket having an AC power supply 5 Turn the TV on Press the power button at the topside of the TV to turn it on If the TV is in power off the indicator in front of the TV illuminates amber ...

Страница 7: ...ur input source press repeatedly to select TV AV1 AV2 S VIDEO or COMPONENT mode according to where you connected your external source y AV1 AV2 for a VCR connected to the AV connectors of the TV y S VIDEO for a S Video VCR connected to the S VIDEO connector of the TV y COMPONENT for a DVD DTV Set Top Box or another component video device connected to Y Pb Pr and to the AV AUDIO inputs L and R VOL ...

Страница 8: ...t a menu item or adjust the setting of Menu item 3 Use the cursor left right to enter a submenu or enable the function 4 Press the MENU button to exit the menu MAIN MENU Press the MENU button into the main OSD On Screen Display Adjust item include VIDEO ADJUST AUDIO ADJUST PIP SLEEP TIMER SET UP and PC ADJUST ...

Страница 9: ...ure contrast brightness color tint and sharpness to the levels you prefer 4 Reset is set up to default value When adjust any item sub OSD will show up like this Audio Adjust 1 Volume is adjusted from 0 to 100 2 Bass and Treble are adjusted from 0 to 100 You can adjust picture Volume Bass and Treble to the levels you prefer When adjust any item sub OSD will show up like this ...

Страница 10: ...selected after the display has disappeared Note To view the remaining time press the SLEEP button once To cancel the sleep time repeatedly press the SLEEP button until APPEARS If you turn the TV off after setting the sleep time the setting will be erased Set it again Set up 1 Blue screen for when no video input screen will be blue or blank If it s ON the screen will be in blue If it s OFF the scre...

Страница 11: ...H SWAP save the location of current channel and destination channel for each other 8 View Mode Includes 3 modes Press repeatedly to select 4 3 16 9 non Linear 9 Reset is set up to default value of BLUE SCREEN and LANGUAGE PC Adjust 1 Auto tune is the function auto sizing for VGA input 2 Contrast Brightness Focus Clock H Position V Position and Color Adjust are the functions for PC adjustment Color...

Страница 12: ... Press to select your input source There is a wide range of video and audio equipment that can be connected to your TV The following connection diagrams show you how to connect them PREPARATION Remove the back plate at the back of the TV as shown on the illustration opposite Lay the LCD TV with the screen down on a table as it will be easier to connect your peripheral equipment Please take your pr...

Страница 13: ...t connect only the VIDEO and the AUDIO L Mono ports If your VCR has an S VHS video jack For improved picture quality connect a S Video cable with the S VIDEO input on the TV instead of connecting the VCR to the VIDEO port S Video does not provide audio audio cables must still be connected to provide sound Watching VCR 1 If you use connection select the TV channel search 2 If you use connection sel...

Страница 14: ...h an S VHS camcorder is obtained by connecting the S VHS cable with the S VIDEO input and AUDIO input How to use 1 Select VIDEO AV2 or S VIDEO 2 Turn on the external AV equipment DVD PLAYER How to connect 2 Connect the audio cables to the DVD player s AUDIO L and R ports and to the AUDIO L and R ports on the TV How to use 1 Select COMPONENT 2 Turn on the DVD set 1 Connect your digital camera camco...

Страница 15: ...rong colors or no color no picture or even combinations of these on your screen check if the connections are done in the right way Check if the cable colors match with the Input connector colors PC 1 2 How to connect PC input please use D sub signal cable in Accessories plug in D sub port which is in TV monitor s bottom side of back as Graph please use Audio Cable in Accessories plug in PC audio c...

Страница 16: ...reen Dust the TV by wiping the screen and the cabinet with a soft clean cloth If the screen requires additional cleaning use a clean damp cloth Do not use liquid cleaners or aerosol cleaners Mobile telephone warning To avoid disturbances in picture and sound malfunctioning of your TV or even damage to the TV keep away your mobile telephone from the TV End of life directives We are paying a lot of ...

Страница 17: ... Pixel Pitch 0 4665mm x 0 4665mm Display colors 16 7 million Contrast Ratio 550 1 Brightness 550 cd m 2 Viewing Angle 170 Horizontal 170 Vertical Response Time 16 6ms Lamp Type Life 50000 hr LCD Panel Color Temperature Cool Warm TV Standard PAL B G D K I NTSC M Sound systems NICAM A2 BTSC TV Function Video Color systems PAL SECAM NTSC AV1 RCA x 1 Audio L R x 1 RCA x 1 AV2 S Video x 1 Audio L R x 1...

Страница 18: ...io Output L R Line Output RCA L R OSD language English Chinese Default Language English Table Stand Included Wall Mount VESA 100 x 100 mm Power Supply AC100V 240V 50 60Hz Power Power Consumption 140W Panel Tilt Forwards Backwards Rotation 5 20 35 operating temp 0 C 40 C storage temp 25 C 60 C Environment operating humidity 10 85 Dimension W x H x D with stand 898 x 470 x 287 mm Weight net Kg w o A...

Страница 19: ...rightness settings Check the Closed Captions control Some TEXT modes could block the screen Good picture but no sound Increase the VOLUME Check that the TV is not muted press the button on the remote control Good sound but poor color Adjust the contrast color and brightness settings Poor picture Sometimes poor picture quality occurs when having activated an S VHS camera or camcorder connected and ...

Страница 20: ...the TV s memory In this way the TV remembers only the locally available or desired channel numbers and skips over any unwanted channel numbers RF Radio Frequency or modulated signal design used as the carrier for television broadcasts Second Audio Program SAP Another or additional audio channel provided for in the Multichannel Television Sound MTS broadcast standard A monaural soundtrack included ...

Отзывы: