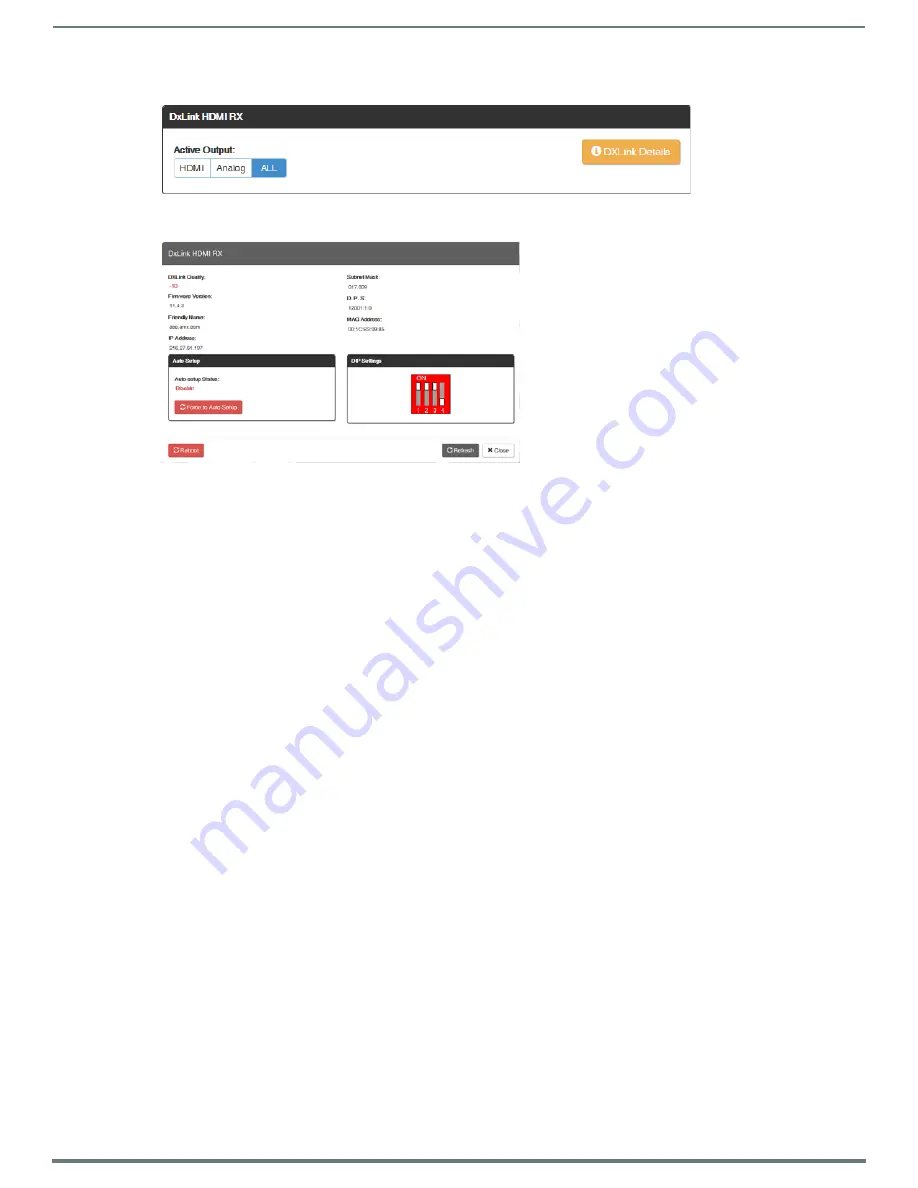
WebConsole - Switching Options
79
NX-Series Controllers - WebConsole & Programming Guide
DXLink (Twisted Pair or Fiber) Receivers (for selected audio output)
Active Output – click either the HDMI, Analog, or All button.
DXLink Details button – click to display additional settings for the DXLink Receiver.
EDID Configuration
NOTE:
Because signals routed through HDMI, DVI, DXLink Twisted Pair, and DXLink Fiber Boards in an Enova DGX 100 Series Switcher
normally produce a quality image, you will not need the information in this section unless the installation has special EDID
requirements.
A default EDID (Extended Display Identification Data) is stored on the boards. This data is provided by the display and presented to
the video source and includes timing and display size/format information for best performance.
Setting an EDID for an Input:
1.
From Configuration page / Switch Mode (on the left), click the Video button.
2.
Check to be sure the Config Viewer on the top right is set to Inputs Only.
3.
From the Switching pane on the left, select the video input.
4.
Under General settings from the EDID Mode drop-down list, select the mode (All Resolutions, Wide-Screen, Full-Screen, or
Custom).
5.
Select the Preferred EDID from the drop-down list of resolutions/refresh rates.
6.
Click the Save EDID button.*
* Once the preferred EDID is saved, it can be loaded to another input(s).
Setting an EDID for an Output:
1.
From Configuration page / Switch Mode (on the left), click the Video button.
2.
Check to be sure the Config Viewer on the top right is set to Outputs Only.
3.
From the Switching pane on the left, select the video output.
4.
Under General settings from the Resolution drop-down list, select the resolution/refresh rate.**
5.
Under General settings, click the Save EDID button.
** Click the “Show only EDID Display Supported (DS)” check box to narrow the drop-down list to show only those resolution/
refresh rate options marked DS (Display Supported).
Setting the EDID Mode for an Audio Input:
1.
From Configuration page / Switch Mode (on the left), click the Audio button.
2.
Check to be sure the Config Viewer on the top right is set to Inputs Only.
3.
From the Switching page components on the left, select the audio input.
4.
Under General settings from the EDID Mode drop-down list, select the mode: Basic, PCM 2-Channel, PCM Multi-Channel,
Dolby Digital, Dolby D DTS, Dolby D MPEG, Dolby D AAC, Dolby TrueHD, or DTS HD Master.
Loading and Saving EDIDs
For custom EDIDs, click the Load EDID button and browse for the .edid file on your device/computer. Once the EDID is loaded, make
any necessary changes and use the Save EDID button to save the altered .edid file to your device/computer.
NOTE:
Some devices run on a secured file-system. As such, file-system operations (e.g., Load and Save operations) may not be
supported by the device’s default capabilities and may require downloading a file manager application.
RX Settings:
DXLink Quality – green = good; red = poor; number
indicates degree or lack of quality
Firmware Version – current version
Friendly Name – current name
IP Address – for auto-setup, displays integrated
Master’s IP address
Subnet Mask – current setting
D. P. S. – current setting
MAC Address – current setting
Auto-Setup – Status (Enable/Disable) and Force to
Auto-Setup button
DIP Settings – indicates settings on DIP switch
Reboot button – reboots RX
Refresh button – updates status of RX settings


