background image

Appendix C – APDiagnostics

91

Epica DGX 144 Instruction Manual

Load Log Files (Emulation Mode Only)

To load log files:

1.

Select File > Load Log File.

2.

From the Open dialog box, navigate to the location the application is storing the .apd files (the 
default location is LogFiles > Activity in the installation directory).

3.

Open the desired .apd and/or .zip file(s). The Status bar at the bottom indicates which file is being 
processed (e.g., “Processing file 2 of 3”).

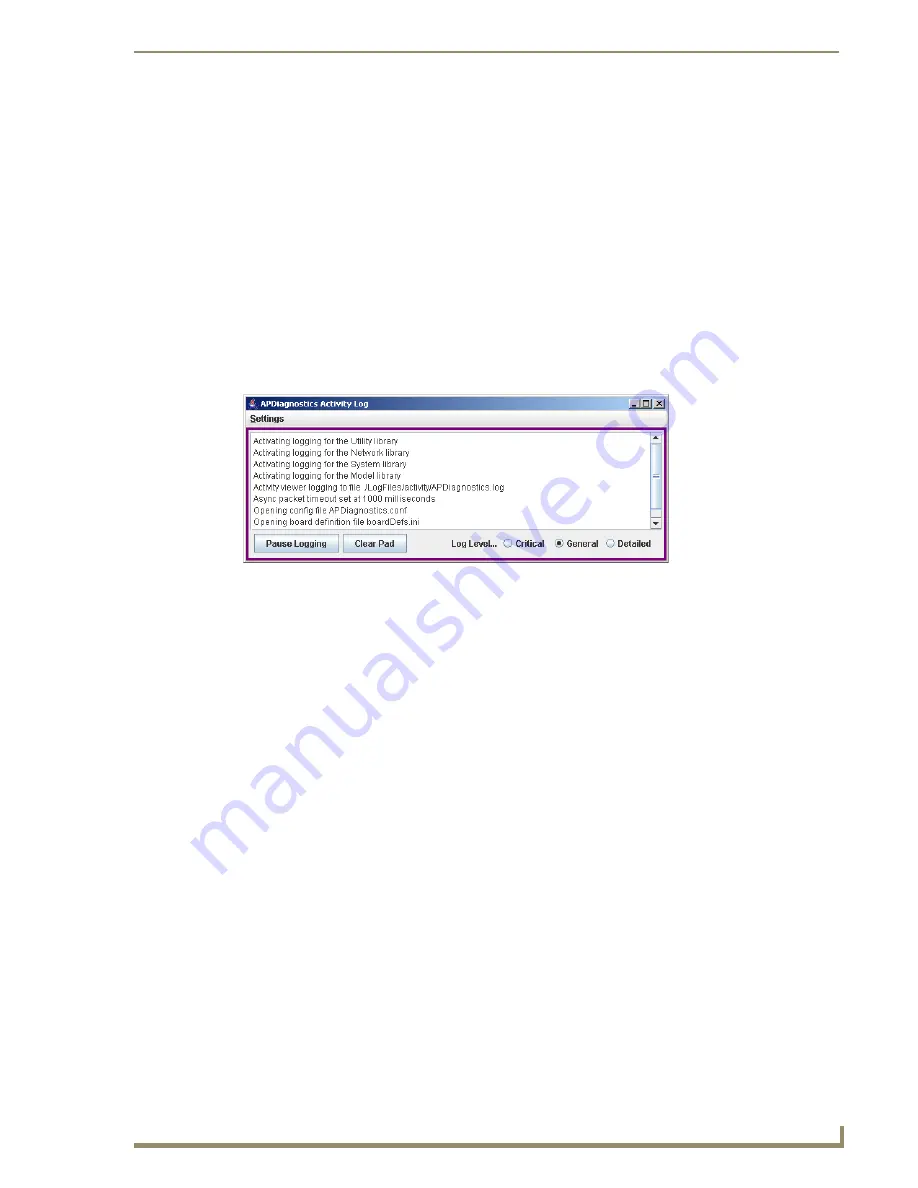
Activity Log

A diagnostics window where all activity is logged in detail keeps track of the application’s activity while 
it is running. The logging can be paused and resumed as required. The logged information can also be 
deleted (Clear Pad). The level of logging can be specified as: Critical, General (default), or Detailed.

To select options in the Activity Log:

1.

Select Options > Show > Activity Log.

2.

Click Pause Logging or Clear Pad as needed (change Log Level if desired).

Содержание Epica DGX 144

Страница 1: ...Instruction Manual AutoPatch Matrix Switchers Epica DGX 144 Distribution Matrix REV C 1 25 2011 ...

Страница 2: ...mming performance or quality there of is not guaranteed due to the random combinations of dimmers lamps and ballasts or transformers AMX software is warranted for a period of ninety 90 days Batteries and incandescent lamps are not covered under the warranty AMX AutoPatch Epica Modula Modula Series 4 Modula Cat Pro Series and 8Y 3000 product models will be free of defects in materials and manufactu...

Страница 3: ... and Recommendations for Laser Products 17 Site Recommendations 18 General Hazard Precautions 18 Unpacking 19 System Setup Options 20 Rack Installation and System Setup 20 Linking Enclosures 23 Attaching External Controllers 30 Attaching Inputs and Outputs 36 Applying Power and Startup 38 Redundant Power Supply RPS 40 Executing a Test Switch 41 Technical Support 43 Epica DGX 144 SC Fiber Boards 45...

Страница 4: ...t 70 Opening a Configuration File 71 Discovering a System 72 Navigating the Interface 73 Modifying a Configuration File 74 Loading a Configuration File 77 Device Discovery Support 77 Appendix C APDiagnostics 79 Overview 79 System Requirements 79 Installing APDiagnostics 79 Modes 81 Main Screen and Menus 82 Communications 92 Appendix D Programmer s Interface for System Diagnostics 93 System Compone...

Страница 5: ... conductive work mats are specifically designed for this purpose Anyone performing field maintenance on AMX AutoPatch equipment should use an appropriate ESD field service kit complete with at least a dissipative work mat with a ground cord and a UL listed adjustable wrist strap with another ground cord These items should not be manufactured locally since they are generally composed of highly resi...

Страница 6: ... call technical support For products with multiple power supplies in each unit make sure all power supplies are turned on simultaneously Use surge protectors and or AC line conditioners when powering AMX AutoPatch products Only use a fuse s with the correct fuse rating in your enclosure Make sure the power outlet is close to the product and easily accessible Make sure the product is on or attached...

Страница 7: ...ntation multiples dans chaque unité soient allumés simultanément Servez vous de protecteurs de surtension ou de conditionneurs de lignes à courant alternatif lorsque vous mettez les appareils AMX AutoPatch sous tension Placez uniquement des fusibles de calibre exact dans les boîtiers Veillez à ce que la prise de courant soit proche de l appareil et facile d accès Veillez à ce que votre appareil AM...

Страница 8: ...tice The United States Federal Communications Commission in 47CFR 15 838 has specified that the following notice be brought to the attention of the users of this product Federal Communication Commission Radio Frequency Interference Statement This equipment has been tested and found to comply with the limits for a Class A digital device pursuant to Part 15 of the FCC Rules These limits are designed...

Страница 9: ...plicable for all AMX equipment Upon shipment of products to Switzerland the requirements of the most up to date Swiss Ordinance Annex 2 15 of SR 814 81 will be met including provision of the necessary markings documents and annual reports relative to the disposal of the batteries to the Swiss Authorities Warnings and Cautions This manual uses the following conventions and icons to draw attention t...

Страница 10: ...Notices 6 Epica DGX 144 Instruction Manual ...

Страница 11: ... connected to any of the output boards When routing from one board type to another the Epica DGX 144 automatically converts the signal format to match the output board For general board information see page 12 and page 36 For specific board information see the applicable board chapter which is based on the supported signal type DGX SC Fiber Boards see page 45 DGX HD 15 RGBHV Board see page 51 DGX ...

Страница 12: ... stereo audio signals unbalanced stereo a sample rate of 48 kHz and embedded digital audio signals PCM over S PDIF 32 kHz 44 1 kHz 48 kHz as well as 96 kHz which requires a minimum 800x600 60 Hz SC Fiber boards also support unidirectional source to destination serial data Compatible DGX SC Fiber Receivers feature SmartScale Technology which automatically responds to the display s declared EDID inf...

Страница 13: ... user PC control APWeb TCP IP control via an external module Supports AMX AutoPatch s simple BCS serial control protocol Supports third party controllers BCS is sent as ASCII characters through the RS 232 port Note Features and specifications described in this document are subject to change without notice Front View The enclosure which is the structural basis of the Epica DGX 144 Distribution Matr...

Страница 14: ...me slots may be empty depending on the configuration 3 expansion control slots CPU Control board Up to 4 power supplies with receptacles Serial number Note The Epica DGX 144 has a hand hold inset on each side to assist with maneuvering the enclosure Do not attempt to move the enclosure by yourself FIG 2 Rear view of an Epica DGX 144 enclosure Power supplies Serial number Input boards up to 9 CPU C...

Страница 15: ...power receptacle that will accept all major international standard power sources US power cords are included with all shipments unless ordered otherwise Maximum power specifications are provided on the power supply receptacles For information on applying power see page 38 The power supply unit has three LED indicators listed left to right AC When the LED is green the power is good DC When the LED ...

Страница 16: ...for a maximum configuration of 144x144 For information on the boards included in your system including connector types cabling directions and specifications see the specific board chapter in this manual For information on adding or replacing boards see Appendix E Board Replacement on page 97 Input and Output Connectors The connectors on the input and output boards are the attachment points for sou...

Страница 17: ...ration software provided on the CD can be used to further customize the configuration file see page 69 Unless you need to modify your system you will not need to use any of the configuration software that is included on the CD If you do modify the configuration file we recommend making a copy of it first Configuration file modifications include creating local presets customizing input and output c...

Страница 18: ...P 20A Control Panel local or remote the panel can fully control the Epica DGX 144 When other types of AMX AutoPatch Control Panels are used to control the Epica DGX 144 some limitations apply For specific control panel information contact your AMX representative For control panel operation see the applicable product s instruction manual BCS Serial Control Protocol The Epica DGX 144 can be controll...

Страница 19: ... is available on the AMX AutoPatch CD or at www amx com APDiagnostics also works with other AMX AutoPatch products that are capable of reporting such data For information on APDiagnostics see Appendix C on page 79 Programmer s Interface for System Diagnostics The Epica DGX 144 displays system information in its splash screen for diagnostic purposes The information indicates the current status and ...

Страница 20: ...Overview and General Specifications 16 Epica DGX 144 Instruction Manual ...

Страница 21: ...nce the class of radiation emitted from the fiber port can be Class 3R when the fiber cable or dust plug is removed a yellow and black label with the following caution is located on the rear of the enclosure to the right of the power supplies Important No user serviceable parts are inside an AMX AutoPatch product service should only be done by qualified personnel Caution Use of controls or adjustm...

Страница 22: ...ss potential hazards that are common to all installations Elevated Operating Temperature The maximum rated ambient temperature for Epica DGX 144 enclosures is 110 F 43 C All equipment should be installed in an environment compatible with the manufacturer s maximum rated ambient temperature In a closed or multi unit rack assembly the operating ambient temperature of the rack environment may be grea...

Страница 23: ...uide AMX AutoPatch CD For orders containing multiple enclosures the shipping boxes are marked as Chassis __ of __ where the first blank is the box number and the second blank is the total number of boxes in the shipment Important If applicable the shipping boxes each have a bright yellow green sticker that states that the unit enclosure is part of a multiple enclosure system and must be installed ...

Страница 24: ... for mounting the enclosure s Power cords Surge protector s highly recommended A PC or laptop computer with a null modem cable for communication with the Epica DGX 144 via the RS 232 serial port Installation Recommendations Write the serial number normally located on rear of enclosure in an easily accessible location before installing the Epica DGX 144 in a rack Use an earth grounded power cord sy...

Страница 25: ... product must be installed and maintained only by qualified technicians see page 17 1 Install the Epica DGX 144 enclosure in a rack see page 22 2 If applicable For multiple enclosure systems link them according to the instructions provided see page 23 Caution On systems with SC Fiber boards we recommend using the provided cable management bars or some other type of cable management system to avoid...

Страница 26: ...ty rack units are recommended Verify that the openings on the top and sides of the enclosure are not blocked and do not have restricted air flow The Epica DGX 144 has a hand hold inset on each side to assist with maneuvering the enclosure Do not attempt to lift the enclosure from the pallet to the rack by yourself Important Do not use the board extractor handles to lift the enclosure or to maneuve...

Страница 27: ...ts Ethernet 10 Base T port which is labeled Enc Link Linking from an Epica DGX 144 enclosure to another Epica DGX 144 or to an Epica DG enclosure is currently not supported Important The shipping boxes each have a bright yellow green sticker that states that the unit enclosure is part of a multiple enclosure system and must be installed with the same serial numbers Linking enclosures allows contro...

Страница 28: ...ures The cable is wired to TIA EIA 568 A on one end and TIA EIA 568 B on the other end RJ 45 Straight Through Patch Cable use to connect a 10Base T enclosure to a Media Converter or to a Multi Port Switch Both ends of the cable are wired to TIA EIA 568 A RG 58 Coax Cable use to connect a 10Base 2 BNC enclosure to a Media Converter also used to daisy chain 10Base 2 enclosures Media Converter use wh...

Страница 29: ...hen the enclosure is linked to an active system The LEDs indicate the following Green LED on speed status is 100 Mbps Green LED off speed status is 10 Mbps Amber LED on link status is active Note The Comm Communication Status indicator at the top left of the CPU indicates if Ethernet traffic is on the system by blinking green FIG 9 Ethernet connector LEDs Green LED Speed Status Amber LED Link Stat...

Страница 30: ... Requirements To link an Epica DGX 144 to an enclosure with a 10Base T Ethernet port 1 Insert the connector on one end of the RJ 45 crossover cable into the Epica DGX 144 enclosure s Enc Link RJ 45 port 2 Insert the connector on the other end of the crossover cable into the Ethernet 10Base T RJ 45 port on the second enclosure s CPU When power is applied the Ethernet connector LEDs illuminate indic...

Страница 31: ... s 10 100 RJ 45 port 3 Fasten a T connector to the Media Converter s BNC connector 4 Attach an RG 58 coax cable to the T connector 5 Add a 50 ohm termination connector to the open end of the T connector 6 Fasten a T connector to the Ethernet 10Base 2 BNC connector on the second enclosure s CPU 7 Attach the open end of the RG 58 coax cable to the T connector 8 If applicable Attach additional enclos...

Страница 32: ...a Media Converter The rest can be daisy chained To link an Epica DGX 144 enclosure to a Multi Port Switch 1 Insert one end of the RJ 45 straight through patch cable into the Enc Link RJ 45 Ethernet port on the Epica DGX 144 enclosure 2 Insert the other end of the RJ 45 straight through patch cable into the Multi Port Switch 3 Repeat Steps 1 and 2 for enclosures with 10Base T ports For 10Base 2 por...

Страница 33: ...ttach the open end of the RG 58 coax cable to the T connector on the Media Converter 7 Add a 50 ohm termination connector to the open end of the T connector on the Media Converter 8 Insert one end of the RJ 45 straight through patch cable into the 10 100 RJ 45 Ethernet port on the Media Converter 9 Insert the other end of the RJ 45 straight through patch cable into the Multi Port Switch When power...

Страница 34: ...rver for control diagnostics and third party access is accessed through a TCP IP interface such as a web browser e g Internet Explorer The Epica DGX 144 serial port DB 9 is used to access APWeb Additional equipment is required for APWeb For setup and operation information see the Instruction Manual APWeb on the AMX AutoPatch CD and at www amx com Important Contact AMX regarding limitations and con...

Страница 35: ...al emulation program Serial port or USB port for USB serial control information see page 33 Connecting Serial Controllers to DB 9 Port The RS 232 cable pinout is in FIG 14 on page 32 and the RS 422 cable pinout is in FIG 15 on page 33 To establish external serial control 1 RS 232 serial cable null modem Plug one end of the null modem serial cable into the serial port DB 9 on the enclosure Or RS 42...

Страница 36: ...pica DGX 144 Serial Port Settings table to the right Click OK A short splash screen appears 5 Execute a test switch to be sure the Epica DGX 144 is working properly see Executing a Test Switch on page 41 Serial Communication Settings When controlling the system with a serial controller use serial communication software and make sure the baud rate is set correctly for the system The recommended def...

Страница 37: ...tion complete all of the steps in the instructions starting below Or When reconnecting after previously establishing a USB connection complete Steps 1 and 2 and then set up and run the desired software program or utility The following steps apply when you use the AMX AutoPatch CD that shipped with the system Using the default selections the Found New Hardware Wizard searches for and installs the s...

Страница 38: ...port for the new port on the PC The Found New Hardware notice window appears briefly The Hardware Wizard will refer to the virtual Com port used by the Epica DGX 144 as an AutoPatch USB Bridge or USB Device The Found New Hardware Wizard opens Note The dialog boxes may differ slightly from those shown here depending on the operating system 4 Insert the AMX AutoPatch CD into the PC s CD holder 5 Cli...

Страница 39: ...a new virtual Com port using the new port If completed the new port will be assigned a different Com number 5 Set up and run the desired method of control AMX control devices For control programming information see the instruction manual for the specific interface APControl 3 0 Install and open the latest version of the program located on the AMX AutoPatch CD Follow the setup wizard which will dis...

Страница 40: ...he table below DMS 59 connectors are numbered for two breakout channels each Because some connectors are capable of routing multiple input or output channels the channels are numbered rather than the connectors The input or output channel numbers are to the left of the connectors and read from top to bottom Numbering is consecutive for inputs outputs start over at 1 and follow the same pattern Boa...

Страница 41: ...Note The DMS 59 connectors support multiple channels see FIG 19 The configuration file and the internal pathways define each DMS 59 connection as two discrete signal paths for routing For information on cabling specific types of connectors see the specific board chapter in this manual FIG 18 AMX AutoPatch Epica DGX 144 cable management bars FIG 19 DMS 59 connectors on a DVI board support multiple ...

Страница 42: ...attaching all power cords to a single surge protector 20 A and or an AC line conditioner Power Up Sequence To apply power simultaneously to power supplies 1 Attach the first two source and destination devices Do not apply power to the source and destination devices until Step 7 2 Plug a power cord into each power receptacle on the enclosure 3 Plug the other end of each power cord into a power stri...

Страница 43: ...ch the serial control device to the enclosure see page 30 and open the control program AMX Control Devices The Epica DGX 144 is compatible with a number of AMX control devices for control programming information see the instruction manual for the specific interface APControl 3 0 If you are using APControl 3 0 install and open the latest version of the program Follow the directions in the setup wiz...

Страница 44: ... the front of the enclosure may blink red or green if a problem occurs Check the AC and DC LED indicators on the rear of the enclosure directly above each power receptacle to determine if a power supply is not working For additional LED indicator information see page 39 Important A failed power supply should be replaced as soon as possible to maintain the system s power redundancy For replacement ...

Страница 45: ...xecuted successfully you may need to adjust the image with the software that is provided on the AMX AutoPatch CD also available at www amx com EDID Programmer software can be used for re programming the DVI and HD 15 RGBHV input boards if necessary see Appendix A EDID Programmer on page 63 Board configuration software can be used to adjust the source signal for optimal display For information on t...

Страница 46: ... connection between the specified input and output connectors within the enclosure If using BCS commands enter SL0O2T If SL0O2T 1 appears the test switch is routed Check all link and signal connections on the rear of the enclosure s to make sure everything is physically set up correctly If applicable check connections on the DGX SC Fiber modules also see Troubleshooting in the module s instruction...

Страница 47: ...stions contact your AMX representative or technical support Have your system s serial number normally located on the rear of the enclosure ready We recommend recording your system s serial number in an easily accessible location AMX Contact Information 3000 Research Drive Richardson TX 75082 800 222 0193 469 624 8000 Fax 469 624 7153 Technical Support 800 932 6993 www amx com ...

Страница 48: ...Installation and Setup 44 Epica DGX 144 Instruction Manual ...

Страница 49: ...or configurations up to a maximum of 144x144 as well as subsets e g 128x64 and 80x112 DGX SC Fiber input boards route signals to any type of Epica DGX 144 output board DGX SC Fiber output boards accept signals from any type of Epica DGX 144 input board When routing signals between different board types the Epica DGX 144 automatically converts the signal format to match the output board For other t...

Страница 50: ...and their specifications without notice Epica DGX 144 SC Fiber Specifications Parameter Value Compatible AutoPatch Fiber Products DGX HD 15 TX and RX DGX DVI TX and RX other AMX AutoPatch DGX SC Fiber signal management products Safety Certifications DGX SC Fiber output board only Class 1 Laser Product Class 3R Laser Product when fiber is disconnected from the unit IEC 60825 1 2001 Signal Types ove...

Страница 51: ...ith the data flow in the same direction as the video signal Important The RS 232 connection on the modules requires management of the RS 232 data line in relation to switching operations In an upstream matrix switching scenario we recommend that RS 232 control commands via the DGX RS 232 data connection are not sent immediately prior or subsequent to a matrix switching command It is possible for t...

Страница 52: ...n an input board disconnect the power on the DGX TX that is connected to the input Before you unplug a fiber cable on an output board disconnect the switch for that output connector Attaching Cables Instructions for attaching cable management bars are on page 23 These bars are recommended and provided with each fiber board Caution Do not severely bend or kink the SC fiber cable Irreversible damage...

Страница 53: ... RS 232 connection on the modules requires management of the RS 232 data line in relation to switching operations In an upstream matrix switching scenario we recommend that RS 232 control commands via the DGX RS 232 data connection are not sent immediately prior or subsequent to a matrix switching command It is possible for the RS 232 data to be corrupted as the video or audio signal is removed an...

Страница 54: ...Epica DGX 144 SC Fiber Boards 50 Epica DGX 144 Instruction Manual ...

Страница 55: ...ype of Epica DGX 144 output board When routing signals between different board types the Epica DGX 144 automatically converts the signal format analog to digital or digital to analog to match the output board When DGX HD 15 RGBHV Input Boards are used with DGX SC Optical Output Boards the signals are converted to fiber and then converted by a DGX RX see System Setup with DGX Modules on page 47 For...

Страница 56: ...l Clock max 165 MHz DDC EDID Support EDID provided by Epica DGX 144 EDID is user re programmable RGB In Signal Level Range 0 to 700 mVpp 0 to 750 mVpp max RGB Input Impedance 75 ohms HV Sync Input Signal Range 0 to 5 V HV Sync Input Impedance 510 ohms HV Sync Input Trigger Voltage 1 25 V Input Connector HD 15 Standard Timing Identification Resolutions Refresh Rate Max ID 1 1920x1200 60 Hz ID 2 192...

Страница 57: ...nformation for the High Density HD 15 connectors on the DGX HD 15 RGBHV input board is provided in the table next to FIG 28 FIG 27 Fasten cables onto input connectors FIG 28 HD 15 RGBHV input board connector pinout Input VESA DDC Compliant 1 Red 6 Red GND 11 ID Bit 2 Green 7 Green GND 12 DDC SDA 3 Blue 8 Blue GND 13 Horizontal Sync 4 ID Bit 9 5 V in DDC 14 Vertical Sync 5 GND 10 GND 15 DDC SCL ...

Страница 58: ...HV input board The Source PC must have a video card that supplies analog RGBHV at one of the resolution and refresh rates in the table below If you need to determine the resolution and refresh rate for the Source PC see page 55 Destination Monitor The Destination Monitor can be connected to any of the Epica DGX 144 output boards Adjustments made with the Wizard are seen on the Destination Monitor ...

Страница 59: ... on each dialog box to exit Important If all of the device EDIDs do not fall within the default resolution parameters provided check Specifications on page 52 see Appendix A EDID Programmer on page 63 before adjusting the video with the DG_HD15 Wizard Adjusting the Video with the DG_HD15 Wizard Before starting the adjustment procedure Install the DG_HD15 Wizard on the Control PC We recommend unins...

Страница 60: ...ct the Vertical Resolution icon and repeat the previous step for the vertical value of the resolution file Important After a preset has been loaded and the resolution values have been verified further adjustments may not be required If this is the case go to Step 13 to complete the procedure 6 On the Source PC open the test image PDF that matches the resolution setting If an image does not appear ...

Страница 61: ...ure variation 12 Repeat as many of the steps above as necessary for additional sources see Time Saving Tip below 13 From the Options menu select Save to System to restore settings upon power up The Save to System Dialog box opens 14 Click OK 15 From the File menu select Save As to save a backup file to the PC 16 Enter a file name and click Save 17 Disconnect the Control PC when finished Time Savin...

Страница 62: ...l 5 From the Options menu select Save to System to restore settings upon power up The Save to System Dialog box opens 6 Click OK 7 From the File menu select Save As to save a backup file to the PC 8 Enter a file name and click Save 9 Disconnect the Control PC when finished ...

Страница 63: ...tput board When DGX DVI Input Boards are used with DGX SC Optical Output Boards the signals are converted to fiber and then converted by a DGX RX see System Setup with DGX Modules on page 47 For other types of available boards see the Applicability Notice on page 7 DGX DVI boards only support digital single link DVI D signals The DVI connectors on the boards are DVI I which allow use of cables wit...

Страница 64: ... provided by Epica DGX 144 EDID is user re programmable HDCP Support No Input Voltage nominal 1 0 Vpp differential Input Cable Equalization Up to 50 ft 15 24 m Output Voltage nominal 1 0 Vpp differential Output Reclocking Yes Output 5 V DDC Pin 50 mA Output Rise Time Fall Time 80 ps min to 200 ps max 20 to 80 0 13 UI min to 0 33 UI max 1 65 Gbps 20 to 80 DVI Input Board Propagation Delay 2 μs DVI ...

Страница 65: ...ctors on the DMS 59 breakout cable are labeled 1 bottom connector and 2 top connector They route signals according to the numbering to the left of the DMS 59 receptacle 1 corresponds to the receptacle number with the lower numerical value and 2 corresponds to the number with the higher numerical value For example on the DMS 59 breakout cable for Inputs 11 and 12 FIG 32 the DVI connector labeled 1 ...

Страница 66: ...ctors pin 14 is a 5 V source with a maximum current limitation of 55 mA FIG 33 DVI I connector pinout DVI I Pinout Information 1 Data 2 9 Data 1 17 Data 0 C1 No connect 2 Data 2 10 Data 1 18 Data 0 C2 No connect 3 Ground 11 Ground 19 Ground C3 No connect 4 No connect 12 No connect 20 No connect C4 No connect 5 No connect 13 No connect 21 No connect C5 No connect 6 DDC CLK 14 5 V 22 Ground 7 DDC Da...

Страница 67: ...d beyond computers to other source devices such as DVD players As long as the source device sends a compatible signal the plug and play feature will work Matrix Switchers and EDID Matrix switchers such as the Epica DGX 144 provide the ability to route one source signal to many potentially different types of display devices Through the use of compatible DGX SC Fiber Receivers featuring SmartScale i...

Страница 68: ...mining the Need for EDID Programming Ideally the EDID analysis will have been completed during installation specification Consideration should be given to the use of DGX SC Fiber output boards and corresponding DGX SC Fiber Receivers which in almost every case will remedy incompatible source and destination resolution issues Specific attention should be given to local output boards which do not pr...

Страница 69: ...can be used to save the EDID information as an edid file which can be opened as a text file click on the Open button and edited or opened and written to an input click the Write button The instructions below cover the situation in which the EDID Programmer is used to read the EDID information from a destination device in the installation with a DVI connector an HD 15 connector can also be used Add...

Страница 70: ...15 video port to a DVI cable attached to a destination device s DVI port Alternatively use the following combination of adapters with a DVI D cable to connect the laptop to the destination device Note The setup of adapters and DVI D cable in FIG 35 passes EDID information but not video signals Writing EDID Data to a DVI or HD 15 RGBHV Input Connector The instructions that follow cover the situatio...

Страница 71: ...sing the PC s spare monitor port 9 Attach the open end of the DVI video cable to the DVI input connector on the Epica DGX 144 board that requires programming 10 Save the board s EDID default as a backup assumes board has factory default EDID programming Click the Refresh Display List button Select the device from the Available Displays drop down list Click the Read button Click the Save button sel...

Страница 72: ...Appendix A EDID Programmer 68 Epica DGX 144 Instruction Manual ...

Страница 73: ...py of the modified file for future support This appendix covers the following topics Installing XNConnect see page 70 Opening a configuration file see page 71 Discovering a system see page 72 Navigating the interface see page 73 Customizing channel names labels see page 74 Creating local presets see page 75 Loading a configuration file see page 77 Device Discovery support see page 77 Standard Virt...

Страница 74: ...ation from the original specification Note Even if XNConnect is already on your PC install the newest version that shipped on the same CD as the configuration file We strongly recommend uninstalling the old version of XNConnect before installing a newer version System Requirements Windows XP Professional 233 MHz processor Minimum of 128 MB of RAM 20 MB of available hard drive space 800x600 screen ...

Страница 75: ...on from the original specification Copy the original file every time the file is modified To launch XNConnect 1 From the Start menu select Programs 2 Select AutoPatch Applications or other file group you specified during the installation 3 Select the XNConnect folder 4 Select XNConnect The XNConnect program opens 5 From the Getting Started dialog box click Open Configuration File If the dialog box...

Страница 76: ...ay take several minutes to complete To discover a system 1 Disconnect any third party control devices from the Epica DGX 144 enclosure s serial port and USB port 2 Connect the enclosure to your computer page 31 3 Launch XNConnect see page 71 4 Open the Communication menu select Serial Port 5 If applicable For a serial port other than Com 1 open the Communication menu again select Change Comm Setti...

Страница 77: ...f dialog boxes that are accessed by right clicking a hardware device or virtual matrix icon and selecting an option from the shortcut menu If you have a question regarding an open dialog box press the F1 key for Help Hardware View The Hardware view displays the system s hardware such as enclosures boards and serial ports Virtual Matrix View The Virtual Matrix view displays properties of the existi...

Страница 78: ...acters To customize the channel names 1 In the Virtual Matrices view click the to the left of the Virtual Matrix 2 Click the to the left of the Sources or Destinations folder 3 Select the channel you want to rename 4 Enter the new name in the Name field in the right hand pane and press Enter The new channel name replaces the default channel name in the Sources or Destinations list Note If a channe...

Страница 79: ...ng local presets involves three dialog boxes that cover managing naming and modifying presets The Epica DGX 144 supports a maximum of 335 local presets The instructions below are for creating a local preset For detailed information on modifying and deleting local presets see the XNConnect Help file To create a new preset 1 In the Virtual Matrices view right click the virtual matrix the preset will...

Страница 80: ...r disconnects to be included in the preset Note For information on the other buttons and preset modifications press F1 while the Manage Local Presets dialog box is open 10 After all switches for the preset have been assigned click OK and then close the Manage Local Presets dialog box 11 Define additional local presets by repeating the steps Caution The system must not be actively switching when lo...

Страница 81: ...dified 2 Connect the Epica DGX 144 enclosure to your computer see page 31 3 Open the Communication menu and select Serial Port 4 Open the Communication menu again select Change Comm Settings Check the settings for the selected port the default is Com 1 Baud Rate 9600 and adjust if necessary 5 Optional Click the Test button to verify that communication has been established with the Epica DGX 144 Cl...

Страница 82: ...Appendix B Managing Configuration Files 78 Epica DGX 144 Instruction Manual ...

Страница 83: ...rage using the Ethernet link whenever possible due to the volume of data involved with monitoring diagnostics See Communications on page 92 Installing APDiagnostics You will need administrative rights to install APDiagnostics contact your Network Administrator Note The default port when APDiagnostics is first launched is the Ethernet port To install APDiagnostics using the Ethernet port recommende...

Страница 84: ...for an Epica DGX 144 are provided in the table to the right 4 Insert the AMX AutoPatch CD into your CD drive to start automatically If the CD does not autorun explore the CD folder and double click the Index html file 5 Select Software and find APDiagnostics 6 Optional Select Release Notes to read about the software before installation 7 Select Install follow the directions in the subsequent dialo...

Страница 85: ...net port default or serial port and the program must be running continuously to acquire data This data consists of system critical operating parameters as well as general information about hardware and control configuration As the data is gathered it is automatically archived on the host PC s hard drive The three types of files maintained by APDiagnostics are Date stamped log acp packet Activity T...

Страница 86: ...em are exceeded APDiagnostics flags that information as warnings or errors depending on the data received by changing the color of the Categories buttons in the Categories pane to yellow for warning or red for error and by displaying the information as Warnings or Errors in the Event Status Notebook at the bottom of the window FIG 38 Main screen in Emulation mode the Comm menu option is not availa...

Страница 87: ...ion about the state of its lowest level constituents To display diagnostic information for Temperature and Power System groups 1 In the Categories pane select the Diagnostics tab 2 Click either the Temperature or Power System button Visual Plot and Details buttons display in the Information pane see page 84 The five buttons on the System tab offer general information for the following Enclosure In...

Страница 88: ...button to display visual details on the enclosure in the System Visual pane For more information see page 86 b Click the Plot button to display a Plot View with a graph of data points for information being gathered Acquisition mode or already gathered Emulation mode for a specific component The data is date stamped as it is added to the graph For more information see page 85 c Click the Details bu...

Страница 89: ...graph and select a shortcut menu item Properties opens a Chart Properties dialog box with three tabs Title Plot and Other Save as opens a standard Save dialog box Print opens a standard Page Setup dialog box Zoom In provides options to zoom in on Both Axes Domain Axis or Range Axis Zoom Out provides options to zoom out on Both Axes Domain Axis or Range Axis Auto Range provides options for auto dis...

Страница 90: ...roups being monitored by the application To display an appropriate image in the System Visual pane 1 In the Categories pane select the Diagnostics tab 2 In the Information pane click the Visual button for the applicable Temperature Groups When components in the system exceed their maximum and minimum levels of operation APDiagnostics flags that information as warnings or errors depending on the da...

Страница 91: ...aximum or minimum set point Data lines display for every component that is queried and provide Green checkmark Notice or yellow Warning or red Error Component description e g Center board 2 POL 1 power General status description e g GOOD has surpassed etc Date time stamp for the event e g 8 03 07 5 15 50 PM Amount of elapsed time that the component has been in that state e g 7m 25s To access a dat...

Страница 92: ...ys system activity in the Activity Log dialog box in text format Application Preferences To access the Application Preferences dialog box and set preferences 1 Select Options Preferences The Preferences dialog box has two tabs General and Logging General Tab To set general application preferences 1 For the upper set of preferences click the applicable Enabled check boxes Always Perform Live Networ...

Страница 93: ...ached Probe History 168 hours For default values see the dialog box Large history sets may impede performance of the application so set this value in accordance with the resources available on the target PC Logging Tab To set the preference for Start acp Logging At Startup 1 Click the Enabled check box 2 Click OK To change settings 1 Edit in place for default values see the dialog box Log File Max...

Страница 94: ... In the event that you need to zip a set of files and send them to technical support use the Log File Zip Utility dialog box to create a single archive file to email To zip log files 1 Select File Zip Log Files 2 Click the Include check boxes for all of the files needing zipped Click individually or use any of the first three option buttons along the bottom Select multiple consecutive files by hol...

Страница 95: ...Status bar at the bottom indicates which file is being processed e g Processing file 2 of 3 Activity Log A diagnostics window where all activity is logged in detail keeps track of the application s activity while it is running The logging can be paused and resumed as required The logged information can also be deleted Clear Pad The level of logging can be specified as Critical General default or D...

Страница 96: ...ection occurs Due to the potentially high volume of information being processed from the attached enclosure we recommend using the Ethernet connection whenever possible To change the Comm Settings in Acquisition mode only 1 Select Comm Settings 2 Ethernet Select the Ethernet tab and set the NIC ID Or Serial Port Select the Serial Port tab and set the Comm ID and baud rate 3 Click Accept If the NIC...

Страница 97: ...The order in which the verbosity and component identity settings are entered is interchangeable Note In a multiple enclosure system the splash screen displays information only for the enclosure that is connected directly to the PC AMX reserves the right to add to the contents of the splash screen at any time without notice Verbosity i e wordiness refers to the amount of information provided the hi...

Страница 98: ...t verbosity level for all components v0i0 FIG 39 on page 93 Using BCS to Access System Diagnostic Information Instructions are provided for accessing the lowest level of verbosity for all components and for accessing a specific level of verbosity for a specific component To access the lowest level of verbosity for all components 1 Enter scr or scrv0i0 Note Either of these commands provides a menu ...

Страница 99: ...ation displayed FIG 40 Display for v3i1 verbosity 3 component 1 FIG 41 Display for v1i7 verbosity 1 component 7 scrv3i1 1 Enclosure AutoPatch EpicaDG host software v3 4 1 hardware driver v1 0 3 R build date Aug 03 2010 05 15 02 pld version A2 xnet address 0xeef4 ap system id 0x0 nvram status valid user preferences restored nvram magic 0xdedafaba scrv1i7 7 System Sensors detected cpu pol detected i...

Страница 100: ...board 5 sensors detected temp 1 32 3c temp 2 33 9c center board 1 sensors detected temp 1 28 5c center board 2 sensors detected temp 1 29 3c scrv3i6 6 Power System good status flags 0x0000 available system power 2418w required system power 990w ac power slot 1 good status flags 0x0000 available power 806w output power 150 850w voltage 12 248V current 12 248v scrv3i4 4 Hardware Boards detected swit...

Страница 101: ...Configuration Requirements below to determine if the file is required PC with a terminal emulation program e g HyperTerminal an RS 232 null modem cable Configuration Requirements If a board is replaced with the same type of board the configuration file does not need to be updated If a board is added to a previously empty slot as part of an unplanned upgrade or if a board is replacing a different t...

Страница 102: ...t that held the original board to make sure the switching commands are correct after you reconnect the source or destination devices Important Cable management bars are not to be used as handles to remove or install boards In the following procedure read each step entirely The steps include helpful tips to avoid damage to the enclosure s internal cables and connectors To remove and replace an Epic...

Страница 103: ...d bottom of the board slot FIG 1 Begin pushing the board into the slot until each extractor starts to engage its metal extractor plate lift into its folded position When the extractor handles start to lift flip the handles toward the middle of the board until they snap into their folded locked positions which firmly seats the board 6 If the enclosure was powered down Reapply power 7 Establish seri...

Страница 104: ...om the SC fiber connectors b remove the dust caps from the fiber cables c establish the connections and d apply power to the DGX TX Transmitter modules that are connected to the inputs For connecting a DGX SC Fiber output board Avoid direct eye exposure as you a remove the dust plugs from the SC fiber connectors b remove the dust caps from the fiber cables and c establish the connections 13 If the...

Страница 105: ...he serial port on the Epica DGX 144 with an RS 232 null modem cable 2 Install XNConnect from the AMX AutoPatch CD sent with the new board If XNConnect is already installed on the PC we strongly recommend uninstalling the old version before installing a new version 3 Open XNConnect 4 From the Communication menu select change Comm Settings Check the settings for the selected PC port the default is C...

Страница 106: ...Appendix E Board Replacement 102 Epica DGX 114 Instruction Manual ...

Страница 107: ...ation knowledge In the ever changing AV industry continual education is key to success AMX University is dedicated to ensuring that you have the opportunity to gather the information and experience you need to deliver strong AMX solutions Plus AMX courses also help you earn CEDIA NSCA InfoComm and AMX continuing education units CEUs Visit AMX University online for 24 7 365 access to Schedules and ...

Отзывы: