Installation and Setup
32
Epica DGX 144 Instruction Manual
2.
Plug the other end of the serial cable (RS-422 uses platform specific pinout) into the serial port on
the serial controller.
3.
If not already on, apply power first to the Epica DGX 144
enclosure and then to the source and
destination devices (see “Applying Power and Startup” on page 38).
Caution:
To avoid system damage, follow the power-up sequence on page 38. We recommend
attaching all power cords to a single surge protector (20 A) and/or AC line conditioner.
4.
Setup and run the desired method of control:
AMX control devices
– For control programming information, see the instruction manual for the
specific interface.
APControl 3.0
– Install and open the latest version of the program (located on the
AMX AutoPatch
CD
). Follow the setup wizard, which will discover the system’s configuration information and open
the APControl Launchbar.
HyperTerminal (terminal emulation)
– Open the program
(typically at start/Programs/Accessories/Communications/
HyperTerminal), select the Com port, and set the settings to match the
default ones in the Epica DGX 144 Serial Port Settings table to the
right. Click OK. A short splash screen appears.
5.
Execute a test switch to be sure the Epica DGX 144 is working
properly (see “Executing a Test Switch” on page 41).
Serial Communication Settings
When controlling the system with a serial controller, use serial communication software and make sure
the baud rate is set correctly for the system. The recommended (default) settings for serial
communication with an Epica DGX 144 Distribution Matrix are provided in the table above. These
enclosures support baud rates of 9600 (default), 19200, 38400, and 57600. The settings on the PC serial
communication software and the enclosure
must
correspond to each other. If a change is required to
make them match, changing the PC’s settings is preferable. If you decide to change the enclosure’s
settings instead, use XNConnect (see the Help file).
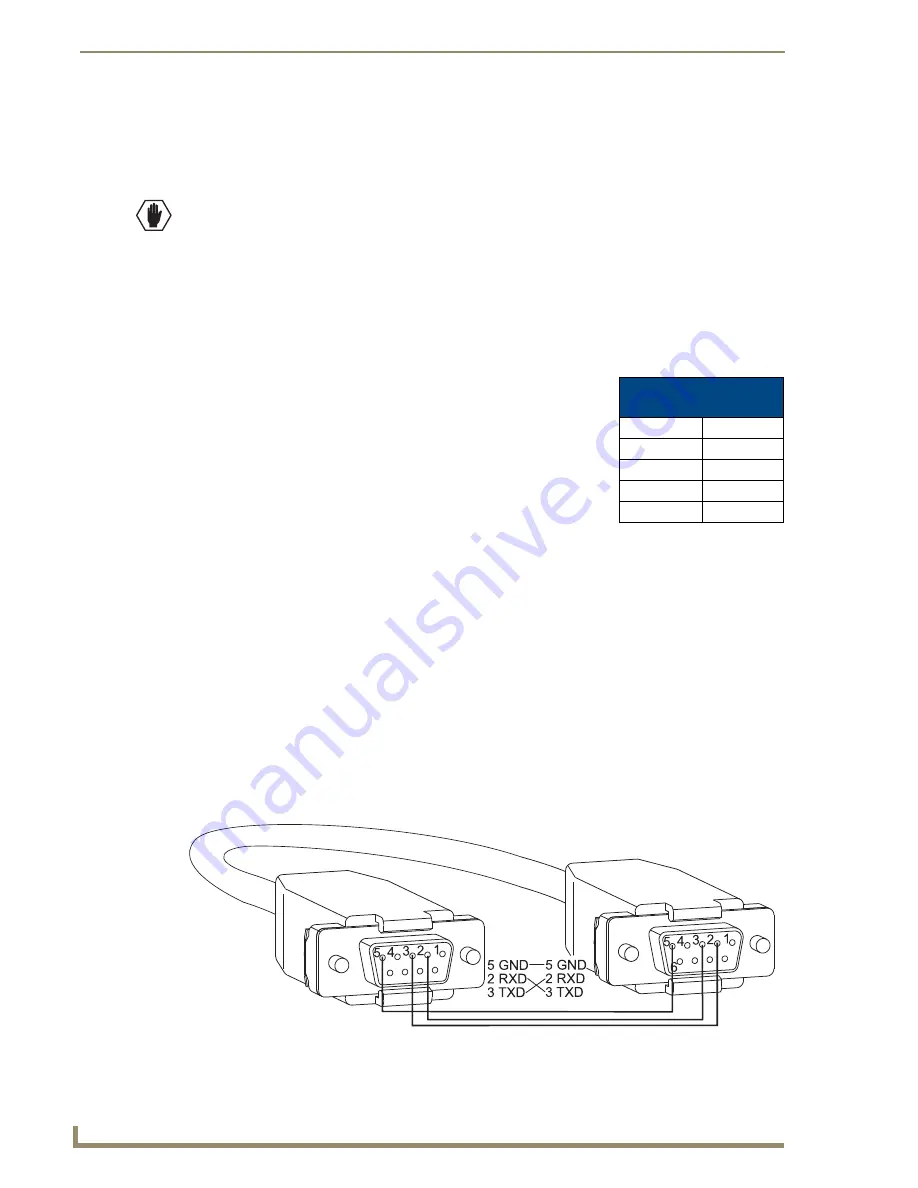
RS-232 Pin Diagram
Use a null modem cable that matches the pin diagram in FIG. 14 for RS-232 without hardware flow
control. AMX AutoPatch equipment requires pins 2, 3, and 5 only.
RS-232 Pin Diagram
FIG. 14
RS-232 null modem cable pin diagram, no hardware flow control
AutoPatch: DB-9
PC: DB-9
Epica DGX 144
Serial Port Settings
Baud Rate
9600
Data Bits
8
Parity
None
Stop Bits
1
Flow Control
None
serial port settings
table
Содержание Epica DGX 144
Страница 1: ...Instruction Manual AutoPatch Matrix Switchers Epica DGX 144 Distribution Matrix REV C 1 25 2011 ...
Страница 10: ...Notices 6 Epica DGX 144 Instruction Manual ...
Страница 20: ...Overview and General Specifications 16 Epica DGX 144 Instruction Manual ...
Страница 48: ...Installation and Setup 44 Epica DGX 144 Instruction Manual ...
Страница 54: ...Epica DGX 144 SC Fiber Boards 50 Epica DGX 144 Instruction Manual ...
Страница 72: ...Appendix A EDID Programmer 68 Epica DGX 144 Instruction Manual ...
Страница 82: ...Appendix B Managing Configuration Files 78 Epica DGX 144 Instruction Manual ...
Страница 106: ...Appendix E Board Replacement 102 Epica DGX 114 Instruction Manual ...


