background image

Cable Details and Pinout Information

47

 Enova DVX-315xHD & DVX-215xHD All-in-One Presentation Switchers - Instruction Manual

DVI-A Male to 5-BNC Male Cable

Cable to be composed of the following:



Five 75ohm 28 AWG mini-coax cables for the Red, Green, Blue, VSync, and HSync signals and returns



EMI shield metal can on DVI connector

Note: 

This cable type corresponds to the CC-DVI-5BNCM DVI-to-Component cable (FG10-2170-08), available from AMX.

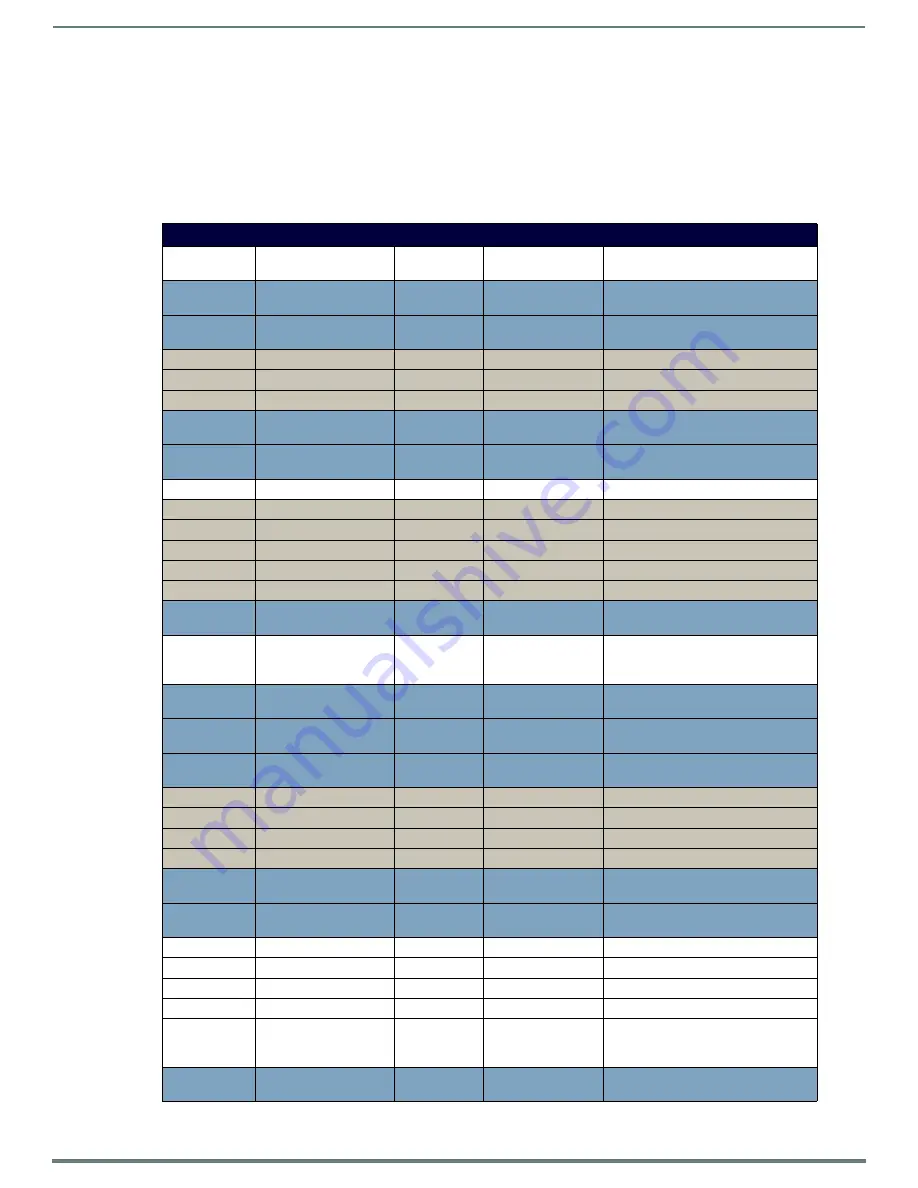
DVI-to-5-BNC Cable Pinout Information

The following table lists DVI--to-5-BNC cable pinouts:

DVI-to-5-BNC Cable Pinout Information

DVI-A

Connector Pin

Signal Name

Signal Name

BNC 

connector pin

Notes:

1

TMDS DATA 2 N

Pin populated in DVI-A connector, but 

not connected for this cable

2

TMDS DATA 2 P

Pin populated in DVI-A connector, but 

not connected for this cable

3

TMDS SHIELD 2/4

Pin not populated in DVI-A connector

4

TMDS DATA 4 N

Pin not populated in DVI-A connector

5

TMDS DATA 4 P

Pin not populated in DVI-A connector

6

DDC CLOCK

Pin populated in DVI-A connector, but 

not connected for this cable

7

DDC DATA

Pin populated in DVI-A connector, but 

not connected for this cable

8

ANALOG VERTICAL SYNC VSync Signal

Black BNC center pin

9

TMDS DATA 1 N

Pin not populated in DVI-A connector

10

TMDS DATA 1 P

Pin not populated in DVI-A connector

11

TMDS SHIELD 1/3

Pin not populated in DVI-A connector

12

TMDS DATA 3 N

Pin not populated in DVI-A connector

13

TMDS DATA 3 P

Pin not populated in DVI-A connector

14

+5VDC

Pin populated in DVI-A connector, but 

not connected for this cable

15

GROUND

VSync, HSync 

Returns 

(shields)

Black/Grey BNC 

shields

16

HOT PLUG DETECT

Pin populated in DVI-A connector, but 

not connected for this cable

17

TMDS DATA 0 N

Pin populated in DVI-A connector, but 

not connected for this cable

18

TMDS DATA 0 P

Pin populated in DVI-A connector, but 

not connected for this cable

19

TMDS SHIELD 0/5

Pin not populated in DVI-A connector

20

TMDS DATA 5 N

Pin not populated in DVI-A connector

21

TMDS DATA 5 P

Pin not populated in DVI-A connector

22

TMDS CLOCK SHIELD

Pin not populated in DVI-A connector

23

TMDS CLOCK P

Pin populated in DVI-A connector, but 

not connected for this cable

24

TMDS CLOCK N

Pin populated in DVI-A connector, but 

not connected for this cable

C1

C1 ANALOG RED

Red Signal

Red BNC center pin

C2

C2 ANALOG GREEN

Green Signal

Green BNC center pin

C3

C3 ANALOG BLUE

Blue Signal

Blue BNC center pin

C4

C4 ANALOG HSYNC

HSync Signal

Grey BNC center pin

C5

C5 ANALOG GROUND

Red, Green, 

Blue Returns 

(shields)

Red/Green/Blue BNC 

shields

BACKSHELL

SHIELD

Pin populated in DVI-A connector, but 

not connected for this cable

Содержание DVX-2150HD-T (FG1905-13)

Страница 1: ... ENOVA DVX 315XHD 21XXHD ALL IN ONE PRESENTATION SWITCHERS DVX 3150HD SP DVX 3150HD T DVX 3155HD SP DVX 3155HD T DVX 3156HD SP DVX 3156HD T DVX 2150HD SP DVX 2150HD T DVX 2155HD SP DVX 2155HD T DVX 2110HD SP DVX 2110HD T ...

Страница 2: ...les and the point where they exit from the apparatus 11 ONLY USE attachments accessories specified by the manufacturer 12 USE ONLY with a cart stand tripod bracket or table specified by the manufacturer or sold with the apparatus When a cart is used use caution when moving the cart apparatus combination to avoid injury from tip over 13 UNPLUG this apparatus during lightning storms or when unused f...

Страница 3: ...Restriction of Hazardous Substances Recast RoHS2 Directive 2011 65 EU European Union WEEE recast Directive 2012 19 EU This product contains batteries that are covered under the 2006 66 EC European Directive which cannot be disposed of with normal household waste Please follow local regulations You may obtain a free copy of the Declaration of Conformity by visiting http www amx com techcenter certi...

Страница 4: ...Instruction Manual This device is designed and evaluated under the condition of altitude below 2000 meters above sea level it can only be used in locations below 2000 meters above sea level Using the device above 2000 meters could result in a potential safety hazard ...

Страница 5: ... 21 Overview 21 Mounting the DVX into an Equipment Rack 21 Ventilation 21 Wiring and Device Connections 22 Overview 22 Front Panel Controls and Indicators 25 LEDs 25 LCD Display 25 SWITCH Pushbutton 26 TAKE Pushbutton 26 VIDEO MENU Pushbutton 26 AUDIO MENU Pushbutton 26 Navigation Pushbuttons 27 STATUS Pushbutton 27 EXIT Pushbutton 27 VIDEO AUDIO MUTE Pushbuttons 28 Rear Panel Audio Inputs and Out...

Страница 6: ...ails and Pinout Information 45 Overview 45 DVI D Male to DVI D Male Single Link Cable 46 DVI to DVI Cable Pinout Information 46 DVI A Male to 5 BNC Male Cable 47 DVI to 5 BNC Cable Pinout Information 47 DVI A Male to Triple RCA Male Cable 48 DVI to Triple RCA Cable Pinout Information 48 DVI A Male to S Video Male Cable 49 DVI to S Video Cable Pinout Information 49 DVI A Male to HD15 VGA Male Adapt...

Страница 7: ...tings 64 Audio Out 64 Audio In Microphone 65 Setting Up Surround Audio 67 Embedding Audio on an HDMI Output 67 Mixing Microphones onto Analog and HDMI Outputs 67 System Settings 68 NetLinx Firmware Upgrades 69 Overview 69 Before You Start 69 Verifying the Current Firmware Version 69 Downloading the Latest Firmware Files from www amx com 70 Downloading Enova DVX Firmware Files on www amx com 70 Req...

Страница 8: ...82 AUDMIC_COMPRESSION_RATIO 83 AUDMIC_COMPRESSION_RELEASE 83 AUDMIC_COMPRESSION_RELEASE 83 AUDMIC_COMPRESSION_THRESH 83 AUDMIC_COMPRESSION_THRESH 83 AUDMIC_DUCK_ATTACK 83 AUDMIC_DUCK_HOLD 83 AUDMIC_DUCK_LEVEL 84 AUDMIC_DUCK_RELEASE 84 AUDMIC_EQ_CF 84 AUDMIC_EQ_CF 84 AUDMIC_EQ_FT 84 AUDMIC_EQ_FT 84 AUDMIC_EQ_GAIN 85 AUDMIC_EQ_GAIN 85 AUDMIC_EQ_Q 85 AUDMIC_EQ_Q 85 AUDMIC_GAIN 85 AUDMIC_GAIN 86 AUDMI...

Страница 9: ...91 AUDOUT_EQ_FT 91 AUDOUT_EQ_GAIN 91 AUDOUT_EQ_GAIN 92 AUDOUT_EQ_MODE 92 AUDOUT_EQ_MODE 92 AUDOUT_EQ_Q 92 AUDOUT_EQ_Q 92 AUDOUT_MAXVOL 92 AUDOUT_MAXVOL 93 AUDOUT_MINVOL 93 AUDOUT_MINVOL 93 AUDOUT_MUTE 93 AUDOUT_MUTE 93 AUDOUT_STEREO 93 AUDOUT_STEREO 93 AUDOUT_TESTTONE 93 AUDOUT_TESTTONE 94 AUDOUT_VOLUME 94 AUDOUT_VOLUME 94 GAIN 94 GAIN 94 HDMIOUT_AUDIO 94 HDMIOUT_AUDIO 94 HDMIOUT_EQ 94 HDMIOUT_EQ ...

Страница 10: ...EDID 100 VIDIN_PREF_EDID 100 VIDIN_RES_AUTO 101 VIDIN_RES_AUTO 101 VIDIN_RES_REF 101 VIDIN_RES_REF 101 VIDIN_SATURATION 101 VIDIN_SATURATION 101 VIDIN_STATUS 101 VIDIN_VSHIFT 101 VIDIN_VSHIFT 102 VIDOUT_ASPECT_RATIO 102 VIDOUT_ASPECT_RATIO 102 VIDOUT_BLANK 102 VIDOUT_BLANK 102 VIDOUT_BRIGHTNESS 102 VIDOUT_BRIGHTNESS 102 VIDOUT_CONTRAST 103 VIDOUT_CONTRAST 103 VIDOUT_FREEZE 103 VIDOUT_FREEZE 103 VI...

Страница 11: ...NSITY_LCD 108 INTENSITY_LEDS 108 System SEND_COMMANDs 109 DXLINK_ETH 109 DXLINK_ETH 109 DXLINK_IN_ETH 109 DXLINK_IN_ETH 109 FAN_SPEED 109 TEMP 109 INTENSITY_LEDS 109 Appendix A Input Resolutions 110 Available Pixel Display and Refresh Rates 110 DVI HDMI and VGA Supported Input Resolutions 110 Composite and S Video Supported Input Resolutions 111 Component Video Supported Input Resolutions 111 Appe...

Страница 12: ... its own mixing and equalization settings Enova All in One Presentation Switchers Name FG Description Page Ref DVX 3150HD SP FG1905 15 10x4 All In One Presentation Switchers Multi Format HDMI Inputs 2x25W 8 Ohm page 14 DVX 3150HD T FG1905 17 10x4 All In One Presentation Switchers Multi Format HDMI Inputs 75W 70 100V page 14 DVX 3155HD SP FG1905 16 10x4 All In One Presentation Switchers Multi Forma...

Страница 13: ...the equivalent of a NetLinx 3101 central controller The 2000 series DVX includes the equivalent of a NetLinx 2100 central controller All DVX models also include a front control panel for an added level of convenience The DVX features standard RS 232 IR digital I O and relay control ports for control over environment and third party equipment ...

Страница 14: ...dicate that the Controller is receiving data OUTPUT red Output LED blinks to indicate that the Controller is transmitting data RS 232 422 485 red yellow 6 sets of LEDs indicate that RS 232 422 485 Ports 1 6 are transmitting or receiving data RELAYS red 8 LEDs indicate relay channels 1 8 are active closed on Port 8 IR SERIAL red 8 LEDs indicate that IR Serial channels 1 8 are transmitting control d...

Страница 15: ... Two 2 position captive wire connectors provide 70V or 100V mono amplified audio output T models only See the AMP OUT section on page 31 for more information AUDIO OUTPUTS 3 3 5mm 5 pin captive wire connector provides for balanced or unbalanced mono or stereo line level audio output See the AUDIO OUTPUTS section on page 31 for more information S PDIF OUTPUT 1 Coaxial RCA connector provides digital...

Страница 16: ...F Operating Temperature 0º C to 40º C 32º F to 104º F Operating Relative Humidity 5 to 85 non condensing Supported Video Resolutions HD resolutions up to 1080p and RGB resolutions up to 1920x1200 60Hz Higher resolutions are supported in pass through mode See the Available Pixel Display and Refresh Rates section on page 110 for a complete listing of all supported video resolutions Dimensions HWD 5 ...

Страница 17: ...cate that the Controller is receiving data OUTPUT red Output LED blinks to indicate that the Controller is transmitting data RS 232 422 485 red yellow 3 sets of LEDs indicate that RS 232 422 485 Ports 1 3 are transmitting or receiving data RELAYS red 4 LEDs indicate relay channels 1 4 are active closed on Port 4 IR SERIAL red 4 LEDs indicate that IR Serial channels 1 4 are transmitting control dat...

Страница 18: ... 30 for more information AMP OUT AMP 4 position captive wire connector provides amplified audio output with volume control SP models only AMP Two 2 position captive wire connectors provide 70V or 100V mono amplified audio output T models only See the AMP OUT section on page 31 for more information AUDIO OUTPUTS 2 3 5mm 5 pin captive wire connector provides for balanced or unbalanced mono or stereo...

Страница 19: ...ing the DVX with the NXA PDU 1508 8 power distribution unit do NOT connect 12V power from any of the NXA PDU s AxLink ports to the AxLink power pin See the AxLink Port and LED 4 pin captive wire section on page 43 for more information Power Connector IEC Power cord connector 100 240V AC 47 63Hz Operating Environment Storage temperature 10º C to 70º C 14º F to 158º F Operating Temperature 0º C to 4...

Страница 20: ...0 2170 09 CC DVI SVID DVI to S Video adapter cable FG10 2170 10 CC DVIM VGAF DVI to HD15 female adapter cable FG10 2170 13 CC 3 5ST5 RCA2F 2 RCA Female to 5 Pin Phoenix Cable FG10 003 20 AVB RX DXLINK HDMI DXLink HDMI Receiver Module FG1010 500 AVB TX HDMI DXLINK DXLink HDMI Transmitter Module FG1010 300 AVB TX MULTI DXLINK DXLink Multi Format Transmitters FG1010 310 AVB WP TX MULTI DXLINK DXLink ...

Страница 21: ...icable wires to the DVX Refer to the Wiring and Device Connections section on page 22 for wiring diagrams and pinout descriptions WARNING DO NOT stand other units directly on top of the DVX when it is rack mounted as this will place excessive strain on the mounting brackets Ventilation ALWAYS ensure that the rack enclosure is adequately ventilated Do not block any ventilation openings Sufficient a...

Страница 22: ...l FIG 6 displays the rear panel of the DVX 3150HD SP FIG 6 DVX 3150HD SP Rear Panel VIDEO MUTE AUDIO MUTE EXIT Pushbutton STATUS Pushbutton VIDEO MENU AUDIO MENU TAKE Pushbutton SWITCH Pushbutton Navigational Pushbuttons LCD Display INPUT LED RS232 422 485 LEDs Relay LEDs IR Serial LEDs I O LEDs LINK ACT LED STATUS LED OUTPUT LED RS232 422 485 Ports RELAYS Port 8 I O Port 17 IR SERIAL Ports 9 16 A...

Страница 23: ... SP with the exception that two HDMI inputs appear in place of two 1 8 mini audio jacks and two DVI inputs on ports 3 and 4 and two DXLink inputs appear in place of two HDMI inputs on ports 7 and 8 FIG 8 displays the rear panel of the DVX 3156HD SP FIG 8 DVX 3156HD SP Rear Panel FIG 9 displays the front panel of the DVX 2150HD SP and DVX 2155HD SP FIG 9 DVX 2150HD SP Front Panel DXLINK INPUTS EXIT...

Страница 24: ...two of the HDMI inputs FIG 10 DVX 2150HD SP Rear Panel FIG 11 displays the rear panel of the DVX 2155HD SP FIG 11 DVX 2155HD SP Rear Panel FIG 12 displays the rear panel of the DVX 2110HD SP FIG 12 DVX 2110HD SP Rear Panel MULTI FORMAT VIDEO INPUTS AUDIO HDMI INPUTS INPUTS AMP OUTPUT AUX OUTPUTS Power RS232 422 485 Ports RELAYS Port 4 I O Port 9 IR SERIAL Ports 5 8 AUDIO OUPUTS AxLink Port LED Con...

Страница 25: ...s the LCD display FIG 15 LCD display Front Panel LEDs Label Color Description LINK ACT Green Blinks when receiving LAN data packets STATUS Green Blinks to indicate that the system is programmed and communicating properly INPUT Yellow Blinks to indicate that the Controller is receiving data OUTPUT Red Blinks to indicate that the Controller is transmitting data RS 232 422 485 Red yellow LEDs indicat...

Страница 26: ... pushbutton FIG 18 VIDEO MENU Pushbutton The Video menu enables you to see and adjust most parameters of the video input and output signals Use the UP and DOWN navigational buttons to traverse the various configuration parameters Use the LEFT and RIGHT navigational buttons to adjust the selected video parameter Adjustments take effect immediately some parameter changes may exhibit a slight delay a...

Страница 27: ...o the next set item if the setting is a set selection These buttons do not change the currently selected menu FIG 20 displays the Navigation pushbuttons FIG 20 Navigation Pushbuttons STATUS Pushbutton Press the STATUS pushbutton to access the STATUS menu on the LCD display FIG 21 displays the STATUS pushbutton FIG 21 STATUS Pushbutton The STATUS menu enables you to see status information such as I...

Страница 28: ...he DVX 3150HD SP FIG 24 Audio Inputs Connectors DVX 3150HD The following table lists the number of ports and the port numbers for each model of DVX HDMI INPUTS The HDMI INPUT connectors on the rear panel routes digital audio and video from connected source input devices to the connected output devices These inputs support the following audio formats For more information about these connectors incl...

Страница 29: ... Vrms Input impedance 12k ohms unbalanced 12k ohms balanced DC coupled FIG 25 displays the AUDIO INPUTS connectors on the DVX 3150HD SP FIG 25 Audio Inputs Connectors The following table lists the number of ports and the port numbers for each model of DVX Source devices require either balanced differential or unbalanced single ended connections FIG 26 illustrates options for wiring between sources...

Страница 30: ...udio Source Wiring WARNING Do not connect the negative terminals to the source connector Doing so can cause damage to your device MIC INPUTS Two 3 5mm 3 pin captive wire MIC INPUT connectors FIG 28 allow up to two mono microphones to be connected to the DVX Each microphone input supports balanced and unbalanced audio Each input supports up to 48V of phantom power FIG 28 displays the MIC INPUTS con...

Страница 31: ...isplays the AMP OUT CLASS 2 WIRING outputs FIG 30 AMP Out Class 2 Wiring Output On SP models connect speakers to the AMP OUT output as displayed in FIG 31 FIG 31 Connecting Speakers to the Amplified Audio Output SP Models On T models connect a speaker to either the 70V or 100V terminals as displayed in FIG 32 FIG 32 Connecting Speakers to the Amplified Audio Output T Models AUDIO OUTPUTS The Line ...

Страница 32: ... outputs on the DVX support HDCP Refer to FIG 6 on page 22 for the component layout of the rear panel MULTI FORMAT VIDEO INPUTS The MULTI FORMAT VIDEO INPUT connectors on the rear panel are used to connect video source input devices to the DVX The DVX routes video from connected source input devices to the connected output devices The DVX 3150HD and 3155HD models each feature four audio outputs po...

Страница 33: ...e to purchase from other vendors assuming that they also utilize industry standard or equivalent pinouts The following table displays the supported video settings for each type of input connection MULTI FORMAT VIDEO INPUT Connectors Pinouts and Signals Pin Signal Pin Signal Pin Signal 1 TMDS Data2 9 TMDS Data1 17 TMDS Data0 2 TMDS Data2 10 TMDS Data1 18 TMDS Data0 3 TMDS Data2 4 Shield 11 TMDS Dat...

Страница 34: ... HDMI INPUTS FIG 38 HDMI Pinouts To connect HDMI input source devices DVI and HDMI to the HDMI INPUT connectors the following optional adapter cables are required The following table displays the supported video settings for each type of input connection compatible with the HDMI INPUT connectors Digital Audio Ports DVX Model No of HDMI Ports Port Numbers No of DXLink Ports Port Numbers DVX 3150HD ...

Страница 35: ...O OUTPUTS for the 315x DVX models include 2 different types of connectors 4 HDMI Output connectors 1 4 each provide digital DVI video and HDMI audio and video output 2 DXLink Twisted Pair outputs 1 3 mirror HDMI outputs 1 and 3 They provide digital video audio Ethernet and bi directional control over Category Cable to DXLink Receivers See the Important Twisted Pair Cabling Requirements and Recomme...

Страница 36: ...ommands only and bi directional control and power over Category Cable to DXLink Receivers Video output on the DXLink port is NOT scaled See the Important Twisted Pair Cabling Requirements and Recommendations section on page 37 information about cable requirements NOTE The DVX 2110HD features 1 DXLink Twisted Pair output 1 which mirrors HDMI port 1 It provides digital video audio Ethernet and bi di...

Страница 37: ...e runs for DXLink equipment shall only be run within a common building DXLink delivers 10 2 GB s throughput over shielded category cable Based on this bandwidth requirement we recommend following industry standard practices designed for 10 Gigabit Ethernet when designing and installing the cable infrastructure The cables should be no longer than necessary to reach the end points We recommend termi...

Страница 38: ...on transmit off CTS RTS clear to send ready to send 300 115 200 baud FIG 45 provides wiring specifications for the RS 232 422 485 connectors FIG 45 RS 232 422 485 DB9 male Connector Pinouts VIDEO OUTPUTS Pin Signal Function RS 232 RS 422 RS 485 1 RX Receive data X X strap to pin 9 2 RXD Receive data X 3 TXD Transmit data X 4 TX Transmit data X X strap to pin 6 5 GND Signal ground X X X 6 RX Receiv...

Страница 39: ...nector provides relay termination Only one 8 pin connector on 21xx DVX models Port 8 on 315x DVX models Port 4 on 21xx DVX models I O The I O port FIG 47 responds to switch closures and voltage level high low changes or can be used for logic level outputs FIG 47 displays the I O port on the DVX 3150HD SP FIG 47 I O Connectors A contact closure between the GND and an I O port is detected as a Push ...

Страница 40: ...x DVX models The IR Serial connector wiring specifications for 315x DVX models are listed in the following table The IR Serial connector wiring specifications for 21xx DVX models are listed in the following table IR Serial Connector Wiring Specifications per Port IR connections Port Signal Function 1 9 GND Signal 1 Signal GND IR Serial data 2 10 GND Signal 2 Signal GND IR Serial data 3 11 GND Sign...

Страница 41: ...cle power then use the NetLinx Studio v 3 x program to resolve the communication and or control problems with the resident NetLinx program After doing so download the corrected program reset the configuration DIP switch to normal mode recycle power and try again To set the CONFIG DIP Switch 1 Turn off the power switch on the rear of the unit 2 Set the CONFIG DIP switch refer to FIG 49 3 Turn on th...

Страница 42: ... changed It is not possible to change the 5002 device ID FIG 51 displays the ID pushbutton FIG 51 ID Pushbutton LAN RJ 45 The LAN RJ 45 port provides 10 100 Mbps communication via Category cable This is an Auto MDI MDI X enabled port which allows you to use either straight through or crossover Ethernet cables FIG 52 displays the LAN port FIG 52 LAN Port The LAN port automatically negotiates the co...

Страница 43: ... the maximum current draw is less than 1 Amp To isolate the DVX from high inrush current AxLink devices or potential power faults on the AxLink bus it is strongly recommended that you power external AxLink devices from an independent power supply NOTE The AxLink port provides only limited power to connected AxLink devices It is recommended to use an alternate power source when connecting AxLink de...

Страница 44: ...AXM AXP and GND wires to the Controller s Phoenix connector when using an external power supply Make sure to connect only the GND wire on the AxLink PWR connector when using a separate 12 VDC power supply Do not connect the PWR wire to the AxLink connector s PWR opening Power Connector Switch Fuse FIG 58 displays the power switch and connector for the DVX FIG 58 Power Connector Switch Fuse WARNING...

Страница 45: ...urce devices S Video Composite VGA Component and HDMI to the DVI Input connectors the following optional adapter cables are required DVI Input Adapter Cables Name Description Length FG CC DVI 5BNCM DVI to 5 BNC Male Note Used for VGA Component or Composite inputs When used for composite inputs connect the green plug on the adapter cable to the composite video output jack on the source device 6 1 8...

Страница 46: ...nnected for this cable 9 TMDS DATA 1 N TMDS DATA 1 N 9 28AWG twisted pair 1 10 TMDS DATA 1 P TMDS DATA 1 P 10 28AWG twisted pair 1 11 TMDS SHIELD 1 3 TMDS SHIELD 1 3 11 28AWG twisted pair 1 drain 12 TMDS DATA 3 N TMDS DATA 3 N 12 Pin not populated in DVI D connector 13 TMDS DATA 3 P TMDS DATA 3 P 13 Pin not populated in DVI D connector 14 5VDC 5VDC 14 28AWG 15 GROUND GROUND 15 28AWG 16 HOT PLUG DE...

Страница 47: ...not populated in DVI A connector 10 TMDS DATA 1 P Pin not populated in DVI A connector 11 TMDS SHIELD 1 3 Pin not populated in DVI A connector 12 TMDS DATA 3 N Pin not populated in DVI A connector 13 TMDS DATA 3 P Pin not populated in DVI A connector 14 5VDC Pin populated in DVI A connector but not connected for this cable 15 GROUND VSync HSync Returns shields Black Grey BNC shields 16 HOT PLUG DE...

Страница 48: ...Pin not populated in DVI A connector 10 TMDS DATA 1 P Pin not populated in DVI A connector 11 TMDS SHIELD 1 3 Pin not populated in DVI A connector 12 TMDS DATA 3 N Pin not populated in DVI A connector 13 TMDS DATA 3 P Pin not populated in DVI A connector 14 5VDC Pin populated in DVI A connector but not connected for this cable 15 GROUND Pin populated in DVI A connector but not connected for this c...

Страница 49: ... but not connected for this cable 9 TMDS DATA 1 N Pin not populated in DVI A connector 10 TMDS DATA 1 P Pin not populated in DVI A connector 11 TMDS SHIELD 1 3 Pin not populated in DVI A connector 12 TMDS DATA 3 N Pin not populated in DVI A connector 13 TMDS DATA 3 P Pin not populated in DVI A connector 14 5VDC Pin populated in DVI A connector but not connected for this cable 15 GROUND Pin populat...

Страница 50: ...out Information 50 Enova DVX 315xHD DVX 215xHD All in One Presentation Switchers Instruction Manual BACKSHELL SHIELD Pin populated in DVI A connector but not connected for this cable DVI to S Video Cable Pinout Information ...

Страница 51: ...TA 12 28AWG 8 ANALOG VERTICAL SYNC VSYNC Signal 14 28AWG 9 TMDS DATA 1 N Pin not populated in DVI A connector 10 TMDS DATA 1 P Pin not populated in DVI A connector 11 TMDS SHIELD 1 3 Pin not populated in DVI A connector 12 TMDS DATA 3 N Pin not populated in DVI A connector 13 TMDS DATA 3 P Pin not populated in DVI A connector 14 5VDC 5VDC 9 28AWG 15 GROUND GND HS Return 5 28AWG 16 HOT PLUG DETECT ...

Страница 52: ...to DVI D cable pinouts HDMI to DVI D Cable Pinout Information HDMI Connector Pin Signal Name Wire DVI D Pin Notes 1 TMDS Data 2 A 2 2 TMDS Data Shield B 3 3 TMDS Data 2 A 1 4 TMDS Data 1 A 10 5 TMDS Data Shield B 11 6 TMDS Data 1 A 9 7 TMDS Data 0 A 18 8 TMDS Data 0 Shield B 19 9 TMDS Data 0 A 17 10 TMDS Clock A 23 11 TMDS Clock Shield B 22 12 TMDS Clock A 24 13 CEC N C N C 14 Reserved N C N C 15 ...

Страница 53: ... MENU button Video Output Menu Options Output Select Use the left and right buttons to manually select which video output you want to use Select 1 2 3 4 or ALL 1 2 or ALL on 21xx DVX models Scaling Use the left and right buttons to toggle whether you want to scale the output image Select AUTO MANUAL or BYPASS The default setting is AUTO Resolution Use the left and right buttons to manually select ...

Страница 54: ... to alter the contrast level adjustment applied to the selected output Set the contrast level from 0 100 The default setting is 50 H Size Use the left and right buttons to set the horizontal size of the image for the selected output Set the size from 25 to 800 The default setting is 100 H Shift Use the left and right buttons to move the location of the video output from left to right Set the shift...

Страница 55: ...he EDID from any of the HDMI outputs EDID Update When the EDID is set to mirror one of the outputs use the left and right buttons to indicate whether you want the EDID going to the source to update anytime the output EDID changes or only when an update is requested manually Select either AUTO or OFF The default setting is AUTO Source Input Video Adjust NOTE The following input video adjustments ha...

Страница 56: ...he overall mix Set the mix level from 0 to 100 The default setting is 0 Mic2 Mix Use the left and right buttons to set the mix level of microphone 2 in the overall mix Set the mix level from 0 to 100 The default setting is 0 HDMI Use the left and right buttons to indicate which analog audio output to embed in the selected HDMI output Select Out1 Out2 Out3 Out4 Pass thru or Off HDMI EQ Use the left...

Страница 57: ...return all audio input options to their default settings Mic Input Menu Options Mic Input Mode Use the left and right buttons to select either Single Stereo to adjust both microphone inputs or Dual Mono Mode to adjust the microphone settings individually If you select Dual Mono Mode be sure to select the desired microphone from the Mic Input Select option before adjusting the available settings fo...

Страница 58: ... available video outputs This option is only available if you select Video on the Switch Level option Select Audio Input Use the SWITCH button to cycle through the available audio inputs This option is only available if you select Audio on the Switch Level option Select Audio Output Use the SWITCH button to cycle through the available audio outputs This option is only available if you select Audio...

Страница 59: ...owser and type the IP Address of the target DVX in the Address Bar 2 Press Enter to access WebConsole for that DVX The initial view is the WebControl page FIG 62 displays the Master Configuration Manager WebControl page FIG 62 Master Configuration Manager WebControl Page Initial View Select this option to show hide the Online Device Tree showing all devices currently connected to this Master Syste...

Страница 60: ... the main page FIG 63 FIG 63 WebConsole Control Buttons WebControl This is the option that is pre selected when the WebConsole is accessed Use the options in the Manage WebControl Connections page to manage G4WebControl connections Security Click to access the System Security page The options in this page allow you to configure various aspects of NetLinx System and Security on the Master System Cl...

Страница 61: ... Address of the DVX Locate the IP address of the DVX by using the buttons on the front panel of the unit The IP address appears on the LCD display on the front panel of the DVX Perform these steps to locate the IP address of the unit 1 Press the STATUS button on the front panel of the unit The Status menu appears on the LCD display 2 Use the UP and DOWN navigational arrow buttons to navigate throu...

Страница 62: ...corner of the screen whenever you select a new input source From the available menus in the same area you can select the color scheme and location of the OSD 4 Select Input Use the menu to select a video input to be switched to the selected video output 5 Logo Test Pattern Use the menu to choose an image logo or output test pattern to display on the video output Select Off to disable the logo or t...

Страница 63: ... click Flash Logos to load the images files into memory WARNING Using concurrent web browsers or users while uploading or flashing image files can cause corruption in your images It is a best practice to use only a single web browser when uploading or flashing an image file NOTE Closing and restarting your web browser removes all current image file information from the Web Console page However if ...

Страница 64: ...ut signal or click Manual to manually select the video resolution for the selected input signal After clicking the Manual option button select a resolution from the corresponding drop down menu The Auto option is selected by default NOTE The recommended setting is Auto In Manual mode the DVX shows blank video if the input is set to any resolution other than the selected manual resolution See the E...

Страница 65: ... of 1 The default value is 0 Balance Use the slider to adjust the balance level of the selected audio output You can set the balance level from 20 to 20 The default value is 0 Sync Delay Use the slider to set the number of milliseconds to delay the audio The default value is 32 Additionally you can silence the audio output by clicking the Mute check box 3 HDMI Output Use the available options to c...

Страница 66: ...cted band You can set the gain from 12 to 12dB in 1dB increments The default setting is 0 Q Q factor adjusts the filter from wider to narrower smoothing between inflection points on the frequency response The default setting is 1 4 The range is from 0 1 to 20 0 in 0 1 increment decrement steps Tone Adjust Use the menu to select a fixed adjustment to the frequency response depending on the current ...

Страница 67: ...ts Equalizer The equalizer is a 3 band parametric equalizer enabling you to set 3 frequencies to any value from 20Hz to 20KHz The default center frequencies are 500Hz 1000Hz and 3000Hz Each band is set individually by selecting the band from the Band menu then adjusting the remaining settings A dynamics chart displays any activity on the equalizer band Changing the Gain Frequency or Q settings can...

Страница 68: ... of the Audio Out tab select the HDMI output that is the destination for audio and then select the analog output you want to embed from the Audio Source options menu See item 3 on Audio Out section on page 64 for more information 5 Route the desired input audio connected in step 2 to the analog output chosen in step 4 and it will automatically embed on the selected HDMI and or S PDIF output 6 In t...

Страница 69: ...d except Microsoft Internet Explorer when HTTP Security is enabled on the DVX Master 3 Microphone Mode Click the checkboxes to activate or deactivate the microphones connected to Mic Inputs 1 and 2 when in Dual Mode or the L R Microphone when in Single Stereo Mode 4 Front Panel Lockout Mode Click the check box to activate a lockout of some or all of the buttons on the front panel Select the type o...

Страница 70: ...Device Number can be viewed on the DVX Configuration Manager Device Configuration page 6 Launch NetLinx Studio and open the Online Device Tree Verifying the Current Firmware Version Use the Online Tree in NetLinx Studio see FIG 71 on page 69 to verify which version of each firmware file is currently installed 1 In NetLinx Studio click on the Online Tree tab in the Workspace Bar to view the devices...

Страница 71: ...TXT file that provides details on this firmware release 1 Accept the AMX Licensing Agreement 2 Download the ZIP file and unzip the contents to a known location Required Order of Firmware Updates for DVX Controllers Upgrade firmware in the following order 1 First upgrade the A V Switcher Scaler firmware 2 When that process is complete upgrade the Master firmware 3 When that process is complete upgr...

Страница 72: ... online device including the current firmware version Before attempting to upgrade the firmware you must have the appropriate Kit file for your DVX The DVX contains three devices which each require a separate Kit file These three devices must be kept at compatible firmware versions for proper operation Device ID 0 NetLinx Master Controller Default Device ID 5001 Device Control Ports Default Device...

Страница 73: ...he integrated A V switcher is 5002 Use the Online Device Tree to determine the device s assigned IDs if it has been changed 5 Review the File Connection Address and Target Device information before you send 6 Click the Send button You can watch the progress of the transfer in the Send to NetLinx Device dialog box NetLinx Studio transfers the files to the DVX and then tells it to reboot After it re...

Страница 74: ...nal counterparts The following table lists the commands which have changed and the new name of the command SEND_COMMAND Changes Original Command New Command Page Ref GAIN AUDIN_GAIN page 81 GAIN AUDIN_GAIN page 81 INPUTEQ AUDMIC_EQ_GAIN page 85 INPUTEQ AUDMIC_EQ_GAIN page 85 PHANTOM_PWR AUDMIC_PHANTOM_PWR page 89 PHANTOM_PWR AUDMIC_PHANTOM_PWR page 88 AUDIO_MUTE AUDOUT_MUTE page 93 AUDIO_MUTE AUDO...

Страница 75: ...e DPS see page 76 for details 41 1 4 Switches audio input 1 to the video output specified in the DPS 42 1 4 Switches audio input 2 to the video output specified in the DPS 43 1 4 Switches audio input 3 to the video output specified in the DPS 44 1 4 Switches audio input 4 to the video output specified in the DPS 45 1 4 Switches audio input 5 to the video output specified in the DPS 46 1 4 Switches...

Страница 76: ... 1 3 Switches video input 4 to the video output specified in the DPS see page 76 for details 35 1 3 Switches video input 5 to the video output specified in the DPS see page 76 for details 36 1 3 Switches video input 6 to the video output specified in the DPS see page 76 for details 41 1 3 Switches audio input 1 to the video output specified in the DPS 42 1 3 Switches audio input 2 to the video out...

Страница 77: ...ed and any changes will be noticed after the DVX exits Standby Mode All audio and video signals are restored in less than 10 seconds after exiting Standby Mode The DVX exits Standby Mode on any power cycle or reboot 141 1 6 Audio Input Gain Down 142 1 6 Black and White State 143 1 6 Audio Input Gain Mute Reserved for future use 144 1 6 Audio Input Gain Mute Cycle Reserved for future use 148 1 6 Vi...

Страница 78: ... 127 127 Video Output Vertical Shift 31 1 4 12 12 Audio EQ Band 1 32 1 4 12 12 Audio EQ Band 2 33 1 4 12 12 Audio EQ Band 3 34 1 4 12 12 Audio EQ Band 4 35 1 4 12 12 Audio EQ Band 5 36 1 4 12 12 Audio EQ Band 6 37 1 4 12 12 Audio EQ Band 7 38 1 4 12 12 Audio EQ Band 8 39 1 4 12 12 Audio EQ Band 9 40 1 4 12 12 Audio EQ Band 10 41 1 4 100 0 Audio Program Source Mixing Level 42 1 4 100 0 Audio Line M...

Страница 79: ...27 127 Video Output Vertical Shift 31 1 3 12 12 Audio EQ Band 1 32 1 3 12 12 Audio EQ Band 2 33 1 3 12 12 Audio EQ Band 3 34 1 3 12 12 Audio EQ Band 4 35 1 3 12 12 Audio EQ Band 5 36 1 3 12 12 Audio EQ Band 6 37 1 3 12 12 Audio EQ Band 7 38 1 3 12 12 Audio EQ Band 8 39 1 3 12 12 Audio EQ Band 9 40 1 3 12 12 Audio EQ Band 10 41 1 3 100 0 Audio Program Source Mixing Level 42 1 3 100 0 Audio Line Mic...

Страница 80: ...r Video output ports 05002 1 0 05002 2 0 05002 3 0 and 05002 4 0 Input and Output functional distinctions are disambiguated from the overlapped port numbers by combining them with the command name The following table lists the port functionality mapping for the audio video ports on the DVX Port Functionality Mapping Port Number Description Address 1 Audio Video Input 1 05002 1 0 2 Audio Video Inpu...

Страница 81: ...ION high Sets the compression setting of the audio input port 1 based on D P S to high AUDIN_COMPRESSION_ATTACK Requests the compression s attack phase for the specified audio port Syntax SEND_COMMAND DEV AUDIN_COMPRESSION_ATTACK Example SEND_COMMAND AUDIO_1 AUDIN_COMPRESSION_ATTACK Returns a COMMAND string of the form AUDIN_COMPRESSION_ATTACK attack AUDIN_COMPRESSION_ATTACK Sets the duration of t...

Страница 82: ...pecified audio port Syntax SEND_COMMAND DEV AUDIN_COMPRESSION_THRESH threshold Variable threshold 0 to 60 in dB Example SEND_COMMAND AUDIO_INPUT_1 AUDIN_COMPRESSION_THRESH 10 Sets the threshold while compressing for the selected audio input port 1 based on D P S to 10dB AUDIN_DIGITAL Requests the format of the specified audio port Syntax SEND_COMMAND DEV AUDIN_DIGITAL Example SEND_COMMAND AUDIO_IN...

Страница 83: ...setting for the specified microphone to setting Syntax SEND_COMMAND DEV AUDMIC_COMPRESSION setting Variable setting off low medium high custom Example SEND_COMMAND MICROPHONE_1 AUDMIC_COMPRESSION high Sets the compression for the microphone port 1 based on D P S to high AUDMIC_COMPRESSION_ATTACK Requests the duration of the attack phase while compressing for a specified microphone Syntax SEND_COMM...

Страница 84: ...hone port 1 based on the D P S to 200 AUDMIC_COMPRESSION_THRESH Requests the compression threshold for a specified microphone Syntax SEND_COMMAND DEV AUDMIC_COMPRESSION_THRESH Example SEND_COMMAND MIC_1 AUDMIC_COMPRESSION_THRESH Returns a COMMAND string of the form AUDMIC_COMPRESSION THRESH thresh AUDMIC_COMPRESSION_THRESH Sets the compression threshold for the specified microphone port Syntax SEN...

Страница 85: ...C_EQ_CF Sets the frequency for the specific band of the equalizer for the specified microphone port Syntax SEND_COMMAND DEV AUDMIC_EQ_CF band frequency Variables band 1 3 on the microphone inputs frequency 20 to 20 000 in Hz Example SEND_COMMAND MICROPHONE_1 AUDMIC_EQ_CF 1 1000 Sets the frequency for the first band of the equalizer for the selected microphone port 1 based on D P S to be 1000 AUDMI...

Страница 86: ...cific band of the equalizer for the specified microphone port Syntax SEND_COMMAND DEV AUDMIC_EQ_Q band Variable band 1 3 on the microphone inputs Example SEND_COMMAND MIC_1 AUDMIC_EQ_Q 1 Returns a COMMAND string of the form AUDMIC_EQ_Q band value AUDMIC_EQ_Q Sets the quality factor Q for a specific band of the equalizer for the specified microphone port Syntax SEND_COMMAND DEV AUDMIC_EQ_Q band fac...

Страница 87: ...MIC_GATING_ATTACK Example SEND_COMMAND MIC_1 AUDMIC_GATING_ATTACK Returns a string of the form AUDMIC_GATING_ATTACK value AUDMIC_GATING_ATTACK Sets the gating attack for the specified microphone port Syntax SEND_COMMAND DEV AUDMIC_GATING_ATTACK attack Variable attack 1 to 2000 Example SEND_COMMAND MICROPHONE_1 AUDMIC_GATING_ATTACK 200 Sets the gating attack for the microphone port 1 based on the D...

Страница 88: ...he specified microphone port Syntax SEND_COMMAND DEV AUDMIC_GATING_THRESH Example SEND_COMMAND MIC_1 AUDMIC_GATING_THRESH Returns a string of the form AUDMIC_GATING_THRESH value AUDMIC_GATING_THRESH Sets the gating threshold for the specified microphone port Syntax SEND_COMMAND DEV AUDMIC_GATING_THRESH thresh Variable thresh 0 to 60 Example SEND_COMMAND MICROPHONE_1 AUDMIC_GATING_THRESH 20 Sets th...

Страница 89: ...HRESH Requests the duration of the threshold phase while limiting from the specified microphone port Syntax SEND_COMMAND DEV AUDMIC_LIMITER_THRESH Example SEND_COMMAND MIC_1 AUDMIC_LIMITER_THRESH Returns a string of the form AUDMIC_LIMITER_ THRESH thresh AUDMIC_LIMITER_THRESH Sets the limiter threshold for the specified microphone port Syntax SEND_COMMAND DEV AUDMIC_LIMITER_THRESH thresh Variable ...

Страница 90: ...DMIC_STEREO Example SEND_COMMAND MICROPHONE_1 AUDMIC_STEREO Returns a COMMAND string of the form AUDMIC_STEREO option AUDMIC_STEREO Sets the microphone to be used by the specified microphone port Syntax SEND_COMMAND DEV AUDMIC_STEREO option Variable option dual mono or single stereo Example SEND_COMMAND MIC_1 AUDMIC_STEREO single stereo Sets the microphone port 1 based on the D P S to use both the...

Страница 91: ... level for the specified output port Syntax SEND_COMMAND DEV AUDOUT_DUCK_LEVEL level Variable level 0 to 20 Example SEND_COMMAND AUDIO_OUTPUT_1 AUDOUT_DUCK_LEVEL 4 Sets the ducking level for the output port 1 based on the D P S to 4 AUDOUT_DUCK_RELEASE Sets the duration of the release phase while ducking from the specified output port Syntax SEND_COMMAND DEV AUDOUT_DUCK_RELEASE release Variable re...

Страница 92: ...o output port value 20 20000 The units are in Hz Example SEND_COMMAND AUDIO_OUTPUT_1 AUDOUT_EQ_CF 1 80 Sets the center frequency on band 1 of audio port 1 equalizer to 80 SEND_COMMAND AUDIO_OUTPUT_2 AUDOUT_EQ_CF 5 100 Sets the center frequency on band 5 of audio port 2 equalizer to 100 AUDOUT_EQ_FT Requests the filter type on the specified equalizer band on the specified audio output port Syntax S...

Страница 93: ..._EQ_MODE movie Sets the equalizer to favor the sounds of a movie for the audio output port 1 based on D P S AUDOUT_EQ_Q Requests the quality factor Q on a specific equalizer band on the specified audio output port Syntax SEND_COMMAND DEV AUDOUT_EQ_Q band Example SEND_COMMAND AUDIO_OUTPUT_1 AUDOUT_EQ_Q 1 Returns a COMMAND string of the form AUDOUT_EQ_Q band factor AUDOUT_EQ_Q Sets the quality facto...

Страница 94: ...TE Requests audio mute status Syntax SEND_COMMAND DEV AUDOUT_MUTE Example SEND_COMMAND dxDev AUDOUT_MUTE Returns a COMMAND string of the form AUDOUT_MUTE enable disable AUDOUT_MUTE Enables or disables audio muting on all ports Syntax SEND_COMMAND DEV AUDOUT_MUTE setting Variables setting desired mute state either ENABLE or DISABLE Example SEND_COMMAND dxDev AUDOUT_MUTE DISABLE AUDOUT_STEREO Reques...

Страница 95: ...MI output port followed by the specified audio port Syntax SEND_COMMAND DEV HDMIOUT_AUDIO Example SEND_COMMAND AUDIO_OUTPUT_1 HDMIOUT_AUDIO Returns a COMMAND string of the form HDMIOUT_AUDIO option HDMIOUT_AUDIO Sets the output used by the specified HDMI output port Syntax SEND_COMMAND DEV HDMIOUT_AUDIO option Variable option off input pass thru analog out 1 analog out 2 analog out 3 analog out 4 ...

Страница 96: ...ME section on page 94 XPOINT Requests the mix level contribution of the audio input port addressed by input to the audio output mixer addressed by output Syntax SEND_COMMAND DEV XPOINT input output Variables input 1 2 3 where 1 LINE 2 Mic1 and 3 Mic2 output 1 4 where 1 is for the AMP output and 2 3 and 4 are for the LINEOUT output Example SEND_COMMAND AUDIO_OUTPUT_2 XPOINT 1 2 Returns a COMMAND st...

Страница 97: ...oth AUDIO and VIDEO input The source input port number output The output port number to switch to Examples SEND_COMMAND SWITCHER CLALLI2O1 Switch audio and video inputs port 2 to output 1 SEND_COMMAND SWITCHER CLVIDEOI3O1 2 Switch video input port 3 to video output ports 1 and 2 SEND_COMMAND SWITCHER CLAUDIOI4O1 Switch audio input port 4 to audio output port 1 SEND_COMMAND SWITCHER CLALLI1O1 2 Swi...

Страница 98: ...section on page 104 VIDEO_TESTPATTERN See the VIDOUT_TESTPAT section on page 106 VIDEO_TESTPATTERN See the VIDOUT_TESTPAT section on page 106 VIDIN_BRIGHTNESS Requests the input brightness of the specified video port Syntax SEND_COMMAND DEV VIDIN_BRIGHTNESS Example SEND_COMMAND VIDEO_INPUT_1 VIDIN_BRIGHTNESS Returns a COMMAND string of the form VIDIN_BRIGHTNESS value VIDIN_BRIGHTNESS Sets the inpu...

Страница 99: ...or Out 2 Mirror Out 3 Mirror Out 4 Example SEND_COMMAND VIDEO_INPUT_1 VIDIN_EDID MIRROR OUT 2 VIDIN_EDID_AUTO Requests whether the EDID source for the specified video input updates the available list of resolutions at regular intervals Syntax SEND_COMMAND DEV VIDIN_EDID_AUTO Example SEND_COMMAND VIDEO_INPUT_1 VIDIN_EDID_AUTO Returns a COMMAND string of the form VIDIN_EDID_AUTO status VIDIN_EDID_AU...

Страница 100: ... ENABLE Example SEND_COMMAND VIDEO_INPUT_1 VIDIN_HDCP ENABLE Enables the HDCP compliance of video input port 1 based on D P S VIDIN_HDMI_EQ Requests the status of the equalizer on the HDMI port Syntax SEND_COMMAND DEV VIDIN_HDMI_EQ Example SEND_COMMAND VIDEO_INPUT_1 VIDIN_HDMI_EQ Returns a COMMAND string of the form VIDIN_HDMI_EQ DISABLE VIDIN_HDMI_EQ Enables disables the equalizer on the HDMI por...

Страница 101: ...n D P S to MyPC This is used for the On Screen Display feature VIDIN_PHASE Requests the input phase of the specified video port This command is valid only for inputs whose format is set to VGA Syntax SEND_COMMAND DEV VIDIN_PHASE Example SEND_COMMAND VIDEO_INPUT_1 VIDIN_PHASE Returns a COMMAND string of the form VIDIN_PHASE value VIDIN_PHASE Sets the input phase of the specified video port value Th...

Страница 102: ...ntal vertical An integer value representing the vertical May have an additional qualifier such as i or p refresh rate An integer value representing the refresh rate Example SEND_COMMAND VIDEO_INPUT_1 VIDIN_RES_REF 1440x480i 59 For a list of supported resolutions see Appendix A Input Resolutions on page 110 VIDIN_SATURATION Requests the saturation level setting of the specified video input port Syn...

Страница 103: ...M ANAMORPHIC NOTE This command also accepts FULL in place of MAINTAIN Example SEND_COMMAND VIDEO_OUTPUT_1 VIDOUT_ASPECT_RATIO ZOOM VIDOUT_BLANK Requests the image setting of the video blanking feature for the specified video output port Syntax SEND_COMMAND DEV VIDOUT_BLANK Example SEND_COMMAND VIDEO_OUTPUT_1 VIDOUT_BLANK Returns a COMMAND string of the form VIDOUT_BLANK image See the VIDOUT_BLANK ...

Страница 104: ...DISABLE Example SEND_COMMAND VIDEO_OUTPUT_1 VIDOUT_FREEZE ENABLE VIDOUT_HSHIFT Requests the horizontal shift value of the specified video output port Syntax SEND_COMMAND DEV VIDOUT_HSHIFT Example SEND_COMMAND VIDEO_OUTPUT_1 VIDOUT_HSHIFT Returns a COMMAND string of the form VIDOUT_HSHIFT value VIDOUT_HSHIFT Sets the horizontal shift of the specified video output port to value Syntax SEND_COMMAND D...

Страница 105: ...ed or disabled Syntax SEND_COMMAND DEV VIDOUT_OSD Example SEND_COMMAND VIDEO_OUTPUT_1 VIDOUT_OSD Returns a COMMAND string of the form VIDOUT_OSD ENABLE DISABLE VIDOUT_OSD Enables or Disables the On Screen Display OSD setting on the specified video port If enabled then the OSD setting is on If disabled then the OSD setting is off Syntax SEND_COMMAND DEV VIDOUT_ OSD ENABLE DISABLE Example SEND_COMMA...

Страница 106: ...output port Syntax SEND_COMMAND DEV VIDOUT_RES_REF Example SEND_COMMAND VIDEO_OUTPUT_1 VIDOUT_RES_REF Returns a COMMAND string of the form VIDOUT_RES_REF h x v rate VIDOUT_RES_REF Sets the resolution and refresh rate of the specified video output port Invalid combinations are ignored by the All In One Presentation Switcher Syntax SEND_COMMAND DEV VIDOUT_RES_REF horizontal x vertical refresh rate V...

Страница 107: ..._VSHIFT value VIDOUT_VSHIFT Sets the vertical shift of the specified video output port Syntax SEND_COMMAND DEV VIDOUT_VSHIFT value Variables value 127 127 Example SEND_COMMAND VIDOUT_VSHIFT 2 Sets the vertical shifting of video output port 1 based on D P S to 2 shift upward SEND_COMMAND VIDOUT_VSHIFT 3 Sets the vertical shifting of video output port 1 based on D P S to 3 shift downward VIDOUT_VSIZ...

Страница 108: ... on the specified video port to value NOTE Adjusting the video output zoom also adjusts the horizontal and vertical sizes of the video output Syntax SEND_COMMAND DEV VIDOUT_ZOOM value Variables value 25 800 Example SEND_COMMAND VIDEO_OUTPUT_1 VIDOUT_ZOOM 100 Sets the zoom of video output port 1 based on D P S to 100 Video SEND_COMMANDs ...

Страница 109: ... Sets the lockout type for front panel Syntax SEND_COMMAND DEV FP_LOCKTYPE value Variable value 1 lock out all menus 2 reserved 3 lockout configure menu only Example SEND_COMMAND SWITCHER FP_LOCKTYPE 1 INTENSITY_LCD Requests the intensity setting of the LCD screen on the Front Panel Syntax SEND_COMMAND DEV INTENSITY_LCD Example SEND_COMMAND SWITCHER INTENSITY_LCD Returns a COMMAND string of the fo...

Страница 110: ...rnet traffic is controlled after negotiation through PDIF Syntax SEND_COMMAND DEV DXLINK_ETH auto off Example SEND_COMMAND SWITCHER DXLINK_ETH auto DXLINK_IN_ETH Requests the control setting for the DXLINK input card Syntax SEND_COMMAND DEV DXLINK_IN_ETH Example SEND_COMMAND SWITCHER DXLINK_IN_ETH Returns a COMMAND string of the form DXLINK_IN_ETH auto off DXLINK_IN_ETH This command instructs the ...

Страница 111: ...76 100 ü ü 576p CEA 861 720x576p 200 720 576 200 ü ü 576p CEA 861 800x500 60 800 500 60 ü ü VESA CVT 800x600 56 800 600 56 ü ü VESA DMT 800x600 60 800 600 60 ü ü VESA DMT 800x600 72 800 600 72 ü ü VESA DMT 800x600 75 800 600 75 ü ü VESA DMT 800x600 85 800 600 85 ü ü VESA DMT 848x480 60 848 480 60 ü ü VESA DMT 848x480 75 848 480 75 ü ü VESA CVT 848x480 85 848 480 85 ü ü VESA CVT 1024x640 60 1024 64...

Страница 112: ...920x1080p 25 1920 1080 25 ü ü 1080p CEA 861 1920x1080p 30 1920 1080 30 ü ü 1080p CEA 861 1920x1080p 50 1920 1080 50 ü ü 1080p CEA 861 1920x1080 60 1920 1080 60 ü VGA only VESA CVT 1920x1080p 60 1920 1080 60 ü ü 1080p CEA 861 1920x1200 60 1920 1200 60 ü ü Reduced Blanking VESA CVT Composite and S Video Supported Input Resolutions Resolution Name Horizontal Active Pixels Vertical Active Pixels Refre...

Страница 113: ... 640x480 60 640 480 60 VESA DMT 640x480 72 640 480 72 VESA DMT 640x480 75 640 480 75 VESA DMT 800x600 60 800 600 60 VESA DMT 800x600 72 800 600 72 VESA DMT 800x600 75 800 600 75 VESA DMT 1024x768 60 1024 768 60 VESA DMT 1024x768 70 1024 768 70 VESA DMT 1024x768 75 1024 768 75 VESA DMT 1280x720p 60 1280 720 60 720p CEA 861 1280x768 60 1280 768 60 1280x800 60 1280 800 60 VESA CVT 1280x1024 60 1280 1...

Страница 114: ...y the output slider Volume Attenuation Percent Decibels Percent Decibels 100 6 0 49 19 5 99 5 5 48 20 0 98 5 0 47 20 5 97 4 5 46 21 0 96 4 0 45 21 5 95 3 5 44 22 0 94 3 0 43 22 5 93 2 5 42 23 0 92 2 0 41 23 5 91 1 5 40 24 0 90 1 0 39 24 5 89 0 5 38 25 0 88 0 0 37 25 5 87 0 5 36 26 0 86 1 0 35 26 5 85 1 5 34 27 0 84 2 0 33 27 5 83 2 5 32 28 0 82 3 0 31 28 5 81 3 5 30 29 0 80 4 0 29 29 5 79 4 5 28 3...

Страница 115: ...X 215xHD All in One Presentation Switchers Instruction Manual Percent Decibels Percent Decibels 59 14 5 8 46 0 58 15 0 7 51 0 57 15 5 6 56 0 56 16 0 5 61 0 55 16 5 4 66 0 54 17 0 3 71 0 53 17 5 2 76 0 52 18 0 1 81 0 51 18 5 0 Infinity 50 19 0 Volume Attenuation ...

Страница 116: ...nies AMX does not assume responsibility for errors or omissions AMX also reserves the right to alter specifications without prior notice at any time The AMX Warranty and Return Policy and related documents can be viewed downloaded at www amx com 3000 RESEARCH DRIVE RICHARDSON TX 75082 AMX com 800 222 0193 469 624 8000 1 469 624 7400 fax 469 624 7153 AMX UK LTD AMX by HARMAN Unit C Auster Road Clif...

Отзывы: