instruction manual
Touch Panels and Accessories
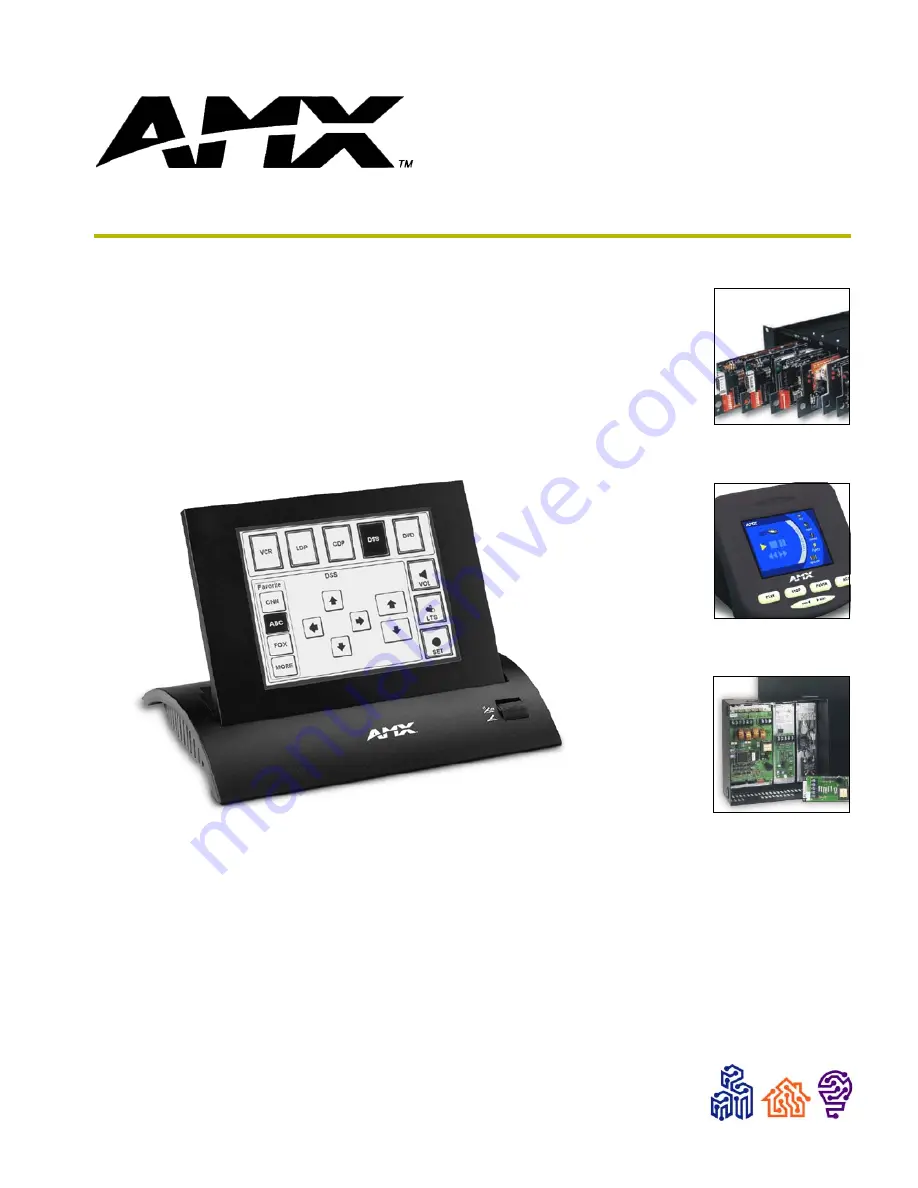
8.5" Black/White LCD
Touch Panels
(Firmware version G3 or higher)
Страница 1: ...instruction manual Touch Panels and Accessories 8 5 Black White LCD Touch Panels Firmware version G3 or higher...
Страница 2: ...liability applies whether damages are sought or a claim is made under this warranty or as a tort claim including negligence and strict product liability a contract claim or any other claim This limita...
Страница 3: ...S 232 connector for mouse control or data 10 Designing Touch Panel Pages 11 Buttons 11 Activating Edit Mode 12 Setting the Device Base 14 Setting the Device Used 14 Adding a Page 14 Setting the page c...
Страница 4: ...end Commands 27 Gray Scale Color Send_Commands 32 Variable Text Send_Commands 34 Shorthand Variable Text Commands 37 Button String Commands 40 Upgrading the Firmware 41 AXT LC EPROM Replacement 41 AXM...
Страница 5: ...46 29 01 cm x 24 03 cm Adjustable display heights 3 40 8 64 cm fully lowered 8 45 21 46 cm fully raised Weight 3 6 lbs 1 6 kg Power 550 mA at 12 VDC Screen resolution HV 640 x 480 pixels Memory 256 KB...
Страница 6: ...R DB 9 connector for PC data transmission or Microsoft mouse control Four pin bus connector 12 VDC power supply Enclosure Metal sub plate and bezel with black or white matte finish Optional accessorie...
Страница 7: ...release slot on the touch panel s faceplate and remove the engraved overlay 3 Place the touch panel into the cutout and mark the screw insert positions as shown in FIG 1 4 Remove the touch panel and...
Страница 8: ...backing from the adhesive tape strips located on the front of the panel press the engraved overlay onto the faceplate 13 Reconnect the AXlink wiring to the Central Controller and optional RS 232 wirin...
Страница 9: ...supplied mounting screws 10 Connect the AXlink and RS 232 wiring to the touch panel 11 Test the connection by reconnecting the AXlink connector to the Central Controller and the optional RS 232 wiring...
Страница 10: ...and a BB TP2 Backbox plasterboard FIG 4 shows the AXD LC PB and BB TP2 UniMount Backbox for plasterboard 1 Cut out the surface using the dimensions shown in FIG 5 FIG 4 AXD LC PB and BB TP2 UniMount...
Страница 11: ...t The panel beeps power up Before continuing disconnect all connections until panel installation is complete 12 Disconnect the above connections until the installation of the panel is complete 13 Fast...
Страница 12: ...not over torque the screws doing so can bend the seating pin and damage the connector Wiring guidelines The touch panels require 12 VDC power to operate properly The touch panel can use either a PS N...
Страница 13: ...AXlink 4 pin connector for data communication with the Central Controller and power transfer from a power supply the incoming PWR and GND cable from the power supply must be connected to the AXlink ca...
Страница 14: ...to strap pins 7 request to send and 8 clear to send together depending on the PC Never connect both power wires from the power supply and Central Controller to the PWR terminal on the touch panel AXli...
Страница 15: ...e pages and specify panel communication parameters Button examples include selection buttons information buttons adjustment buttons and operation bars The general button categories are described in th...
Страница 16: ...u press ENTER after typing an incorrect password you are immediately returned to the previous page General Button Categories Cont Status buttons Status buttons always have a dark fill with light lette...
Страница 17: ...p page and return to the Setup page now in Edit mode 6 Press EXIT again to return to the Main page The EDIT button appears at the top of the page indicating Edit mode is active 7 Press EDIT to open th...
Страница 18: ...the number of devices being used by the touch panel 3 Press ENTER to save the value Adding a Page 1 Press PAGE on the Edit bar to open the PAGE menu 2 Press ADD to open the keyboard and enter a name f...
Страница 19: ...has its own Button Properties page with settings specific to the button 6 Press BORDER to open the BUTTON BORDER pages 7 Select a border to set for the button and return to the Button Properties page...
Страница 20: ...E FLIP TYPE button FIG 15 in the Button Properties page to open the PAGE FLIP TYPE menu 2 Select a Page Flip type If you select FLIP PREVIOUS in the PAGE FLIP TYPE menu the FLIP TO PAGE button appears...
Страница 21: ...t file 1 Launch the TPDesign3 software program and open a project file that contains the desired bitmaps icons and fonts 2 Select File from the menu bar to open the File menu 3 In the File menu click...
Страница 22: ...ties Use the Button Properties page to set channel level and button colors Refer to the Setting the variable text code section on page 16 and the Setting the channel code section on page 15 for furthe...
Страница 23: ...include firmware version device number mouse type output resolu tion number of devices cursor enable brightness always 0 and contrast always 0 Syntax PAR Example PAR Requests the information CALIBRATE...
Страница 24: ...t compatible serial mouse Refer to the MOU section on page 29 for the chart describing the BIT information and definitions SET CAL Sets the calibra tion variables Syntax SET CAL X Multiplier X Offset...
Страница 25: ...text string 0 59 characters Example SEND_COMMAND TP AKEYB TOUCH HERE Opens the touch panel keyboard with TOUCH HERE in the display AKEYP Opens the touch panel keypad and initializes the number string...
Страница 26: ...TP CALIBRATE Starts the calibration operation on the touch panel CLOCK Sets the time and date Syntax CLOCK mm dd yy hh mm ss Variables mm 01 12 dd 01 31 yy 00 99 hh 00 23 mm 00 59 ss 00 59 Example SEN...
Страница 27: ...1 Microsoft serial mouse cursor On Example SEND_COMMAND TP MOUSE 01 Turns on Microsoft compatible serial mouse Refer to the MOU section on page 29 for the chart describing the BIT information and defi...
Страница 28: ...Syntax SETUP Example SEND_COMMAND TP SETUP Flips the touch panel to the Setup page SLEEP Forces the touch panel to screen saver mode Syntax SLEEP Example SEND_COMMAND TP SLEEP Activates the screen sa...
Страница 29: ...TP2 PAGE TP1_BUFFER CLEAR_BUFFER TP1_BUFFER IF FIND_STRING TP1_BUFFER PPON 1 OR FIND_STRING TP1_BUFFER PPOF 1 SEND_COMMAND TP2 TP1_BUFFER CLEAR_BUFFER TP1_BUFFER IF LENGTH_STRING TP2_BUFFER IF FIND_ST...
Страница 30: ...uch panel screen saver mode and resets the sleep timer XMRT Sets the new net work communica tion retry value for the panel and SoftROM Syntax XMRT number Variable number 1 15 ASCII characters Example...
Страница 31: ...panel The variable fonts are programming numbers assigned by the touch panel during the download process Border Styles and Programming Numbers No Border styles No Border styles 0 No border 11 Double...
Страница 32: ...the specified background color is not the same as the current color Syntax CFN variable text address color_number Variables variable text address 1 255 color number See the Colors and Programming Numb...
Страница 33: ...ariables variable text address 1 255 color number See the Colors and Programming Numbers table on page 26 Example SEND_COMMAND TP CTN 1 72 Sets the ON feedback text color to White for variable text bu...
Страница 34: ...Laser Disc Control Page If a page name is empty the current page is used If the popup page is part of a group the whole group is deactivated PPK Deactivates a popup page on all touch panel pages If a...
Страница 35: ...ntax SSL string Variable string alphanumeric characters Example SEND_COMMAND TP SSL Touch Panel Deactivated Sends Touch Panel Deactivated to the Controller SST Changes the Star tup string sent to the...
Страница 36: ..._COMMAND TP CBOFF1 72 Sets the OFF feedback border color to White for the variable text button 1 CALL Sets the colors for a variable text but ton You must use the variable text assignments to change b...
Страница 37: ...color to the specified color Syntax CFON variable text address color_number Variables variable text address 1 255 color number See the Colors and Programming Numbers table on page 26 Example SEND_COM...
Страница 38: ...ck text color to White for variable text button 1 Variable Text Send_Commands B Sets a specific button to On or Off Syntax B variable text address ON OFF Variables variable text address 1 255 ON 0 OFF...
Страница 39: ...able text address 1 255 font size See the Font Styles and Programming Numbers table on page 27 Example SEND_COMMAND TP F 1 6 Changes the font on the variable text button one to hollow medium FONT Chan...
Страница 40: ...ver sion of TEXT command Syntax T variable text address new button text Variables variable text address 1 255 new button text 1 60 characters Example SEND_COMMAND TP T 1 VCR PLAY Changes the title on...
Страница 41: ...tton text ASCII characters empty is clear P bitmap Bitmap filename empty is clear I icon 1 255 icon numbers are assigned in TPDesign3 project file J text alignment 1 9 as shown the following alignment...
Страница 42: ...stop responding to pushes completely until it is sent an Enable command Nothing short of a touch panel SoftROM firmware reload will re enable the button Reloading the touch panel file reload ing the A...
Страница 43: ...to display text on multiple lines Syntax TXT variable text address text Variables variable text address 1 255 text Enter button text to appear on the button Example SEND_COMMAND TP TXT 2 VCR PLAY Sets...
Страница 44: ...ns the cursor Off SC Sends a serial port send_command within a panel as if sent from Axcess Syntax SC device offset send_command variable text data Variables device offset Device number variable text...
Страница 45: ...el face down onto a soft cloth and remove the seven Phillips head screws from the bottom panel Then gently remove the panel 4 Remove the Phillips head screw located in the center of the circuit card 5...
Страница 46: ...in power connector from the rear side of the panel If you are using power via AXlink remove the AXlink connector 3 Flip the touch panel face down onto a soft cloth and remove the seven Phillips head s...
Страница 47: ...e Once you can confirm the panel is receiving power remove the connector align the screw hole and insert the Phillips head screw and tighten 12 Replace the housing on the touch panel and align the scr...
Страница 48: ...Upgrading the Firmware 44 8 5 Black and White Touch Panels...
Страница 49: ...Flip the touch panel face down onto a soft cloth and remove the seven Phillips head screws from the bottom panel Then gently remove the panel 4 Remove the Phillips head screw located in the center of...
Страница 50: ...Remove the lithium batteries from the touch panel 1 Discharge the static electricity from your body by touching a grounded object and unscrew the Decor style faceplate 2 Remove the four 6 32 mounting...
Страница 51: ...Replacing the Batteries 47 8 5 Black and White Touch Panels...
Страница 52: ...ve richardson TX 75082 USA 469 624 8000 800 222 0193 fax 469 624 7153 technical support 800 932 6993 036 004 1805 8 02 2002 AMX Corporation All rights reserved AMX the AMX logo the building icon the h...