


v082516
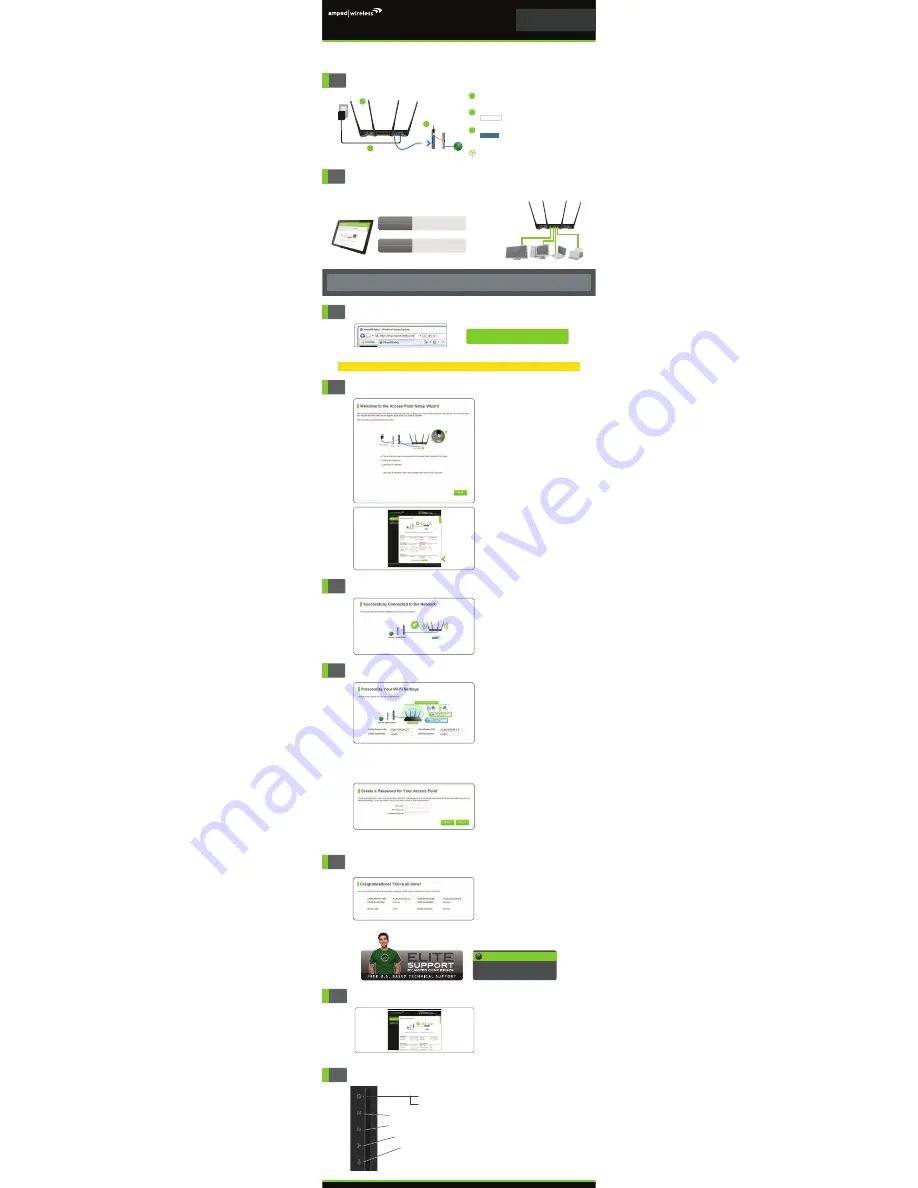
Indicates when the Access Point is powered on. The LED will remain on.
Blinks when Wi-Fi Protected Setup (WPS) is activated and the Access Point awaits a connection.
Blinks rapidly when data traffic is transmitted or received over the 5GHz wireless network.
Blinks rapidly when data traffic is transmitted or received over the 2.4GHz wireless network.
Indicates when the Access Point is connected to your network.
Indicates when a USB storage device is connected to the USB 2.0 and/or the USB 3.0 port.
Power:
WPS:
5.0GHz Wireless Activity:
2.4GHz Wireless Activity:
Network Connection:
USB Connection:
LED Indicator Information
Once you have completed the Setup Wizard, you
will now see the Dashboard when you access
http://setup.ampedwireless.com. You will not see
the Setup Wizard again. Through the Dashboard
you can further adjust settings and access the
features of the Access Point. Here you will find
features like Guest Networks, User Access Controls,
Wi-Fi Coverage Controls, Parental Controls and
many other features.
Dashboard
7
Setup Summary
Congratulations, the Access Point is now
successfully configured and your settings are now
saved. You may now connect additional devices
directly to the 4 wired ports on the back panel or
connect wirelessly to the Access Point.
The Wizard will notify you if there is a newer
firmware for the Access Point. We recommend
that you upgrade at this time if an update
is available.
GOT QUESTIONS?
Phone: 888-573-8820 or 909-217-3168
Email: [email protected]
Web: www.ampedwireless.com/support
?
6
Personalize your Wi-Fi Settings
The default ID of your 5GHz Wi-Fi network and
2.4GHz Wi-Fi network is:
Amped_AthenaAP_5.0
or
Amped_AthenaAP_2.4
To change it, enter a new name in the SSID field. Users
connecting wirelessly to the Access Point will use these
IDs to identify your Wi-Fi networks.
The default Security Key of your Wi-Fi networks
is:
wireless
T
o change them, enter a new key for both the 5GHz
and 2.4GHz Wi-Fi networks in the Security Key field.
The keys must be at least 8 characters long.
Create a Password for your Access Point
This password is NOT your Wi-Fi connection
password. This password is to access the web
menu of the Access Point to access additional AP
settings. Leave this blank if you do not wish to
have a password.
Click
Apply
to save your settings. The Access Point
will reboot. This process may take up to 1 minute.
The page will automatically reload after the count-
down. If it does not, you may need to refresh the
page manually or check your connection to the AP.
The Wizard will detect your network settings.
Please be patient.
Once the Wizard has configured your network
settings, you should see a green check mark.
Click
Next
to continue.
5
Network Connection Detection
4
Welcome to the Setup Wizard
If this is your first time setting up the Access
Point, the Setup Wizard should automatically
load.
Be sure the Access Point is connected to
your network.
Click
Next
to continue.
If the Dashboard loads (see left image), instead
of the Setup Wizard, scroll to the bottom and
click the
Setup Wizard
button to access the
Wizard.
3
Recommended browsers: Google Chrome, Safari or Internet Explorer (8.0 and up). Do not use Firefox.
http://setup.ampedwireless.com
Open your Web Browser
If the URL fails to open try: http://192.168.80.240
Enter the setup web address into your browser:
ACCESSING THE WEB MENU DOES NOT REQUIRE INTERNET ACCESS. THE MENU IS SERVED FROM THE ACCESS POINT.
2
Connect your Computer to the Access Point
Wired Connections:
Scan for available wireless networks on your PC or
tablet and connect to one of the following networks:
Wireless Connections:
Attach any
Wired Devices
to the Access Point using
an Ethernet cable.
NETWORK ID:
Amped_AthenaAP_2.4
PASSWORD:
wireless
NETWORK ID:
Amped_AthenaAP_5.0
PASSWORD:
wireless
- or -
Note: If your network uses static IP address assignments, you will need to manually configure the settings for
your Access Point. See the instructions on the back to access the configuration menu of the Access Point.
Attach the antennas to the antenna connectors
on the Access Point.
a
Connect a cable from the Access Point's
port to your Router’s local network
port (LAN) or network switch.
NETWORK
c
Attach the Power Adapter to the Access Point’s
port and plug it into a power outlet.
PWR
b
Connect the Access Point to your Router/Network
1
b
c
Modem
Internet
Router
(LAN port)
a
Allow up to two (2) minutes for the Access Point
to automatically configure itself to your network.
READ FIRST
SETUP GUIDE
GOT QUESTIONS?
Phone: 888-573-8820 or 909-217-3168
Email: [email protected]
Web: www.ampedwireless.com/support
APA2600M
ATHENA-AP
HIGH POWER
TM
AC2600
WI-FI
®
ACCESS POINT