background image

INSTALLATION & MAINTENANCE GUIDE

AMP

®

 Solar Bistro Lights (50ft)  

ASSI-9008-50-BK

4

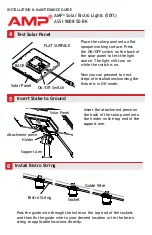
Test Solar Panel

Place the solar panel onto a flat 

opaque working surface. Press 

the ON/OFF switch on the back of 

the solar panel to test the light 

source. The light will turn on 

while the switch is on.

Now you can proceed to next 

steps of installations knowing the 

fixture is in ON mode.

On/Off Switch

BACK

FLAT SURFACE

Solar Panel

5

Insert Stake to Ground

Insert the attachment piece on 

the back of the solar panel onto 

the holder on the top end of the 

support arm.

Support Arm

Solar Panel

Holder

Attachment piece

6

Install Bistro String

Pass the guide wire through the holes on the top end of the sockets 

and then fix the guide wire to your desired location or tie the bistro 

string to applicable locations directly.

Socket

Guide Wire

Bistro String

Содержание ASSI-9008-50-BK

Страница 1: ...INSTALLATION MAINTENANCE GUIDE Help Hotline 1 813 978 3900 Mon Fri 9am 6pm EST www amplighting com AMP Solar Landscape Lighting AMP Solar Bistro Lights 50ft ASSI 9008 50 BK ...

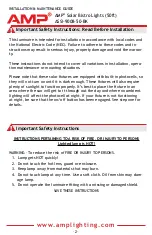
Страница 2: ...ill not turn on until it is dark enough These fixtures will also require plenty of sunlight to function properly It s best to place the fixture in an area where the sun will get to it through out the day and where no ambient lighting will affect the photocell at night If your fixture is not functioning at night be sure that the on off button has been engaged See step one for details INSTRUCTIONS P...

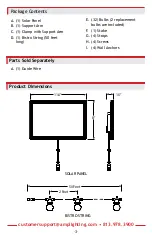
Страница 3: ... Contents A 1 Solar Panel B 1 Support Arm C 1 Clamp with Support Arm D 1 Bistro String 50 feet long E 32 Bulbs 2 replacement bulbs are included F 1 Stake G 4 Straps H 4 Screws I 4 Wall Anchors A 1 Guide Wire Product Dimensions 11 6 50 Feet 2 Feet SOLAR PANEL BISTRO STRING 8 1 5 ...

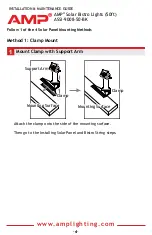
Страница 4: ...ASSI 9008 50 BK Follow 1 of the 4 Solar Panel Mounting Methods Method 1 Clamp Mount Mount Clamp with Support Arm Attach the clamp onto the side of the mounting surface Then go to the Installing Solar Panel and Bistro String steps Mounting Surface Clamp Clamp Support Arm Mounting Surface ...

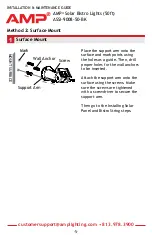
Страница 5: ...port arm onto the surface and mark points using the holes as a guide Then drill proper holes for the wall anchors to be inserted Attach the support arm onto the surface using the screws Make sure the screws are tightened with a screwdriver to secure the support arm Then go to the Installing Solar Panel and Bistro String steps Wall Anchor Mark Support Arm Screw MOUNT SURFACE ...

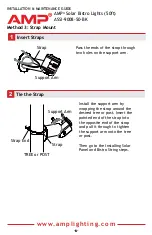
Страница 6: ...oles on the support arm Strap Support Arm 2 Tie the Strap Install the support arm by wrapping the strap around the desired tree or post Insert the pointed end of the strap into the opposite end of the strap and pull it through to tighten the support arm onto the tree or post Then go to the Installing Solar Panel and Bistro String steps Strap Strap End Support Arm TREE or POST ...

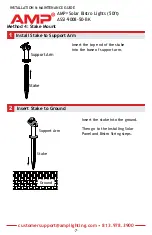
Страница 7: ... Insert the top end of the stake into the base of support arm Stake Support Arm 2 Insert Stake to Ground Insert the stake into the ground Then go to the Installing Solar Panel and Bistro String steps Support Arm Ground Stake INSTALLATION MAINTENANCE GUIDE AMP Solar Bistro Lights 50ft ASSI 9008 50 BK ...

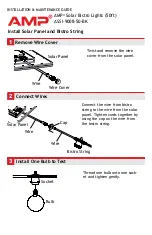
Страница 8: ...he wire cover from the solar panel Wire Cover Solar Panel Wire 2 Connect Wires Wire Wire Cap Solar Panel Bistro String Connect the wire from bistro string to the wire from the solar panel Tighten cords together by using the cap on the wire from the bistro string 3 Install One Bulb to Test Thread one bulb onto one sock et and tighten gently Bulb Socket ...

Страница 9: ... of installations knowing the fixture is in ON mode On Off Switch BACK FLAT SURFACE Solar Panel 5 Insert Stake to Ground Insert the attachment piece on the back of the solar panel onto the holder on the top end of the support arm Support Arm Solar Panel Holder Attachment piece 6 Install Bistro String Pass the guide wire through the holes on the top end of the sockets and then fix the guide wire to...

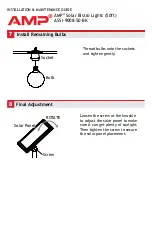
Страница 10: ...all Remaining Bulbs Thread bulbs onto the sockets and tighten gently Bulb Socket 8 Final Adjustment Screw Solar Panel ROTATE Loosen the screw at the knuckle to adjust the solar panel to make sure it can get plenty of sunlight Then tighten the screw to secure the solar panel placement ...

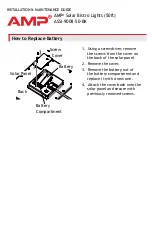
Страница 11: ...driver remove the screws from the cover on the back of the solar panel 2 Remove the cover 3 Remove the battery out of the battery compartment and replace it with a new one 4 Attach the cover back onto the solar panel and secure with previously removed screws Screw Cover Battery Battery Compartment Back Solar Panel ...

Страница 12: ...ations and product details subject to change without notice Copyright 2021 AMP Lighting Lutz FL USA 33549 All rights reserved customersupport amplighting com 813 978 3900 Help Hotline 1 813 978 3900 Mon Fri 9am 6pm EST www amplighting com ...

Отзывы: