Ameriwood 249-05-0488 Скачать руководство пользователя страница 1

B345945307T

00

>> assembly instructions

Mixed Material

4 drawer dresser

style # 5945307T
DPCI # 249-05-0494

TM

Содержание 249-05-0488

Страница 1: ...B345945307T00 assembly instructions Mixed Material 4 drawer dresser style 5945307T DPCI 249 05 0494 TM...

Страница 2: ...ions and you ll be on your way to transforming your room in no time Good luck though we re confident you won t need it before you begin 1 Check for damaged or missing parts Call 1 855 MYTGTHOME 855 69...

Страница 3: ...ction hardware parts list how to use the cam lock system assembly QUESTIONS Just call 1 855 MYTGTHOME 855 698 4846 for parts and service For faster service have the style number and DPCI number ready...

Страница 4: ...flat head screw A13410 5 x32 nail A21110 6 x28 8 x 7 16 pan head screw A12120 7 x26 6 x 1 1 4 flat head screw A11600 8 x40 6 x 7 16 flat head screw A11080 9 x8 8 32 x 7 8 bolt A17400 10 x8 drawer bra...

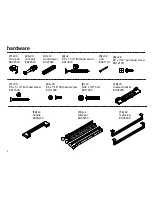
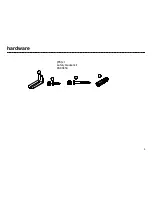
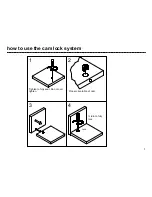
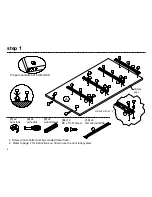
Страница 5: ...hardware 15 x1 safety bracket kit A80450 5 15a 15b 15c 15d...

Страница 6: ...DRAWER BRACE 35945000130 4 M UPPER DRAWER BACK C1670704331540B 1 DRAWER DIVIDER 35945331150 1 O BACK PANEL K594500000 1 Parts shown are the base cabinet of your model Please note most parts are labele...

Страница 7: ...how to use the cam lock system 2 3 turn to fully lock 4 Tighten to fully seat Do not over tighten Proper orientation of cam 1 Lock Titu s Titu s T it u s 7...

Страница 8: ...2 2 2 3 x2 wood dowel 8 x12 6 x 7 16 screw 13 x4 left cabinet slide 2 8 8 8 8 8 8 8 8 8 8 8 8 2 8 3 3 13a 13a 13a 13a 13a marked with an L finished edge 13a 1 Screw in cam bolts must be screwed down f...

Страница 9: ...ood dowel 8 x12 6 x 7 16 screw 13 x4 right cabinet slide 1 3 1 3 2 B 2 8 8 8 8 2 2 8 8 8 8 8 8 8 8 8 2 13b 13b 13b 13b 13b 13b marked with an R finished edge 1 Screw in cam bolts must be screwed down...

Страница 10: ...cam bolt C 2 2 2 15 x1 safety bracket kit 2 15a 15b finished edge 15a 15b 1 Screw in cam bolts must be screwed down flush 2 Refer to page 7 for instructions on how to use the cam lock system do not ti...

Страница 11: ...4 step Proper orientation of CAM LOCK E F x3 1 x8 cam lock 3 x8 wood dowel 11 1 1 1 1 3 3 3 3 1 Refer to page 7 for instructions on how to use the cam lock system...

Страница 12: ...5 step 12 UNLOCK LOCK A finished edge E F E E 1 Refer to page 7 for instructions on how to use the cam lock system x4...

Страница 13: ...6 step A B E E E F UNLOCK LOCK finished edge 13 1 Refer to page 7 for instructions on how to use the cam lock system x4...

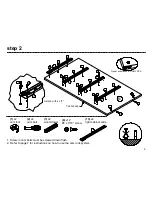
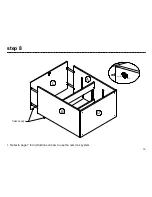
Страница 14: ...7 step 14 4 x4 8 x 1 3 4 flat head screw finished edge 4 4 4 4 D B A raw surface...

Страница 15: ...8 step UNLOCK LOCK 15 A B C finished edge D 1 Refer to page 7 for instructions on how to use the cam lock system x4...

Страница 16: ...e sure that the Back Panel is attached securely WARNING Assure that the unit is square Distance from corner to corner must be equal as shown Attach the back panel so that the bottom edge is even with...

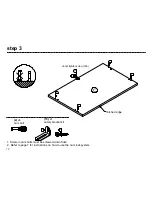
Страница 17: ...10 step 17 6 x12 8 x 7 16 pan head screw 14 x2 metal leg D B C 6 6 14 14 6...

Страница 18: ...surface Carefully line up the drawer bracket with the holes in the drawer side as shown Using a hammer tap each drawer bracket stem part way into each hole Repeat this process until the drawer bracket...

Страница 19: ...G H line up all grooves during assembly right drawer side marked RIGHT left drawer side marked LEFT left drawer side marked LEFT right drawer side marked RIGHT 1 Screw in cam bolts must be screwed do...

Страница 20: ...13 step 20 1 x8 cam lock M x4 Proper orientation of CAM LOCK 1 M G H x3 M 1 Refer to page 7 for instructions on how to use the cam lock system 1 UNLOCK LOCK x8...

Страница 21: ...14 step 21 raw surface G H x3 raw surface drawer bottom drawer bottom...

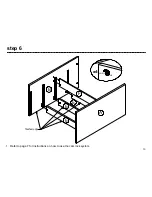
Страница 22: ...15 step 7 x18 6 x 1 1 4 flat head screw 22 x3 7 7 7 7 7 7 H drawer back marked BACK...

Страница 23: ...16 step O finished edge 3 x2 wood dowel 23 O G finished edge 3 3...

Страница 24: ...17 step 7 x8 6 x 1 1 4 flat head screw 24 7 7 7 7 7 7 7 7 G upper drawer back marked UPPER BACK...

Страница 25: ...wer slide 8 x16 6 x 7 16 flat head screw 8 8 8 8 8 8 8 8 H 25 9 x8 8 32 x 7 8 bolt 12 x4 handle 12 9 9 9 9 12 13c 13d 13 x4 right drawer slide 13c 13c 13d 13d marked with an L marked with an R marked...

Страница 26: ...local hardware store for appropriate anchors to securely attach the safety bracket Option 1 Attachment into a wall stud preferred method Using a stud finder locate a stud in the wall Place your unit...

Страница 27: ...20 step 1 Notice the drawer bracket holes are slotted Drawer fronts can be adjusted by loosening screws making needed adjustments and retightening screws 27 cabinet member roller drawer runner roller...

Страница 28: ...shown Exceeding these load limits could cause sagging instability product collapse and or serious injury Warning Risk of injury to persons do not place a television on this furniture This furniture i...

Страница 29: ...2 This certificate applies to compliance of this product with the CPSC Ban on Lead Containing Paint 16 CFR 1303 3 This product is distributed by Ameriwood Industries Inc 410 East First Street South Wr...

Страница 30: ...2016 Target The Bullseye Design is a trademark of Target Brands inc All rights reserved TM 30...

Отзывы: