background image

4

Rev. 5

Introduction

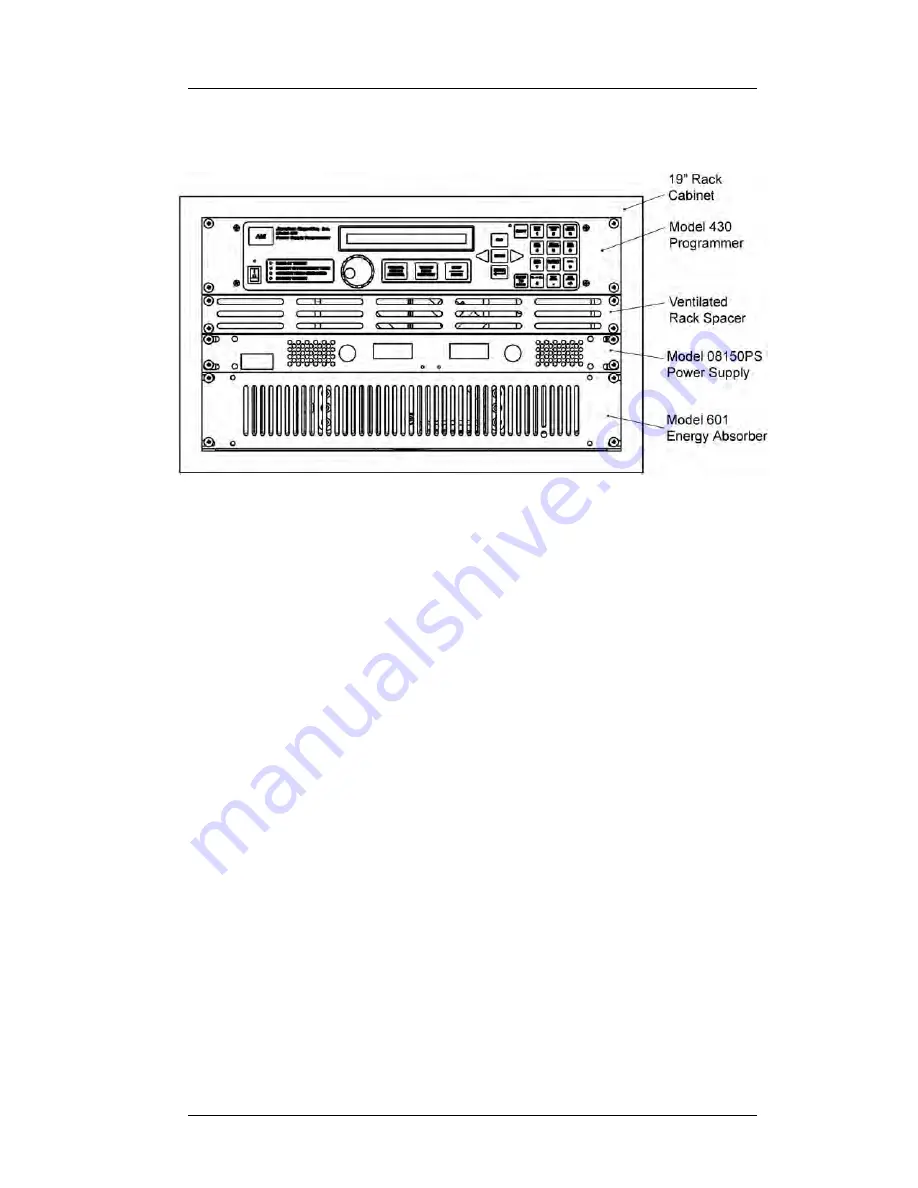
System Rack

1.1.9

Power Supply System Rack Front Panel Layout      

Figure 1-1. 

Typical Model 05100PS-430-601 System Rack Layout

Содержание 05100PS-430-601

Страница 1: ...oad Oak Ridge TN 37831 2509 Tel 865 482 1056 Fax 865 482 5472 Rev 5 Issue November 28 2011 MODEL 05100PS 430 601 HIGH STABILITY INTEGRATED POWER SUPPLY SYSTEM INSTALLATION OPERATION AND MAINTENANCE INSTRUCTIONS EXCELLENCE IN MAGNETICS AND CRYOGENICS ...

Страница 2: ......

Страница 3: ...tion Based Magnet Auto Rampdown 2 1 1 8 Model 05100PS 430 601 General Description 3 1 1 9 Power Supply System Rack Front Panel Layout 4 1 2 Model 430 Front Panel Layout 5 1 3 Model 430 Rear Panel Layout 6 1 4 Power Supply Unit Front Panel Layout 7 1 5 Model 601 Energy Absorber Front Panel Layout 8 1 6 System Specifications 25 C 9 1 7 Operating Characteristics 10 1 7 1 Dual Quadrant Operation 10 In...

Страница 4: ... Entering Picklist Values 32 3 6 Single key Commands Menu 33 3 6 1 Persistent Switch Control Key 33 3 6 2 Target Field Setpoint Key 35 3 6 3 Ramp Pause Key 36 3 6 4 Ramp To Zero Key 36 3 7 SHIFT key Commands Menus 37 3 7 1 Ramp Rate SHIFT key 37 3 7 2 Voltage Limit SHIFT key 41 3 7 3 Reset Quench SHIFT key 41 3 7 4 Increment Field SHIFT key 42 3 7 5 Field Current SHIFT key 42 3 7 6 Decrement Field...

Страница 5: ...ocedure for Entering Persistent Mode 82 3 13 3 Procedure for Exiting Persistent Mode 85 3 13 4 Toggling the State of the Persistent Switch Heater 88 3 14 Ramping Functions Example 89 3 15 Quench Detection 90 3 15 1 External Quench Detection 91 3 15 2 Disabling Internal Quench Detection 91 3 16 External Rampdown 92 3 16 1 External Rampdown while in Persistent Mode 92 3 16 2 External Rampdown while ...

Страница 6: ...nce 139 5 2 Troubleshooting Hints 139 5 2 1 Electrostatic Discharge Precautions 140 5 2 2 The Model 430 does not appear to be energized 140 5 2 3 FAILURE TO LOAD message displayed after power up 142 5 2 4 Power supply unstable magnet voltage oscillates 142 5 2 5 The power supply system will not charge the magnet 143 5 2 6 Cannot charge the magnet at the selected ramp rate 143 5 2 7 Cannot discharg...

Страница 7: ...in this Manual 161 A 11 Model 430 Programmer Specifications 165 A 12 Power Supply Details 167 A 12 1 Model 08150PS Electrical Specifications 168 A 12 2 Model 08150PS Dimensional Specifications 171 A 13 Model 601 and Energy Absorption 173 A 13 1 Model 601 Specifications 173 A 13 2 Model 601 Energy Absorber Functional Description 174 A 14 Remote Computer Communication with the Model 430 177 A 14 1 C...

Страница 8: ...viii Rev 5 Table of Contents A 17 Model 430 Remote Control Application 194 A 18 Model 430IP Power Supply Programmer 197 A 19 Persistent Switch Operation Flowchart 200 Index 203 ...

Страница 9: ...ecification Sheet 77 Figure 3 14 Ramping to two different target field current settings 89 Figure 4 1 The Model 430 Programmer Status System 105 Figure 4 2 Asterisk Indicating Model 430 in Remote Mode 113 Figure A 1 Model 08150PS Terminal Block Connections 170 Figure A 2 Model 08150PS Dimensions Front and Rear Views 171 Figure A 3 Model 08150PS Dimensions Top and Side Views 172 Figure A 4 Loop Vol...

Страница 10: ...x Rev 5 List of Figures ...

Страница 11: ...for SUPPly MODE Query 116 Table 4 5 Return Values and Meanings for STATE Query 129 Table 4 6 Model 430 Programmer Trigger Function Bit Definitions 132 Table 5 1 V V Mode Input Range Picklist Values 141 Table A 1 Magnet Station Connectors Pin Definitions 151 Table A 2 LHe Level Temp Connectors Pin Definitions 152 Table A 3 Current Transducer Signal Connector Pin Definitions 153 Table A 4 Current Tr...

Страница 12: ...xii Rev 5 List of Tables ...

Страница 13: ...d installed in conjunction with ancillary equipment in typical superconducting magnet systems Block level diagrams document the interconnects for various system configurations Operation describes how the Model 430 Programmer is used to control a superconducting magnet All Model 430 Programmer displays and controls are documented The ramping functions persistent switch heater controls and the quenc...

Страница 14: ... extreme suffocation hazards since a small amount of liquid will vaporize and yield a very large volume of oxygen displacing gas Always ensure the location where the cryogen is used is well ventilated Breathing air with insufficient oxygen content may cause unconsciousness without warning If a space is suspect purge the space completely with air and test before entry If this is not possible wear a...

Страница 15: ... or near room temperature into a cryogenic liquid should be done with great caution There may be a violent gas boil off and a considerable amount of splashing as a result of this rapid boiling There is also a chance that the material may crack or catastrophically fail due to forces caused by large differences in thermal contraction of different regions of the material Personnel engaged in this typ...

Страница 16: ...there is any doubt as to the sufficiency of the pressure relief system contact the manufacturer of the magnet and cryostat for assistance Safety Summary Superconducting magnet systems are complex systems with the potential to seriously injure personnel or equipment if not operated according to procedures The use of cryogenic liquids in these systems is only one factor to consider in safe and prope...

Страница 17: ...Refer to IEC 417 No 5007 Warning The Warning sign denotes a hazard It calls attention to a procedure or practice which if not correctly adhered to could result in personal injury Do not proceed beyond a Warning sign until the indicated conditions are fully understood and met Caution The Caution sign denotes a hazard It calls attention to an operating procedure or practice which if not adhered to c...

Страница 18: ...xviii Rev 5 Foreword Safety Summary ...

Страница 19: ...and flexibility of use 1 1 2 Superior Resolution and Stability The Model 430 Power Supply Programmer incorporates high resolution converters to translate signals between the analog and digital domains Precision instrumentation techniques and potentiometer free designs are employed throughout the Model 430 Programmer to ensure accurate sig nal translation for a wide range of conditions The magnet c...

Страница 20: ...e Programmer or remotely with operational parameters which must not be exceeded for the given conditions of the system Once set should an operator inadvertently attempt to take the magnet system to an excessive magnetic field strength or charge at an excessive voltage the Programmer will not accept the parameter and will alert the operator that a value was rejected because it was outside the user ...

Страница 21: ... by a 10 Vdc remote analog signal supplied by the Model 430 Programmer and applied to the power supply analog input Programming and control of the current loop composed of the magnet power supply Model 601 Energy Absorber and Model 430 Programmer zero flux device is provided by a Model 430 ramp generated current reference with parameters as set by the user in the Model 430 The Model 430 compares t...

Страница 22: ...4 Rev 5 Introduction System Rack 1 1 9 Power Supply System Rack Front Panel Layout Figure 1 1 Typical Model 05100PS 430 601 System Rack Layout ...

Страница 23: ...x 16 Dot Graphic VF Display 9 Persistent Switch Heater Control Key 3 Shift Indicator LED 10 Target Field Setpoint Key 4 Shift Key 11 Ramp Pause Switch 5 4 Row x 3 Column Keypad 12 Menu Navigation and Data Entry Keys 6 Power Switch 13 Ramp to Zero Key 7 Magnet Status Indicator LEDs Table 1 1 Model 430 Front Panel Description ...

Страница 24: ...6 Rev 5 Introduction Model 430 Rear Panel Layout 1 3 Model 430 Rear Panel Layout Table 1 2 Model 430 Zero Flux Version Rear Panel Description ...

Страница 25: ...ront panel controls and indicators Figure 1 2 Model 08150PS Front Panel Table 1 3 Power Supply Front Panel Controls and Indicators Control or Indicator Function POWER ON OFF Circuit Breaker Turns the power supply on or off Circuit breaker provides input overload protection DC VOLTS display Four digit LED display that shows output voltage Status 4 character display Displays active function or blink...

Страница 26: ... elements has malfunctioned or power has been lost to the rear panel power connector An audible alarm will also sound when the Fault LED is energized Caution If the system is in operation when an energy absorber fault occurs a safe magnet system state typically zero current or a cooled persistent switch in a connected magnet should immediately be attained Do not continue to operate the unit and re...

Страница 27: ...ut Voltage Range 0 to 5 Vdc Measurement Resolution 10 mV Load Inductance Range 0 5 to 100 H Primary Power Requirements Range 100 115 or 200 230 Vac 10 50 60 Hz 1500 VA Physical Dimensionsa a H height W width D depth 12 5 H x 21 W x 24 5 D 318 mm H x 533 mm W x 622 mm D Approximate Weight 80 lbm 35 kg Terminal Torque Limit 48 lbf in 5 4 N m Environmental Limits Ambient Temperature 0 C to 40 C 32 F ...

Страница 28: ...lowing much faster magnetic field reduction This corresponds to operation in quadrants 1 and 4 of Figure 1 4 The disadvantage to this type of system is that energy is being dissipated in the energy absorbing element whenever current is flowing This loss is sometimes a significant portion of the power required to operate the system The high stability dual quadrant precision current transducer based...

Страница 29: ...e shunt version by an order of magnitude Magnet Coil s Persistent Switch optional Misc Line Losses V Unipolar Power Supply Current To Model 430 CURRENT TRANSDUCER SIGNAL Connector Current Transducer Energy Absorber Figure 1 6 Dual Quadrant System with Precision Current Transducer Option ...

Страница 30: ...12 Rev 5 Introduction Operating Characteristics ...

Страница 31: ...in a life threatening explosion Do not modify this equipment in any way If component replacement is required return the equipment to AMI facilities as described in the Troubleshooting section of this manual If used in a manner not specified in this manual the protection provided by the design manufacture and documentation of the system may be impaired 2 1 Inspecting and Unpacking Carefully remove ...

Страница 32: ...ed by removing the power cord from the power receptacle Failure to do so could result in personnel coming in contact with high voltages capable of producing life threatening electrical shock Note The voltage selector switch is labeled 115 for nominal line voltages from 100 to 115 VAC The switch is labeled 230 for nominal line voltages of 200 to 230 VAC If the Model 430 Programmer operating voltage...

Страница 33: ...e to carry the full rated current of the power supply Typically for short runs less than 25 ft or 7 6 m 2 AWG wire is sufficient for 125 A current and 2 0 AWG wire is best for 250 A current Note that an AMI Model 13x Liquid Helium Level Instrument is shown as a possible component of each integrated system The main instrumentation cable connecting the magnet support stand to one of the Model 430 Pr...

Страница 34: ...VAC 180 264 VAC SENSOR J1 AMI Model 13x Rear Panel Current Transducer Current Transducer Power Supply 10 11 12 13 14 1 6 7 Model 601 Energy Absorber Rear Panel Model 08150PS Unipolar Supply S CS S 08150PS 08150PS To additional parallel Model 601 Energy Absorbers total units including primary one per 100 A system rating To each slave 08150PS unit 15 16 18 19 To each slave 08150PS unit Analog I O 17...

Страница 35: ...onditions a Connect the protective diode between the output busbars of the power supply anode to the negative terminal and the cathode to the positive terminal b Connect the positive OUTPUT bus 1 of the power supply to the positive bus 15 of the Model 601 Energy Absorber Note The current direction arrow on the CT must point toward the power supply c Connect the negative bus 16 of the Model 601 Ene...

Страница 36: ...d Model 601 power adapter from the respective device to the appropriate power receptacle m Remote communications via Ethernet and or RS 232 can be accomplished by connecting suitable cabling to the Model 430 Programmer rear panel ETHERNET and or RS 232 connectors 2 6 Special Configurations The Model 430 Programmer has been designed for optimal operation with a superconducting magnet i e a very low...

Страница 37: ...the resistance of the load is increased the stability setting must be decreased to improve the transient response of the system If the current appears to lag then decrease the stability setting until the system is responsive If the current appears to oscillate increase the stability setting until the oscillations are damped Note If you have purchased a superconducting magnet with the Model 430 Pro...

Страница 38: ...ithout the potential for damage to the magnet The following procedures will assist the user in the verifying key system components 1 Using the appropriate diagram from section 2 5 as a guide verify all system components are connected as shown If there is any doubt as to the correct connection of a component contact an AMI Technical Support Representative The user may be required to properly make a...

Страница 39: ...ter a stability setting of 100 Refer to sections 3 3 on page 29 and 3 7 9 on page 43 6 Verify the various setup menu values for the system with the exception of the stability setting which is to be temporarily left at 100 If the power supply system was purchased with an AMI magnet AMI has preset the setup menu values for proper operation See sections 3 3 3 5 3 9 and 3 10 for more discussion of the...

Страница 40: ...hat the Model 430 Programmer is in the holding mode at the target current value 10 00 A Note There may be a discrepancy between the current shown on the power supply display1 and the current displayed on the Model 430 Programmer The current measurement system incorporated in the Model 430 is more accurate than the power supply shunt 14 Verify that the output current display of the power supply ind...

Страница 41: ... turn off the Model 430 21 Remove the short from the power supply leads and connect the leads to the magnet current leads of the magnet After successful completion of this test the system is ready for operation with a superconducting magnet Refer to the ramping function example presented in section 3 14 on page 89 for a discussion of the various available ramping methods ...

Страница 42: ...24 Rev 3 Installation Power Up Procedure ...

Страница 43: ...t 3 1 System Power On Off Sequence The Model 430 Programmer should always be energized before the power supply that it is controlling The Model 430 Programmer is designed to prompt the user in order to ensure the power supply is energized at the proper time The Model 430 Programmer should always be de energized after the power supply is shut down 3 1 1 Model 430 Programmer Power On Off Place the M...

Страница 44: ...supply jumpers dip switches or other factory settings If not rack mounted always position power supply and Model 601 Energy Absorber for convenience in disconnecting the power cords 3 1 2 1 Power Supply Place the power supply switch in the ON position No local front panel adjustments or connections are required since the power supply control mode and other parameters have been factory configured f...

Страница 45: ... being indicated The default display can be thought of as being logically divided into four display areas the Field Current Display area the Voltage Display area the Status Indicator area and the Main Display area 3 2 1 Field Current Display The field current display indicates either the field strength or current1 This is always displayed in the upper left corner of the display see Figure 3 1 rega...

Страница 46: ...em 3 2 2 Voltage Display The voltage display indicates either the voltage across the magnet Vm or the power supply output voltage Vs This is always displayed in the lower left corner of the display see Figure 3 1 regardless of what else is being displayed on the Model 430 Programmer display The parameter displayed magnet voltage or power supply voltage is toggled by pressing SHIFT followed by Vs V...

Страница 47: ...es as shown in Table 3 6 on page 80 Persistent switch heater state is displayed on the bottom line of the main display If the Model 430 Programmer has been setup for use with a persistent switch it will indicate either ON or OFF for the persistent switch heater state otherwise it will display No PSwitch Installed 3 3 Entering Numeric Values A consistent method of entering values is used within men...

Страница 48: ...revious setting If the ESC key is pressed while numeric entry is active and digits have been entered the entered digits will be cleared and the cursor will remain for reentry of a new desired value If the ESC key is pressed with no entered digits on the display the setting will revert to the previous value and numeric entry will be made inactive Thus if digits have been entered the first time ESC ...

Страница 49: ... transition PSwitch Current PSwitch Heated Time PSwitch Cooled Time PSwitch Cooling Gain Quench Rate Instead of entering a value using the numeric keypad SHIFT is pressed followed by FINE ADJUST The display will show an up down arrow indicating that the fine adjust knob is active When the fine adjust knob is live adjustments made using it take place immediately This is a very useful and powerful f...

Страница 50: ...uire the user to select a value from a list of predefined values picklist values Such menus will display an item selector which points to the picklist value currently selected To change the value to another value in the picklist first press the ENTER key the display will show an asterisk indicating that picklist entry is active While picklist entry is active the left and right keypad arrows to the...

Страница 51: ... key Commands Menu All ramping controls PERSIST SWITCH CONTROL TARGET FIELD SETPOINT RAMP PAUSE and RAMP TO ZERO are accessed with a single keystroke See section 3 12 on page 79 for details of ramping controls Below is a brief summary of the function of each of these keys 3 6 1 Persistent Switch Control Key Pressing the PERSIST SWITCH CONTROL key toggles the Model 430 Programmer persistent switch ...

Страница 52: ...l without first indicating a persistent switch is installed in the Load submenu and specifying the switch heating current heated time and cooled time2 The nominal switch heating current is listed on the magnet specification sheet and may be entered in the Model 430 Programmer by accessing the Load submenu3 In addition to the heating current the user must also specify a heated time cooled time PSw ...

Страница 53: ... 430 Programmer will not allow ramping functions to be executed and will beep once if the user attempts to initiate a ramping operation Refer to section 3 13 on page 81 for a complete description of magnet persistent switch control A flowchart of the persistent switch control functions are located in the Appendix beginning on page 200 3 6 2 Target Field Setpoint Key Pressing the TARGET FIELD SETPO...

Страница 54: ...ediately begin ramping field current up or down to zero field current at the defined ramp rate s Ramping to zero may be interrupted at any time by pressing the RAMP PAUSE key which causes the Model 430 Programmer to enter the PAUSED mode and maintain the field current present at the point it was paused Note If the RAMP TO ZERO function is PAUSED and then the RAMP PAUSE button is pressed a second t...

Страница 55: ... then press the VOLTAGE LIMIT key also the 2 key Note that some of the SHIFT key menus can also be accessed using the setup menu Pressing the ESC key or the SHIFT key a second time will clear the SHIFT function and return the keypad to it s numeric function 3 7 1 Ramp Rate SHIFT key Use of the RAMP RATE SHIFT key provides a menu for setting ramp rate s The ramp rate may be set2 within the range sp...

Страница 56: ...to 55 A 2 0 1 A s from 55 to 58 A 3 0 05 A s above 58 A In the following discussion the fine adjust knob3 can optionally be used for ramp rate adjustment if the persistent switch is heated or if no persistent switch is installed If the user attempts to edit ramp rate segments using the fine adjust knob while an installed switch is cooled the Model 430 Programmer will produce one beep to indicate a...

Страница 57: ...y The segment 2 current range upper bound is set to a value of 58 Pressing the right arrow key accesses the next third segment ramp rate display The segment 3 ramp rate is set to a value of 0 05 Pressing the right arrow key accesses the segment 3 current range display Note Note that when there is more than one segment the upper bound of the last segment is always the Magnet Current Rating1 or the ...

Страница 58: ...he new segment assuming the ENTER key is pressed before the segment has completed If at some later time it is desired to temporarily set the Current Limit to a new value lower than the Magnet Current Rating for example 56 A this lower value will override the Magnet Current Rating Now only the first two ramp segments would be active since the new limit falls within the range of segment 2 The displa...

Страница 59: ...set less than or equal to the maximum output voltage of the power supply 1 If Voltage Limit becomes active while ramping it will be indicated by a reverse illumination character V for the status indicator Once the Voltage Limit function becomes active the current and therefore field will no longer be ramping linearly with time as the voltage available to charge the magnet will be reduced as the to...

Страница 60: ...field units either kG or T and the FIELD CURRENT SHIFT key is used the Model 430 Programmer will begin using current units A Conversely if the Model 430 is using current units A and the FIELD CURRENT SHIFT key is used the Model 430 will begin using field units either kG or T Note The Model 430 Programmer cannot use field units unless a valid coil constant has been entered3 3 7 6 Decrement Field SH...

Страница 61: ...The stability setting is specified in percent and controls the transient response and stability of the system The valid input range is from 0 0 to 100 0 The default value is 0 0 unless preset by AMI to match a specific superconducting magnet See section 3 10 2 1 on page 52 for details of how to determine the stability setting to use 3 7 10 Vs Vm SHIFT key The Vs Vm SHIFT key is used to toggle the ...

Страница 62: ...t Status Indicators Four LEDs are grouped together to show the magnet status 3 8 2 1 Field At Target Indicator The green FIELD AT TARGET LED indicates that the current is at the target value If the magnet is not in persistent mode persistent switch heater is on then this is an indication that the magnet field has reached the target value If the magnet is in persistent mode then this is an indicati...

Страница 63: ...LED is kept in nonvolatile memory when the Model 430 is powered off so that the LED state is retained even during a power cycle of the Model 430 Thus the MAGNET IN PERSISTENT MODE LED is an indicator that the magnet is persistent and has at least some persistent field 3 8 2 3 Current Leads Energized Indicator The blue CURRENT LEADS ENERGIZED LED indicates that at least 100 mA of current is flowing...

Страница 64: ...r between the different submenu items Pressing the left keypad arrow moves the item selector one item to the left and pressing the right keypad arrow moves the item selector one item to the right When the last item is reached and the right keypad arrow is pressed the item selector will move to the first item Likewise when the item selector is pointing to the first item and the left keypad arrow is...

Страница 65: ...ALCULATE MAGNET INDUCTANCE PSWITCH INSTALLED PSw CURRENT DETECT PSWITCH CURRENT PSWITCH HEATED TIME PSWITCH COOLED TIME PSWITCH P S RAMP RATE PSWITCH COOLING GAIN ENABLE QUENCH DETECT ENERGY ABSORBER PRESENT EXTERNAL RAMP DOWN DISABLED MISC DISPLAY BRIGHTNESS RAMP SEGMENTS RAMP RATE TIME UNITS FIELD UNITS QUENCH RATE SETTINGS PROTECTION SETTINGS PASSWORD SETUP MENU SUPPLY SELECT SUPPLY CUSTOM MIN ...

Страница 66: ...the picklist selection back to where it was when the Supply submenu was selected it also exits the Select Supply picklist 3 10 1 1 Select Supply Picklist The Select Supply picklist provides a set of picklist items that contain presets for standard AMI power supplies The left and right keypad arrows are used to cycle through the list of selections When the item selector points at the desired power ...

Страница 67: ...0PS 200 000 AMI 05300PS 300 000 AMI 05400PS 400 000 AMI 05500PS 500 000 HP 6260B 10 000 100 000 Kepco BOP 20 5Mb 10 000 5 000 5 000 10 000 to 10 000 Kepco BOP 20 10Mb 10 000 10 000 Xantrex XFR 7 5 140 0 000 7 500 0 000 140 000 0 000 to 10 000 Custom c 20 000 20 000 200 000 200 000 10 000 to 10 000 a The individual 05100PS power supply unit will source 10 000 Vdc at 100 A How ever the standard conf...

Страница 68: ... 5 V to 5 V at the power supply system output terminals The AMI 4Q06125PS power supply operates as a four quadrant power supply without the addition of an energy absorber The addition of an energy absorber to the system does not change the capabilities of the power supply itself or the values entered for the supply The addition of an energy absorber does however change the system operating ranges ...

Страница 69: ...set by using either the numeric keypad per section 3 3 on page 29 or the fine adjust knob section 3 4 on page 31 3 10 1 1 1 3 Min Output Current The minimum output current is specified in amperes A and reflects the minimum output current capacity of a connected power supply The valid range is 0 000 to 2000 000 A1 and can be set by using either the numeric keypad per section 3 3 on page 29 or the f...

Страница 70: ...del 430 Programmer as an input to the connected power supply This submenu item provides a picklist of six preset selections and does not allow numeric entry of a range The picklist values are shown in Table 3 3 below 3 10 2 Load Submenu When the Load submenu is selected several parameters associated with the superconducting magnet load can be viewed and or changed 3 10 2 1 Stability Setting The st...

Страница 71: ...et the stability setting for magnets with a persistent switch installed and inductance of less than 3 henries Magnets with an inductance of greater than 3 henries that have a persistent switch installed should operate with a stability setting of 0 0 The Model 430 Programmer internal control loop gain is proportional to the multiplier 100 Stability Setting except that for a Stability of 100 the mul...

Страница 72: ...e graph above as a starting point no greater than 0 1 changes should be made above 98 no greater than 0 2 changes should be made between 94 and 98 no greater than 0 5 changes should be made between 84 and 94 no greater than 2 changes should be made between 44 and 84 and no greater than 5 changes should be made below 44 See the summary in the table below 3 10 2 2 Coil Constant The coil constant is ...

Страница 73: ... The Magnet Current Rating is normally set to match a specific superconducting magnet The setting should not be changed unless a different magnet is to be used always refer to the magnet specification before changing the Magnet Current Rating A magnet operates within the capabilities of the associated power supply Since the supply must be selected from the available standard ratings the current li...

Страница 74: ...430 Programmer will beep once and deny the change if the user attempts to set the Magnet Current Rating below the present Target Field Setpoint If a lower current limit is required for testing or other purposes the Current Limit see section 3 10 2 4 can be set by the user to limit the magnet current to values lower than the Magnet Current Rating 3 10 2 4 Current Limit The current to the load will ...

Страница 75: ...l 430 Programmer will beep once and deny the change if the user attempts to set the Current Limit below the present Target Field Setpoint 3 10 2 5 Calculate Magnet Inductance This menu pick will automatically determine the inductance of the load magnet The inductance is determined by measuring the voltage developed across the magnet Vm with a fixed di dt current rate of change in A sec passed thro...

Страница 76: ...on will automatically determine the proper value of heater current in a persistent switch installed on a magnet connected to the power supply system The power supply should be energized and at zero current When the ENTER key is pressed to start the process the following occurs 1 The persistent switch current is set to 0 1 mA 2 The power supply current is ramped to 2 A at 0 1 A sec 3 After the powe...

Страница 77: ...he previously set persistent switch current is retained 3 10 2 8 PSwitch Current The persistent switch heater current can be set to any value between 0 0 and 125 0 mA The value can be set by using either the numeric keypad per section 3 3 on page 29 or the fine adjust knob section 3 4 on page 31 The default value is 10 0 mA unless preset by AMI to match a specific superconducting magnet 3 10 2 9 P...

Страница 78: ...e fully superconducting The time may be set to any value between 5 and 3600 seconds2 The value can be set by using either the numeric keypad per section 3 3 on page 29 or the fine adjust knob section 3 4 on page 31 The default is 20 seconds unless preset by AMI to match a specific superconducting magnet During the persistent switch cooling period the Model 430 Programmer ramping functions are disa...

Страница 79: ...ity during switch cooling which could potentially prevent the switch from cooling Most systems requiring some cooling gain to control magnet drift will likely work with value set to about 25 The value can be set by using either the numeric keypad per section 3 3 on page 29 or the fine adjust knob section 3 4 on page 31 3 10 2 13 Enable Quench Detect The internal quench detection function of the Mo...

Страница 80: ...net system Signals such as low liquid levels cryocooler compressor faults or abnormal temperatures can be used to trigger a controlled magnet rampdown even if the magnet is in persistent mode Refer to section 6 2 on page 157 The external rampdown function may be enabled or disabled according to the preference of the user The default value is NO With the exception of enable yes no the settings and ...

Страница 81: ... value is 1 there is only one ramp rate for the Model 430 Programmer used for the full available current range For multiple ramp rates set the value to the number of ramp segments desired up to ten segments See section 3 7 1 on page 37 for details regarding the use of ramp rate segments 3 10 3 3 Ramp Rate Time Units This picklist value specifies the unit of time used to enter and the display ramp ...

Страница 82: ... 31 If the magnet quenches and the Model 430 Programmer does not select the quench the value should be lowered until all quenches are detected 3 10 3 6 Settings Protection Settings Protection allows virtually1 every command and menu submenu setting to be protected from alteration or use If a setting is locked it cannot be used from the front panel without first unlocking the setting which requires...

Страница 83: ...s pressed to change settings protection the password must be correctly entered before settings protection can be edited Using the keypad type the numeric password up to 4 digits and press ENTER The default password is 1234 If an incorrect password is entered the Model 430 Programmer beeps and again prompts for the password Once the password has been correctly entered the protection value Locked or...

Страница 84: ...d The default value is Unlocked 3 10 3 6 4 Ramp To Zero Lock This picklist value specifies whether use of the RAMP TO ZERO key is locked or unlocked The default value is Unlocked 3 10 3 6 5 Ramp Rate Settings Lock This picklist value specifies whether ramp rate settings are locked or unlocked Ramp rate settings protected by this setting are use of the RAMP RATE SHIFT key menu editing of the Ramp S...

Страница 85: ...e default value is Unlocked 3 10 3 6 7 Voltage Limit Lock This picklist value specifies whether use of the VOLTAGE LIMIT SHIFT key menu is locked or unlocked The default value is Unlocked 3 10 3 6 8 Reset Quench Lock This picklist value specifies whether use of the RESET QUENCH SHIFT key command is locked or unlocked The default value is Unlocked 3 10 3 6 9 Incr Decr Field Lock This picklist value...

Страница 86: ...efault value is Unlocked 3 10 3 6 12 Stability Setting Lock This picklist value specifies whether the Stability Setting value is locked or unlocked whether accessed through the STAB SHIFT key menu or under the Load submenu The default value is Unlocked 3 10 3 6 13 Vs Vm Lock This picklist value specifies whether use of the Vs Vm SHIFT key command is locked or unlocked The default value is Unlocked...

Страница 87: ... Unlocked 3 10 3 6 16 Coil Constant Lock This picklist value specifies whether the Coil Constant value under the Load submenu is locked or unlocked The default value is Unlocked 3 10 3 6 17 Current Limit Lock This picklist value specifies whether the Current Limit value under the Load submenu is locked or unlocked The default value is Unlocked 50 00 A Volt Meter Lock 0 50 Vs Locked Unlocked 50 00 ...

Страница 88: ...tch Heated Time value the PSwitch Cooled Time value the PSwitch P S Ramp Rate value and the PSwitch P S Cooling Gain value The default value is Unlocked 3 10 3 6 20 Quench Detect Lock This picklist value specifies whether the Enable Quench Detect picklist value under the Load submenu is locked or unlocked The default value is Unlocked 3 10 3 6 21 Quench Rate Lock This picklist value specifies whet...

Страница 89: ... the Display Brightness picklist value under the Misc submenu is locked or unlocked The default value is Unlocked 3 10 3 6 25 Net Setup Lock This picklist value specifies whether the Net Setup submenu is locked or unlocked The default value is Unlocked 3 10 3 7 Settings Password Settings Password is a password protected submenu under the Misc submenu It provides a means of changing the settings pr...

Страница 90: ...sword for confirmation Using the keypad again type the new 4 digit maximum numeric password and press ENTER If the second password entry does not match the first password entry the Model 430 Programmer beeps and the user is prompted again to re enter the new password The new password is not accepted until it is confirmed by entering the same password a second time If ESC is pressed before confirma...

Страница 91: ...3 IP Address Present This submenu item displays the currently assigned system IP address for the Model 430 Programmer The value in parentheses after the IP address value indicates how the IP address is assigned DHCP indicates that the value is dynamically assigned by a DHCP server Static indicates that the value is static assigned by the Model 430 user The default value is 0 0 0 0 However since th...

Страница 92: ...y set by the network DHCP server 3 10 5 Net Setup Submenu Selecting the Net Setup submenu allows network settings to be edited except for the system name which can only be modified using remote communications Note also that the system IP address the subnet mask and the gateway IP address can only be assigned by the user if the currently selected method of IP address assignment is Static if the cur...

Страница 93: ...ss Assignment is DHCP the system IP address is assigned by the network DHCP server and cannot be assigned by the user 3 10 5 3 Subnet Mask If IP Address Assignment is Static then the subnet mask can be assigned by the user The default value is 0 0 0 0 Note This item is only available in the Net Setup submenu if IP Address Assignment is Static If IP Address Assignment is DHCP the subnet mask is ass...

Страница 94: ...the Model 430 Programmer and power supply all of the setup items should be reviewed and set if necessary with appropriate values for the connected superconducting magnet Figure 3 13 on the next page shows an example magnet specifications sheet Several parameters needed to operate the magnet are specified These values should be entered into the appropriate setup menu of the Model 430 Programmer For...

Страница 95: ...il sales americanmagnetics com 0 1 7 63 7 216 AMI JOB MAGNET TYPE 6ROHQRLG MODEL XVWRP FOR U R QJLQHHULQJ WG DATE 0D Rated Central Field 4 2K1 N Rated Current DPSV Max Field Tested N Field to Current Ratio JDXVV DPS Homogeneity over a 1 cm DSV Measured Inductance KHQU V Charging Voltage YROWV Axial Clear Bore LQFKHV Overall Length flange to flange LQFKHV Maximum Outside Diameter LQFKHV Weight OEV ...

Страница 96: ...ividing the rated field by the rated current if not explicitly stated 0 934 Current Limit A 85 600 PSwitch Installed YES PSwitch Current mA 41 0 PSwitch Heated Time sec 20 PSwitch Cooled Time sec 20 PSwitch P S Ramp Rate A sec 10 Enable Quench Detect YES Energy Absorber Present NO Voltage Limit V 4 100b b Value is the 2 1 V charge rate plus allowances for power lead drop at the rated current With ...

Страница 97: ... Once the ramp rate and Voltage Limit are specified the Model 430 Programmer provides two modes of ramping manual and automatic Manual ramping will ramp to the Current Limit via manual direction control by the user Automatic ramping will ramp to the target field current automatically Automatic ramping can be thought of as a next point operation whereby the Model 430 determines the appropriate ramp...

Страница 98: ...current begins immediately If ramping is PAUSED ramping to the target field current Table 3 6 Ramp modes and descriptions Mode Description Ramping Automatic ramping to the target field currenta is in progress Holding The target field current has been achieved and is being maintained Paused Ramping is suspended at the field current achieved at the time the PAUSED mode was entered Manual Ramping is ...

Страница 99: ...it is operating Adjustment of the current is prevented from exceeding the Current Limit specified in the Load setup menu see section 3 10 2 4 on page 56 The resolution of the adjustment is 15 digits which is greater than the resolution of the display When the field current is adjusted to the desired value press the ENTER key to keep that value as the target field current If any other operation is ...

Страница 100: ... heater must be energized Perform the following steps 1 Turn on the persistent switch heater by pressing the PERSIST SWITCH CONTROL key to heat the persistent switch heater 2 After the persistent switch heater has been heated for the preset heating time as set by the PSwitch Heated Time variable the display will show the default display and wait at zero current for a command from the operator 3 13...

Страница 101: ...preset persistent switch cooling time set by the PSwitch Cooled Time variable3 The display indicates that the persistent switch is being cooled and indicates the number of seconds 4 in this example remaining in the cooling cycle c When the cooled time is complete the green MAGNET IN PERSISTENT MODE LED will illuminate4 and the power supply will ramp to zero at the PSw P S Ramp Rate value5 1 Refer ...

Страница 102: ...witch was cooled and then heat the switch After the persistent switch heated time has elapsed the display will indicate the persistent mode transition malfunction After pressing ENTER the Model 430 Programmer will revert to the default field current display 5 After the power supply is finished ramping to zero the following screen will be displayed 45 39 A Mode Power Supply Ramping 3 44 Vs to match...

Страница 103: ...mer is next turned on discussed in the section to follow 3 13 3 Procedure for Exiting Persistent Mode To exit the persistent mode of magnet operation the user should perform the following steps 1 If the Model 430 Programmer has not been powered off since the magnet was placed in persistent mode proceed to step 3 2 If the Model 430 Programmer has been powered off since the magnet was placed in pers...

Страница 104: ... Programmer will execute steps 4 through 7 below Note If persistent mode is not exited and it is later desired to display the magnet current that was established when the persistent switch was cooled refer to section 3 6 2 on page 35 for the procedure 4 When ENTER is pressed the power supply is ramped to the current that was flowing in the magnet at the time the persistent mode was entered The pow...

Страница 105: ...during the time the magnet was in persistent mode Since this is not a critical error2 after 15 seconds the screen will change back to the default display 6 After the Model 430 Programmer has completed this persistent switch heating operation the display reads 1 Refer to section 3 10 2 9 on page 59 The 4 in the display indicates the number of seconds remaining in the heating cycle 4 in this example...

Страница 106: ...L key to turn off the persistent switch heater current Note that the Model 430 Programmer will enter the COOLING SWITCH mode and disallow any ramping during the switch cooling period 3 If magnet current is greater than 100 mA when the switch heater current is turned off the MAGNET IN PERSISTENT MODE LED will illuminate 3 13 4 2 Exiting Persistent Mode without altering the power sup ply current out...

Страница 107: ... 430 Programmer for the purposes of the example is assumed to be in the PAUSED mode at 0 A at the beginning of the ramping example Point 1 The current is 0 A and the Model 430 Programmer is in the PAUSED mode The user sets the target field current to 13 000 A The RAMP PAUSE key is pressed so that the PAUSED mode is no longer active and the Model 430 begins ramping current Point 2 The target field ...

Страница 108: ... in the magnet The power supply matches the magnet current at point 6d Point 7 The user again increases the ramp rate and presses the RAMP TO ZERO key to begin ramping to zero current The Model 430 Programmer automatically ramps the current to 0 A Point 8 The Model 430 Programmer switches to ZERO CURRENT mode at 0 A current when achieved and holds at this current until further commands are issued ...

Страница 109: ... supply output voltage to zero and will not respond to further input until the RESET QUENCH SHIFT key is used to clear the quench detect condition or until the quench condition is cleared by a remote command The rear panel input cannot be disabled however it may be left disconnected without the possibility of a generating a false quench condition Note If the external quench detection circuit conti...

Страница 110: ...n is provided on the rear panel of the Model 430 Programmer The process is started by shorting for at least 10 milli seconds the input connections through closure of user supplied external contacts Once triggered rampdown of the magnetic field of the magnet is initiated Operator intervention such as Ramp Pause ESC etc is inhibited until rampdown is completed and the external rampdown signal is cle...

Страница 111: ...guishes and rampdown begins The FIELD AT TARGET LED extinguishes 5 After rampdown the following will display Note The external rampdown signal MUST be cleared before pressing ENTER will yield a response Further operator control is inhibited until the external rampdown signal is cleared 6 Once the external signal has been cleared ENTER can be pressed User control will be re established and the oper...

Страница 112: ...le in Persistent Mode 2 The sequence continues as described for the magnet in persistent mode section 3 16 1 steps 5 through 6 Note After rampdown the external rampdown signal MUST be cleared before continuing Further operator control is inhibited until the external rampdown signal is cleared 3 17 Summary of Operational Limits and Default Settings Table 3 7 provides a summary of the operational li...

Страница 113: ...ity Setting 0 0 to 100 0 0 0 Coil Constant kG A 0 001 to 999 99999 1 0 PSwitch Current mA 0 0 to 125 0 10 0 PSwitch Heated Time sec 5 to 120 20 PSwitch Cooled Time sec 5 to 3600 20 PSwitch Power Supply Ramp Rate A sec same as min and max ramp see table on page 9 10 PSwitch Cooling Gain 0 0 to 100 0 0 0 Magnet Current Rating A 0 001 to 9999 9999999999 80 000 Current Limit A Min Output Current and M...

Страница 114: ...96 Rev 5 Operation Summary of Operational Limits ...

Страница 115: ...ons are used for SCPI Standard Commands for Programmable Instruments syntax for the remote interface commands Braces enclose valid parameter choices A vertical bar separates multiple choices for each parameter Triangle brackets indicate that you must supply a value Parentheses within indicate alternative units are available For example the command PSwitch 0 1 indicates that the command PSwitch has...

Страница 116: ...NG current A CONFigure CURRent LIMit current A CONFigure PSwitch 0 1 CONFigure PSwitch CURRent current A CONFigure PSwitch HeatTIME time seconds CONFigure PSwitch CoolTIME time seconds CONFigure PSwitch CoolingGAIN percent CONFigure PSwitch PowerSupplyRampRate rate A s CONFigure QUench DETect 0 1 CONFigure QUench RATE value CONFigure ABsorber 0 1 CONFigure RAMP RATE UNITS 0 1 CONFigure FIELD UNITS...

Страница 117: ...TING PSwitch CURRent PSwitch HeatTIME PSwitch CoolTIME PSwitch PowerSupplyRampRate PSwitch AUTODetect PSwitch CoolingGAIN PSwitch INSTalled QUench DETect QUench RATE ABsorber RAMP RATE UNITS FIELD UNITS IPNAME see page 119 for more information CONFigure LOCK PSwitch CONTRol 0 1 CONFigure LOCK TARGet 0 1 CONFigure LOCK RAMP PAUSE 0 1 CONFigure LOCK RAMPrate 0 1 CONFigure LOCK ZEROfield 0 1 SETUP Co...

Страница 118: ...CONFigure LOCK CURRent RATING 0 1 CONFigure LOCK PSwitch SETtings 0 1 CONFigure LOCK QUench DETect 0 1 CONFigure LOCK QUench RATE 0 1 CONFigure LOCK ABsorber 0 1 CONFigure LOCK BRIGHTness 0 1 CONFigure LOCK NETsetup 0 1 see page 119 for more information LOCK PSwitch CONTRol LOCK TARGet LOCK RAMP PAUSE LOCK ZEROfield LOCK RAMPrate LOCK RAMPDown LOCK SUPPly LOCK VOLTage LIMit LOCK QUench RESet LOCK ...

Страница 119: ...Rev 5 101 Remote Interface Reference SCPI Command Summary LOCK ABsorber LOCK BRIGHTness LOCK NETsetup ...

Страница 120: ...ure RAMP RATE SEGments segments RAMP RATE SEGments CONFigure RAMPDown ENABle 0 1 CONFigure RAMPDown RATE SEGments segments CONFigure RAMPDown RATE CURRent segment rate A s A min upper bound A CONFigure RAMPDown RATE FIELD segment rate kG s kG min T s T min upper bound Kg T RAMPDown ENABle RAMPDown RATE SEGments RAMPDown RATE CURRent segment RAMPDown RATE FIELD segment VOLTage LIMit CURRent TARGet ...

Страница 121: ...h 0 1 PSwitch PERSistent see page 130 for more information QUench 0 1 QUench Quench COUNT see page 130 for more information RAMPDownFile RAMPDownBackup RAMPDown COUNT see page 132 for more information Ramping State Commands and Queries Switch Heater Commands and Queries Quench State Control and Queries Rampdown State Control and Queries Trigger Control and Queries ...

Страница 122: ...ONFIGURE Any other form of the keyword is illegal and will generate an error Many commands also require multiple keywords to traverse the tree structure of the entire Model 430 Programmer command set For example commands associated with a current setting require the prefix of CONFigure CURRent Note that a colon separates the keywords No spaces are allowed before or after the colon Parameters must ...

Страница 123: ...n enable register write a decimal value which corresponds to the binary weighted sum of the bits you wish reported to the Status Byte register 4 2 2 1 Status Byte Register The Status Byte register group reports conditions from the Standard Event register or output buffers Data in the output buffer is immediately reported in the Serial Message Available bit bit 3 Clearing a bit in the Standard Even...

Страница 124: ...d condition no longer exists The Status Byte enable register is cleared when The SRE 0 command is executed The power is turned off and then back on and the Model 430 Programmer was configured for PSC 1 power on status clear The enable register setting is persistent if the Model 430 Programmer is configured for PSC 0 no status clear on power on Table 4 1 Bit Definitions for the Status Byte Register...

Страница 125: ...t Register The Standard Event register group reports a power on condition various error conditions and indicates when an operation has completed Any or all of the Standard Events can be reported to the Status Byte register by enabling the corresponding bit s in the Standard Event enable register see Figure 4 1 To set the Standard Event enable register write a binary weighted decimal value using th...

Страница 126: ...ending numerous commands in sequence there are two methods available to help prevent command queue overflows which are discussed below 4 2 4 1 Using the OPC Command The OPC command is executed within the normal command queue Upon completed execution of the OPC command the Operation Complete bit bit 0 of the Standard Event register will be set This command is useful Table 4 2 Bit Definitions for th...

Страница 127: ... OPC command for determining when execution all of the commands including OPC is completed The OPC query is used to query completion of all three commands 4 2 4 2 Using the OPC Query The OPC query is similar to the OPC command but instead of setting the Operation Complete bit of the Standard Event register the OPC query returns a 1 plus termination characters to the appropriate output buffer when ...

Страница 128: ...ed on IBM compatible computers The RS 232 connector pinout for the Model 430 Programmer is fully documented on page 160 in the Appendix 4 3 2 Termination Characters All commands and queries are transmitted and received as ASCII values and are case insensitive The Model 430 Programmer always transmits CR LF a carriage return followed by a linefeed at the end of an RS 232 transmission The Model 430 ...

Страница 129: ...rs even those assigned by a DHCP server can be viewed using the Net Settings submenu see section 3 10 4 4 4 1 Ethernet Connector The Model 430 Programmer uses a standard RJ 45 jack for Ethernet communications The Ethernet jack pinout is fully documented in Table A 8 on page 160 in the Appendix 4 4 2 Termination Characters All commands and queries are transmitted and received as ASCII values and ar...

Страница 130: ...the PSC setting TST Performs a self test Currently always returns 1 Ctrl C This clears the output buffers of the Model 430 Programmer and prepares the instrument for a new command Status registers are unaffected Ctrl C corresponds to ASCII code 03 SYSTem LOCal Enables all front panel controls All front panels controls are enabled by default after a power up or RST command SYSTem REMote Note The SY...

Страница 131: ...ffer and messages 4 5 2 Status System Commands The status system register groups and commands are illustrated in Figure 4 1 on page 105 STB Returns the contents of the Status Byte register The STB command does not clear the Summary Bit bit 6 of the Status Byte register SRE enable_value Enables bits in the Status Byte register to be reported in the Summary Bit bit 6 of the Status Byte register To e...

Страница 132: ...ighted sum of the bits enabled by the last ESE command PSC 0 1 Power On Status Clear If PSC 1 is in effect the Standard Event enable register and the Status Byte enable register are cleared at power on If PSC 0 is in effect the enable registers are not cleared at power on The default setting is 1 PSC Returns the Power On Status Clear setting currently in effect A value of 0 indicates the enable re...

Страница 133: ...n a preset supply type is selected SUPPly VOLTage MAXimum Returns the maximum power supply compliance in volts This value can be configured only via front panel operation using the Supply submenu and is set automatically when a preset supply type is selected Table 4 3 Return Values and Meanings for SUPPly TYPE Query Return Value Meaning 0 AMI 12100PS 1 AMI 12200PS 2 AMI 4Q05100PS 3 AMI 4Q06125PS 4...

Страница 134: ...teger value corresponding to the voltage output mode according to the table below This value can be configured only via front panel operation using the Supply submenu and is set automatically when a preset supply type is selected CONFigure STABility percent Sets the stability setting in percent STABility Returns the stability setting in percent CONFigure COILconst value kG A T A Sets the coil cons...

Страница 135: ...led on the connected superconducting magnet 1 indicates that a persistent switch is installed If a persistent switch is installed the persistent switch heated current and time should be specified The default value is 1 CONFigure PSwitch CURRent current mA Sets the persistent switch heater current in mA PSwitch AUTODetect Executes the auto detection algorithm Refer to section 3 10 2 7 on page 58 an...

Страница 136: ... CONFigure PSwitch CoolingGAIN percent Sets the persistent switch cooling gain in percent PSwitch CoolingGAIN Returns the persistent switch cooling gain in percent CONFigure QUench DETect 0 1 Sending 0 disables the automatic quench detection function of the Model 430 Programmer 1 enables the automatic quench detection function of the Model 430 See section 3 15 for more information 0 is the default...

Страница 137: ...e commands FIELD UNITS Returns 0 for field values displayed specified in terms of kilogauss or 1 for tesla CONFigure IPNAME system name Sets the system name also known as host name or computer name the name by which the Model 430 Programmer is identified on a network Note If the system name value is changed the Model 430 Programmer power must be cycled off for at least 5 seconds and then back on t...

Страница 138: ...E key unlocked or 1 for locked CONFigure LOCK ZEROfield 0 1 Specifies whether use of the RAMP TO ZERO key is locked or unlocked Sending 0 unlocks A 1 locks 0 is the default value LOCK ZEROfield Returns 0 for use of the RAMP TO ZERO key unlocked or 1 for locked CONFigure LOCK RAMPrate 0 1 Specifies whether ramp rate settings are locked or unlocked Ramp rate settings protected by this setting are us...

Страница 139: ...g 0 unlocks A 1 locks 0 is the default value LOCK QUench RESet Returns 0 for use of the RESET QUENCH SHIFT key command unlocked or 1 for locked CONFigure LOCK QUench RATE 0 1 Specifies whether use of the quench rate command is locked or unlocked Sending 0 unlocks A 1 locks 0 is the default value LOCK QUench RATE Returns 0 for use of the quench rate command unlocked or 1 for locked CONFigure LOCK I...

Страница 140: ...0 is the default value LOCK STABility Returns 0 for Stability Setting value unlocked or 1 for locked CONFigure LOCK VOLTage VS VM 0 1 Specifies whether use of the Vs Vm SHIFT key command is locked or unlocked Sending 0 unlocks A 1 locks 0 is the default value LOCK VOLTage VS VM Returns 0 for use of the Vs Vm SHIFT key command unlocked or 1 for locked CONFigure LOCK VOLTMeter 0 1 Specifies whether ...

Страница 141: ...locked or unlocked Persistent switch settings protected by this setting all under the Load submenu are the PSwitch Installed picklist value the PSwitch Current value the PSwitch Heated Time value PSwitch Current Detect PSwitch Cooled time PSw P S Ramp Rate and PSwitch Cooling Gain Sending 0 unlocks A 1 locks 0 is the default value LOCK PSwitch SETtings Returns 0 for persistent switch settings unlo...

Страница 142: ... Magnet Current Rating picklist value under the LOAD submenu is locked or unlocked Sending 0 unlocks A 1 locks 0 is the default value LOCK CURRent RATING Returns 0 for Magnet Current Rating picklist value under the LOAD submenu unlocked or 1 for locked CONFigure LOCK RAMPDown 0 1 Specifies whether the External Rampdown Enabled picklist value under the LOAD submenu is locked or unlocked Sending 0 u...

Страница 143: ...nt be defined otherwise an error is generated FIELD TARGet Returns the target field setting in units of kilogauss or tesla per the selected field units This query requires that a coil constant be defined otherwise an error is generated CONFigure RAMP RATE SEGments value Sets the number of ramp segments see section 3 7 1 for details of the use of ramp segments RAMP RATE SEGments Returns the number ...

Страница 144: ...IELD segment Returns the ramp rate setting for the specified segment values of 1 through the defined number of ramp segments are valid in units of kilogauss second or minute or tesla second or minute per the selected field units and ramp rate units and the current upper bound for that range in kilogauss or tesla per the selected field units This command requires that a coil constant be defined oth...

Страница 145: ...he external rampdown function is enabled Returns 1 for enabled while 0 for disabled 0 is the default value CONFigure RAMPDown RATE SEGments segments Sets the number of external rampdown segments RAMPDown RATE SEGments Returns the number of external rampdown segments CONFigure RAMPDown RATE CURRent segment rate A s A min upper bound A Sets the external rampdown rate for the specified segment values...

Страница 146: ...ampdown rate units and the current upper bound for that range in kilogauss or tesla per the selected field units This command requires that a coil constant has been defined otherwise an error is generated The two return values are separated by a comma For example RAMPDown RATE FIELD 1 0 0100 5 0000 4 5 6 Ramping State Commands and Queries The ramping state commands control and query the ramping st...

Страница 147: ...o the ramping state according to the table below 4 5 7 Switch Heater Command and Query The PSwitch commands control and query the state of the persistent switch heater For further information regarding the persistent switch heater see section 3 13 on page 81 PSwitch 0 1 Turns the persistent switch heater OFF and ON Sending 0 turns the switch heater OFF Sending a 1 turns the switch heater ON The de...

Страница 148: ...e quench output of the rear panel Quench I O connector is asserted and all ramping functions are disabled QUench Queries the quench state If a 0 is returned no quench condition exists If a 1 is returned a quench detect has occurred and is still in effect QUench COUNT Queries the number of recorded quench events 4 5 9 Rampdown State Queries RAMPDownFile Formats and sends the contents of the standar...

Страница 149: ...Rev 5 131 Remote Interface Reference Quench State Control and Queries RAMPDown COUNT Queries the number of recorded rampdown events ...

Страница 150: ... return data in the appropriate output buffer s Data placed in the serial or Ethernet output buffers is transmitted immediately Note that trigger output data may be placed in both the serial and the Ethernet output buffers if desired Table 4 6 Model 430 Programmer Trigger Function Bit Definitions Bit Number Bit Name Decimal Value Definition 0 Magnet Voltage 1 Magnet voltage in volts is included in...

Страница 151: ... Commands and Queries ETE enable_value Enables trigger functions according to the definitions in Table 4 6 To enable the trigger functions you must write a decimal enable_value which corresponds to the binary weighted sum of the functions you wish to enable For example to enable formatted output of the time magnet field and the magnet voltage to the serial interface send the command ETE 109 The re...

Страница 152: ...rror strings may contain up to 80 characters Errors are classified in the following categories command errors query errors execution errors and device errors Each category corresponds to the identically named bit in the standard event register see section 4 2 3 If an error occurs in any one of the categories the corresponding bit in the standard event register is set and remains set until cleared ...

Страница 153: ...e user attempted to activate the persistent switch heater when no switch is installed Before activating the persistent switch heater the user must indicate a switch is installed and set the switch current and heating time see page 58 108 Not Ramping The command that was issued requires the Model 430 Programmer to be ramping for the duration of command processing and the Model 430 Programmer was ei...

Страница 154: ...th unprocessed commands or queries The command or query is lost Review the handshaking section on page 108 for directions for avoiding input overflow errors 304 Error buffer overflow More than 10 errors have occurred For further errors to be recorded in the internal buffer at least one error must be cleared 4 6 4 Device Errors 401 Checksum failed The non volatile memory which stores the calibratio...

Страница 155: ...number of data bits stop bits and parity as the Model 430 Programmer 8 data bits 1 stop bit and no parity 404 Serial data overrun The received buffer of the Model 430 Programmer was overrun Verify that the host device has hardware handshaking RTS CTS enabled ...

Страница 156: ...138 Rev 5 Remote Interface Reference Error Messages ...

Страница 157: ... the exterior surfaces clean by gently wiping with a damp cloth moistened with a mild detergent The power supply should be occasionally opened for inspection and clean out of accumulated dust dirt and debris from ventilation holes heat sink air passages and circuitry this is especially important when operating the power supply in dirty or dusty environments The maintenance interval is dependent on...

Страница 158: ...m the work area 5 Minimize the handling of the system and all static sensitive components 6 Keep replacement parts in static free packaging 7 Do not slide static sensitive devices over any surface 8 Use only antistatic type desoldering tools 9 Use only grounded tip soldering irons 10 Use only static dissipative hand tools pliers cutters etc 5 2 2 The Model 430 does not appear to be energized 1 Ens...

Страница 159: ...for continuity c If a fuse is bad replace with a fuse of identical rating Caution Installing fuses of incorrect values and ratings could result in damage to the Model 430 Programmer in the event of component failure c Replace the fuse and securely fasten the Model 430 Programmer top cover Reconnect the power cord 4 Verify the input voltage selector switch on the Model 430 Programmer printed circui...

Страница 160: ...te programming voltage to voltage mode Consult the manufacturer s operations manual for the necessary power supply configuration 3 Verify that the persistent switch heater is operating Also verify that the actual persistent switch in the magnet is correctly installed and connected Note If the persistent switch heater is activated without an inductive load present at the supply outputs oscillating ...

Страница 161: ...riate power receptacle 5 Check the Voltage Limit settings of the Model 430 Power Supply Programmer and verify the limits are set to a value greater than 5 volts plus the charging voltage and any power lead voltage drops 5 2 6 Cannot charge the magnet at the selected ramp rate 1 Ensure the Model 430 Programmer is properly configured for the connected power supply See section 3 10 1 2 Ensure that th...

Страница 162: ...terminals either by a voltmeter on the front of the supply or by a DVM measurement If the supply output voltage is approximately zero the resistance of the power leads not the Model 430 Programmer is dictating the maximum ramp down rate An energy absorber is necessary to increase the rampdown rate 5 2 8 Cannot charge the magnet to desired field 1 If the power supply ramps to full output current af...

Страница 163: ...bilities of the magnet Exceeding the designed rate for ramping the magnet may cause a quench or it may turn on protective diodes on the magnet which may appear very similar to a quench 2 Ensure there is adequate LHe level in the cryostat For systems operating at less then 4 2K ensure the magnet is cooled to the temperature specified by the magnet manufacturer 3 For conduction cooled magnets ensure...

Страница 164: ...observe if an internal green LED is energized by looking through the Model 601 rear panel grating If the green LED is energized then the DC power converter is operating correctly If the internal green LED is not energized then the DC power converter has failed or AC power to the DC power converter has been lost Contact an Authorized AMI Technical Support Representative for a replacement 3 If the D...

Страница 165: ...e removed from the cryostat check the position of break away vapor cooled current leads 4 Ensure the LHe level sensor is not continuously energized if continuous level indication is not necessary 5 Ensure the vacuum in vacuum jacketed dewars is of sufficiently low pressure 5 2 16 Cannot display the magnetic field strength only current Enter a coil constant in accordance with section 3 10 2 2 on pa...

Страница 166: ...ve drift during cooling increase the PSWitch Cooling Gain value by several percent 5 2 19 Model 430 appears to lock up when connecting to network Note If the IP Address Assignment value is changed the Model 430 Programmer power must be cycled off for at least 15 seconds and then back on to complete the change On power up when connecting via Ethernet Internet Protocol the Model 430 will display the...

Страница 167: ...rior return authorization 5 4 Return Authorization Items to be returned to AMI for repair warranty or otherwise require a return authorization number to ensure your order will receive proper attention Please call an AMI representative at 865 482 1056 for a return authorization number before shipping any item back to the factory ...

Страница 168: ...150 Rev 5 Service Return Authorization ...

Страница 169: ...nitions Pin Function Pin Function 1 LHe Sensor I Red 14 spare 2 LHe Sensor I Black 15 spare 3 LHe Sensor V Yellow 16 spare 4 LHe Sensor V Blue 17 spare 5 Temperature Sensor I Red 18 spare 6 Temperature Sensor I Black 19 spare 7 Temperature Sensor V Yellow 20 spare 8 Temperature Sensor V Blue 21 spare 9 Persistent Switch Heater I Red 22 spare 10 Persistent Switch Heater I Black 23 spare 11 Magnet V...

Страница 170: ...The LHe level and temperature sensor signals are also internally routed to the LHe Level Temp Connectors If the Model 430 Programmer is purchased as part of a magnet system a Magnet Station Connector instrumentation cable will be provided with the system A 2 LHe Level Temp Connectors The two 9 pin D sub male LHe Level Temp Connectors are identically wired and connected pin for pin internally Table...

Страница 171: ...MI LHe sensor and the wiring for the sensor is to have no live parts which are accessible Conductors connected to its terminals must be insulated from user contact by basic insulation rated for 150 VAC Category I Note For maximum noise immunity use shielded cabling and connect one end of the shield to the LHe Level Temp Connector shell A 3 Current Transducer Signal Connector The current transducer...

Страница 172: ...nector is an 8 pin female DIN connector with the shell lugs connected to the Model 430 Programmer chassis ground The pins that receive the power into to the Model 430 are wired internally to the current transducer signal connector for powering the CT 7 V out 8 not used 9 power 15 volts out Table A 4 Current Transducer Power Connector Pin Definitions Pin Function 1 not used 2 not used 3 not used 4 ...

Страница 173: ...f the Program Out connector is the program out voltage Pin 4 of the Program Out connector is the output return All other pins of the Program Out connector are unused Note For maximum noise immunity the Model 430 Programmer chassis and the chassis of any connected power supply should be tightly Table A 5 Program Out Connector Pin Definitions Pin Function 1 not used 2 not used 3 not used 4 Program O...

Страница 174: ...s own quench detection circuitry the output of which is wired to the Model 430 Programmer The external input overrides the internal quench detection function of the Model 430 Programmer and cannot be disabled Caution The external quench detection input is a dry contact input not galvanically isolated from the Model 430 Programmer internal circuitry To avoid noise problems and potential damage to t...

Страница 175: ...rom any external circuitry It is recommended that the external rampdown input be driven by the contacts of a low level dry contact relay which will galvanically isolate the input from all other circuitry When the external rampdown input pins pins 6 and 7 of the Quench I O connector are shorted together for more than 10 milliseconds the Model 430 Programmer enters external rampdown mode If the magn...

Страница 176: ...ber of segments equal zero A separate segmented ramp rate table is available for external rampdown This option is accessible only via the external interface commands See section 4 5 5 on page 124 A 6 3 External Quench Detection Output The external quench detection output is a set of dry contacts pins 1 and 2 of the Quench I O connector which close when the Model 430 Programmer internal circuitry d...

Страница 177: ...ch input pin has a 1 megohm resistor to analog circuit common The inputs are differential inputs Aux Input 1 and Aux Input 2 have a 1 V nominal input voltage range Aux Input 3 Aux Input 4 Aux Input 5 and Aux Input 6 have a 10 V nominal input voltage range Table A 7 Aux Inputs Connector Pin Definitions Pin Function 1 Aux Input 1 2 Aux Input 1 3 Aux Input 2 4 Aux Input 2 5 not used 6 Aux Input 3 7 A...

Страница 178: ...in Mnemonic Function 1 TXD Transmit differential output 2 TXD Transmit differential output 3 RXD Transmit differential input 4 not used 5 6 RXD Transmit differential input 7 not used 8 Table A 9 RS 232 Connector Pin Definitions Pin Mnemonic Function 1 DCD Data Carrier Detect 2 RXD Receive Data 3 TXD Transmit Data 4 DTR Data Terminal Ready 5 GND Signal Ground 6 DSR Data Set Ready 7 RTS Request To S...

Страница 179: ...rical power source in terms of the voltage For example 240 Vac ASCII American Standard Code for Information Interchange numerical representation of characters such as a or or an action such as line feed plain raw text with no formatting such as tabs bold or underscoring CR Text Carriage Return character CT Current Transducer CTS DTE clear to send signal DB9 Type of electrical connector containing ...

Страница 180: ...tion and processing of signals typically converted to from analog signals external to the processor DTE Data Terminal Equipment the source or destination of data in a communication connection DTE s are connected to DCE which in turn is connected to the communication channel EFT Electrical Fast Transient EMC Electromagnetic Compatibility Eo Power supply output voltage ESD Electrostatic Discharge FI...

Страница 181: ... frequency spectrum Rlead Electrical circuit lead or wiring resistance RTS DTE ready to send signal RS 232 RS 232 is a long established standard and protocol for relatively low speed serial data communication between computers and related devices originally established for teletypewriter communication SCPI Standard Commands for Programmable Instruments STP Standard Temperature and Pressure T Tesla...

Страница 182: ...y device which unlike liquid crystal displays can emit very bright high contrast light in various colors Vlead Voltage I x R developed across circuit lead or wiring resistance due to current flow Vm Magnet voltage Vs Power supply voltage Table A 11 Abbreviations and Acronyms Continued Term Meaning ...

Страница 183: ...ent Control Temperature Coefficient 0 01 of Imax per C Stability With standard resistive shunt better than 0 02 of Imax after 20 minutes at desired current and better than 0 01 of Imax after 60 minutes at desired current With zero flux current sensing option 0 001 of Imax after 10 minutes at desired current Programming Resolution 15 digitsa Ramp Rate Resolution 15 digitsa Nominal Load Inductance R...

Страница 184: ...l time Clock Backup Battery 3 V CR2032 Lithium coin cell Physical Dimensions 89 mm H x 483 mm W x 191 mm D 3 5 H x 19 W x 10 75 D Weight 8 5 lbm 3 9 kg Environmental Ambient Temperature Operating 0 C to 50 C 32 F to 122 F Non operating 20 C to 70 C 4 F to 158 F Relative Humidity 0 to 95 non condensing Terminal Torque Limit 48 lbf in 5 4 N m Standards EMI EMC Standards EN 61000 4 2 EN 61000 4 3 EN ...

Страница 185: ...ower supply parameters given in this section will not apply as configured by the factory in the closed loop current feedback configuration incorporating the Model 601 Energy Absorber under control of the AMI Model 430 Programmer Refer to section A 11 on page 165 section A 13 on page 173 and System Specifications on page 9 for additional specifications relating to the overall system and individual ...

Страница 186: ... Meets EN 61000 3 2 Maximum Input Current 120 Vac 13A rms Rated load 1200W 240 Vac 6 5A rms Inrush Current 265 Vac 40A Peak 132 Vac 20A Input Fusing Circuit Breaker 2 line Low ac Protection Self protected No fixed limits Output hold up typical 10 milliseconds Ride through Leakage Current 115 Vac 60Hz 5mA max 230 Vac 50Hz 10mA max OUTPUT CHARACTERISTICS Voltage dc range 0 to 10 Vdc 1200 W current l...

Страница 187: ...rnal dc fans exhaust to the rear Humidity 0 to 95 RH non condensing Shock 20 g 11msec 50 half sine non operating Vibration 5 10 Hz 10mm double amplitude 3 axes non operating 10 55 Hz 2g Altitude sea level to 10000 ft 0 3 000 ft 100 linear derating to 70 of power at 10 000ft Dimensions English 1 735 H x 19 W x 17 5 D Depth excluding connectors and ter minal blocks metric 44 45 x 482 6 x 443 7 mm We...

Страница 188: ...170 Rev 5 Appendix Power Supply Details Refer to Figure A 1 for Model 08150PS rear panel terminal block connections Figure A 1 Model 08150PS Terminal Block Connections ...

Страница 189: ...ppendix Power Supply Details A 12 2 Model 08150PS Dimensional Specifications Figure A 2 and Figure A 3 show dimensional specifications of the Model 08150PS Figure A 2 Model 08150PS Dimensions Front and Rear Views ...

Страница 190: ...172 Rev 5 Appendix Power Supply Details Figure A 3 Model 08150PS Dimensions Top and Side Views ...

Страница 191: ... for internal cooling from the superconducting magnet Upon loss of ac power to a power supply system the Model 601 will ramp the system to zero current at a discharge rate of approximately 5 Vdc Table A 14 Model 601 Energy Absorber Specifications Parameter Value AC Input to AC power adapter 100 to 240 Vac 10 50 60 Hz 100 VA max DC Input from AC power adapter 5 Vdc 5 4 A max Maximum Magnet Operatin...

Страница 192: ...s a power supply or from natural decay of the field the inductor always presents a terminal voltage in the direction that would preserve the former current rate of flow i e oppose the change The magnitude of this opposing voltage is equal to the current rate of change Amperes per second multiplied by the inductance Henries In mathematical symbols V L x di dt 1 In charging a magnet the power supply...

Страница 193: ... in steady state with the power supply providing only the voltage required for the resistive IR drops A 13 2 2 Magnet Discharging To begin discharging or reducing the charge on a magnet the power supply voltage will decrease As the voltage drops the magnet polarity reverses in its natural attempt to oppose any change in current Current Figure A 5 Loop Voltages Magnet Charging Figure A 6 Loop Volta...

Страница 194: ...decaying only at the natural time constant of the circuit inductance and resistance Tsec L R The current will be reduced by 63 during each successive time constant period T With a typical inductance of 50 Henries and lead resistance of 0 001 Ohms T 50 000 seconds it will take over 14 hours to decay to 37 and many times that to reduce to near zero Introduction of the Model 601 Energy Absorber provi...

Страница 195: ...venience A 14 Remote Computer Communication with the Model 430 A 14 1 Communication via RS 232 1 Using serial a null modem cable connect the DB9 RS 232 connector on the rear of the Model 430 Programmer to a serial connector on the computer 2 Start a terminal emulator program on the remote computer As an example this procedure will use the HyperTerminal program running on a Windows machine ...

Страница 196: ...ose File New Connection and in the resulting screen field enter a name for the connection Click on OK 4 From the Connect using pull down menu select the appropriate COM port and click OK 5 Edit the communication parameters per section 4 3 on page 110 and click OK ...

Страница 197: ...2 6 Choose File Properties and then click on the Settings tab 7 Click on the ASCII Setup button and check the Send line ends with line feeds box and the Echo typed characters locally box in the ASCII Sending area Click on OK and then OK on the next screen ...

Страница 198: ...computer or through a computer network on which the host computer resides a For a host computer on a network connect a standard Ethernet cable between the Model 430 and the network b For a direct hardwired connection between the Model 430 and a host computer use a null modem or crossover Ethernet cable connected from the Model 430 directly to the host computer 2 Turn on the Model 430 and press ENT...

Страница 199: ...nnection 6 Use to locate IP Address Present similar to that shown in Figure 1 7 Make note of the IP Address Present 8 Start a terminal emulation program on the remote computer As an example this procedure will use the HyperTerminal program running under Windows XP 9 Choose File New Connection and in the resulting screen field enter a name for the connection Click OK the Connect to screen will appe...

Страница 200: ...IP address as determined previously in step 2 11 Enter 7180 in the Port Number field 12 From the Connect using pull down menu select TCP IP Winsock and click OK 13 The computer will connect with the Model 430 Programmer and display a welcome screen 14 Choose File Properties and then click on the Settings tab ...

Страница 201: ...irmware via FTP Note IMPORTANT If the Model 430 is being upgraded from Version 1 59 or earlier proceed to the upgrade procedure in section A 16 on page 190 Note These instructions apply specifically to the Windows XP operating system For other operating systems please make adjustments as appropriate A 15 1 Hardware and Software Requirements 1 Personal Computer PC networked by Ethernet to the syste...

Страница 202: ... the file server 2 Extract and save the AMI supplied upgrade file Model430 exe to the new folder 3 Ensure that the PC is connected to the network 4 Ensure the Model 430 is connected to the network via standard Ethernet cable b Direct PC to Model 430 1 Make a new Upgrade folder located in an appropriate location on the PC 2 Extract and save the AMI supplied upgrade file Model430 exe to the new fold...

Страница 203: ... Address Present A 15 3 Procedure Note The result of each of the following steps is depicted in the figure appearing above or below the action described The actual screens will vary depending on the files and file structure on the users PC or file server and whether FileZilla is used as the FTP Client 1 Open the FileZilla client application a screen similar to the following will appear 2 Enter the...

Страница 204: ...admin c Password supermagnets d Port 21 3 Click the Quickconnect button to connect to the Model 430 the Remote Site section of the screen will populate 4 On the Local Site left side representing your PC or server file system navigate to the folder containing the Model430 exe ...

Страница 205: ...rmware Upgrade via FTP upgrade file the folder name will be that which was previously given the new upgrade folder 5 Double click to open the upgrade folder on the Local Site left side of the screen the Model430 exe file will appear ...

Страница 206: ...v 5 Appendix Model 430 Firmware Upgrade via FTP 6 On the Remote Site right side representing the Model 430 files select the Upgrade folder 7 Double click the Upgrade folder to open it the folder will be empty ...

Страница 207: ...e Loading screen as the Model 430 is booting up the new Firmware Version will momentarily2 be displayed 11 Reboot the Model 430 Programmer by switching the power switch on the front panel off for 10 seconds and then turning the switch back on 12 Verify that after approximately 20 seconds the Model 430 display briefly shows the new upgraded firmware version3 1 Alternatively copy Model430 exe from t...

Страница 208: ... the CF card removed and the files updated using a CF card reader Once this upgrade is completed the CF card should not have to be removed in order to perform future upgrades A 16 1 Hardware and Software Requirements 1 The zip file Model 430 flash card update zip is required for this upgrade the zipped files are to be extracted and copied to the CF card 2 Host computer on a network to which the Mo...

Страница 209: ... host computer to verify the CF card is visible as a drive A 16 3 Procedure The following steps provide detailed instructions to complete the upgrade 1 Copy the zip file Model 430 flash card update zip to a location on the host computer for example C Model 430 Model 430 v1 60 Upgrade 2 Double click the zip file to open it the following or similar screen should appear with the files shown 1 The Com...

Страница 210: ...sh Card Reader 3 Choose File Extract All to start the extraction wizard 4 Click Next until prompted with Select a Destination 5 Browse to My Computer and choose the top level root of the drive associated with the CF card for example E or G and select Next ...

Страница 211: ...k in the following process 13 Verify that the web interface is functioning correctly as follows a Connect the Model 430 to the host computer using one of the following two methods 1 Via Ethernet cable to the same physical network as the host computer 2 Via crossover or null modem Ethernet cable direct ly to the host computer s Ethernet port b Plug in and power up the Model 430 c As the Model 430 b...

Страница 212: ...d Model 430 Programmer can be used to control any Model 430 front panel hardware device except the power switch Also any setting changes made at the actual Programmer will be reflected on the displayed version The Model 430 Programmer RJ 45 Ethernet port must be connected either directly to a host computer or through a computer network on which the host computer resides 2 In the form http xxx xxx ...

Страница 213: ...the Model 430 System Name or IP Address must be known The System Name should be available from the Model 430 configuration documentation the IP Address can be determined after Model 430 power up The following examples illustrate how the System Name or IP Address may be determined using the Model 430 menu system 1 IP Address Menu Net Settings IP Address Present 2 System Name Menu Net Settings Syste...

Страница 214: ...the computer mouse1 exactly as the hardware Model 430 The initial screen also includes links to the Model 430 Manual in PDF form along with Frequently Asked Questions relating to the Model 430 application all stored in the Model 430 firmware There are links to the AMI website and an e mail form for contacting AMI Customer Support The Command Interface is available under the tab of the same name an...

Страница 215: ... computer or through a computer network on which the host computer resides 1 For a host computer on a network connect a standard Ethernet cable between the Model 430 and the network 2 For a direct hardwired connection between the Model 430 and a host computer use a null modem or crossover Ethernet cable connected from the Model 430 to the host computer Once connected plug in and power up the Model...

Страница 216: ...be known because it changes on each Model 430 power up in this case the IPNAME must be used the IPNAME is also known as the System Name1 With serial port communication established refer to RS 232 Configuration on page 110 query the unit for IPNAME as follows refer to SCPI Command Summary on page 97 IPNAME The port will respond with the IPNAME System Name Open a web browser on the host computer In ...

Страница 217: ...del 430 The initial screen also includes links to the Model 430 Manual in PDF form along with Frequently Asked Questions relating to the Model 430 There are links to the AMI website and an e mail form for contacting AMI Customer Support Also available is the Command Interface under the tab of the same name which operates exactly as described in Remote Interface Reference on page 97 1 To rotate the...

Страница 218: ...IST SWITCH CONTROL key press NO YES Is remote lockout active Beep YES Is 430 in PAUSE or HOLDING mode or at ZERO Beep NO YES To START To START To START Is 430 at default current field display NO NO Is PSwitch Installed Beep NO Is feature locked YES NO Beep twice YES A B To START To START To START To START To START To START Figure A 15 Persistent Switch Operation Flowchart Page 1 ...

Страница 219: ...3UHVHQW 36ZLWFK VWDWH 6 RRO 36ZLWFK 7 7R 67 57 22 7R 67 57 6 ESC 3UHVVHG 12 6 7R 67 57 ENTER SUHVVHG WR HQWHU 3HUVLVWHQW 0RGH 12 6 5DPS SRZHU VXSSO WR SHUVLVWHQW PDJQHW FXUUHQW DW 3VZLWFK 3 6 5DPS 5DWH HDW 36ZLWFK DLW IRU LQWHUYDO VHW E 3VZLWFK HDWHG 7LPH RRO 36ZLWFK DLW IRU LQWHUYDO VHW E 3VZLWFK RROHG 7LPH 7XUQ RQ MAGNET IN PERSISTENT MODE 7R 67 57 Figure A 16 Persistent Switch Operation Flowcha...

Страница 220: ...202 Rev 5 Appendix Persistent Switch Operation Flowchart Figure A 17 Persistent Switch Operation Flowchart Page 3 ...

Страница 221: ...protection commands 119 quench control 130 ramping commands 124 ramping states 128 setup commands 114 status commands 113 switch heater control 129 system commands 112 trigger commands 133 trigger functions 132 summary conventions 97 protection commands 99 protection configuration queries 100 quench state 103 ramp configuration 102 ramping state 103 setup configuration commands 98 setup configurat...

Страница 222: ...own 62 71 92 93 94 124 127 128 external rampdown input 157 F FAILURE TO LOAD message 26 142 field display 28 field units 64 fine adjust knob coil constant 54 current limit 57 custom ps max output current 52 max output voltage 51 min output current 51 min output voltage 51 displayed up down arrow 31 enter key vs esc key 32 general description 31 immediate affect on the system 31 lock unlock 69 magn...

Страница 223: ... 52 misc submenu 63 net settings submenu 72 net setup submenu 74 supply submenu 47 misc submenu coil constant lock 69 current limit lock 69 display brightness 63 display brightness lock 71 external rampdown lock 71 field current lock 68 field units 64 field units lock 68 fine adjust lock 69 increment decrement field lock 67 mag current rating lock 70 net setup lock 71 persistent switch settings lo...

Страница 224: ...ntegral components 1 system interconnects 15 system rack layout 4 system terminology 161 system troubleshooting 139 unipolar bipolar 173 voltage voltage mode 3 power up down sequence 25 powering system off 26 powering system on 25 power up test 20 programmed current 35 protection password 64 71 protective diode power supply 17 pswitch see persistent switch Q quench detection 64 90 disabling 61 91 ...

Страница 225: ...5 Model 601 173 stability setting 18 19 43 52 54 142 stabilizing resistor 18 status indicator 29 submenus 46 supply submenu max output current 52 max output voltage 51 min output current 51 min output voltage 51 select power supply 48 v v mode range 52 system features 1 system interconnects 15 system name 195 T terminal torque limits 9 166 test procedure 20 torque limit on terminals 9 166 troubles...

Страница 226: ...208 Rev 5 Index ...

Отзывы: