800-643-7332 • AmericanLandMaster.com
2500 lb. CAPACITY WINCH KIT – 17153 (full size) / 17530 (crew cab)
SPECIAL REQUIREMENTS:
Requires
the use of a
front receiver hitch
and
auxiliary accessory distribution block
.
TOOLS REQUIRED
Pliers
Needle Nose pliers
phillips screw driver
1/2 wrench or socket (2)
5/16 wrench or socket
wire crimper
wire cutter/stripper
13mm wrench or socket (2)
9/16 wrench or socket (2)
5/32 allen key
10mm wrench or socket (2)
ESTIMATED INSTALLATION TIME
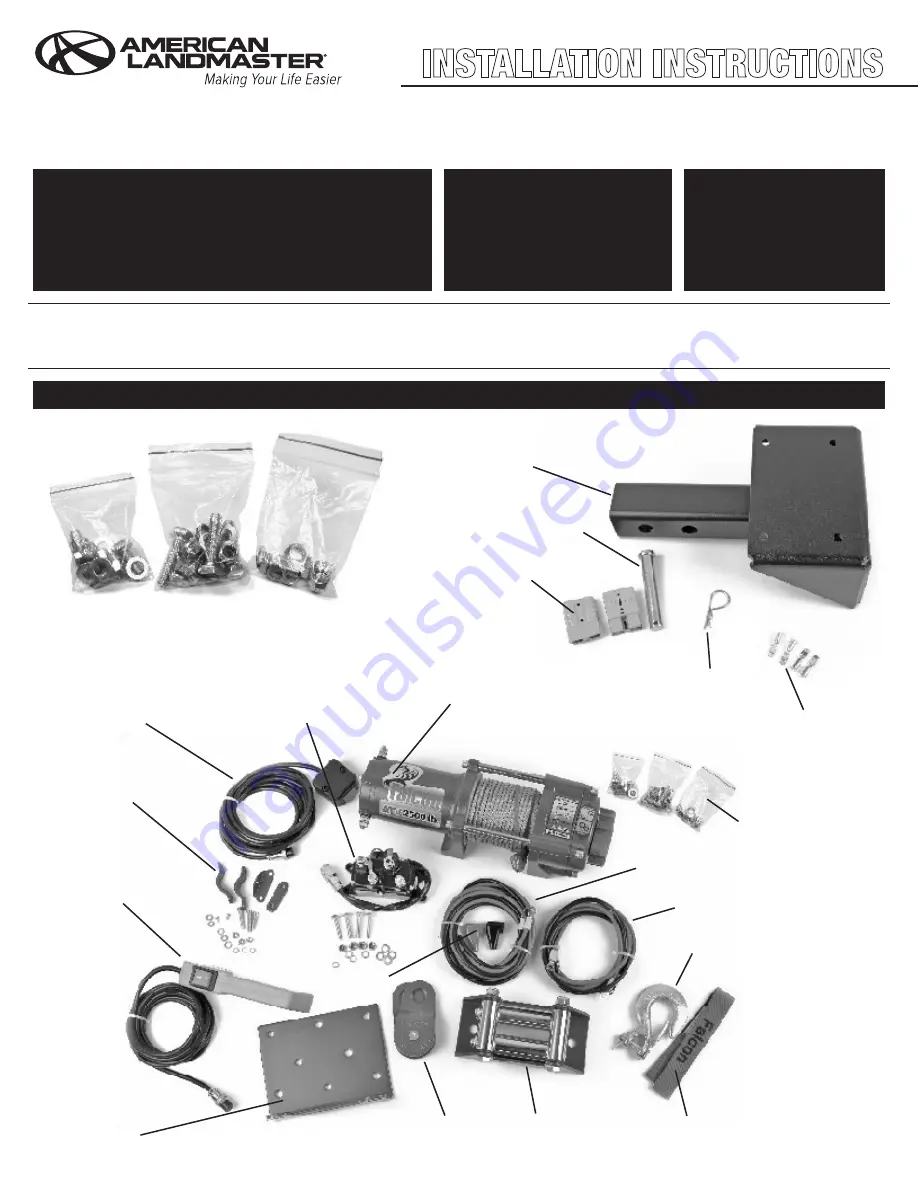
PARTS LIST FOR AMERICAN LANDMASTER INSTALLATION (parts not shown actual size)
RECOMMENDED SKILL LEVEL
60 - 90 minutes
Intermediate
Before you begin, check the contents of the kit against the parts list below. Immediately contact American LandMaster with any questions or discrepancies.
American LandMaster cannot assume responsibility for any damage or injury resulting from incorrectly installed parts.
American LandMaster suggests that accessory kits be installed by an authorized American LandMaster dealer or service center.
15961 Rev. C
page 1 of 7
(4) M8 x 1.25 x 20 bolt
(4) M8 slit lock washer
(4) M8 flat washer
(4) M8 x 1.25 x 35 bolt
(4) M8 slit lock washer
(4) M8 flat washer
(4) M8 x 1.25 nylon
insert lock nut
(2) M8 x 1.25 x 20 bolt
(2) M8 slit lock washer
(2) M8 flat washer
(2) M8 x 1.25 nylon
insert lock nut
hand held controller
rubber boots
dash mount
controller hardware
guide roller
mounting plate
relay / hardware
receiver pin clip
quick connect terminals
quick connectors
winch mount
clevis pin
winch
dash mount controller
relay to winch wires
winch hardware (listed above)
battery to relay wires
snatch block
roller fairlead
winch hook
grab strap


