


Installation and Operation Guide
59
Change the Network Setting
— HTTPS.
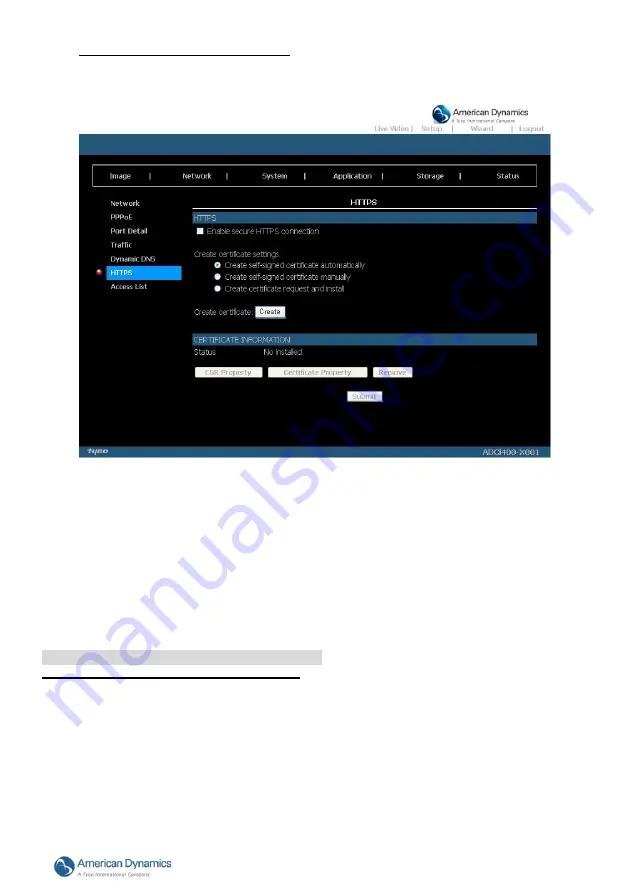
The “Network” page has, on its upper left, the “HTTPS” icon. Please follow the steps below to change the
HTTPS setting through the network as necessary.
1.
Click on the
HTTPS
button on the upper left menu to enter the “HTTPS Setting” page.
Figure 5.23 HTTPS
2.
Mark the “Enable HTTPS secure connection” to activate the function.
3.
Click to select the “Create certificate method” from “Create self-signed certificate automatically”,
“Create self-signed certificate manually” and “Create certificate request and install”.
4.
Click “Create” to save the create certificate settings.
5.
The Certification Information will show below.
6.
Click “CSR Property” to see the Certificate Signing Request information.
7.
Click “Certificate Property” to see the Certificate information.
8.
Click “Remove” to remove the created certificate.
9.
Click on the
Submit
button to submit the new setting.
NOTE: The certificate cannot be removed while the HTTPS is still enabled. To remove the
certificate you must first uncheck Enable HTTPS secure connection.
Methods of creating and installing the certificate:
1. Create self-signed certificate automatically
Before using HTTPS for communication with the IP camera, a “Create self-signed certificate
automatically” option is available:
(1) Enable HTTPS secure connection.
(2) Selec
t the “Create self-signed certificate automatically” option.
(3) Click the Create button.
(4) The new Certification Information will show in the third column on the HTTPS setting page.
(5)
Click Home to return to the main page. Change the address from “http://” to “https://“ in the address
bar and press Enter on your keyboard. Some Security Alert dialogs will pop up. Click OK or Yes to
enable HTTPS.


