Amcrest ATC-801 Скачать руководство пользователя страница 3


1. Instructions 

1.1 General Description 

The Amcrest ATC-801 is a big game hunting camera which can be triggered by any 

movement  in  a  specified  region  monitored  by  highly  sensitive  Passive  Infrared  (PIR) 
motion  sensors.  It  can  also  automatically  capture  high  quality  pictures  (up  to  12 
Megapixels) and record 720p HD video clips (WVGA or QVGA). 

At sunrise, the unit begins to take color photos and video until there is insufficient 

light. At dusk, the camera will take infrared (monochrome) photos and video.   

Easy to use with a 2.0 inch colorful LCD display, and weatherproof for outdoor usage, 

the Amcrest ATC-801 is the best hunting camera for all your needs. 

1.2 Camera Body Interface 

The camera has the following input/output (I/O) interfaces: USB connector, SD-card 

slot, TV output, and external DC power connector.   

Take a few moments to familiarize yourself with the camera’s controls and display. It 

is  helpful  to  bookmark  this  section  and  refer  to  it  as  you  read  through  the  rest  of  the 
manual. 

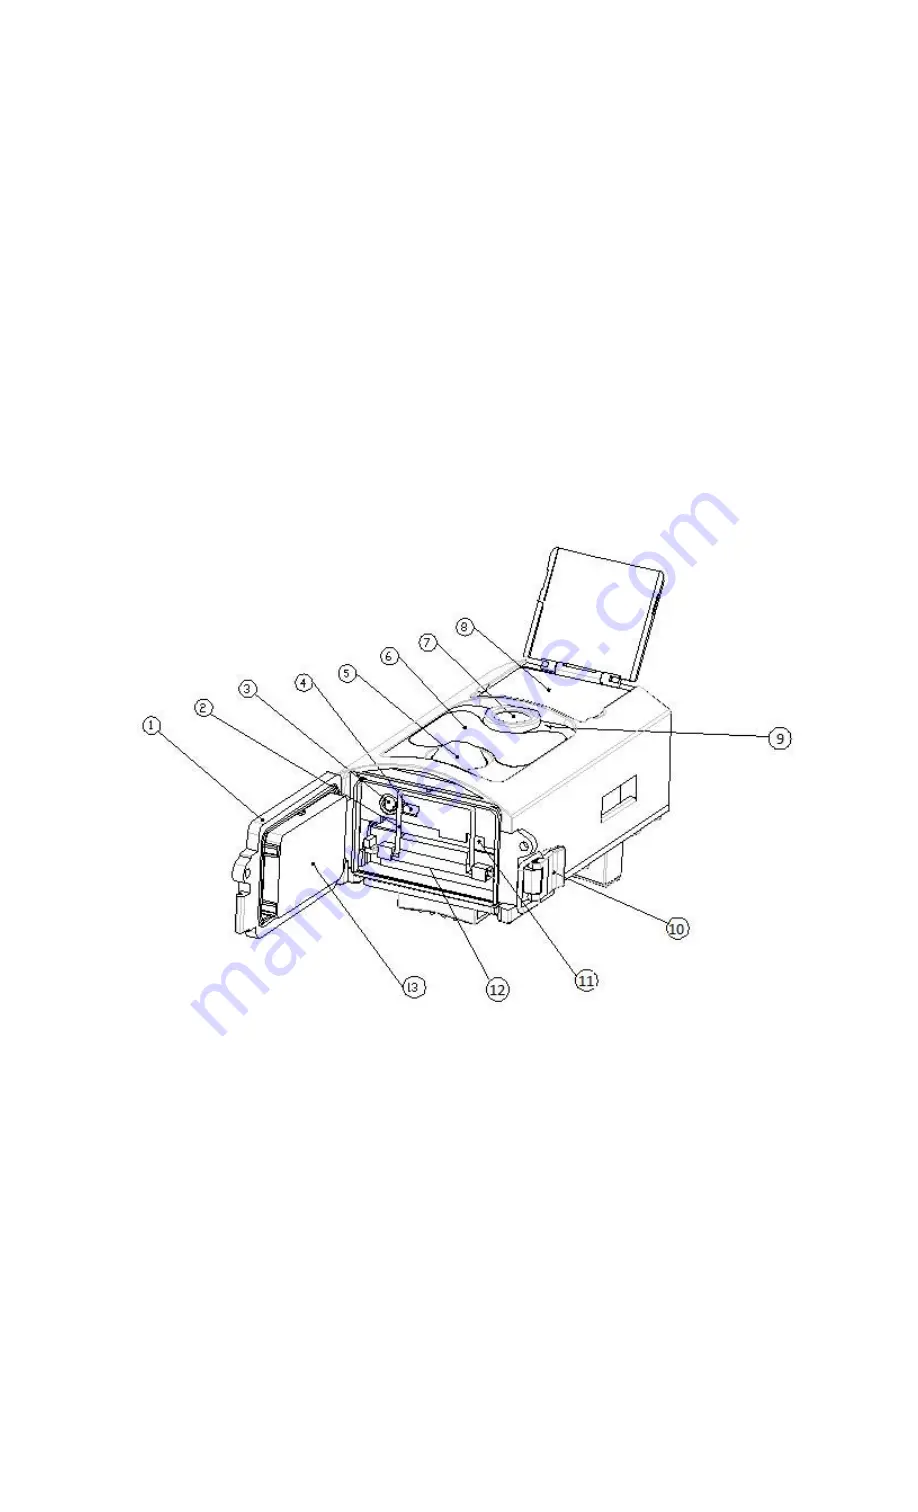
1.3 Camera components and features 


1) Bottom Cover     
2) SD-Card Slot 
3) TV/AV Out     
4) USB Connector 
5) PIR (Passive Infrared) 
6) Infrared Flash         
7) Lens     

8) 2 inch color LCD Display 
9) Sound recorder     
10) Lock   
11) Power switch 
12) Battery compartment 
13) Portable remote control 
 

1.4 Remote Control 

        The remote control is primarily used for custom settings and password input. This is 
an infrared wireless remote control. The maximum distance the remote can be used at is 
9 meters (30 feet). There are fifteen buttons on the remote control (Sette: Remote control 
is located inside of the camera). 
 

Содержание ATC-801

Страница 1: ...Digital Game Trail Hunting Camera User Manual ATC 801 Version 1 1 3...

Страница 2: ...Images or Videos 5 3 5 Power Off 5 4 Advanced Operations 6 4 1 Settings Menu 6 4 1 1 Photo Settings 7 4 1 2 Video Setting 7 4 1 3 System Setting 8 4 1 4 Default 8 4 1 5 General Settings 9 4 1 6 Camera...

Страница 3: ...The camera has the following input output I O interfaces USB connector SD card slot TV output and external DC power connector Take a few moments to familiarize yourself with the camera s controls and...

Страница 4: ...formation Display When the camera is turned on the power switch is in the TEST position the shooting information will be displayed on the LCD 1 6 Supported Format Item Format Photo JPG Video AVI SD Ca...

Страница 5: ...not insert or take out the SD card when the power switch is in the ON position It is recommended to format the SD card with the camera when being used for the first time The camera will be in USB mod...

Страница 6: ...s at this time 3 2 Insert the SD card Insert a SD card into the card slot with contacts facing the front of the camera Please note that the SD card can only be inserted in one direction Make sure that...

Страница 7: ...nually capture photos or record video 3 4 3 View Images or Videos There are two ways to view the captured images or videos 1 View using the LCD screen on the camera 2 View using a TV monitor which con...

Страница 8: ...enu press MENU while in TEST mode called the settings menu in this chapter The settings menu will be shown on the camera s LCD or the external TV monitor Navigating the menus and settings The MENU key...

Страница 9: ...7 4 1 1 Photo Settings 4 1 2 Video Setting...

Страница 10: ...vity High Low 7 meters Medium 15 meters High 20 meters Resolution Camera 8M 8M 5M 3M Interval 5 Seconds 5 30 Seconds 1 30 Minute Multi Single Single 3 6 9 Pictures ISO Auto Auto 100 200 400 Resolution...

Страница 11: ...how a message Please Wait as below Press MENU return to the info display without saving the settings 4 1 8 Photo Size This parameter has three values 8MP 5MP and 3MP The default value is 5 mega pixels...

Страница 12: ...he ISO setting a Press MENU to display the settings menu b Press RIGHT or LEFT to select the Camera menu c Press DOWN and then OK to ISO d Press DOWN UP to select the desired ISO setting e Press OK to...

Страница 13: ...ord setting is set to On after switching on the camera the LCD screen on the camera will prompt to enter the password The default password setting is off It can be changed by the following steps a Pre...

Страница 14: ...tely saved in a pre named folder 100MEDIA File number increases as new photos or videos are taken The file name is similar to PTDC0001 JPG or PTDC0001 AVI Through the suffix you can distinguish whethe...

Страница 15: ...inutes Selectable Image Resolution 8MP 5MP 3MP Multiple Frame 1 3 6 9 Video Resolution 720P WVGA QVGA File Format JPEG AVI Date Time Imprint Yes Exposure Auto MMS EMAIL SMS Support No support Device N...

Отзывы: