background image


Structure and function 


80


Centaya Super  BAH0092-6  10.20


5.14.2  Seed rate increase 


All coulter types 


With and without ISOBUS system 


Without min./max. pressure stages 

For a uniform crop, the seed rate can be set 
higher when changing to heavy soils.  

Without ISOBUS system: 

If you are working with the AMADRILL 2 control 
terminal, enter the increased seed rate manually 
for heavy soils if necessary. 

With ISOBUS system: 

The control terminal serves to enter the desired 
rate increase.  

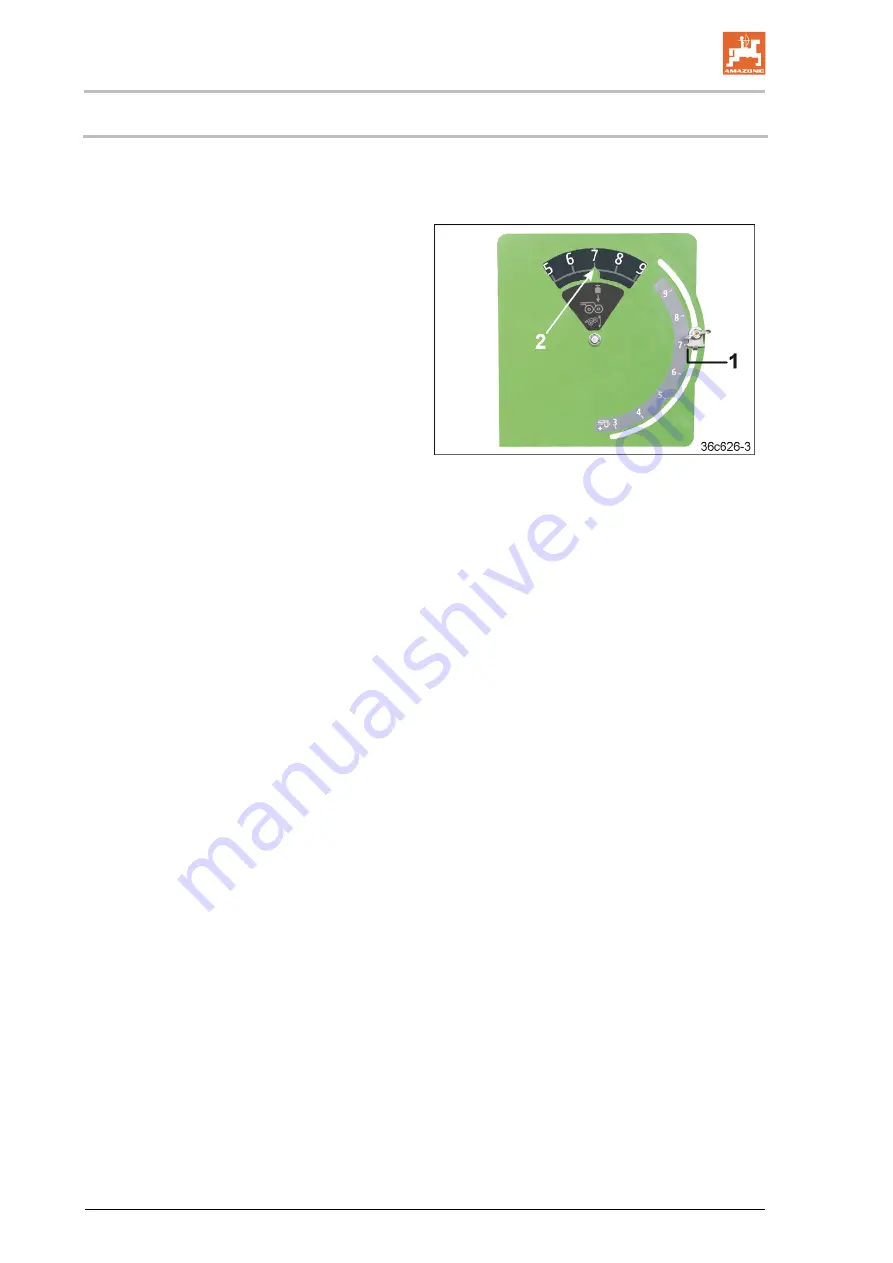
The desired increased rate is activated with the 
adjustable pointer (Fig. 77/1).  

The pointer (Fig. 77/1) indicates the coulter 
pressure scale mark (Fig. 77/2) above which the 
increased rate should be spread. 

If the seed rate should be increase above a 
coulter pressure scale mark of 7, the pointer (Fig. 
77/1) must be set at 7. 

The increased rate is spread when the coulter 
pressure scale pointer (Fig. 77/2) is pointing at a 
scale value between 7 and 10. 


Fig. 77 


Содержание Amazone Centaya 3000 Super 1600

Страница 1: ...top seed drill Centaya 3000 3500 4000 Super 1600 Centaya 3000 3500 4000 Super 2000 MG6194 BAH0092 6 10 20 Please read and observe this operating manual before initial operation of the implement Keep i...

Страница 2: ......

Страница 3: ...Co KG Postfach 51 D 49202 Hasbergen Tel 49 0 5405 501 0 email amazone amazone de Spare Parts Order Spare parts lists are freely accessible in the spare parts portal at www amazone de Please send order...

Страница 4: ...only be rectified if problems are claimed immediately Before initial operation read and comply with the information in this operating manual and particularly the safety instructions Only after careful...

Страница 5: ...Loading and unloading the implement upon delivery 33 4 Product description 36 4 1 Components of the AMAZONE seeding combination 36 4 2 Equipment variations of the Centaya pneumatic pack top seed dril...

Страница 6: ...Start up ramp 88 5 20 Tramlines 89 5 20 1 Tramline rhythm tabular determination 92 5 20 2 Tramline rhythm graphic determination 92 5 20 3 One sided switching 94 5 20 3 1 One sided switching by instal...

Страница 7: ...e seed placement depth 144 8 5 1 1 Adjusting the depth control discs wheels 145 8 6 TwinTeC double disc coulter 147 8 6 1 Adjusting and checking the seed placement depth 147 8 7 Coulter pressure seed...

Страница 8: ...ety when cleaning the implement 191 12 3 2 Safety when working on the distributor head 193 12 3 3 Safety when working on the hydraulic system 193 12 4 Repairs 194 12 4 1 Cleaning the fan suction guard...

Страница 9: ...e grid on the RoTeC Pro Control coulter 213 12 7 Oils and greases 214 12 7 1 Lubricants for grease nipples and grease guns 214 12 8 Bolt tightening torques 215 13 Hydraulic diagrams 216 13 1 Hydraulic...

Страница 10: ...es in the specifications figures or descriptions If you want to sell the implement ensure that the operating manual is supplied with the implement The operating manual describes the operation and main...

Страница 11: ...mbols on the implement in a legible state to replace damaged warning symbols Obligations of the user Before starting work anyone charged with working with on the machine is obliged to comply with the...

Страница 12: ...shall be available to the operator at the latest on conclusion of the contract Guarantee and liability claims for damage to people or property will be excluded if they can be traced back to one or mo...

Страница 13: ...ath or serious physical injury WARNING Indicates a medium risk which could result in death or serious physical injury if not avoided If the instructions are not followed then this may result in death...

Страница 14: ...e personnel Check all the available safety equipment regularly 2 4 Safety and protective equipment Before starting up the implement each time all the safety and protection equipment must be properly a...

Страница 15: ...son is a person who has been instructed regarding the tasks assigned to him and with regard to possible dangers in the event of improper behaviour and if required has been taught and instructed concer...

Страница 16: ...Check all the bolted connections for tightness On completion of the maintenance work check the function of the safety and protective devices 2 10 Design changes You may make no changes expansions or...

Страница 17: ...spare parts from third parties there is no guarantee that they have been designed and manufactured in such a way as to meet the requirements placed on them AMAZONEN WERKE shall accept no liability fo...

Страница 18: ...ual dangers At these points there are permanent or unexpected dangers A warning symbol consists of two fields Field 1 Shows the danger in a triangular safety symbol Field 2 Shows instructions for avoi...

Страница 19: ...ning This prohibition also applies to implements with step surfaces or platforms Make sure that nobody is riding on the implement MD 095 Before commissioning the machine read and observe the operating...

Страница 20: ...ing troubleshooting cleaning maintaining and repairing due to the tractor and the implement being started unintentionally and rolling away These dangers can cause extremely serious and potentially fat...

Страница 21: ...re starting transportation MD 199 The maximum operating pressure of the hydraulic system is 210 bar MD 242 Risk of falling caused by walking on the charging sieve Causes serious potentially fatal inju...

Страница 22: ...General Safety Information 22 Centaya Super BAH0092 6 10 20 2 13 1 Placement of the warning symbols The following figures show the arrangement of the warning symbols on the implement Fig 1...

Страница 23: ...General Safety Information Centaya Super BAH0092 6 10 20 23 Fig 2 Fig 3 Fig 4...

Страница 24: ...secured working areas Failure of important implement functions Failure of prescribed methods for maintenance and repairs Risk to people due to mechanical and chemical influences environmental hazard t...

Страница 25: ...of the metering units or other implement components caused by wheel movements or radar pulses 2 16 1 General safety instructions and accident prevention instructions In addition to these instructions...

Страница 26: ...vehicles and may only move between the vehicles when both are at a standstill Before the implement is connected to or disconnected from the tractor s three point hydraulic system secure the operating...

Страница 27: ...f the mounted towed implement and the permissible axle and drawbar loads of the tractor If necessary drive only with a partially filled tank It is forbidden to stand in the working area of the impleme...

Страница 28: ...ctor plus mounted towed implement Check the brake power before moving off When turning corners with the mounted or towed implement take the wide sweep and centrifugal mass of the implement into accoun...

Страница 29: ...rking brake take out the ignition key Have the hydraulic hose lines checked for proper functioning by a specialist at least once a year Replace the hydraulic hose lines if they are damaged or worn Use...

Страница 30: ...rminal If there is accidental earth contact there is a danger of explosion Risk of explosion Avoid sparking and naked flames in the area of the battery The implement may be equipped with electronic co...

Страница 31: ...tractor do not exceed the permissible total tractor weight the permissible tractor axle loads The permissible load bearing capacities of the tractor tyres Observe the max payload of the mounted imple...

Страница 32: ...s switched off the implement plug is disconnected from the tractor e g ISOBUS plug the drive is switched off the tractor engine is at a standstill the ignition key has been removed Regularly check the...

Страница 33: ...ement when it is mounted on the soil tillage implement It is not permitted to load the implement while it is standing on the parking supports Load the implement only when the hopper is empty Please pa...

Страница 34: ...ry 34 Centaya Super BAH0092 6 10 20 Fasten the 2 slings on the marked fastening points Fig 7 1 on the pack top seed drill Fig 7 1 sling to the transport eye Fig 8 1 in the seed hopper Secure the combi...

Страница 35: ...move the transport eyes Fig 9 1 1 2 Loosen the 2 round head screws Fig 9 2 and remove the transport eye Fig 9 2 Close the tank opening 2 1 Insert the plugs Fig 10 1 from inside into the seed hopper op...

Страница 36: ...n 36 Centaya Super BAH0092 6 10 20 4 Product description 4 1 Components of the AMAZONE seeding combination Fig 13 1 AMAZONE soil tillage implement 2 AMAZONE roller 3 AMAZONE pneumatic pack top seed dr...

Страница 37: ...AH0092 6 10 20 37 4 2 Equipment variations of the Centaya pneumatic pack top seed drill Fig 14 Centaya 3000 Super equipped with TwinTeC double disc coulters Fig 15 CombiDisc 3000 with Centaya 3000 Sup...

Страница 38: ...board with steps 3 Seed metering unit electrically driven 4 Control centre 5 Distributor head 6 Seed tube hoses 7 TwinTeC double disc coulter optionally RoTeC Pro Control coulter 8 Exact following har...

Страница 39: ...Product description Centaya Super BAH0092 6 10 20 39 1 Seed metering unit electrically driven 2 Injector sluice Fig 17 1 Fan 2 Hydraulic motor Fig 18 Cabinet for the supply lines Fig 19...

Страница 40: ...chanical transport lock for the track markers on the soil tillage implement see also Soil tillage implement operating manual Fig 20 1 Handrail Fig 21 1 Charging sieve in the seed hopper Prevents conta...

Страница 41: ...hydraulic hose lines All hydraulic hose lines have handles with coloured markings and a code number or code letter to assign the respective hydraulic function to the pressure line of a tractor contro...

Страница 42: ...k marker Lifting and lowering alternately Tramline marker Lifting and lowering depending on the tramline counter green Double acting Coulter pressure Infinitely adjustable Seed rate increase Exact fol...

Страница 43: ...marker Lifting and lowering alternating Tramline marker Lifting and lowering depending on the tramline counter green Double acting Pre selection on the control terminal Coulter pressure Infinitely ad...

Страница 44: ...lage implement operating manual 2 side facing warning signs the use of which is not permitted in Germany and several other countries 2 Road safety bar two part in combination with the exact following...

Страница 45: ...ted by one person Slopes can be travelled Across the slope Direction of travel to left 10 Direction of travel to right 10 Up down the slope Up the slope 10 Down the slope 10 Intended use also includes...

Страница 46: ...5 KW 4000 580 125 KW 4000 580 154 KW 3000 580 125 KW 3000 580 150 AMAZONE Wedge ring roller KWM 600 Matrix tyre profile 2 tube System roller frame KWM 3000 600 125 KWM 3000 600 150 KWM 3500 600 125 KW...

Страница 47: ...struction reasons Here the safety regulations from the corresponding section are applicable No one may remain in the danger area of the implement while the tractor engine is running with the universal...

Страница 48: ...and the CE mark on the implement The CE mark indicates compliance with the stipulations of the valid EU directives Fig 28 The following information is specified on the rating plate and the CE mark 1...

Страница 49: ...cm 12 5 15 0 12 5 14 6 12 5 15 4 Medium working speed km h 6 to 10 6 up to 10 6 to 10 Maximum working speed km h 12 12 12 TwinTeC double disc coulter No of rows 24 20 28 24 32 26 Row spacing cm 12 5 1...

Страница 50: ...wer link ball and the centre of gravity of the rear mounted implement combination Rear mounted implement combinations with Centaya Super always have the same distance d Fig 30 Distance d 1 05 m The pe...

Страница 51: ...t 81 kW 110 HP AMAZONE rotary cultivator KW wedge ring roller Centaya 3500 Super starting at 103 kW 140 HP AMAZONE rotary cultivator KW wedge ring roller Centaya 4000 Super starting at 132 kW 180 HP E...

Страница 52: ...coulters Fig 31 2 The seed falls into the seed furrow prepared by the coulters Mulch seeding is possible in combination with the AMAZONE rotary cultivator or the CombiDisc compact disc harrow The mete...

Страница 53: ...llers see section Approved AMAZONE implement combinations page 46 The AMAZONE PW tooth packer roller has good self propulsion and with its on grip teeth it achieves full area reconsolidation of the su...

Страница 54: ...y good features The wedge ring roller with matrix tyre profile has particularly good self propulsion and produces lots of fine soil to fill the seed rows Fig 34 The AMAZONE TRW trapeze ring roller rec...

Страница 55: ...th the TwinTerminal A detailed description can be found in the AmaDrill 2 operating manual ISOBUS software operating manual Fig 37 5 3 Control terminal for implements with ISOBUS system The combinatio...

Страница 56: ...2 AMAZONE TwinTerminal The communication with the control terminal in the tractor cab takes place through the TwinTerminal The TwinTerminal can be used on implements with ISOBUS system The TwinTermin...

Страница 57: ...ntral key During adjustment work the central key Fig 41 1 is used to loosen and fasten bolts and nuts In parking position the central key is inserted in the transport bracket on the soil tillage imple...

Страница 58: ...rking speed the worked area the speed of the metering roller drive motor For a constant seeding rate at different forward speeds Use of the radar sensor requires teaching in of the pulses over a calib...

Страница 59: ...lly Foreign objects in the seed can be sieved and easily removed It is forbidden to step onto the sieve grid To set the low level sensor the sieve grid can be opened The handle Fig 45 1 serves to open...

Страница 60: ...e same time the control terminal displays a warning message This warning message is intended to remind the tractor driver to refill the seeds in due time The height of the low level sensor is adjustab...

Страница 61: ...the air flow to the distributor head and then to the coulters As soon as the implement is raised when turning at the end of a field or when the implement comes to a stop the electric motor switches o...

Страница 62: ...etering roller depending on the seed and the seed rate can be found in the table section Table metering rollers seed page 65 If the seed is not listed select the metering roller for a seed that has a...

Страница 63: ...re and function Centaya Super BAH0092 6 10 20 63 5 9 1 Metering roller table Figures Metering roller Volume 3 75 cm3 Metering roller Volume 7 5 cm3 Metering roller Volume 20 cm3 Metering roller Volume...

Страница 64: ...Structure and function 64 Centaya Super BAH0092 6 10 20 Metering roller Volume 120 cm3 Metering roller Volume 350 cm3 Metering roller Volume 660 cm3 Metering roller Volume 880 cm3...

Страница 65: ...d 3 75 cm 7 5 cm 20 cm 40 cm Beans Buckwheat Spelt Peas Flax dressed X X Barley Grass seed Oats Millet Caraway X Lupins Lucerne X X Maize Poppy X X X Oilseed flax moist dressing X X Fodder radish X X...

Страница 66: ...0 cm 880 cm Beans X X Buckwheat Spelt Peas X X Flax dressed X Barley X X Grass seed Oats X Millet X Caraway Lupins X Lucerne X Maize X Poppy Oilseed flax moist dressing Fodder radish X Phacelia X Rape...

Страница 67: ...t kg of the collected metered material Always calibrate the seed rate during the initial operation when changing the seed type if the seed type is identical but the grain size grain shape specific wei...

Страница 68: ...inTerminal Fig 54 The calibration button and the button on the TwinTerminal must be pressed and held during calibration The metering roller stops automatically as soon as the calibration is finished A...

Страница 69: ...Centaya Super BAH0092 6 10 20 69 The scale Fig 56 1 is inserted together with the collapsible bucket Fig 56 2 in the control centre Fig 56 The folding bracket Fig 57 1 is used to hang up the digital...

Страница 70: ...inal speed The percent deviation at which the alarm should be triggered can be adjusted see ISOBUS Software operating manual Fig 58 The fan hydraulic motor is connected to the tractor hydraulic system...

Страница 71: ...ends on the seed fine seed types Fig 61 2 e g rapeseed or grass seed cereals or legumes Fig 61 3 and the seed rate kg ha Fig 61 4 the working width Fig 61 5 the fan equipment without suction guard scr...

Страница 72: ...s the tramline coulters do not spread any seed The connected tramline segments in the distributor head have flaps Fig 63 1 to seal the distributor head outlet When creating the tramlines the flaps Fig...

Страница 73: ...g must be connected to an ISOBUS compatible control terminal e g AmaTron 4 refer to the Seed tube monitoring operating manual without ISOBUS system the implement plug must be connected to the AmaDrill...

Страница 74: ...and the high coulter pressure the coulter runs very smoothly and accurately maintains the seed placement depth The depth control discs wheels see below are used for limiting the seed placement depth...

Страница 75: ...ved if the seed placement depth is not reached Hole Placement 1 Shallow 2 3 4 Seeding without depth control disc depth control wheel Deep Fig 69 The handle Fig 70 1 is used to adjust the depth control...

Страница 76: ...ble discs The parallel guided double disc coulters are supported on the press rollers Fig 71 2 and therefore precisely maintain the seed placement depth The rubberised press rollers close the seed fur...

Страница 77: ...r The coulter pressure can reach 60 kg per coulter The central key is used to adjust the placement depth of the coulter set and the coulter pressure The coulter pressure can be more conveniently infin...

Страница 78: ...Seed placement depth TwinTeC double disc coulters only The seed placement depth is adjusted with the central key Fig 73 Turn clockwise deeper placement Turn counter clockwise shallower placement Fig 7...

Страница 79: ...ls are also evenly levelled when the coulter pressure is increased the exact following harrow pressure can be increased see section 5 16 page 83 the roller pressure of the roller harrow can be increas...

Страница 80: ...ly for heavy soils if necessary With ISOBUS system The control terminal serves to enter the desired rate increase The desired increased rate is activated with the adjustable pointer Fig 77 1 The point...

Страница 81: ...Without min max pressure stages For soil tillage without seeding the coulters can be lifted out of the soil Fig 78 The tractor control valve green is used to actuate the coulter lift The coulters are...

Страница 82: ...ven on heavy soils the exact following harrow pressure or roller harrow pressure can be increased along with the coulter pressure increase When changing to heavy soils call up the Coulter pressure and...

Страница 83: ...echanically or hydraulically The exact following harrow pressure determines the tillage intensity of the exact following harrow and depends on the soil texture Before driving in reverse always life th...

Страница 84: ...rectly set the harrow tines of the exact following harrow should lie horizontally on the ground and 5 8 cm clearance underneath Fig 84 The central key is used to adjust distance A Fig 85 The pictogram...

Страница 85: ...r the linch pin is inserted in the group of holes the greater the exact following harrow pressure Fig 88 Adjust the exact following harrow pressure so that all seed rows are evenly covered with earth...

Страница 86: ...89 1 lifts the exact following harrow Depending on the implement equipment actuation of the exact following harrow lift with a tractor control unit is possible in 2 variations The exact following har...

Страница 87: ...ruct snails access to the seed Fig 90 The roller harrow is only used in combination with RoTeC Pro Control coulters The adjuster segment Fig 90 3 serves to adjust the pitch of the harrow tines the wor...

Страница 88: ...ering roller is automatically adjusted for changes in the working speed During the acceleration phase of the implement the seed is metered at low speed and only deposited in the soil when the implemen...

Страница 89: ...ng the tramlines the number 0 or a symbol appears on the control terminal depending on the equipment see ISOBUS Software operating manual AmaDrill 2 operating manual the tramline flaps in the tramline...

Страница 90: ...g fertiliser spreader and or field sprayer which are used on the seeded field The data for configuring tramline control must be entered on the control terminal see control terminal operating manual I...

Страница 91: ...control terminal Track width Fig 96 a of the cultivating tractor Wheelmark width Fig 97 c of the cultivating tractor Distance from the plant row to the track Fig 97 c After entering the cultivating im...

Страница 92: ...iliser spreader and field sprayer 3 9 m 12 m 4 12 m 16 m 5 15 m 20 m 6 18 m 21 m 24 m 7 21 m 28 m 8 24 m 28 m 32 m 9 27 m 36 m 2 12 m 16 m 21 18 m 21 m 24 m Fig 98 5 20 2 Tramline rhythm graphic deter...

Страница 93: ...Structure and function Centaya Super BAH0092 6 10 20 93 Fig 99...

Страница 94: ...he left side of the implement see Fig 100 does not place seeds in the soil when field work begins on the right field edge 5 20 3 1 One sided switching by installing an insert The distributor head can...

Страница 95: ...e adjuster segments If both levers are underneath in the adjuster segments the seed drill operates with half a working width Fig 103 If a lever Fig 104 1 is located above in the adjuster segment the s...

Страница 96: ...or left half of the implement respectively By pressing a button on the control terminal the required partition wall is lifted This provides the option to interrupt the seed supply to the coulters on...

Страница 97: ...carrier for combinations with exact following harrow 5 21 1 Tramline marker with implement frame fastening The brackets for the track discs Fig 107 1 are secured to the seed drill frame Fig 107 The fo...

Страница 98: ...atically lowered and mark the tramline that is being created This makes the tramlines visible before the seed has germinated Fig 110 The following are adjustable the track width of the tramline the wo...

Страница 99: ...orking intensity of the track marker depending on the soil type The track markers are attached to the soil tillage implement Adjustment work is described in the Soil tillage implement operating manual...

Страница 100: ...ear glare free representation of multiple camera images simultaneously The camera system can be quickly mounted and dismounted with simple plug connections Fig 114 5 24 Work floodlights The work flood...

Страница 101: ...0 E Fig 117 1 catch crop seed drill is mounted at the rear of the seed drill for this purpose A 12 V electric gear motor drives the seeding shaft of the GreenDrill with a hopper volume of 200 l The me...

Страница 102: ...is suitable for the task The tractor and implement must meet the national road traffic regulations Vehicle owner and vehicle operator are responsible for compliance with the statutory provisions of t...

Страница 103: ...achieves the required braking delay with the machine connected Requirements for the suitability of a tractor are in particular the permissible total weight the permissible axle loads the permissible d...

Страница 104: ...d implement or drawbar load of the hitched implement This note applies only to Germany If having tried all possible alternatives it is not possible to comply with the axle loads and or the permissible...

Страница 105: ...d implement or front ballast or measurement a1 m Distance from the centre of the front axle to the centre of the lower link coupling point Refer to the tractor operating manual or measure a2 m Distanc...

Страница 106: ...e load specified in the tractor operating manual 6 1 1 4 Calculation of the actual total weight of the tractor and implement combination H L V tat G T G G In the table section 6 1 1 7 enter the numeri...

Страница 107: ...bility and insufficient tractor steering and brake power It is forbidden to couple the implement to the tractor used as the basis for calculation if one of the actual calculated values is greater than...

Страница 108: ...ring of raised unsecured implement parts unintentional starting and rolling away of the tractor implement combination Secure the tractor and the implement against unintentional starting and rolling be...

Страница 109: ...se only pipes with DN 16 e g 20 x 2 0 mm with a short return path to the hydraulic oil tank For operation of all hydraulic functions the tractor hydraulic pump output should be at least 80 l min at 15...

Страница 110: ...The pack top seed drill can be parked solo on the parking supports Fig 120 mounted on the soil tillage implement Fig 121 This section describes the coupling and uncoupling of the soil tillage impleme...

Страница 111: ...g e g ISOBUS plug Risk of accident due to unintentional activation of the metering unit or other implement components caused by radar pulses WARNING Risk of crushing due to unintentional starting and...

Страница 112: ...e lines observe the coloured markings with the code number or code letters on the hydraulic plugs Check the compatibility of the hydraulic fluids before connecting the implement to the hydraulic syste...

Страница 113: ...ontrol units into the float position 3 Connect the hydraulic lines In doing so observe the labels on the hydraulic lines see section 4 5 Fig 123 7 1 2 Disconnecting the hydraulic hose lines 1 Put the...

Страница 114: ...of the tractor and the implement are the same Whenever you couple the implement check the coupling parts such as the top link pin for visible defects Replace the coupling parts in the event of clearl...

Страница 115: ...R When the tractor control units are actuated several hydraulic cylinders could be operated at the same time depending on the switch position Direct people out of the danger area Risk of injury from m...

Страница 116: ...ed see section Fig 226 page 176 Seed drills with and without ISOBUS system have an analogue working position sensor Fig 126 1 The bracket with the analogue working position sensor Fig 126 1 is fastene...

Страница 117: ...ig 127 2 coupling pieces can be found in parking position on the soil tillage implement They serve as a mechanical lock after coupling the combination 2 Direct persons away from the danger area betwee...

Страница 118: ...e implement under the seed drill Fig 129 2 Fig 129 5 Pick up the seed drill with the catch hooks 6 Apply the tractor parking brake switch the tractor engine off and remove the ignition key Fig 130 7 S...

Страница 119: ...ngth of the top link The length dimension see below serves as a reference value The pictogram with the length dimension can also be found on your implement 11 Tighten the lock nut for the top link len...

Страница 120: ...rting the combination the parking supports can accidentally wander out of the mounts and become a risk for other road users You can unscrew the rear facing warning signs together with the lighting off...

Страница 121: ...ed move the coulters and harrow into working position see section Coulter pressure seed rate increase and coulter lift page 151 3 Set the combination down on a level parking area with firm ground Fig...

Страница 122: ...2 When the implement has coulter lift and the coulters are lifted lower the coulters into working position Only combinations with TwinTeC double disc coulters 3 Set the placement depth to 0 see secti...

Страница 123: ...tractor parking brake switch off the engine and remove the ignition key 12 3 Unlock both coupling pieces To do so remove the linch pin 2 linch pins Fig 141 1 secure one coupling piece Fig 141 13 Remov...

Страница 124: ...port Fig 144 2 for implements with TwinTeC double disc coulters Fig 144 16 Release the top link Fig 145 1 Fig 145 17 Direct persons away from the danger area between the soil tillage implement and the...

Страница 125: ...rds no one is permitted to stand between the tractor and the implement It is forbidden to climb onto the loading board when the implement is standing on the parking supports risk of tipping You can un...

Страница 126: ...or The holders are not included in the scope of delivery For tractors with cab suspension observe the instructions from the tractor manufacturer Do not fasten the holders on the suspended cab 2 Mount...

Страница 127: ...n the FTender is conveyed through the Y pieces Fig 153 into the RoTeC Pro Control coulters Each Y piece is connected to both distributor heads Fig 153 Outlet on the TwinTeC coulter The seed or fertili...

Страница 128: ...rolling away before working on the implement Wait for the implement to stop before entering the implement danger area WARNING Before adjustment maintenance and repair work if not specified otherwise...

Страница 129: ...drill is coupled to the soil tillage implement CAUTION Only step onto the loading board via the steps Climbing onto the loading board without using the steps can lead to serious injuries due to falli...

Страница 130: ...n the seed drill is coupled to the soil tillage implement 1 Hold onto the steps 2 Release the mechanical transport lock see above for the steps 3 Unfold the steps Fig 156 The steps Fig 157 1 are autom...

Страница 131: ...suspended loads implement parts when filling the hopper caused by unintentional lowering Always put the implement combination down on the ground before filling the hopper Never stand under full Big B...

Страница 132: ...right metering roller has been used If necessary replace the metering roller in the metering unit see section 10 7 2 page 183 The metering roller can be replaced more easily if the hopper is empty 7 O...

Страница 133: ...hten the wing nuts Fig 160 11 Fill the hopper with bagged goods from a supply vehicle with a filling auger from Big Bags 12 Close and secure the roller tarpaulin with 2 straps 13 Fold up the steps see...

Страница 134: ...ate the control terminal and the metering roller drive motor 3 Fill the seed hopper with at least 1 3 of the hopper volume for fine seeds correspondingly less of seed refer to section 8 2 page 131 4 U...

Страница 135: ...Settings Centaya Super BAH0092 6 10 20 135 7 2 Turn the carriage once opening at the top 7 4 Place the carriage on the runners Fig 164 7 5 Lower the carriages until the stop Fig 165...

Страница 136: ...BAH0092 6 10 20 8 Open the injector sluice flap 8 1 Turn the handle clockwise to the left Fig 166 The injector sluice flap Fig 167 1 is opened Fig 167 9 Based on the Software operating manual seed ra...

Страница 137: ...137 10 Weigh the collected seed 10 1 Turn the handle clockwise to the right Fig 168 The injector sluice flap Fig 169 1 is closed Fig 169 The carriage can only be moved if the injector sluice flap is c...

Страница 138: ...ht of the collected metered material on the control terminal in the tractor cab or on the TwinTerminal Fig 172 1 16 Repeat the calibration Generally the desired seed rate is spread with repeated calib...

Страница 139: ...position 18 1 Position the carriage downwards on the runners and slide into the bracket until the stop Fig 173 19 Close the flap of the control centre Fig 174 1 The bar Fig 174 2 which is used to han...

Страница 140: ...eed until the operating temperature is reached If the fan is put back into operation after a longer standstill period the set fan speed is only reached once the hydraulic fluid has heated up to operat...

Страница 141: ...ting the fan speed on tractors without flow control valve 1 The required fan speed can be found in the following table Fig 61 page 71 2 Set the fan speed according to section 8 4 4 2 or section 8 4 5...

Страница 142: ...gly 3 Tighten the lock nut 8 4 4 2 Fan speed setting This setting should only be carried out when the fan hydraulic motor is connected to the tractor hydraulic system and the tractor is not equipped w...

Страница 143: ...rns 4 Tighten the lock nut 8 4 5 2 Fan speed setting This setting should only be carried out when the fan hydraulic motor is connected to the tractor hydraulic system and the tractor is not equipped w...

Страница 144: ...seed placement depth more continuously 2 Seed approx 30 m to 50 m at working speed 3 Expose the seed at a number of points 4 Check the seed placement depth 5 If the desired seed placement depth is no...

Страница 145: ...control discs wheels as described in this section Engaging the depth control disc wheel in one of the holes on the coulter 1 Read the required hole for the depth control disc wheel from the table Fig...

Страница 146: ...ing the depth control disc roller 1 Insert the depth control disc wheel on the locking mechanism Fig 182 3 In doing so the shoulder engages in the slotted hole Fig 182 2 of the coulter 2 Move the dept...

Страница 147: ...coulter lift page 151 Particularly on heavy soils a higher coulter pressure maintains the seed placement depth more constantly 2 Adjust the seed placement depth using the central key Fig 183 see secti...

Страница 148: ...ow tines relative to the soil can be adjusted in three positions flat medium and steep Before each adjustment raise the implement until the harrow tines are directly above the ground but not touching...

Страница 149: ...a stop for the harrow tines Fig 186 2 Fig 186 8 6 1 2 Harrow tine working depth adjustment 1 Before each adjustment raise the implement until the harrow tines are directly above the ground but not to...

Страница 150: ...eded can be put into parking position Fig 188 1 Before each adjustment raise the implement until the harrow tines are directly above the ground but not touching it 2 Remove the pins Fig 189 2 3 Swivel...

Страница 151: ...high press roller pressure the germination of plants can be negatively impacted This setting affects the seed placement depth Check the seed placement depth after the adjustment 8 7 1 Coulter pressure...

Страница 152: ...ut ISOBUS system If you are working with the AMADRILL 2 control terminal enter the increased seed rate manually for heavy soils if necessary With ISOBUS system 1 Set the pointer Fig 191 1 to the desir...

Страница 153: ...es direct all persons out of the swivelling range of the coulters and harrow 1 Keep actuating the tractor control valve green until the pointer indicates the scale setting Fig 192 1 and the scale come...

Страница 154: ...control terminal in the tractor cab see ISOBUS operating manual Fig 194 8 7 5 Min max pressure stages Coulter lift All coulter types With ISOBUS system With min max pressure stages If your seed drill...

Страница 155: ...5 8 8 Adjusting the exact following harrow 8 8 1 Adjusting the exact following harrow tines 1 Insert the central key 2 Set the distance A see Fig 84 page 84 3 Insert the central key into the transport...

Страница 156: ...ed at the same time 1 Tension the tension springs of the exact following harrow with the lever Fig 197 1 Fig 197 2 Insert a safety pin for the tube Fig 198 1 into a hole underneath the stop Fig 198 2...

Страница 157: ...ed the permissible transport width during transport and protrude into the traffic area see section Legal regulations and safety page 169 To avoid exceeding the permissible transport width insert both...

Страница 158: ...202 1 below the link Fig 202 2 in all segments in the same hole Fig 202 The deeper the safety pin for the tube Fig 202 1 is inserted in the adjuster segment the flatter the pitch Tines Adjusting the...

Страница 159: ...204 1 shows the current roller contact pressure Fig 204 Lifting lowering the roller harrow 1 Select the roller harrow lift out function on the control terminal only implements with ISOBUS system 2 Ac...

Страница 160: ...anical lock for the track marker immediately before beginning field work WARNING Direct people out of the danger area The track markers and tramline markers can be swivelled simultaneously when actuat...

Страница 161: ...dust when emptying the hopper and metering unit when working on the distributor head 1 Perform work on the distributor head from the loading board see section Safety when working on the distributor h...

Страница 162: ...top of the adjuster segment see section One sided switching by actuating a lever page 95 3 Halve the seed rate refer to the ISOBUS software operating manual Fig 208 8 11 3 One sided switching setting...

Страница 163: ...the implement on the field 2 Take hold of the track disc carrier 3 Withdraw the pin Fig 210 1 4 Unfold the section Fig 210 2 with the track disc into working position 5 Secure the connection by inser...

Страница 164: ...and remove the ignition key 5 Pull out the pin Fig 213 1 and fold the section Fig 213 2 with the track disc into transport position In transport position both sections may only be folded towards the m...

Страница 165: ...214 1 3 Withdraw the pin Fig 214 2 The pin is secured with a spring cotter pin Fig 214 3 4 Swivel the track disc carrier into working position Fig 214 5 Set the tramline counter to 0 6 Lower the track...

Страница 166: ...splay the symbol for creating tramlines 3 Actuate the tractor control unit yellow to lift the track disc carrier 4 Apply the tractor parking brake switch the tractor engine off and remove the ignition...

Страница 167: ...h the multi part road safety bar Fig 217 1 over the tine tips of the exact following harrow 2 Fasten the road safety bar with spring holders Fig 217 2 to the exact following harrow Fig 217 8 14 2 Movi...

Страница 168: ...of the tramline counter can be disabled refer to AmaDrill 2 operating manual ISOBUS software operating manual 4 Fold and lock the track markers Page 160 5 Move the tramline markers to the transport p...

Страница 169: ...his section have to be complied with prior to starting and during travel Transport width Transport height In Germany and in many other countries the transportation of a implement combination up to 3 0...

Страница 170: ...are secured against accidental loosening with the original linch pins DANGER Risk of personal injury from cutting and impacts caused by unintentional lowering of the track marker during transport Befo...

Страница 171: ...tor lower link so that the mounted or trailed implement cannot swing back and forth WARNING Danger of breaking during operation insufficient stability and insufficient tractor steering and braking pow...

Страница 172: ...ements extended protrude to the side in the area of the traffic and put other road users at risk Moreover the permissible transport width of 3 m is exceeded Push the outer harrow elements into the mai...

Страница 173: ...nprotected drive elements Only ever start up the implement when the protective equipment is fully installed WARNING Risk of slipping stumbling or falling due to unauthorised climbing onto the implemen...

Страница 174: ...Check all the components of the hydraulic system for leaks Check all bolted connections for tight fit Section 12 8 Page 215 10 2 Work floodlights The work floodlights Fig 222 1 are switched on the ISO...

Страница 175: ...of the top link Fig 224 1 The setting lengths can be found in section Coupling Pack top seed drill and soil tillage implement page 117 3 Tighten the lock nut for the top link length adjustment Fig 224...

Страница 176: ...oil comes to a stop as soon as the seed drill coulters come out of the soil Fig 226 10 Run the fan up to nominal speed Page 140 11 Actuate the tractor control unit yellow Lower the active track marker...

Страница 177: ...ime the seed hopper is refilled Only implements with RoTeC Pro Control coulters after adjusting the depth control discs wheels Check the seed placement depth with RoTeC Pro 8 5 1 144 with TwinTeC 8 6...

Страница 178: ...disc of the tramline marker 2 Operate the control unit for the tractor lower link Raise the combination 3 Turn the combination The coulter and harrow must not contact the ground during turning Raisin...

Страница 179: ...ual After passing the obstacle lower the track marker and check the tramline counter Correct it if necessary After actuating the tractor control unit for the track markers several times check the tram...

Страница 180: ...either emptied nor cleaned a viscous to solid mass may form there if water enters under the metering roller The metering roller is braked strongly and deviations may occur between the pre set and actu...

Страница 181: ...ignition key disconnect the power supply between the tractor and the implement Disconnect the implement plug e g ISOBUS plug Risk of accident due to unintentional activation of the metering units or...

Страница 182: ...emptying Actuate the quick emptying with the shutter Fig 228 Fig 228 A commercially available hose DN 140 can be fitted A residual quantity remains in the hopper underneath the quick emptying The mete...

Страница 183: ...ing roller 1 Close the opening between the hopper and the metering unit only necessary when hopper is full 1 1 Remove the spanner Fig 229 1 from the holder Fig 229 1 2 Release two nuts Fig 230 1 but d...

Страница 184: ...to 8 3 page 134 The contents of the metering unit drop into the carriages Fig 232 3 Remove the metering roller from the metering unit housing 3 1 Loosen but do not remove the two bolts Fig 233 1 Fig 2...

Страница 185: ...t insert the metering roller into the metering unit 4 2 Pull the shutter Fig 237 2 slowly out of the metering unit The contents of the hopper drop into the carriages 4 3 Thoroughly clean the hopper me...

Страница 186: ...and rolling away before eliminating faults on the implement Wait for the implement to stop before entering the implement danger area CAUTION Before working on the implement couple the pack top seed d...

Страница 187: ...e To record the worked area and the required seed rate the pulses from the radar sensor over a calibration distance of 100 m are required Field surfaces change during work e g when changing from dry l...

Страница 188: ...nd couplings Section 12 6 1 Check all the components of the hydraulic system for leaks Rinse out the hand wash tank and fill with fresh water Section 5 6 During operation Overview of checks during ope...

Страница 189: ...p Checking replacing the TwinTeC inner scraper Section 12 6 3 Specialist workshop Checking replacing the TwinTeC press roller Section 12 6 6 Every 3 months at least every 500 operating hours Specialis...

Страница 190: ...starting and rolling away before working on the implement Wait for the implement to stop before entering the implement danger area CAUTION Before adjustment maintenance and repair work couple the pac...

Страница 191: ...move the safety equipment in the hopper when the metering roller is being driven or as long as the metering roller can be unintentionally driven 12 3 1 Safety when cleaning the implement DANGER Dressi...

Страница 192: ...ulations for working with your cleaning device Observe the legal regulations for handing and disposing of cleaning agents Do not clean any electrical components with high pressure cleaners Never aim t...

Страница 193: ...ground 4 Apply the tractor parking brake switch the tractor engine off and remove the ignition key The distributor head is easy to access from the loading board Fig 241 CAUTION Dressing dust is toxic...

Страница 194: ...ad to imbalance and damage to the bearing 12 4 3 Clean the distributor head 1 Observe section Safety when working on the distributor head page 193 2 Loosen the knurled screw Fig 242 1 and remove the c...

Страница 195: ...pins Adhere to the inspection intervals see section Maintenance schedule page 188 WARNING Risk of contusions catching and knocks when the implement unexpectedly releases from the tractor Check the upp...

Страница 196: ...hould not be used for longer than 6 years including any storage time of maximum 2 years The hydraulic hose lines are marked with the manufacturing date see section 12 4 5 1 Even with proper storage an...

Страница 197: ...o insert the plugs in the distributor head Fig 244 Tramline segments cannot be closed using the plugs Fig 244 1 If work should be performed with closed tramline segments close and deactivate the respe...

Страница 198: ...s see section Maintenance schedule page 188 Checking the roller scraper The distance between the press roller and the scraper is approx 3 mm over the entire perimeter of the press roller Readjusting r...

Страница 199: ...s see section Adjusting and checking the seed placement depth page 147 Thoroughly clean and dry the coulters Then preserve the coulters against rust with environmentally friendly corrosion protection...

Страница 200: ...ised state or when bent e g layer separation bubble formation pinching bends Leak points Tighten the screwed connections if necessary Damage or deformation of the hose assembly sealing function restri...

Страница 201: ...exceeded When connecting a hydraulic hose line to moving parts the hose length must be measured such that the smallest approved bending radius is not undershot over the whole range of movement and or...

Страница 202: ...imum diameter of 300 mm Replace worn seeding discs by new ones in due time see section 12 6 2 2 page 202 Fig 247 12 6 2 2 Readjusting the TwinTeC disc bearings With increasing wear of the seeding disc...

Страница 203: ...ight hand or left hand thread see above The TwinTeC coulters can be equipped with plastic bearing housings or steel bearing housings When screwing in the countersunk screws pay attention to the correc...

Страница 204: ...e inspection intervals see section Maintenance schedule page 188 Checking the inner scraper Check the inner scraper Fig 251 1 for wear Replace the inner scraper if worn Replacing the inner scraper It...

Страница 205: ...affle lip 1 Dismount the seed line see section Dismounting the TwinTeC seed line page 206 2 Loosen the hexagon nut Fig 252 2 remove the socket Fig 252 3 and replace the baffle lip Fig 252 1 Fig 252 If...

Страница 206: ...e The seed line is inserted in the rotation lock Fig 254 1 and is fastened with a hexagon bolt Fig 254 2 Fig 254 It is not necessary to dismount the seeding discs to remove the seed line 1 Loosen the...

Страница 207: ...ls see section Maintenance schedule page 188 Checking the press roller Check the press rollers Fig 256 1 for wear Replace worn press rollers Replacing the press roller 1 Loosen the hexagon nut Fig 256...

Страница 208: ...butor head and is carried to the coulters through the connected seed line tubes The number of segments in the distributor head corresponds to the number of coulters Fig 257 The tramline segments Fig 2...

Страница 209: ...moving and installing the segment in the distributor head page 210 connect the plug according to section Electrical connection of the tramline segments page 211 12 6 7 2 Setting the tramline wheelmark...

Страница 210: ...s chapter describes the removal and installation of a segment or tramline segment 1 Observe section Safety when working on the distributor head page 193 2 Loosen the four knurled screws Fig 261 1 and...

Страница 211: ...n of the tramline segments Fig 265 The figure shows a distributor head Fig 265 1 with four tramline segments Fig 265 2 for creating the right side tramline track and four tramline segments Fig 265 3 f...

Страница 212: ...266 1 1 1 Disconnect the plug Fig 266 2 and socket Fig 266 3 1 2 Connect socket Fig 266 4 1 3 Open the deactivated tramline flap Fig 266 Tramline flaps that are not connected to the implement cable mu...

Страница 213: ...in case of wear 1 Remove the depth control disc wheel Fig 267 1 Fig 267 2 Loosen the socket head bolt 16X 45 Fig 268 1 Tightening torque 220 Nm 3 Remove the coulter disc Fig 268 2 Fig 268 4 Loosen 2 l...

Страница 214: ...cate using a lithium saponified multi purpose grease with EP additives Company Lubricant designation ARAL Aralub HL2 FINA Marson L2 ESSO Beacon 2 SHELL Ratinax A The lubrication points on the implemen...

Страница 215: ...eicherort zeigt M S 8 8 10 9 12 9 M 8 13 25 35 41 M 8x1 27 38 41 M 10 16 17 49 69 83 M 10x1 52 73 88 M 12 18 19 86 120 145 M 12x1 5 90 125 150 M 14 22 135 190 230 M 14x1 5 150 210 250 M 16 24 210 300...

Страница 216: ...ydraulic cylinder coulter pressure lift out left 0140 Hydraulic cylinder coulter pressure lift out right 0150 Coulter pressure current divider 0210 Comfort hydraulic system control block 0310 Tramline...

Страница 217: ...Hydraulic diagrams Centaya Super BAH0092 6 10 20 217 Fig 271...

Страница 218: ...rottle 0130 Hydraulic cylinder coulter pressure lift out left 0140 Hydraulic cylinder coulter pressure lift out right 0210 Comfort hydraulic system control block 0310 Tramline marker solenoid valve 03...

Страница 219: ...Hydraulic diagrams Centaya Super BAH0092 6 10 20 219 Fig 272...

Страница 220: ......

Страница 221: ......

Страница 222: ...H DREYER GmbH Co KG Postfach 51 D 49202 Hasbergen Gaste Germany Tel 49 0 5405 501 0 email amazone amazone de http www amazone de...

Отзывы: