35
I N S T A L L A T I O N
E N
5.7
Calibration of Axes
Following the set-up and installation of the
Ceramill Map400 scanner to the PC, the scanner
must be calibrated using the supplied calibration
model.
▷
Mount spacer plate No. 1, the fixation plate with
the clamp and the model plate (please refer to
section 4.4.2).
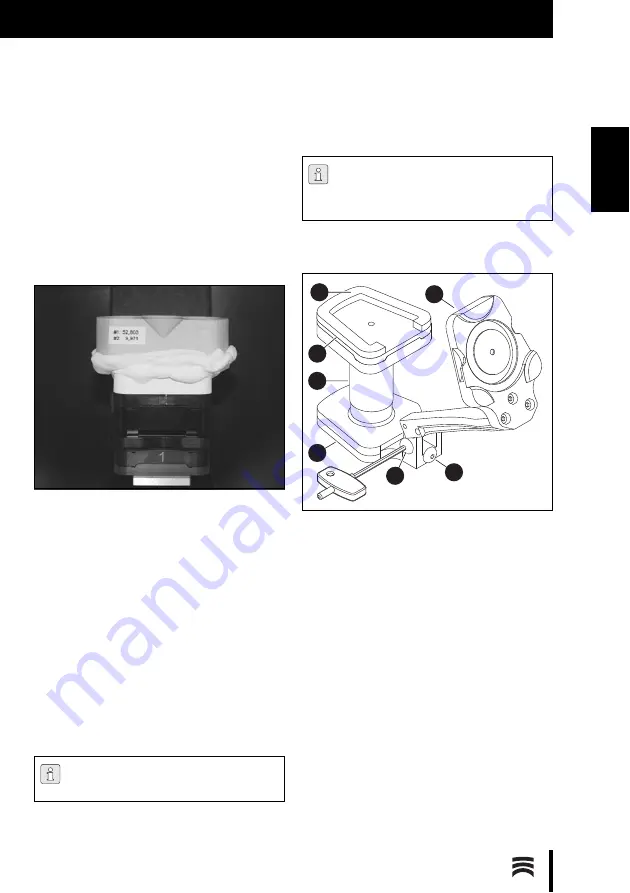
Fig. 5 Calibration model
▷
Insert the calibration model
▷
Create a new patient case and start Ceramill
Map from the data base.
▷
Cancel the subsequent command prompt for
the 2D scan.
▷
Start the axes calibration under
Options > Serv-
ice > Axis calibration.
▷
Follow the software instructions.
If required:
▷
Re-enter the calibration-model values entered
during installation under
Options > Service >
Register calibration object....
5.8
Calibrating the Artex Fixator
Before the Artex Fixator is used in the scanner, it
must be calibrated with the Splitex calibration key:
Fig. 6
1
Fixator, bottom element
2
Adhesive surface
3
Splitex plate
4
Splitex calibration key
5
Fixator, upper element
6
Lateral screw
7
Rear screw
▷
Open the Fixator.
▷
Place Splitex calibration key
4
onto upper ele-
ment
5
.
▷
Place Splitex plate
3
onto calibration key.
▷
Apply adhesive (Loctite) to bottom side of the
Splitex plate.
▷
Spray activator onto bottom element of
fixator
1
.
The scanner should be recalibrated at reg-
ular intervals.
The calibration of the fixator with the Spli-
tex calibration key should be checked at
regular intervals.
1
2
3
4
5
6
7
Содержание 179140
Страница 2: ......
Страница 19: ...19 I N S T A L L A T IO N D E Mit der Leertaste auf den Vestibulärscan umschalten Bild 13 ...
Страница 21: ...21 I N S T A L L A T IO N D E Mit dem Button Weiter die Oberkiefer Zuordnung starten Bild 15 ...
Страница 23: ...23 I N S T A L L A T IO N D E Mit dem Button Weiter die Feinausrichtung starten Bild 17 ...
Страница 43: ...43 I N S T A L L A T IO N E N Switch to the vestibular scan by pressing the space bar Fig 13 ...
Страница 45: ...45 I N S T A L L A T IO N E N Start the upper jaw scan by clicking on theNext button Fig 15 ...
Страница 47: ...47 I N S T A L L A T IO N E N Start the fine alignment by clicking on theNext button Fig 17 ...
Страница 68: ...68 I N S T A L L A T IO N F R Passez au scan vestibulaire à l aide de la Barre d espacement Fig 13 ...
Страница 72: ...72 I N S T A L L A T IO N F R Démarrez l alignement précis à l aide du bouton Continuer Fig 17 ...
Страница 93: ...93 IN STA L LA ZI O N E I T Con la barra spaziatrice commutare sulla scansione vestibolare Fig 13 ...
Страница 95: ...95 IN STA L LA ZI O N E I T Avviare con il pulsante Avanti la correlazione dell arcata superiore Fig 15 ...
Страница 97: ...97 IN STA L LA ZI O N E I T Avviare con il pulsante Avanti l allineamento di precisione Fig 17 ...
Страница 119: ...119 I N S T A L A C IÓ N E S Accionar la barra espaciadora para acceder al escaneo vestibular Fig 13 ...
Страница 121: ...121 I N S T A L A C IÓ N E S Arrancar la correspondencia del maxilar superior con el botón Continuar Fig 15 ...
Страница 123: ...123 I N S T A L A C IÓ N E S Arrancar el posicionamiento fino con el botón Continuar Fig 17 ...
Страница 129: ...129 ...
Страница 130: ...130 ...
Страница 131: ......


