Amana BX521VE Скачать руководство пользователя страница 5

4

IMPORTANT:

Save all screws for reuse.

For plug removal requiring use of flat blade screwdriver
or putty knife, blade of tool must be covered with
masking tape to avoid damage to refrigerator
finish. 
For plugs using a screwdriver or nut driver style
head, use appropriate tool to avoid damage to plugs.

To Remove Doors and Hinges

Some installations may require door and hinge removal to
transport unit to final location.

WARNING

!

To avoid electrical shock which can cause severe
personal injury or death, disconnect power to
refrigerator before removing doors. After replacing
doors, connect power.

1. Remove top hinge cover

 (A). Top hinge cover snaps

off. While supporting refrigerator door, remove top
hinge

 (B) and shim (C) using 

5

/

16

" hex nut driver to

remove screws

 (D).

A

B

D

C

2. Lift refrigerator door off center hinge.

3. While supporting freezer door, remove center hinge pin

(A) from center hinge bracket (B) with 

5

/

16

" hex nut

driver. Remove and retain all round washer shims 

(C–

some models).

B

C

A

4. Remove freezer door by lifting door off bottom hinge.

Instructions for Installation

5. Remove center hinge bracket

 (A) and shim (B) by

removing screws

 (C) using Phillips screwdriver.

B

A

C

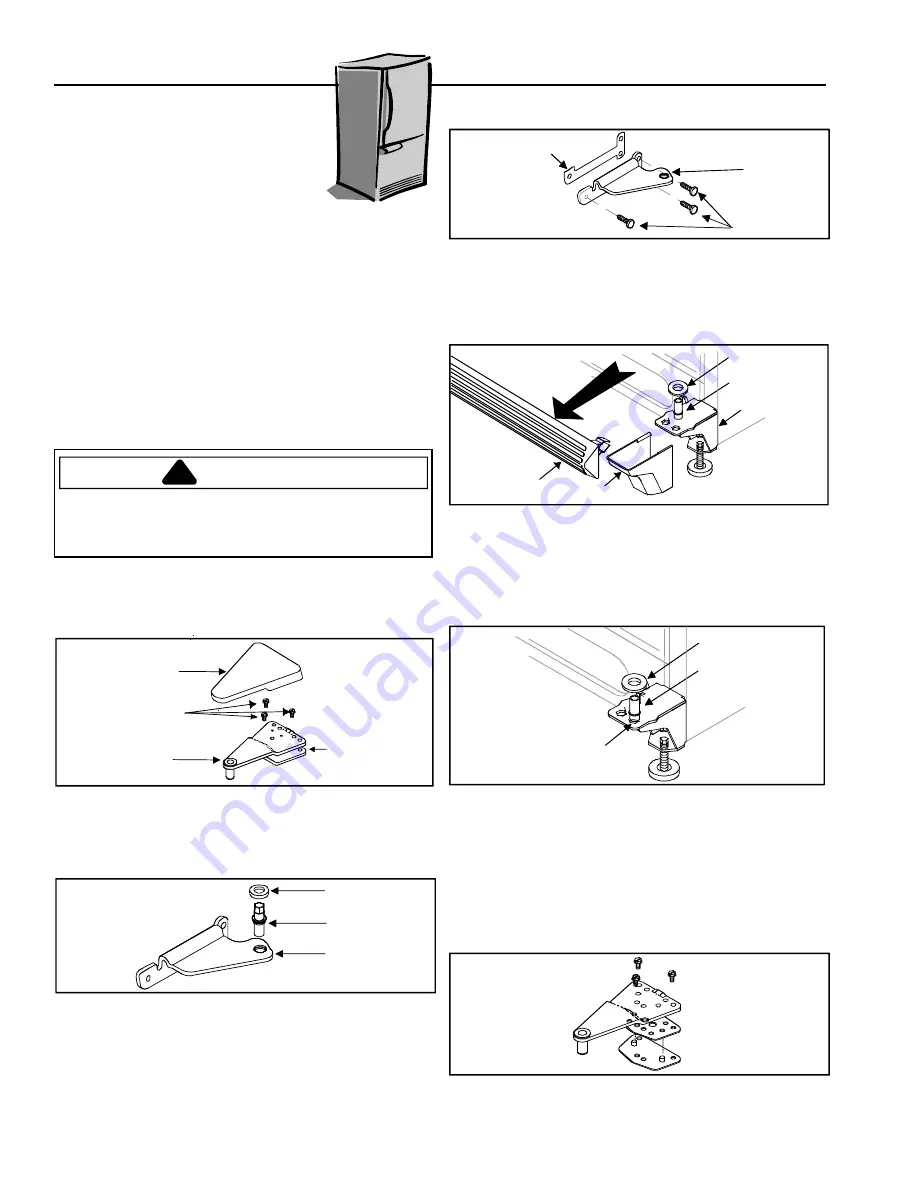
6. Remove toe grille

 (A) and bottom hinge cover (B). Both

snap off.

7. Remove bottom hinge

 and shim (C) with 

3

/

8

" hex nut

driver. Remove hinge pin

 (D). Remove and retain all

round washer shims

 (E), if present.

B

A

D

C

E

To Replace Doors

1.

Replace bottom hinge and shims with 

3

/

8

" hex nut

screws from hinge removal.

2.

Replace bottom hinge pin 

(A) in hinge bracket

hole 

(B) toward outside of cabinet. Replace all washer

shims 

(C–some models).

A

B

C

3.

Replace center hinge and shims with Phillips screws
from hinge removal.

4.

Place freezer door on bottom hinge pin.

5.

Replace center hinge pin with 

5

/

16

" hex nut driver.

Make sure fit is tight. Replace all washer shims
(some models).

6.

Assemble top hinge, hinge shim, and positioning
shim together. Attach loosely to opposite side of
cabinet to allow for door clearance.

Proper installation will ensure this
refrigerator operates most efficiently.

Amana cannot be held responsible for
improper installation.

Tools Required
Putty knife

5

/

16

" hex nut driver

Masking tape

¼" hex nut driver

3

/

8

" hex nut driver

Phillips screwdriver

Содержание BX521VE

Страница 1: ...International Bottom Freezer Refrigerator Owner s Manual Keep these instructions for future reference Be sure this manal stays with refrigerator BX521VE BX521VW...

Страница 2: ...ance Correct installation will avoid delays and unnecessary service calls Once installation is complete read this booklet carefully and get to know the controls and the features of your new appliance...

Страница 3: ...estions call the Consumer Affairs Department at 1 800 843 0304 inside U S A and 1 319 622 5511 outside the U S A or contact us on the internet at www amana com When contacting Amana provide product in...

Страница 4: ...0 NOTE Do not install the refrigerator near an oven radiator or other heat source Do not install the refrigerator in a location where the temperature will fall below 55 F 13 C discard an old refrigera...

Страница 5: ...oor by lifting door off bottom hinge Instructions for Installation 5 Remove center hinge bracket A and shim B by removing screws C using Phillips screwdriver B A C 6 Remove toe grille A and bottom hin...

Страница 6: ...saddle valves Both reduce water flow become clogged with time and in addition may cause leaks if repair is attempted The correct type a shut off valve requires a hole to be drilled in the water suppl...

Страница 7: ...ttom hinge cover B Turn roller adjustment screws C to raise or lower refrigerator cabinet Front of refrigerator must be 6 mm or bubble on your level higher than the back of your refrigerator Make sure...

Страница 8: ...l completely to refrigerator cabinet Leveling Refrigerator is tilted 1 4 6 mm from front to rear Toe grille is properly attached to refrigerator Product Literature Owner s manual is reviewed including...

Страница 9: ...4 C adjust fresh food control one number at a time Check again after 5 8 hours Fresh Food Features Fresh Food Shelves Shelves adjust to meet individual storage needs Some models feature Spillsaver TM...

Страница 10: ...ons entitled Spillsaver Shelves for removing and replacing shelf Remove drawer and sleeve by lifting and pulling out Replace drawer by sliding into place Garden Fresh Crispers Garden Fresh crispers ke...

Страница 11: ...wall of fresh food section by placing a knife covered with masking tape underneath cap and pulling forward 3 Rotate boot F 180 to opposite side 4 Insert plastic cap in hole G opposite side of fresh fo...

Страница 12: ...r fits on front edge of any refrigerator door bucket or door shelf A Door Shelves Remove door shelves by lifting ends and pulling out Replace door shelves by placing shelf on glides A and sliding down...

Страница 13: ...ce so any impurities left in the water line after installation are not consumed If you wish to stop automatic ice production lift ice maker arm A A definite click is heard when proper position is reac...

Страница 14: ...storage for frozen food items in freezer door and tilts forward for easy access of those items A Pullout Drawer Baskets some models Door assembly of drawer removed from illustration for visual clarit...

Страница 15: ...ves Include all drawers shelves and gaskets 3 Connect power to refrigerator and return food to refrigerator Wash and dry all containers Wrap foods in tightly sealed containers to prevent further odor...

Страница 16: ...hex nut screws A B Vacation Tips Complete the following steps for short vacations 1 Remove perishable foods 2 If an ice maker is installed move ice maker arm to Off position See Automatic Ice Maker se...

Страница 17: ...isses or pops 5 Defrost timer sounds like an electric clock and snaps in and out of defrost cycle 6 Condenser fan air rushes and whirs 7 Compressor has a high pitched hum or pulsating sound and cycles...

Страница 18: ...r restricts airflow Chiller Fresh System temperature is too warm Slide control to colder setting Adjust freezer control to colder setting See Setting Controls instructions of Controls section Verify C...

Страница 19: ...es a water pressure of 20 100 psi to function properly Confirm ice maker arm is down See Automatic Ice Maker section Confirm household water supply is reaching water valve Make sure the water valve sh...

Страница 20: ...free of charge for parts and labour provided that all service is performed during normal working hours by Kleenmaid or their designated Agents Where the appliance is installed outside the normal serv...

Страница 21: ...ashers Dryers Dishwashers Ovens Cooktops Rangehoods Sinks Waste Disposals Taps Cookware Refrigerators Freezers Vacuum Cleaners For sales information on the full range of quality kitchen and laundry ap...

Отзывы: