
Internet Radio Alarm Clock
<with Built-in WiFi>
Quick Start Guide
AIRMM02F
qsg Q10066
Copyright © 2010 Aluratek, Inc. All Rights Reserved.
aluratek.com
Features, Requirements & Package Contents
Features:
• Choose between more than 11,000+ radio stations worldwide
via built-in vTuner with no monthly cost
• Search music by genre, i.e. classic, pop, talk, news, sports etc.
and geographically over 150 countries
• Compatible with universal Plug-n-Play audio servers such as:
Microsoft Media Player 11 / 12 (WMP11 / WMP12), Microsoft
Media Connect and MusicMatch Jukebox
• Wireless access WIFI 802.11 b/g, Ethernet and USB 2.0
(host only) connectivity
• Built-in FM radio tuner for local FM broadcast service
• Access music files stored on a USB 2.0 flash drive, MP3 player
or Hard drive through the unit’s USB port
• Alarm clock function with 2 programmable alarms wakes you up
to internet radio, FM radio, digital music, or alarm tone
• Integrated amplifier: 2x2W stereo
• External plug for headsets (3.5mm)
• 2 RCA plugs (Stereo Lineout) for external speakers
• No PC is required
• 1 Year limited warranty
Requirements:
• Wired / wireless router
• Internet connection
Package Contents:
Your order has been carefully packaged and inspected. The
following should be included in your package. Please inspect the
contents of the package to ensure that you have received all
items and that nothing has been damaged. If you discover a
problem, please contact us immediately for assistance.
• WiFi Internet Radio
• Remote Control
• Power Adaptor
• Instructional Manual / CD
• Quick Start Guide
• Warranty / Registration Card
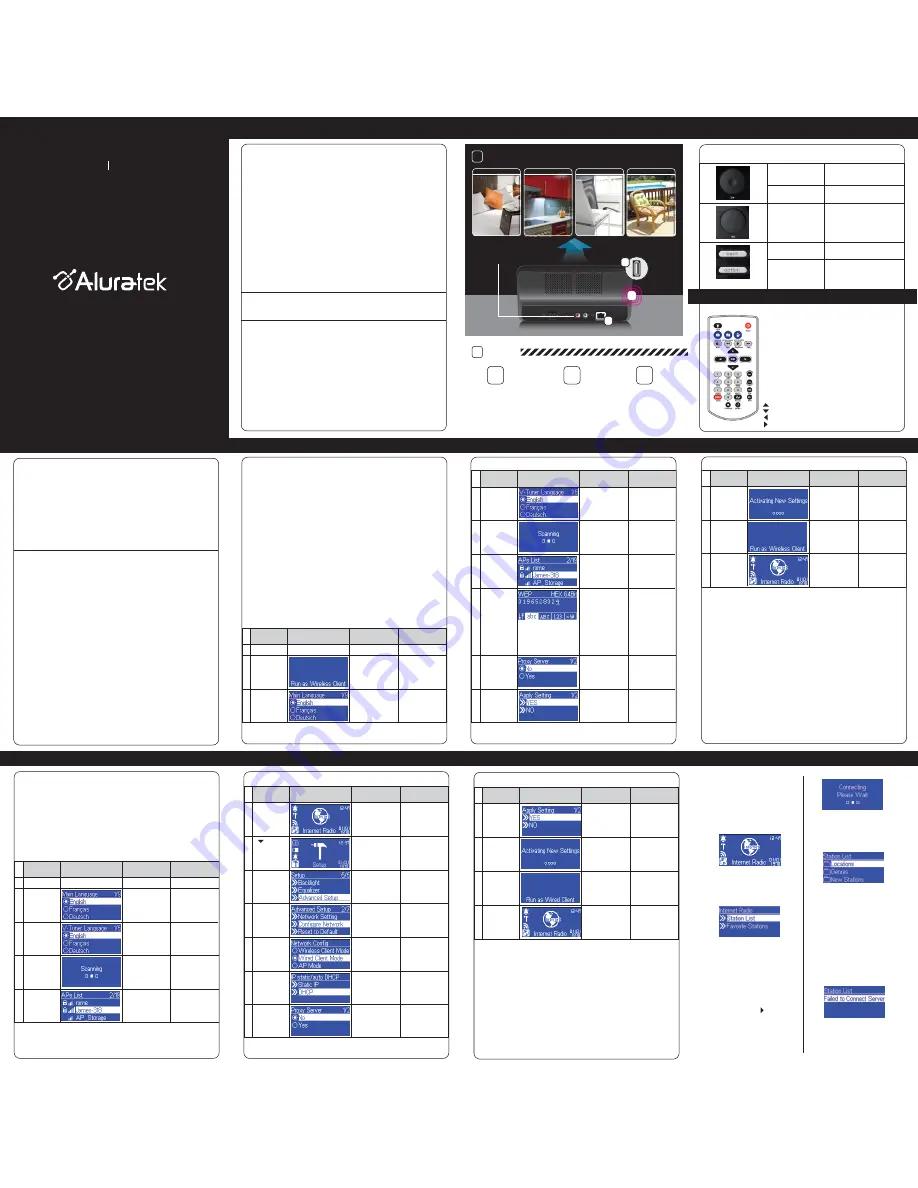
Product Application
Stream Internet Radio
from your WiFi / wireless
802.11 B / G router.
Connect your local
CAT5 Ethernet cable to
stream Internet Radio
Plug in any USB Drive
and listen to your music
files. (USB port at front)
B
C
A
OR
OR
2
LISTEN
PLACE IN ANY ROOM OF YOUR HOME
1
B
C
A
Built-in WiFi
Hardware & Software Installation
Hardware Installation:
If you prefer to use Ethernet for wired network connection, please
plug in your Ethernet cable to the LAN (RJ45) port.
Please plug in the DC power adapter to the outlet and the DC
power jack carefully.
To operate the device, you can use both the supplied remote
control and also the keypad buttons.
Software Installation:
AIRMM02F can work as a stand-alone device or as a media
streamer of a media server. As a stand-alone unit, you can use it
to listen to Internet radio, FM Radio and external USB
storage/MP3 players. No computer is needed.
For digital music files that are stored in your computer, you need
to install streaming server software in the computer so that
AIRMM02F can request the streaming service from that server.
AIRMM02F is compliant to UPnP protocol. It works with media
server software such as Microsoft Windows Media Player 11
(WMP11), Microsoft Media Connect 2.0 (WMC2.0), and Music
-
match Jukebox. Once you have the software installed on the
computer, you can stream your music collection to AIRMM02F.
Please find Appendix A and B in the manual for instructions on
how to connect AIRMM02F to your computer via WMP11, and
WMC2.0.
Configure as a Wireless Client
The factory default mode is the wireless client code. According to
the availability of an Ethernet cable, the device will automatically
select a suitable client mode to operate. User can also manually
change the setting of network configuration through the Setup
menu “Setup/Advanced Setup/Configure Network”.
AIRMM02F will connect wirelessly if it detects an 802.11b/g
wireless network. With no Ethernet cable attached, you just need
to power on the device and AIRMM02F will automatically enter
the wireless client mode.
To connect AIRMM02F to the wireless network for the first time,
you will need to set the encryption key for a secured network.
Once the setting is finished, the device will remember the related
settings and try to connect to the designated AP when it is power
on next time. However, if there is something trouble in connecting
to the designated AP, the device will show the AP list screen for
you to configure again
First time using device without an Ethernet cable plugged in:
Configure as a Wired Client
If there is no 802.11b/g wireless network, AIRMM02F can also
connect to the wired network through an Ethernet cable.
For this case, prior to power on the device, you have to plug in
the Ethernet cable into the LAN (RJ45) connector on the back of
the unit. After you power on the device, it will automatically go
into the wired client mode when it detects a link status through
the Ethernet connection.
First time using device with an Ethernet cable plugged in:
Listen to Internet Radio
The first screen of Internet
Radio function shows 2 items
for you to select:
It takes few seconds to get the
latest list from Internet. And you
will see the next screen.
This means the AIRMM02F is
connected to the Internet server
and received the information
from the server.
If you see the following screen
instead, it means that the device
has encountered problem in
retrieving the list from the
internet server, please try again.
Unit Functions
Bedroom
Home Office
Kitchen
Backyard / Patio
Integrate the AIRMM02F
into your home theater
system via the RCA jacks
To listen to music or broadcast
programs from Internet radio
stations, please select the
“Internet Radio” function from the
main menu and then press the
OK button to enter the Internet
Radio function.
“
Station List
”: Retrieve the
Internet radio station lists from
the Internet portal server.
“
Favorite Stations
”: Retrieve the
favorite station lists that stored in
the device.
Press “OK” button or “ ” button to
retrieve the Station List. The device
will try to connect to the Internet
radio server to retrieve the Internet
radio stations for further playback,
you will see the following screen:
USB Port
Remote Functions
Function select
Scroll the wheel to select the
function, and press it once to
confirm/ente
r.
Volume control
Sc
roll the wheel to change the
volume.
Back
P
ress the
‘ba
ck’ key to go
ba
ck to the previous menu.
Press this button once to play/
pause the select station.
Play / Pause music
Option
T
his key has various functions
that are listed in menu such
a
s St
op playing music, go to
favorite etc.
Power
-standby / power on
Light
-change the brightness
of the display
Radio IP
-Go to Internet
Radio
Media Player
-Go to Media
Server
MP3 Reader
-Go to MP3
player
Mute
-Mute
REW
-Rewind
Play/Pause
-Play/Pause
FWB
-Forward
- up
- down
- left
- right
OK
-OK
Vol+
-Volume up
Vol-
-Volume down
Prev
-Prev song
Next
-Next song
1~0
-Numeric or alphabet
input
STOP
-Stop playing
music
ZZZ
-Snooze
Favorite
- add to My
favorite
Shuffle
-shuffle music
Go to next
screen
Notes
1.
Select the MMI
language
Device is running
as a Wireless
Client.
Screenshot
Instructions
2.
3.
Initial screen
Aluratek
“►” button or
“OK” button or
press the right
rotary wheel.
“►” button or
“OK” button or
press the right
rotary wheel.
First time using device without an Ethernet cable plugged in (cont.):
Go to next
screen
Notes
Scanning for
available
APs.
Select the internet
radio menu lan-
guage.
Screenshot
Instructions
4.
5.
“►” button or
“OK” button or
press the right
rotary wheel.
Y
ou can use the
numeric/ alphabet
keypad on remote
control to input
the WEP
key, or
you can use the
option button to
change the abc/
ABC/123/~!# input.
Note: Case sensitive
.
Select the
A
P
that you can
connect to your
router device.
6.
7.
“►” button or
“OK” button or
press the right
rotary wheel.
“OK” button or
press the right
rotary wheel.
8.
“▼” button
(1 times) or
rotate right
rotary wheel
clockwise.
Numeric key
pads
“►” button or
“OK” button or
press the right
rotary wheel.
Confirm to the
settings above.
9.
“►” button or
“OK” button or
press the right
rotary wheel.
Go to next
screen
Notes
Apply new
settings.
Screenshot
Instructions
10.
11.
12.
The device is
connected to your
network.
First time using device without an Ethernet cable plugged in (cont.):
Go to next
screen
Notes
1.
S
elect the inter-
net radio menu
language.
Device is running
as a Wireless
Client.
Screenshot
Instructions
2.
3.
Initial screen
Aluratek
“►” button or
“OK” button or
press the right
rotary wheel.
“►” button or
“OK” button or
press the right
rotary wheel.
4.
5.
P
re
ss STOP
on
remote control
Go to next
screen
Notes
Screenshot
Instructions
6.
7.
8.
9.
“►” button or
“OK” button or
press the right
rotary wheel.
“►” button or
“OK” button or
press the right
rotary wheel.
“▼” button
(1 times) or
rotate right
rotary wheel
clockwise.
10.
11.
“ “ button
(5 times) or
rotate right
rotary wheel
clockwise.
“►” button or
“OK” button or
press the right
rotary wheel.
First time using device with an Ethernet cable plugged in: (cont.)
“►” button or
“OK” button or
press the right
rotary wheel.
“▼” button
(1 times) or
rotate right
rotary wheel
clockwise.
“▼” button
(1 times) or
rotate right
rotary wheel
clockwise.
12.
“►” button or
“OK” button or
press the right
rotary wheel.
“►” button or
“OK” button or
press the right
rotary wheel.
First time using device with an Ethernet cable plugged in: (cont.)
13.
Go to next
screen
Notes
The device is in
wired client mode
now. It is connect-
ed to your network.
Screenshot
Instructions
14.
15.
16.
Device runs as
a Wired Client.
“►” button or
“OK” button or
press the right
rotary wheel.


