background image

KN9108 / KN9116 User Manual

114

Trusted Certificates

Overview

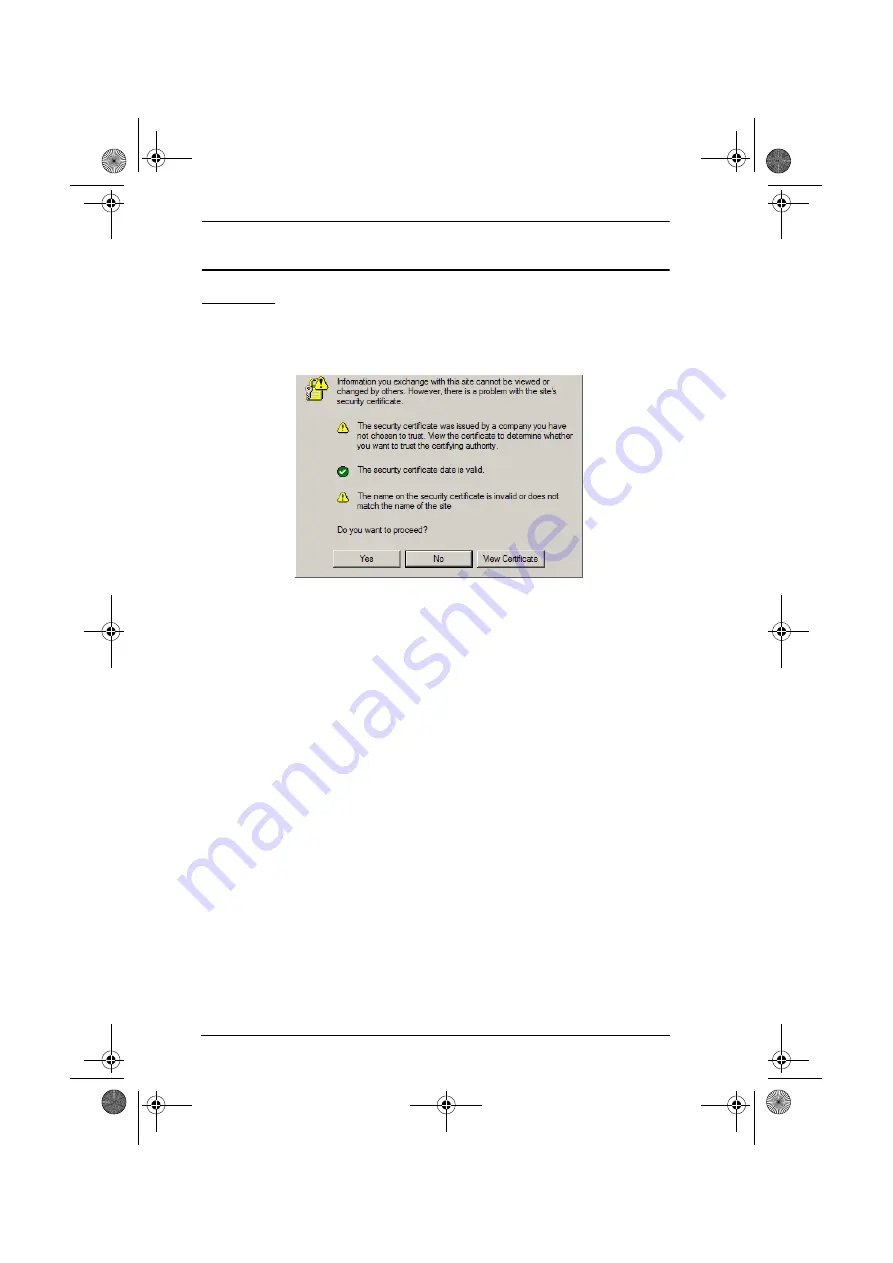
When you try to log in to the device from your browser, a Security Alert 
message appears to inform you that the device’s certificate is not trusted, and 
asks if you want to proceed.

The certificate can be trusted, but the alert is triggered because the certificate’s 
name is not found on Microsoft list of Trusted Authorities. You have two 
options: 1) you can ignore the warning and click 

Yes

 to go on; or 2) you can 

install the certificate and have it be recognized as trusted.

Š

If you are working on a computer at another location, accept the certificate 
for just this session by clicking 

Yes

.

Š

If you are working at your own computer, install the certificate on your 
computer (see below for details). After the certificate is installed, it will be 
recognized as trusted.

kn9108_9116_2007-09.book  Page 114  Friday, September 21, 2007  10:39 AM

Содержание KN9108: KN9116

Страница 1: ...KVM Over the NET KN9108 KN9116 User Manual www altusen com tw kn9108_9116_2007 09 book Page i Friday September 21 2007 10 39 AM...

Страница 2: ...terference when the equipment is operated in a commercial environment This equipment generates uses and can radiate radio frequency energy and if not installed and used in accordance with the instruct...

Страница 3: ...urpose Any of the manufacturer s software described in this manual is sold or licensed as is Should the programs prove defective following their purchase the buyer and not the manufacturer its distrib...

Страница 4: ...tallation and operation procedures carefully to prevent any damage to the switch or to any other devices on the installation Features may have been added to the KN9108 KN9116 since this manual was pri...

Страница 5: ...System Requirements 4 Remote Computers 4 Computers 4 Cables 5 Components 6 Front View 6 KN9108 6 KN9116 6 Rear View 8 KN9108 8 KN9116 8 Chapter 2 Hardware Setup Rack Mounting 12 Installation 13 Hot Pl...

Страница 6: ...ading the Firmware 41 Chapter 4 Browser Operation Logging In 43 Web Page Layout 45 The General Dialog Box 45 Web Page Icons 46 Web Page Buttons 47 Chapter 5 The Windows Client The Main Page 51 Port Op...

Страница 7: ...ava Client The Java Client Control Panel 74 Set Video Parameters 75 Keypad 75 Mouse Synchronization 76 Message Board 76 The Button Bar 77 Lock Key LEDs 79 Resolution 79 Switch Screen Mode 79 About 79...

Страница 8: ...04 International 104 North America 104 Troubleshooting 105 Administration 105 General Operation 105 The Java Client 106 The Log Server 106 Panel Array Mode 107 The Windows Client 107 Sun Systems 108 A...

Страница 9: ...into the KN9108 KN9116 with your browser and explains the functions of the icons and buttons on the KN9108 KN9116 web page Chapter 5 The Windows Client explains how to connect to the KN9108 KN9116 wi...

Страница 10: ...ced Indicates text that you should key in Indicates keys you should press For example Enter means to press the Enter key If keys need to be chorded they appear together in the same bracket with a plus...

Страница 11: ...of a powerful mouse driven graphical OSD On Screen Display menu system A convenient Auto Scan feature also permits automatic scanning and monitoring of the activities of all computers running on the i...

Страница 12: ...ures that allow users to take control of share ports The KN9108 KN9116 features high density 15 pin CPU port connectors instead of the usual 25 pin connectors This space saving innovation allows a ful...

Страница 13: ...e board feature allows logged in users to communicate with each other and allows a user to take exclusive control of the KVM functions Windows based Log Server Remote power control for attached Power...

Страница 14: ...t com downloads Users who want to access the KN9108 KN9116 with the Java Client must have Sun s Java 2 1 4 2 or higher runtime environment installed Java is available for free download from the Sun Ja...

Страница 15: ...erall performance If you need additional cables we strongly recommend that you see your dealer to purchase our high quality CS Custom Cable sets Part Number Length m 2L 5201P 1 2 2L 5202P 1 8 2L 5203P...

Страница 16: ...KN9108 KN9116 User Manual 6 Components Front View KN9108 KN9116 2 3 1 4 5 6 2 3 1 4 5 6 kn9108_9116_2007 09 book Page 6 Friday September 21 2007 10 39 AM...

Страница 17: ...uch as the end of a paper clip or a ballpoint pen Pressing and holding this switch in while powering on the KN9108 KN9116 makes the switch use the factory installed firmware version rather than the fi...

Страница 18: ...KN9108 KN9116 User Manual 8 Rear View KN9108 KN9116 4 1 2 3 5 6 4 1 2 3 5 6 kn9108_9116_2007 09 book Page 8 Friday September 21 2007 10 39 AM...

Страница 19: ...at link the KN9108 KN9116 to the computers plug in here The shape of these connectors has been specifically modified so that only cables designed to work with this switch can plug in see Cables page 5...

Страница 20: ...KN9108 KN9116 User Manual 10 This Page Intentionally Left Blank kn9108_9116_2007 09 book Page 10 Friday September 21 2007 10 39 AM...

Страница 21: ...vice is provided on page 101 Please review it before proceed ing 2 Make sure that power to all the devices you will be connecting up have been turned off You must unplug the power cords of any compute...

Страница 22: ...ule can be mounted at the front of the rack while the rear module is mounted at the rear To rack mount the unit do the following 1 Remove the four screws that attach the front and rear modules 2 Using...

Страница 23: ...ports of the computer you are installing 3 Plug the LAN WAN or Internet cable into the KN9108 KN9116 s RJ 45 socket 4 Plug the female end of the power cord into the KN9108 KN9116 s Power Socket plug...

Страница 24: ...two digit number which reflects the CPU Port on the KN9108 KN9116 that the computer is connected to Port numbers from 1 9 are padded with a preceding zero so they become 01 09 For example a computer...

Страница 25: ...rform is to set up the unit for user operation The most convenient way to do this for the first time is from the local console After the local console has been connected and the KN9108 KN9116 turned o...

Страница 26: ...evert back to normal opacity Note 1 1 It is recommend that you set the refresh rate of the monitor higher than 75Hz before using this feature 2 When the transparent feature is enabled if you switch to...

Страница 27: ...ch of the ports The following sections describe how to enable Quick View and how to assign names to ports Quick View Ports Selecting certain ports as Quick View ports is a way of limiting which ports...

Страница 28: ...cope of which ports the OSD displays lists in the Main Screen To invoke the List Function click the arrow at the upper right corner of the screen or press F3 The screen changes to allow you to choose...

Страница 29: ...culars icons to the right of the box or press Enter To go back to the default view erase the string and either click the binoculars to the right of the box or press Enter To dismiss the List function...

Страница 30: ...the port you want to edit wait one second and then click again Alternately use the up and down arrow keys to move the highlight bar to the port and then press the F2 function key Note This is not a do...

Страница 31: ...e click anywhere outside of the input box to complete the operation Port Operation Since port operation is the same as for the Windows and Java Client OSDs the procedures are discussed in Chapter 5 an...

Страница 32: ...iguration Page settings are the same for the local console the Windows Client and the Java Client Their use is discussed in Chapter 5 and Chapter 6 The Log Page Clicking the Log tab brings up the cont...

Страница 33: ...ge The meaning of these items is described in the table below Item Description Device Name This field lets you give the switch a unique name This can be convenient when you need to differentiate among...

Страница 34: ...s Up to 64 user profiles can be established To delete a user profile select it in the list box and Click Remove To modify a user profile select it and Click Edit To add a user Click New If you choose...

Страница 35: ...t Power Manager and Java Client permissions are granted see below Select If the permissions selected for the account do not match those specified for Administrators or Users Select is automatically ch...

Страница 36: ...view the screen and can perform operations on the system from the keyboard and mouse View A diagonal line through the port icon indicates the port access is View The user can view the screen but cann...

Страница 37: ...what these numbers are set to since they have no effect 2 You must set different values for each of the service ports An explanation of the fields is given in the table below Field Explanation Progra...

Страница 38: ...ges are kept in an automatically generated log file In this panel you specify the MAC address and a port number for the computer that the Log Server resides on Installation and operation of the Log Se...

Страница 39: ...Set IP address manually radio button and fill in the IP address subnet mask and default gateway DNS Server You can set the KN9108 KN9116 to automatically obtain the DNS server address or you can spec...

Страница 40: ...vers 3 Set the time in seconds that the KN9108 KN9116 waits for a RADIUS server reply before it times out in the Timeout field 4 Set the number of RADIUS retries allowed in the Retries field 5 Key the...

Страница 41: ...y see OSD Hotkey page 72 uhk0 Scroll Lock Scroll Lock uhk1 Ctrl Ctrl Syntax uhk0 UOL Defines the OSD List Function see page 18 uol0 All uol1 Powered On uol2 Quick View uol3 Quick View Powered On Synta...

Страница 42: ...1 Powered On usm2 Quick View usm3 Quick View Powered On Syntax usm0 UST Determines the length of time in seconds the KVM focus dwells on each port in Auto Scan Mode see Scan Duration page 72 Syntax us...

Страница 43: ...cdefg The user must include the forward slash and the string along with the IP address For security purposes we recommend that you change this string from time to time Note 1 If no string is specified...

Страница 44: ...cess to the KN9108 KN9116 all other addresses are allowed access To add a filter Click New A dialog box similar to one of the ones below appears Note Each IP filter can consist of a single address or...

Страница 45: ...login again after it has exceeded the number of allowed failures Working Mode If Stealth Mode is enabled the KN9108 KN9116 refuses ICMP echo request packets To permit browser access to the KN9108 KN91...

Страница 46: ...ck Attributes on the Customization dialog box The Setting I O Attributes dialog box appears The port numbers are listed in the column on the left The port s attributes are shown to its right 2 Double...

Страница 47: ...ave this setting Occupy The first user to switch to the port has control over the port However up to 32 users may view the video from the port If the user who controls the port is inactive for longer...

Страница 48: ...he Timeout field If the user does not send input before the time expires that user is timed out and the port is released The next user to send mouse or keyboard input gains control of the port To appl...

Страница 49: ...ample if you change the IP address in the Network dialog box you must open this page and enable Reset on exit before logging out Otherwise the change will not take effect Reset Values Clicking this bu...

Страница 50: ...located in drop down the Time Zone list and choose the city that most closely corresponds to where it is at To set the year and day use the Calendar graphic Clicking or moves you backward or forward...

Страница 51: ...1 Download the new firmware file to a computer that is not part of your KN9108 KN9116 installation 2 From that computer open your browser and log in to the KN9108 KN9116 see Logging In page 43 3 Click...

Страница 52: ...KN9108 KN9116 User Manual 42 This Page Intentionally Left Blank kn9108_9116_2007 09 book Page 42 Friday September 21 2007 10 39 AM...

Страница 53: ...8 KN9116 and to invoke the OSD Logging In To log in from an Internet browser 1 Open the browser and specify the IP address of the KN9108 KN9116 in the URL bar Note If you don t know the IP address get...

Страница 54: ...iscover a valid Username and Password If you see this message try logging in again being careful with the Username and Password 2 If you are the Administrator and are logging in for the first time use...

Страница 55: ...KN9116 MAC Address The KN9108 KN9116 s MAC Address displays here Firmware Version Indicates the KN9108 KN9116 s current firmware version level Reset on exit To save any configuration administration c...

Страница 56: ...except that the time zone difference is still maintained Firmware Click this icon to install new versions of the KN9108 KN9116 s firmware See Upgrading the Firmware page 41 for details Note The Firmw...

Страница 57: ...administrators don t want the KN9108 KN9116 to be accessible by browser Clicking this button allows the user to download the API version of the Windows Client Once a user has downloaded the API progr...

Страница 58: ...KN9108 KN9116 User Manual 48 This Page Intentionally Left Blank kn9108_9116_2007 09 book Page 48 Friday September 21 2007 10 39 AM...

Страница 59: ...for running the AP version of the Windows Client see Chapter 9 AP Operation for details 2 When the file download security warning dialog box appears click Run 3 If a second security warning dialog bo...

Страница 60: ...is closest to the area you want to view and the screen will scroll If Keep Screen Size is enabled the box is checked after you connect the remote screen is not resized If the remote resolution is smal...

Страница 61: ...e lower right The control panel is discussed in detail on page 60 There are two buttons on the title bar at the top right They are described below starting from the left and moving to the right Log ou...

Страница 62: ...9116 s ports You access the computers connected to its ports by selecting them on this page Details regarding the meaning and operation of the main page elements are provided in Chapter 3 Administrati...

Страница 63: ...nding on the settings that were selected under ID Display see page 72 the Port Number and or the Port Name display at the right of the toolbar Note When the toolbar displays mouse input is confined to...

Страница 64: ...accessible port on the entire installation without having to invoke the OSD Click to skip to the first accessible port previous to the current one without having to invoke the OSD Click to begin Auto...

Страница 65: ...ode see Multiuser Operation page 59 Auto Scanning The Auto Scan function automatically switches among all the ports that are accessible to the currently logged on User at regular intervals so that the...

Страница 66: ...ended You must exit Auto Scan Mode in order to regain normal control of the keyboard To exit Auto Scan Mode press Esc or the Spacebar Auto Scanning stops when you exit Auto Scan Mode Skip Mode Skip Mo...

Страница 67: ...tion see page 72 and displays information about the port port name resolution on line status port access status at the bottom of the panel The number of panels in the array 16 9 4 or 1 can be selected...

Страница 68: ...mputer exactly as if you had selected it from the OSD Main screen The panel array toolbar at the lower right of the screen provides shortcut navigation and control of the panel array as described in t...

Страница 69: ...other user can interrupt Auto Scan Mode by invoking the OSD Panel Array Mode When a user has invoked Panel Array Mode see page 57 all successive users automatically enter Panel Array Mode Panel Array...

Страница 70: ...k on the hand icon and drag to move the control panel to another position on the screen Click to bring up the Hotkey Setup dialog box see page 61 for details Click to bring up the Video Options dialog...

Страница 71: ...inations The Hotkey setup utility is accessed by clicking the Keyboard icon on the Control Panel The actions performed by the Hotkeys are listed in the left column the currently defined keys that invo...

Страница 72: ...ts original configuration Adjust mouse This utility synchronizes the local and remote mouse movements following a video resolution change After invoking this utility simply click the local mouse point...

Страница 73: ...which you wish to re assign Hotkeys 5 Click Close Note You can use the same function keys for more than one action as long as the first key is not the same For example you can use F1 F2 F3 for one ac...

Страница 74: ...Drag the slider bars to adjust the RGB Red Green Blue values When an RGB value is increased the RGB component of the image is correspondingly increased Gamma This section allows you to adjust the vid...

Страница 75: ...Click and drag the diagonal line at as many points as you wish to achieve the display output you desire Click Save As to save up to four user defined configurations derived from this method Saved con...

Страница 76: ...s problem a message board feature has been provided allowing users to communicate with each other The message board functions much like an Internet chat program does When you click the Message Board i...

Страница 77: ...s next to the user s name in the User List panel when the user has disabled Chat Occupy Release Keyboard Video Mouse When you Occupy the KVM other users cannot see the video and cannot input keyboard...

Страница 78: ...e individual user select the user s name before sending your message If a user s name is selected and you want to post a message to all users select All Users before sending your message If a user has...

Страница 79: ...he Ctrl key and the F12 key could substitute for the Alt key in which case F12 Tab substitutes for Alt Tab and F11 F12 Del substitutes for Ctrl Alt Del See Hotkeys page 61 for details on setting up a...

Страница 80: ...nel Moving the mouse pointer into the Control Panel and back out again Performing an Auto Sync with the Video Adjustment function see Video Adjustment page 63 for details If performing these actions d...

Страница 81: ...up their own individual working environments The KN9108 KN9116 stores a separate configuration record for each user profile and sets up the working configuration according to the Username that is use...

Страница 82: ...those Ports which have been set Accessible and have been selected as Quick View Ports and are Powered On The default is ALL Scan Duration Determines how long the focus dwells on each port as it cycles...

Страница 83: ...un Java website http java sun com 2 Accept the security certificates 3 When the browser dialog asks what to do with the program file click Open Note 1 If the browser cannot run the file save it to dis...

Страница 84: ...e Windows Client Main Page page 51 The Java Client Control Panel Instead of a control panel like the one that the Windows Client uses the Java Client has a hidden control panel located at the bottom c...

Страница 85: ...stment dialog box See Video Adjustment page 63 for details Keypad Some keyboard combinations cannot be captured and sent to the KN9108 KN9116 In order to implement their effects on the remote system t...

Страница 86: ...our local mouse pointer directly on top of the remote pointer and click 2 Move your local mouse pointer over the Java Client Control Panel and click Message Board The KN9108 KN9116 supports multiple u...

Страница 87: ...Video Mouse When you Occupy the KVM other users cannot see the video and cannot input keyboard or mouse data The button is shadowed when the KVM is occupied The icon displays next to the user s name...

Страница 88: ...st panel By default messages are posted to all users To post a message to one individual user select the user s name before sending your message If a user s name is selected and you want to post a mes...

Страница 89: ...e connected to the remote port displays directly below the Lock LEDs Switch Screen Mode Clicking this button enables or disables Full Screen Mode By default the Java Client opens in Full Screen Mode A...

Страница 90: ...ck Pause the Array stops scanning the ports The button changes to an arrowhead and its caption changes to Resume To resume scanning click the Resume button Hotkey Operation Hotkey operation is the sam...

Страница 91: ...ne below appears A maximum of 512 events are stored in the log file To clear the log file click on the Clear Log icon at the lower right of the screen Note The Log File is a temporary file that is era...

Страница 92: ...KN9108 KN9116 User Manual 82 This Page Intentionally Left Blank kn9108_9116_2007 09 book Page 82 Friday September 21 2007 10 39 AM...

Страница 93: ...log into the KN9108 KN9116 see page 43 2 Click the Log Server button at the left of the web page to start the Log Server installation program 3 If any security warning dialog boxes appear ignore them...

Страница 94: ...the Service Configuration page of the Administrator Utility see page 27 2 The Log Server requires the Microsoft Jet OLEDB 4 0 driver in order to access the database The screen is divided into three c...

Страница 95: ...te They are used to add new KN9108 KN9116 units to the KN9108 KN9116 List edit the information for units already on the list or delete KN9108 KN9116 units from the list To add a KN9108 KN9116 to the K...

Страница 96: ...rs Field Explanation Address This can either be the IP address of the KN9108 KN9116 or its DNS name if the network administrator has assigned it a DNS name Port The Port number assigned to the KN9108...

Страница 97: ...e unit for the search If no units are selected the search is performed on all of them Priority List Sets the level for how detailed the search results display should be 1 is the most general 3 is the...

Страница 98: ...o set the number of seconds that the Log Server should wait before attempting to connect if the previous attempt to connect failed When you click this item a dialog box similar to the one below appear...

Страница 99: ...N9108 KN9116 units that have been selected for the Log Server to track see Configure page 85 The lower Event panel displays the log events for the currently selected KN9108 KN9116 the highlighted one...

Страница 100: ...heckbox is checked the Log Server will still record its log events Address This is the IP Address or DNS name that was given to the KN9108 KN9116 when it was added to the Log Server see Configure page...

Страница 101: ...er page After they have been downloaded by the Users the Administrator can disable browser access see Working Mode page 35 The Windows Client Installation To install the Windows Client on your compute...

Страница 102: ...ved the Windows Client program to and double click its icon WinClient exe to bring up the Windows Client Connection Screen Note You must have DirectX 7 0 or higher installed on your computer If not th...

Страница 103: ...Port number then contact the Administrator When the IP address and Port number for the unit you wish to connect to have been specified Click Connect to start the connection When you have finished with...

Страница 104: ...w There are two entries on the Tools Menu Keyboard and Config They are explained in the sections that follow Keyboard Various configuration actions related to the keyboard video and mouse can be perfo...

Страница 105: ...o the area you want to view and the screen will scroll If Keep Screen Size is enabled there is a checkmark in the box the remote screen is not resized If the remote resolution is smaller its display a...

Страница 106: ...id Username and Password and then click OK The program attempts to connect to the selected KN9108 KN9116 unit While it does so you can check the Message List window for status messages regarding the o...

Страница 107: ...nd displayed on your monitor At the same time your local keystroke and mouse input is captured and sent to the remote system The look and feel of the AP Windows client operation is the same as for the...

Страница 108: ...n your hard disk to save it to Starting Up To connect to the KN9108 KN9116 do the following 1 Open a command line window and change to the directory where the Java Client file KN9108main jar or KN9116...

Страница 109: ...rrectly as part of the IP address The system administrator may change the string from time to time to thwart unauthorized access attempts Be sure you have the correct string when you attempt to connec...

Страница 110: ...100 Operation The look and feel of the AP Java client operation is the same as for the browser version of the Java client Refer back to Chapter 6 for details kn9108_9116_2007 09 book Page 100 Friday S...

Страница 111: ...quid or aerosol cleaners Use a damp cloth for cleaning The device should be operated from the type of power source indicated on the marking label If you are not sure of the type of power available con...

Страница 112: ...evice from the wall outlet and bring it to qualified service personnel for repair The power cord or plug has become damaged or frayed Liquid has been spilled into the device The device has been expose...

Страница 113: ...g a device from the rack Use caution when pressing the device rail release latches and sliding a device into or out of a rack the slide rails can pinch your fingers After a device is inserted into the...

Страница 114: ...at describes the most com monly encountered problems and offers possible solu tions to them online documentation including electronically available manuals and the latest drivers and firmware for your...

Страница 115: ...s and hold the Reset Switch see page 7 for longer than three seconds Mouse and or keyboard not responding due to improper mouse and or keyboard reset Unplug the cable s from the console port s then pl...

Страница 116: ...nguage characters do not appear When entering national language characters if your local keyboard is set to a non English national language layout you must set the remote computer s keyboard layout to...

Страница 117: ...onitors 2 If that doesn t resolve the problem use the Adjust Mouse feature see Mouse Synchroniza tion page 70 to bring them back in sync 3 If the two methods described above fail to resolve the proble...

Страница 118: ...ands setenv output device screen r1024x768x60 reset all Under XWindow 1 Open a console and issue the following command m64config res 1024x768x60 2 Log out 3 Log in Video display problems with 13W3 int...

Страница 119: ...n the computer you are using to access the KN9108 KN9116 2 In order for the local and remote mice to synchronize you must use the generic mouse driver supplied with the Windows operating system If you...

Страница 120: ...Pointer Options 3 Windows ME Windows 95 Set the mouse speed to the middle position disable mouse acceleration click Advanced to get the dialog box for this 4 Windows NT Windows 98 Set the mouse speed...

Страница 121: ...the login information and return all settings to their defaults do the following 1 Power off the KN9108 KN9116 and remove its housing 2 Using a jumper cap short the jumper on the mainboard labeled J8...

Страница 122: ...B 9 Male Black Switches Reset 1 x Semi recessed Pushbutton Power 1 x Rocker Port Selection 2 x Pushbutton LEDs On Line 8 Green 16 Green Selected 8 Orange 16 Orange Power 1 Blue Link 1 Green 10 100Mbps...

Страница 123: ...k Port ID Display Port Number Name Port ID Display Duration 5 Seconds Scan Skip Mode All Scan Duration 10 Seconds Screen Blanker 0 Minutes disabled Beeper On Accessible Ports F Full For all Users on a...

Страница 124: ...on Microsoft list of Trusted Authorities You have two options 1 you can ignore the warning and click Yes to go on or 2 you can install the certificate and have it be recognized as trusted If you are w...

Страница 125: ...s Note There is a red and white X logo over the certificate to indicate that it is not trusted 2 Click Install Certificate 3 Follow the Installation Wizard to complete the installation Unless you have...

Страница 126: ...K to close the dialog box Certificate Trusted The certificate is now trusted When you click View Certificate you can see that the red and white X logo is no longer present further indication that the...

Страница 127: ...repair by anyone other than ATEN This warranty does not cover products sold AS IS or WITH FAULTS IN NO EVENT SHALL ATEN S LIABILITY EXCEED THE PRICE PAID FOR THE PRODUCT FURTHER ATEN SHALL NOT BE RESP...

Страница 128: ...KN9108 KN9116 User Manual 118 This Page Intentionally Left Blank kn9108_9116_2007 09 book Page 118 Friday September 21 2007 10 39 AM...

Страница 129: ...ox 45 Logging In 43 Operation 43 C Clear Name List 39 Compatible Cascade Switches 113 Configuration Page Java Client 80 Local Console 22 Windows Client 71 Control Panel Java Client 74 Windows Client 6...

Страница 130: ...84 Maintenance 88 Menu Bar 85 Options 88 Search 86 Settings 28 Starting Up 84 Logging In 43 Logging Out 46 Login Failure 35 Invalid login 44 M Main Page Local Console 17 Windows Client 51 Main Webpage...

Страница 131: ...Scan Interval 55 Share Mode 36 SJ T 11364 2006 ii Skip Mode 56 Specifications 112 SPHD Connectors 113 Stealth Mode 35 Substitute keys 69 System Requirements 4 T Technical Support 104 Telephone support...

Страница 132: ...fig 95 AP File Menu 94 AP Installation 91 AP Login 96 AP Operation 97 AP Tools Menu 94 Control Panel 60 Hotkeys 61 94 Message Board 66 OSD Toolbar 53 Troubleshooting 107 Video Adjustment 63 Windows cl...

Отзывы: