Altimium SCA61E Скачать руководство пользователя страница 7

Compact Scaler Switcher 6x1


Altimium                                                            3                                    www.altimium.com 

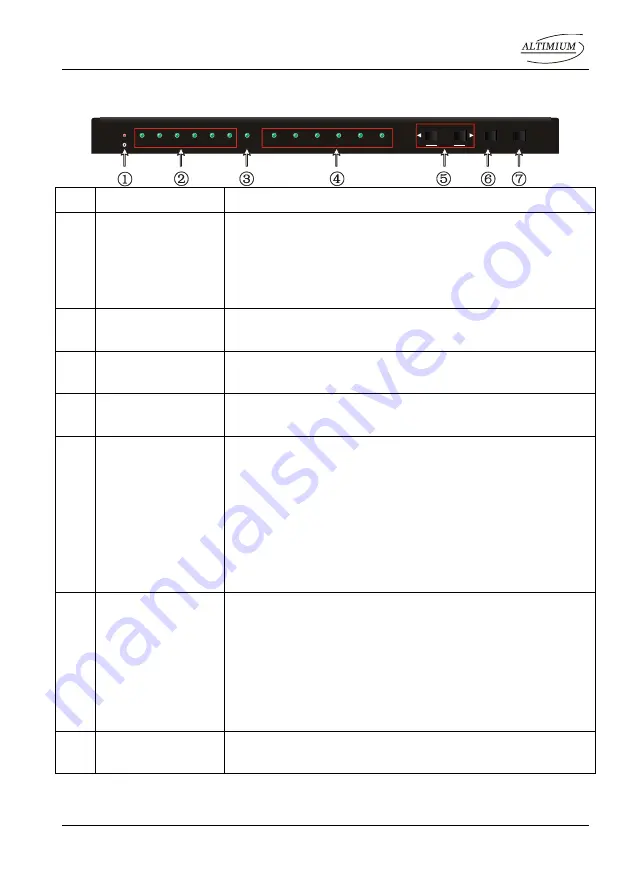
2. Panel Description 

2.1 Front Panel   


No. 

Name 

Description 

    Power LED 

Indicator for power status 

  Off when no power. 

  Constantly green when the system is in working. 

  Constantly red when the system is enter in standby. 

    Inputs LED   

Constantly  green  when  choosing  the  corresponding  audio 
source. 


Auto-switching 
LED 

Constantly green when enter in auto-switching mode. 


Output  resolution 
selection LED 

Constantly green when choosing the corresponding output 
resolution (Input is VGA). 

    SOURCE/AUTO   

  Audio source selection button: switching circularly 

between HDMI1, HDMI2, HDMI3, HDMI4, VGA1, 
VGA2. dial 

◀ 

to select the previous one, dial 

▶ 

to 

select the next one. 

  Switching mode selection button 

: Press and hold for 

3 seconds or more to enter in 

auto-switching

 mode, 

press and hold for 3 seconds or more again to enter in 

manual-switching

 mode.   


RESOLUTION/FW 
UPDATE 

  Output resolution manual switching button for VGA 

input: selection circularly among 1920

×

1200, 1920

×

1080, 1360

×

768, 1280

×

800, 1024

×

768, 1280

×

720.default resolution:1920

×

1080. 

  Firmware updating button: press and hold for 7 seconds 

or more to enter in software updating procedure. All 
LED blinking when the system is loading firmware 

    OUTPUT BLACK 

Press to switch on/off audio & Video output. All LED turn off 
except power LED when switch off output. 

Note: 

Pictures shown in this manual are for reference only, different model and 

specifications are subject to real product. 

RESOLUTION

HDMI 1

HDMI 2

HDMI 3

HDMI 4

VGA 1

VGA 2

1280x800

1360x768

1920x1080

1280x720

1024x768

1920x1200

AUTO/3s

FW UPDATE/7s

AUTO

SOURCE

OUTPUT BLACK

Содержание SCA61E

Страница 1: ...SCA61E Compact Scaler Switcher 6x1 All Rights Reserved Version SCA61E_2016V1 0 User Manual...

Страница 2: ...es of the trademark owner No part of this publication may be copied or reproduced without the prior written consent FCC Statement This equipment generates uses and can radiate radio frequency energy a...

Страница 3: ...ain moisture or install this product near water Do not put any heavy items on the extension cable in case of extrusion Do not remove the housing of the device as opening or removing housing may expose...

Страница 4: ...nnection 5 3 1 Usage Precautions 5 3 2 System Diagram 5 3 3 Connection Procedures 5 3 4 Application 6 4 System Operations 7 4 1 Front Panel Button Control 7 4 2 RS232 Control 8 4 2 1 Control Software...

Страница 5: ...to HDMI output Scale scale VGA to HDMI output Output resolutions selectable to assure preferred output and supports various output resolutions such as 1920x1200 1920x1080 1360x768 1280x800 1024x768 1...

Страница 6: ...Compact Scaler Switcher 6x1 Altimium 2 www altimium com 1 x User manual Notes Confirm all the accessories are included if not please contact with the dealers...

Страница 7: ...ode selection button Press and hold for 3 seconds or more to enter in auto switching mode press and hold for 3 seconds or more again to enter in manual switching mode RESOLUTION FW UPDATE Output resol...

Страница 8: ...OPTICAL optical audio output port Control FIRMWARE Type A USB port for updating firmware RS232 Serial port 3 pin pluggable terminal block connect with control terminal e g a PC to control Compact Sca...

Страница 9: ...agram 3 3 Connection Procedures Step1 Connect HDMI DVI sources e g DVD to HDMI input ports of SCA61E with HDMI cables Step2 Connect VGA sources e g DV Camera to VGA input ports of SCA61E with VGA cabl...

Страница 10: ...nnect an IR Receiver working voltage 5V to the IR IN port of Compact Scaler Switcher Step8 Plug DC 5V 3A power adapter to Compact Scaler Switcher 3 4 Application SCA61E has a good application in vario...

Страница 11: ...keep on The auto switching mode abides by the following principles New input principle Once detecting a new input signal SCA61E would switch to this new signal automatically Rebooting device principle...

Страница 12: ...se HDMI2 to output 4 2 RS232 Control Here we take the software CommWatch exe as example 4 2 1 Control Software Operation Installation Copy the control software file to the computer connected with Comp...

Страница 13: ...bit none Command Function Feedback Example Switch Commands 50701 Switch to HDMI 1 Input Switch to HDMI 1 50702 Switch to HDMI 2 Input Switch to HDMI 2 50703 Switch to HDMI 3 Input Switch to HDMI 3 50...

Страница 14: ...nel buttons Front Panel Unlock 502xx Set the brightness to xx xx ranges from 0 to 99 for VGA input Brightness xx 503xx Set the contrast to xx xx ranges from 0 to 99 for VGA input Contrast xx 504xx Set...

Страница 15: ...0 means negative polarity Vpolarity 0 1 50769 Read the EDID file the file must be named EDID bin to the flash from U flash disk 50772 Set the EDID date of all input ports bypass mode EDID bypass mode...

Страница 16: ...atus 50655 Black screen Disable Black screen Enable 50709 Check the present resolution and polarity 1920x1080 Hpolarity 1 Vpolarity 0 50754 Check the panel locked status Front Panel Lock UnLock 50778...

Страница 17: ...remember to end the commands with the ending symbol 2 EDID commands are for HDMI sources only 3 The procedure of upgrading EDID data for user Step1 Copy the file the file must be named EDID bin to the...

Страница 18: ...ns Select resolution via pressing corresponding button Output black button Press to switch on off Audio Video output 4 4 Firmware Updating SCA61E supports firmware updating via USB flash disk The proc...

Страница 19: ...Dual Mono analog audio 1 stereo audio 1 optical audio Input Connector 1 3 5mm jack Output Connector 1 3 pin pluggable terminal block 3 81mm 1 3 5mm jack 1 SPF fiber connector Control parts Control Po...

Страница 20: ...Hz 1600x1200 65Hz 1600x1200 70Hz 1600x1200 75Hz 1600x1200 85Hz 1680x1050 60Hz 1792x1344 60Hz 1856x1392 60Hz 1856x1392 75Hz 1920x1080 60Hz 1920x1200 60Hz 1920x1440 60Hz 3840x2160 24Hz 3840x2160 30Hz 38...

Страница 21: ...3 HDMI 4 VGA 1 VGA 2 1280x800 1360x768 1920x1080 1280x720 1024x768 1920x1200 AUTO 3s FW UPDATE 7s AUTO SOURCE OUTPUT BLACK INPUTS HDMI 1 HDMI 2 HDMI 3 HDMI 4 VGA 2 AUDIO 2 HDMI OPTICAL DC 5V OUTPUTS C...

Страница 22: ...o unlock it Cannot select source via SOURCE AUTO buttons In auto switching mode Press it and hold for 3 seconds or more to enter in manual switching mode Cannot control the device by control device e...

Страница 23: ...een altered or removed from the product Damage deterioration or malfunction caused by Normal wear and tear Use of supplies or parts not meeting our specifications No certificate or invoice as the proo...

Страница 24: ...ALTIMIUM 587 Avenue Blaise Pascal 77550 MOISSY CRAMAYEL T l 01 64 13 31 00 Fax 01 60 29 62 70 Mail contact tesca audio com Web www altimium com...

Отзывы: