19
A. Preparing the SolShare
Important:
- Before commissioning, re-check all
CTs and output cables are connected
as per their labels.
- Record connection information on
commissioning notes page, you will
need to enter this while commissioning
the unit after the cover is closed.
To power on the SolShare:
1. Pull down cover of SolShare into the Closed Position,
ensuring the seals are oriented correctly. Fasten shut
by replacing the 4 screws on the underside of the
SolShare, that were removed in section III/A.1.
Maximum torque for cover fasteners is 1.5Nm
2. Turn on System Disconnect (located between
inverter(s) and SolShare).
3. Ensure dwelling unit main breakers are swiched on.
4. Turn on Inverter(s)
IV/ Commissioning
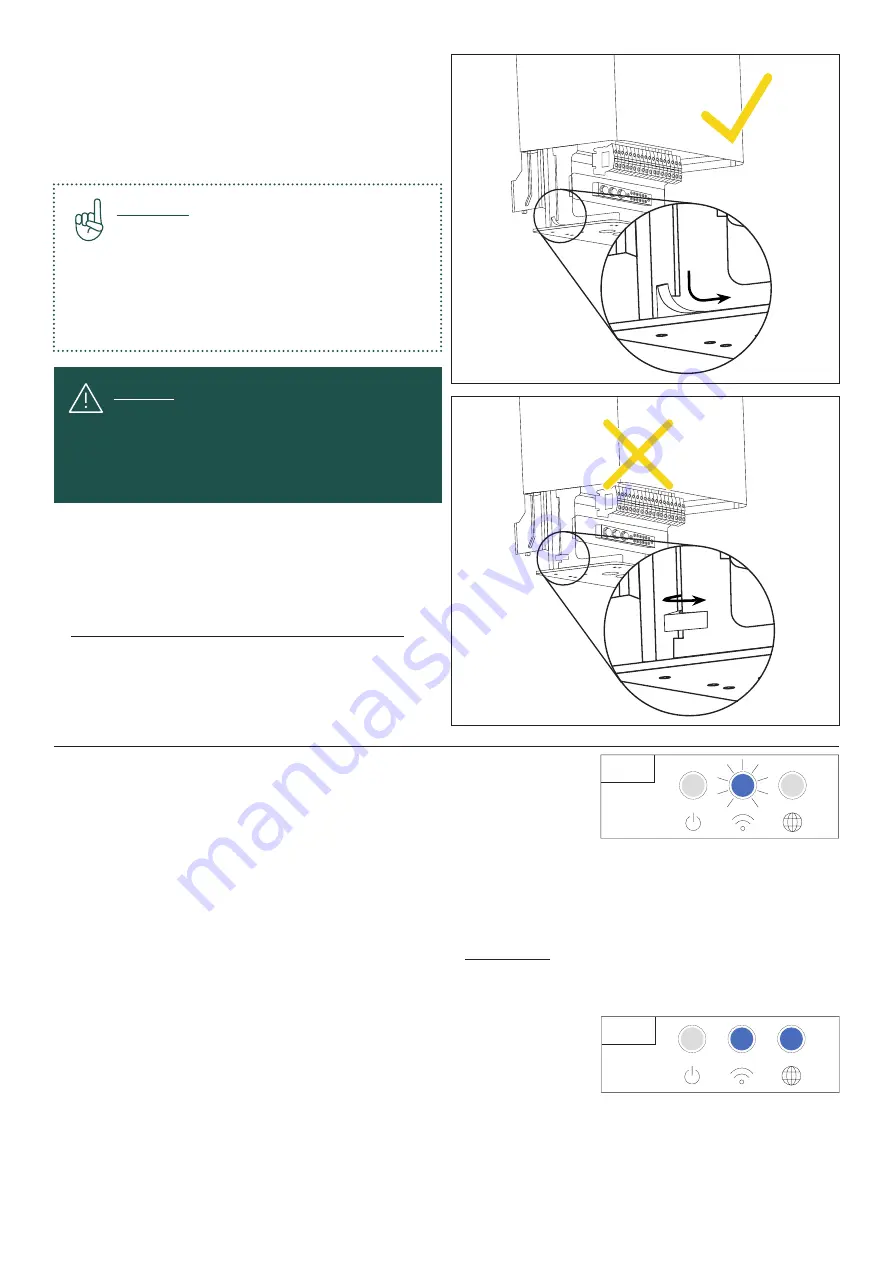
Warning:
When closing the cover of the SolShare,
ensure the seals are oriented correctly. This
will ensure an appropriate seal for the IP56
rating of the SolShare. See the graphics to the
right showing correct orientation of the seals.
To connect the SolShare to Wi-Fi:
1. Push the button on the underside of the SolShare for 5 seconds.
This will put the SolShare into Wi-Fi access point mode. You will see
the Wi-Fi LED turn blue and flash.
2. Using a laptop or phone (your device), connect your device to the SolShare’s Wi-Fi network
(this will appear as SolShare: 2P_100_XXXX where XXXX is the last 4 digits of the SolShare serial number).
You will have 30 minutes to complete the Wi-Fi connection process. Note that the SolShare will reconnect
to its most recent Wi-Fi settings (where applicable) if a device is not connected within 5 minutes of putting
the SolShare into Wi-Fi access point mode.
3. Open an internet browser on your device and navigate to 192.168.4.1.
4. Once the page loads in the browser, enter the SSID (Wi-Fi network name) and password of the Wi-Fi network
that you want the SolShare to connect to.
5. The SolShare will attempt to connect to the Wi-Fi credentials provided.
If successful, the Wi-Fi LED will turn blue, and if there is a strong internet
connection, the Internet LED will also turn blue after about 30 seconds.
If unsuccessful, the Wi-Fi LED will be flashing blue, and you should
repeat this process (from Step 2). For more information about which
Wi-Fi network the SolShare is connected to, consult the commissioning
app at https://commissioning.allumeenergy.com/wifi-status.
6. Once a successful Wi-Fi connection has been made, reconnect your device to the internet in preparation
for the commissioning steps below.
If you are having troubles with this process or need more detail, consult the How to set-up/change Wi-Fi credentials
document.
STEP 1
STEP 5
Содержание SolShare
Страница 1: ...1 SolShare Installation Manual US VERSION...


